Page 70 of 156
CREATING A DRIVER PROFILE
Creating a Driver Profile provides many benefits beyond just pairing a phone. The profile
records and remembers station presets, sound preferences, home and work address (if
equipped with navigation), phone favorites, screen icons and placement, and the
background wallpaper.
To create a driver profile:
1. On the Home screen, select “Settings”.Then, in the General menu, select “Driver
Profile”.
2. Select “Add New Profile”.
3. Select “Enter Name” to display the keyboard screen, and then type your name.
Now select “Next” on this screen and the
following screen.
DRIVER PROFILE
68
Page 74 of 156

PAIRING A PHONE
To begin using your Bluetooth®hands-free device you must first
pair your phone with the system. Phone pairing provides access to
the contact list on your phone and allows you to use the voice
recognition system to make and receive calls. The system can also
read incoming text messages, as well as allowing you to reply to
texts or send short messages. The system automatically reconnects
to your Bluetooth
®device and will remember your driver profile.
Visit www.subaru.com/engineering/starlink/multimedia.html for
more information on what is available by connecting a phone to the
Touchscreen.
For instructions on how to pair your phone to the Touchscreen, see page 119 for
Android devices or page 123 for Apple devices.
MAKING A CALL
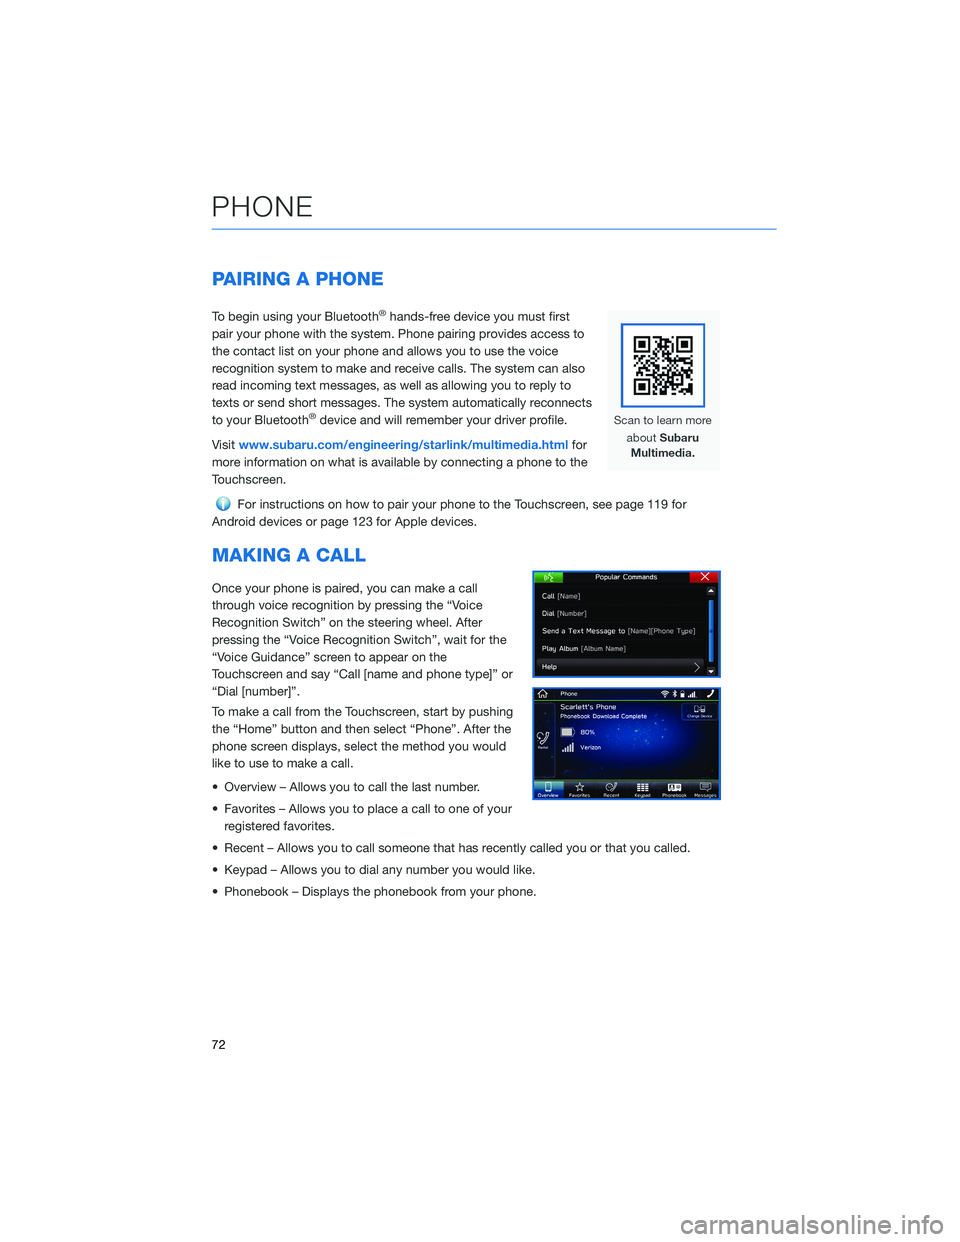
Once your phone is paired, you can make a call
through voice recognition by pressing the “Voice
Recognition Switch” on the steering wheel. After
pressing the “Voice Recognition Switch”, wait for the
“Voice Guidance” screen to appear on the
Touchscreen and say “Call [name and phone type]” or
“Dial [number]”.
To make a call from the Touchscreen, start by pushing
the “Home” button and then select “Phone”. After the
phone screen displays, select the method you would
like to use to make a call.
• Overview – Allows you to call the last number.
• Favorites – Allows you to place a call to one of your registered favorites.
• Recent – Allows you to call someone that has recently called you or that you called.
• Keypad – Allows you to dial any number you would like.
• Phonebook – Displays the phonebook from your phone.
PHONE
72
Page 83 of 156

• To cancel a SOS Emergency Assistance, Enhanced Roadside Assistance or a Conciergecall, press and hold the same button for approximately two seconds or select the “End
Call” button if displayed on the Touchscreen.
Head to www.Subaru.com/STARLINK to see all the SUBARU
STARLINK
®subscription services and packages.
* Access to STARLINK®Safety and Security services requires an active
STARLINK®subscription. Not available in all States. See retailer for details.
Remote Engine Start available on keyless access with push-button start
vehicles. Remote Engine Start with Climate Control is available on select
models only. Not available on vehicles with manual transmission. See
Retailer for details or visit the STARLINK
®page on Subaru.com to learn
more.
ENROLLMENT
To enroll in SUBARU STARLINK®and access remote services, a MySubaru account is
required. MySubaru is the Subaru owner website that allows you to access vehicle remote
services, user preferences, diagnostic alerts and other useful features enabled by your
STARLINK
®Safety Plus, STARLINK®Security Plus and STARLINK®Concierge
subscription.
Your retailer may have created an account for you during the delivery process. However,
you can also create a MySubaru account at www.mysubaru.com.
Enrollment in SUBARU STARLINK
®can be done online at MySubaru.com, through the
MySubaru Mobile App, at your Subaru retailer or by calling a STARLINK®Customer Care
Representative at: 1-855-753-2495
NOTE: Please have your Vehicle Identification Number (VIN) available, as you will need it
to complete this step. After the enrollment process, you will learn more about the features
in detail at MySubaru.com.
STARLINK SAFETY AND SECURITY
81
Page 118 of 156
MEMORY HEIGHT(if equipped)
You can set where the rear gate stops when it opens. This is a great
feature to limit the upward travel of the rear gate to ensure you can
reach it or to prevent the rear gate from contacting a garage ceiling.
You can learn more about setting the Power Rear Gate Memory
Height from the how-to video linked in the QR code and the steps
below.
1 Make sure the Memory
Height Switch is the “OFF”
position (the switch is raised
and you can see a white line
on the top).
2 Open the rear gate using the
Power Rear Gate Button.
Pause the rear gate when it
reaches the desired height
by pressing the Power Rear
Gate Button on the rear
gate, instrument panel, or
key fob.
Memory Height Button
Power Rear Gate Button
HOW TO APPENDIX
116
Page 119 of 156
3Press the memory switch in
the instrument panel to
select the “ON” status
(switch is depressed and you
can no longer see the white
line on top).
4 With the rear gate at the
desired height, press and
hold the Power Rear Gate
Close Button on the inside
edge of the rear gate. A chirp
will sound and the hazard
warning lights will flash to
confirm the height is set.
When the memory switch is in the “ON” status, the rear gate will stop at the set memory
height when you use any of the Power Rear Gate buttons.
For more information, please refer to “Keys and Doors” in your Owner’s Manual.
Memory Height Button
Power Rear Gate Close Button
HOW TO APPENDIX
117
Page 120 of 156

MEMORY DRIVER’S SEAT(if equipped)
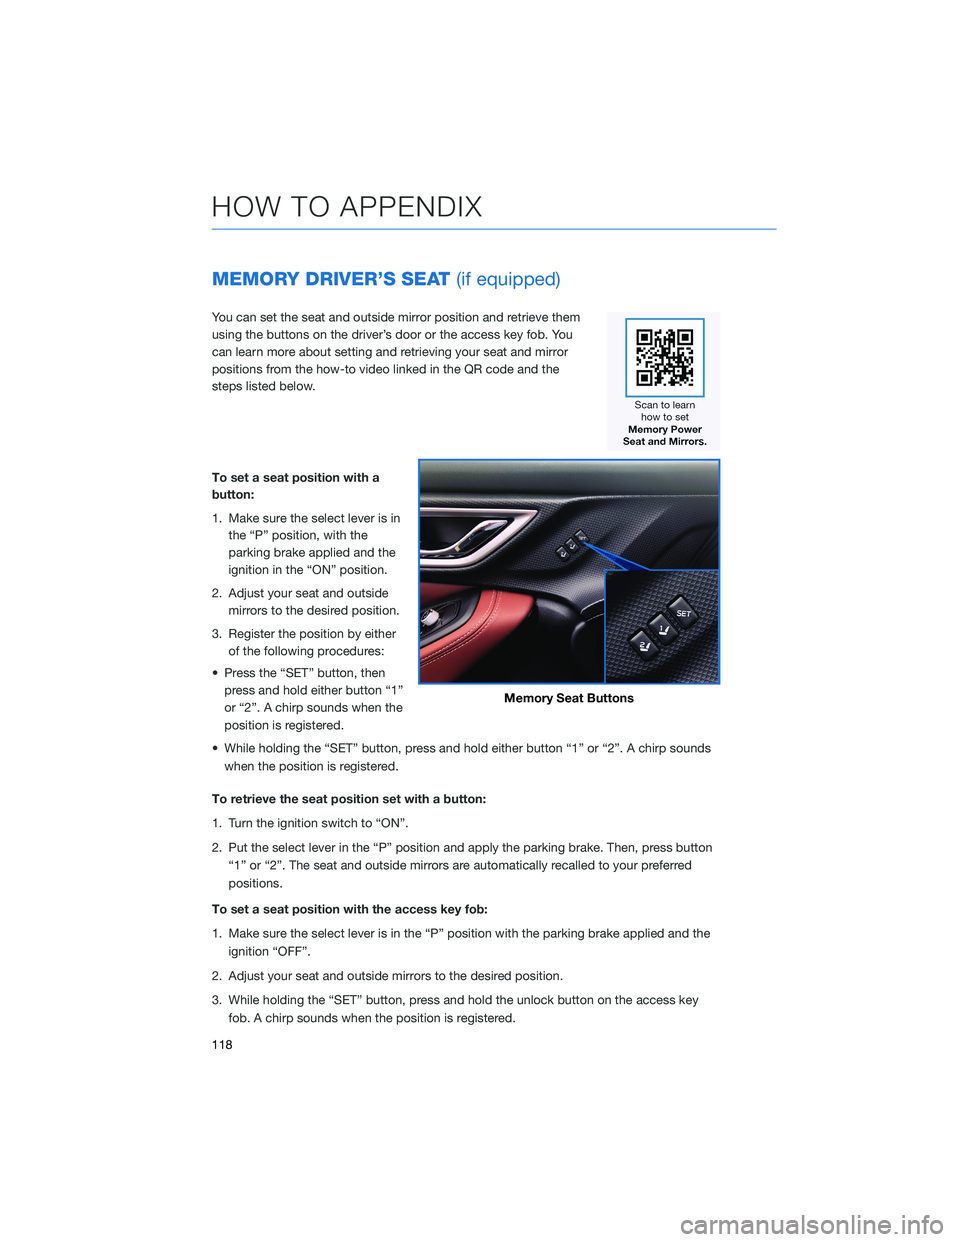
You can set the seat and outside mirror position and retrieve them
using the buttons on the driver’s door or the access key fob. You
can learn more about setting and retrieving your seat and mirror
positions from the how-to video linked in the QR code and the
steps listed below.
To set a seat position with a
button:
1. Make sure the select lever is in
the “P” position, with the
parking brake applied and the
ignition in the “ON” position.
2. Adjust your seat and outside mirrors to the desired position.
3. Register the position by either of the following procedures:
• Press the “SET” button, then press and hold either button “1”
or “2”. A chirp sounds when the
position is registered.
• While holding the “SET” button, press and hold either button “1” or “2”. A chirp sounds when the position is registered.
To retrieve the seat position set with a button:
1. Turn the ignition switch to “ON”.
2. Put the select lever in the “P” position and apply the parking brake. Then, press button “1” or “2”. The seat and outside mirrors are automatically recalled to your preferred
positions.
To set a seat position with the access key fob:
1. Make sure the select lever is in the “P” position with the parking brake applied and the ignition “OFF”.
2. Adjust your seat and outside mirrors to the desired position.
3. While holding the “SET” button, press and hold the unlock button on the access key fob. A chirp sounds when the position is registered.
Memory Seat Buttons
HOW TO APPENDIX
118
Page 121 of 156
To retrieve the seat position set with the access key fob:
1. Hold the access key fob.
2. Unlock and open the driver’s door. The seat and outside mirrors are automaticallyrecalled to your preferred positions.
BLUETOOTH®PAIRING
Pairing an Android Device
1. Start by selecting “Settings” on the Homescreen.
2. Select the Phone menu, then select “Add Device”.
3. This screen will be displayed when pairing mode is in progress. The device name will
most likely be Subaru BT, but be sure to
make note of what name it is, so you can
find it on your phone.
HOW TO APPENDIX
119
Page 136 of 156
MAPS(if equipped)
Finding a Destination by Address
Start by selecting the “Map” button to display the map screen. To search by address:
1. Select the “Menu” button, then select
“Search for Destination Enter Address.”
2. The keypad screen displays. Enter the address or a keyword (e.g. pizza) and select
“Search.” As you type the address or name
of the destination, suggestions will display.
The route calculation screen is displayed if
a suggested is selected.
3. Select the desired item from the list, then select “GO” for the route calculation
screen.
4. The route calculation screen displays three recommended routes at the bottom left of
the screen. Select the desired route, then
select “GO”.
HOW TO APPENDIX
134