Page 90 of 156
6Select “Manual”.
7 Now adjust the time and date using the “+” and
“-” buttons. Select the check mark when finished.
For black-and-white Multi-Function Display
(MFD), use the “+” and “-” buttons next to the
clock.
Automatically
To set the clock automatically, the “Auto” mode must be selected in the clock adjustment
setting. To set the clock:
1 Press the “Home” button.
2 Select “Settings”.
3 Select “Vehicle”.
4 Select “Time/Date”.
5 Select “Mode”.
SETTINGS AND UPDATES
88
Page 97 of 156

Advanced Adaptive Cruise Control with Lane Centering
Advanced Adaptive Cruise Control is a driving support system intended to reduce the
burden on you when driving on an expressway (including during congestion and when
driving at high speed). Advanced Adaptive Cruise Control and Lane Centering work
together to assist you by automatically controlling the accelerator, brake, and steering.
Advanced Adaptive Cruise Control
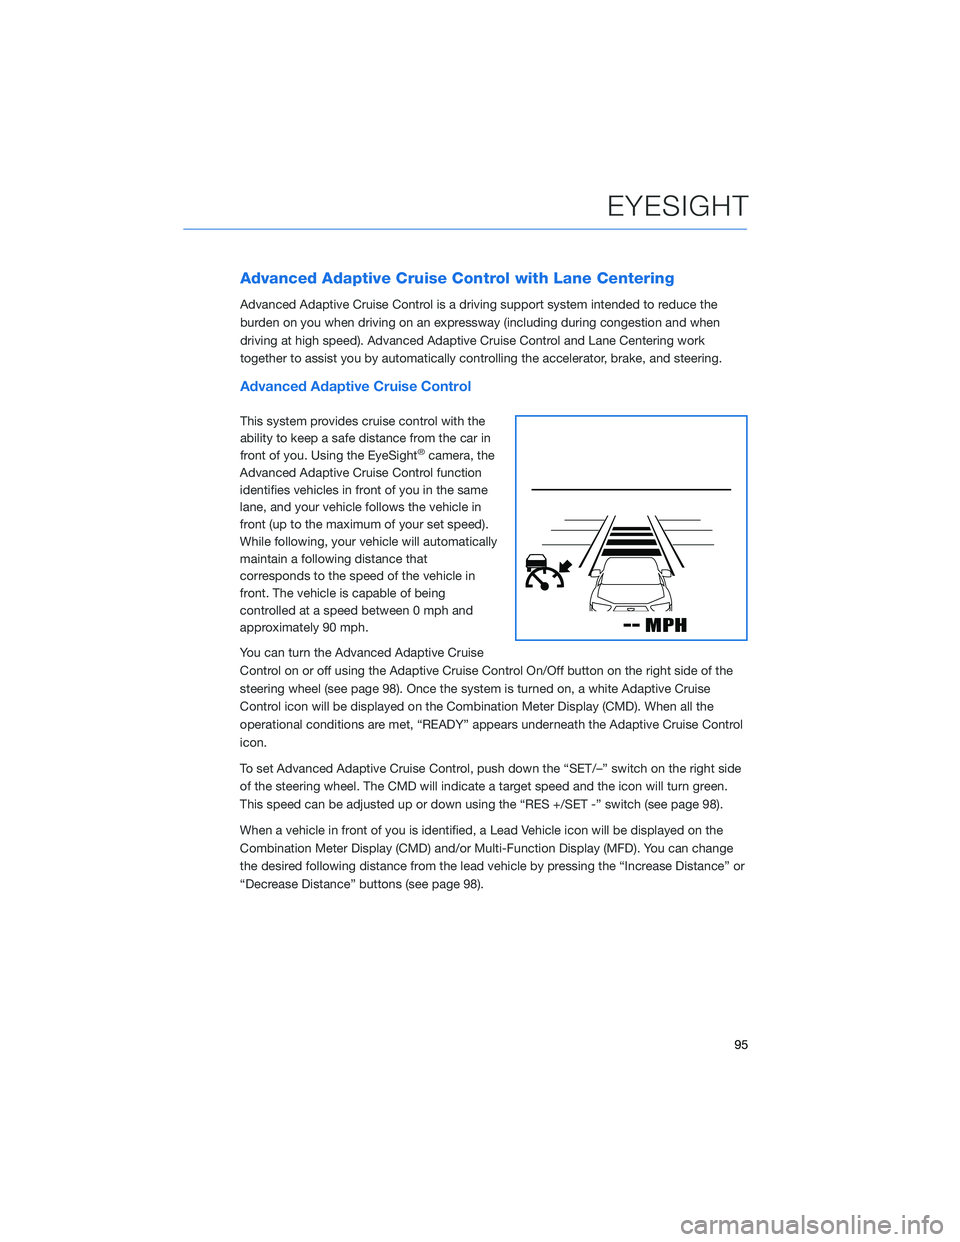
This system provides cruise control with the
ability to keep a safe distance from the car in
front of you. Using the EyeSight
®camera, the
Advanced Adaptive Cruise Control function
identifies vehicles in front of you in the same
lane, and your vehicle follows the vehicle in
front (up to the maximum of your set speed).
While following, your vehicle will automatically
maintain a following distance that
corresponds to the speed of the vehicle in
front. The vehicle is capable of being
controlled at a speed between 0 mph and
approximately 90 mph.
You can turn the Advanced Adaptive Cruise
Control on or off using the Adaptive Cruise Control On/Off button on the right side of the
steering wheel (see page 98). Once the system is turned on, a white Adaptive Cruise
Control icon will be displayed on the Combination Meter Display (CMD). When all the
operational conditions are met, “READY” appears underneath the Adaptive Cruise Control
icon.
To set Advanced Adaptive Cruise Control, push down the “SET/–” switch on the right side
of the steering wheel. The CMD will indicate a target speed and the icon will turn green.
This speed can be adjusted up or down using the “RES +/SET -” switch (see page 98).
When a vehicle in front of you is identified, a Lead Vehicle icon will be displayed on the
Combination Meter Display (CMD) and/or Multi-Function Display (MFD). You can change
the desired following distance from the lead vehicle by pressing the “Increase Distance” or
“Decrease Distance” buttons (see page 98).
EYESIGHT
95
Page 107 of 156
Reverse Automatic Braking (RAB) OFF
In some cases, such as connecting a trailer, it may be helpful to temporarily turn the
system off. RAB can be turned off using the buttons in the lower corners of the
touchscreen when the select lever is in the “R” position.
Select and hold the “RAB ON” button in the lower part of the touchscreen
until it changes to “RAB OFF” to disable the automatic braking functions of
the RAB system.
Select and hold the “P))) ON” button in the lower part of the touchscreen until
it changes to “P))) OFF” to disable the audible beeping of the RAB system.
DRIVER ASSIST TECHNOLOGIES
105
Page 119 of 156
3Press the memory switch in
the instrument panel to
select the “ON” status
(switch is depressed and you
can no longer see the white
line on top).
4 With the rear gate at the
desired height, press and
hold the Power Rear Gate
Close Button on the inside
edge of the rear gate. A chirp
will sound and the hazard
warning lights will flash to
confirm the height is set.
When the memory switch is in the “ON” status, the rear gate will stop at the set memory
height when you use any of the Power Rear Gate buttons.
For more information, please refer to “Keys and Doors” in your Owner’s Manual.
Memory Height Button
Power Rear Gate Close Button
HOW TO APPENDIX
117
Page 120 of 156

MEMORY DRIVER’S SEAT(if equipped)
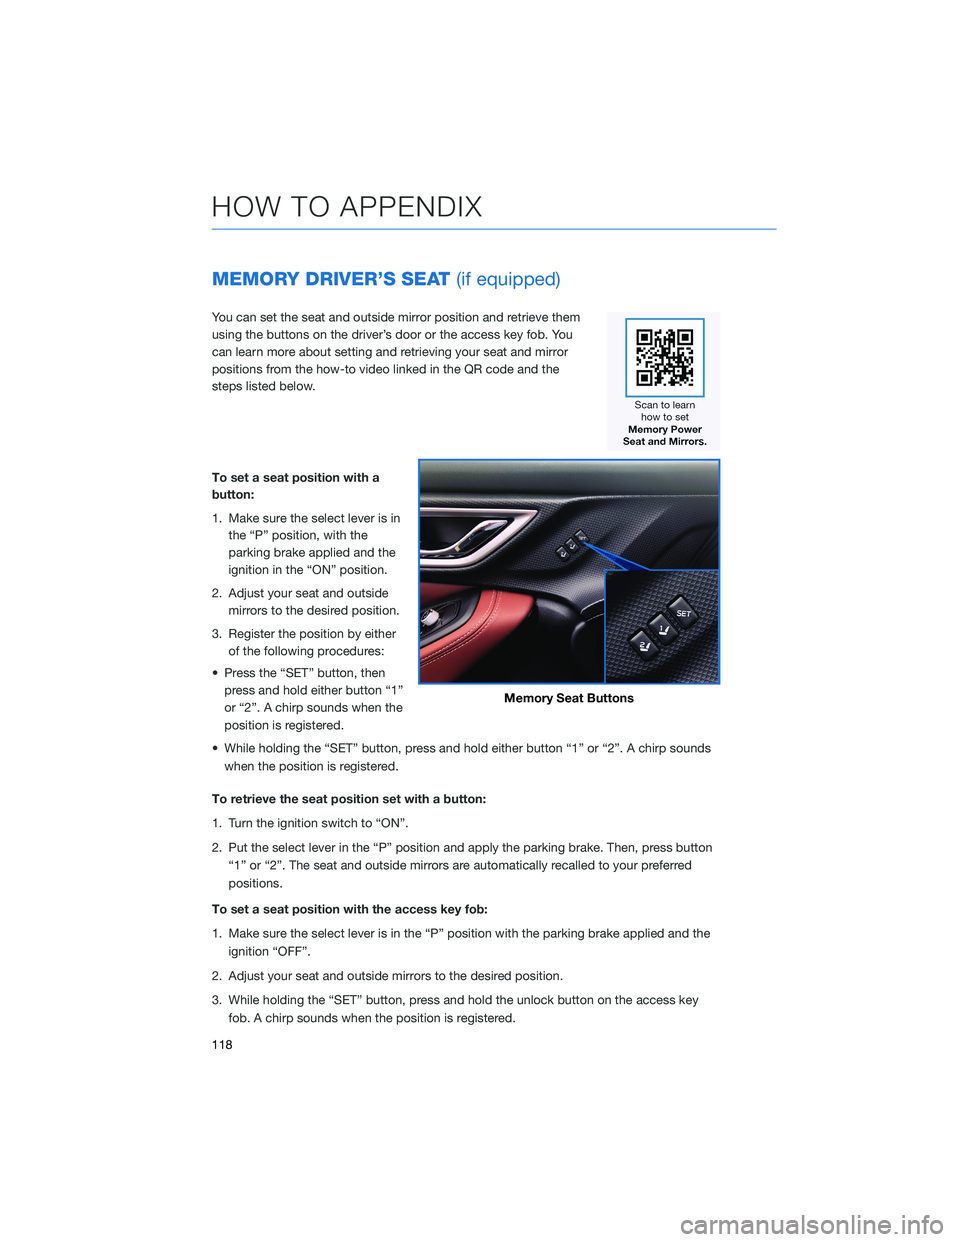
You can set the seat and outside mirror position and retrieve them
using the buttons on the driver’s door or the access key fob. You
can learn more about setting and retrieving your seat and mirror
positions from the how-to video linked in the QR code and the
steps listed below.
To set a seat position with a
button:
1. Make sure the select lever is in
the “P” position, with the
parking brake applied and the
ignition in the “ON” position.
2. Adjust your seat and outside mirrors to the desired position.
3. Register the position by either of the following procedures:
• Press the “SET” button, then press and hold either button “1”
or “2”. A chirp sounds when the
position is registered.
• While holding the “SET” button, press and hold either button “1” or “2”. A chirp sounds when the position is registered.
To retrieve the seat position set with a button:
1. Turn the ignition switch to “ON”.
2. Put the select lever in the “P” position and apply the parking brake. Then, press button “1” or “2”. The seat and outside mirrors are automatically recalled to your preferred
positions.
To set a seat position with the access key fob:
1. Make sure the select lever is in the “P” position with the parking brake applied and the ignition “OFF”.
2. Adjust your seat and outside mirrors to the desired position.
3. While holding the “SET” button, press and hold the unlock button on the access key fob. A chirp sounds when the position is registered.
Memory Seat Buttons
HOW TO APPENDIX
118
Page 139 of 156
Guidance Screen Icons
The Guidance Screen Icons are the common icons used for the navigation guidance:
ICONEXPLANATION ICONEXPLANATION
Turn left.Stay in the left lane.
Turn right.Stay in the right lane.
U-Turn Left.Straight ahead at the
intersection.
U-Turn right.Turn left at the T junction.
Keep left at the fork in the
road.Turn right at the T junction.
Keep right at the fork in the
road.Go left at the roundabout.
Turn left & sharp curve.You are half way to your
destination.
Turn right & sharp curve.You have arrived at your
destination.
Map Zoom
Once on the map screen, you can zoom in or
out by touching the “+” or “-” buttons on the
screen. You can also use two fingers on the
screen and move them apart to zoom in or
together to zoom out.
HOW TO APPENDIX
137
Page 145 of 156

2.5 L ENGINE . . . . . . . ........ 55
A
ACCESSORY CONNECTIONS . . . . . . 38
ADDING SHORTCUTS . . . . . ..... 67
ADVANCED ADAPTIVE CRUISE CONTROL . . . . . . .......... 19
ANDROID AUTO™ . . . . . . ...... 127
Cables . . . . . . . . .........127
Compatible Models . .........129
Connecting an Android Phone ....127
APPLE CARPLAY
®............ 130
Cables . . . . . . . . .........130
Compatible Models . .........131
Connecting an iPhone . . . . ....130
AUDIO CONTROLS . ........... 18
AUTO START–STOP . . . . . . . . . . . 42
B
BLIND SPOT DETECTION (BSD) / REAR CROSS TRAFFIC ALERT (RCTA) . . 102
Blind Spot Detection (BSD) . . . . . 102
Blind Spot Detection / Rear Cross
Traffic Alert OFF . . . . . .......103
Lane Change Assist (LCA) ......103
Rear Cross-Traffic Alert (RCTA) . . . 103
BLUETOOTH
®PAIRING . . . ...... 119
Pairing an Android Device . . . . . . 119
Pairing an iOS/Apple Device . . . . . 123
BUTTONS . . . . . ............ 60
CD Player Functions ..........61
Controlling the Volume . . . . . . . . . 61
Other Functions . . . . . . .......61
Radio Functions . . . . . . .......60 C
CARGO AREA AND COVER ....... 53
CHILD SAFETY LOCKS . . . . . . .... 50
CLIMATE CONTROL . . . . . . ..... 31
Automatic Climate Control . . . ....31
Dual—Zone Automatic
Climate Control . . . . . . .......34
Heated Seats (if equipped) . .....37
Heated Steering Wheel . . ......37
Rear Heated Seats ...........37
Remote Engine Start with
Climate Control . . . . . . .......36
CLOCK . . . ................ 87
Automatically . .............88
Manually .................87
COMBINATION METER . ......... 16
CREATING A DRIVER PROFILE . .... 68
Retrieving a Driver Profile .......69
CREATING HOME AND WORK PROFILES . . . . . . . . . ....... 79
D
DRIVERFOCUS
®COMPONENTS . . . 106
Camera . . ...............106
Combination Meter Display (CMD) . 108
INFO SWITCH . . . . . . .......107
i/SET Switch . . . . . . ........108
Multi Function Display (MFD) . . . . 107
DRIVERFOCUS
®OVERVIEW ..... 106
DRIVER MONITORING SYSTEM OFF . . 111
DRIVER PROFILE/CONVENIENCE
SETTINGS . .............. 109
Deleting a Driver . . . .........111
Recognizing a Driver .........111
Registering a Driver . . . . . . . . . . 109
Temperature Gesture Control ....110
DRIVING THE VEHICLE . . . . ...... 40
Automatic Transmission Shift Mode . 40
Paddle Shift Control Switches
(if equipped) ...............41
SI-DRIVE . . . . .............41
DROWSY/INATTENTIVE WARNINGS . 109
INDEX
143