Page 3 of 132

PURPOSE OF THIS GUIDE
WELCOME................. 4
IMPORTANT SAFETY
INFORMATION.............. 4
OWNER’S RESOURCES....... 4
IN CASE OF EMERGENCY..... 5
TOWING YOUR ALL-WHEEL
DRIVE SUBARU............. 6
ENTRY AND EXIT
KEYLESS ENTRY............ 7
KEYLESS ACCESS WITH PUSH
BUTTON START............. 8
INSTRUMENT PANEL........10
GAUGES AND WARNING
LIGHTS
COMBINATION METER.......12
WARNING AND INDICATOR
LIGHTS....................13
CONTROLS
INSTRUMENT PANEL SWITCHES
(LOWER LEFT)..............14
AUDIO CONTROLS...........14
CRUISE CONTROL..........15
ADVANCED ADAPTIVE CRUISE
CONTROL.................15
i/SET SWITCH...............16
INFO SWITCH...............16
LIGHT CONTROLS...........17TURN SIGNALS.............18
WINDSHIELD WIPERS........19
REAR WINDOW WIPER.......19
OVERHEAD CONSOLE........20
GETTING COMFORTABLE
SEATING...................21
TILT AND TELESCOPIC STEERING
COLUMN...................23
POWER EXTERIOR MIRRORS . . 23
REAR VIEW MIRROR.........24
POWER WINDOWS..........25
POWER MOONROOF........25
CLIMATE CONTROL..........26
ACCESSORY CONNECTIONS . . 29
OPERATING THE VEHICLE
IGNITION SWITCH...........30
PUSH-BUTTON IGNITION
SWITCH...................30
STARTING THE VEHICLE......30
DRIVING THE VEHICLE.......31
AUTO START–STOP.........33
X-MODE
®..................35
TURNING OFF THE VEHICLE...37
REFUELING
FUEL FILLER LID............38
FUEL SPECIFICATIONS AND
CAPACITY..................38
TABLE OF CONTENTS
Page 20 of 132

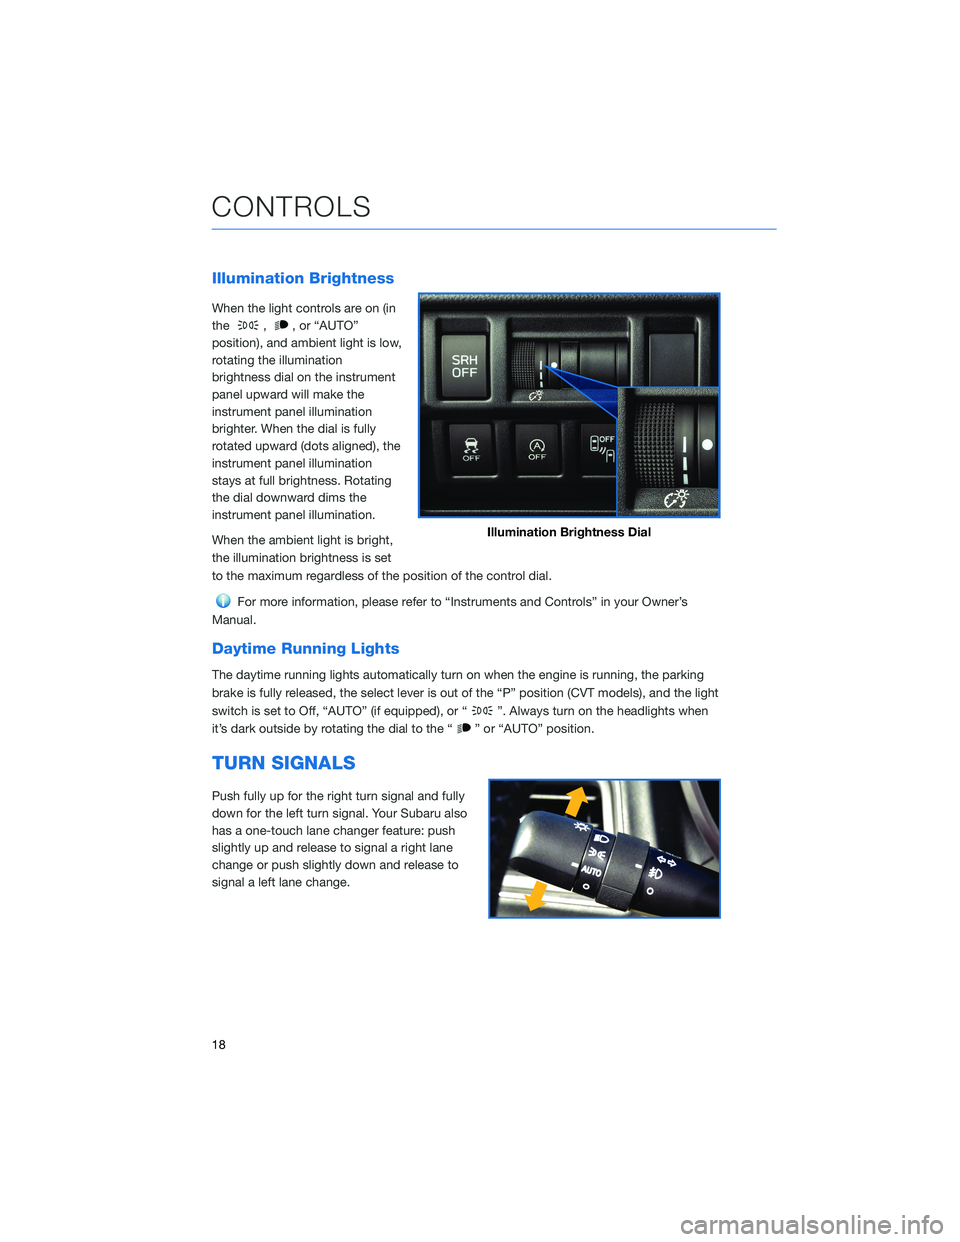
Illumination Brightness
When the light controls are on (in
the
,, or “AUTO”
position), and ambient light is low,
rotating the illumination
brightness dial on the instrument
panel upward will make the
instrument panel illumination
brighter. When the dial is fully
rotated upward (dots aligned), the
instrument panel illumination
stays at full brightness. Rotating
the dial downward dims the
instrument panel illumination.
When the ambient light is bright,
the illumination brightness is set
to the maximum regardless of the position of the control dial.
For more information, please refer to “Instruments and Controls” in your Owner’s
Manual.
Daytime Running Lights
The daytime running lights automatically turn on when the engine is running, the parking
brake is fully released, the select lever is out of the “P” position (CVT models), and the light
switch is set to Off, “AUTO” (if equipped), or “
”. Always turn on the headlights when
it’s dark outside by rotating the dial to the “
” or “AUTO” position.
TURN SIGNALS
Push fully up for the right turn signal and fully
down for the left turn signal. Your Subaru also
has a one-touch lane changer feature: push
slightly up and release to signal a right lane
change or push slightly down and release to
signal a left lane change.
Illumination Brightness Dial
CONTROLS
18
Page 90 of 132

REAR-VISION CAMERA
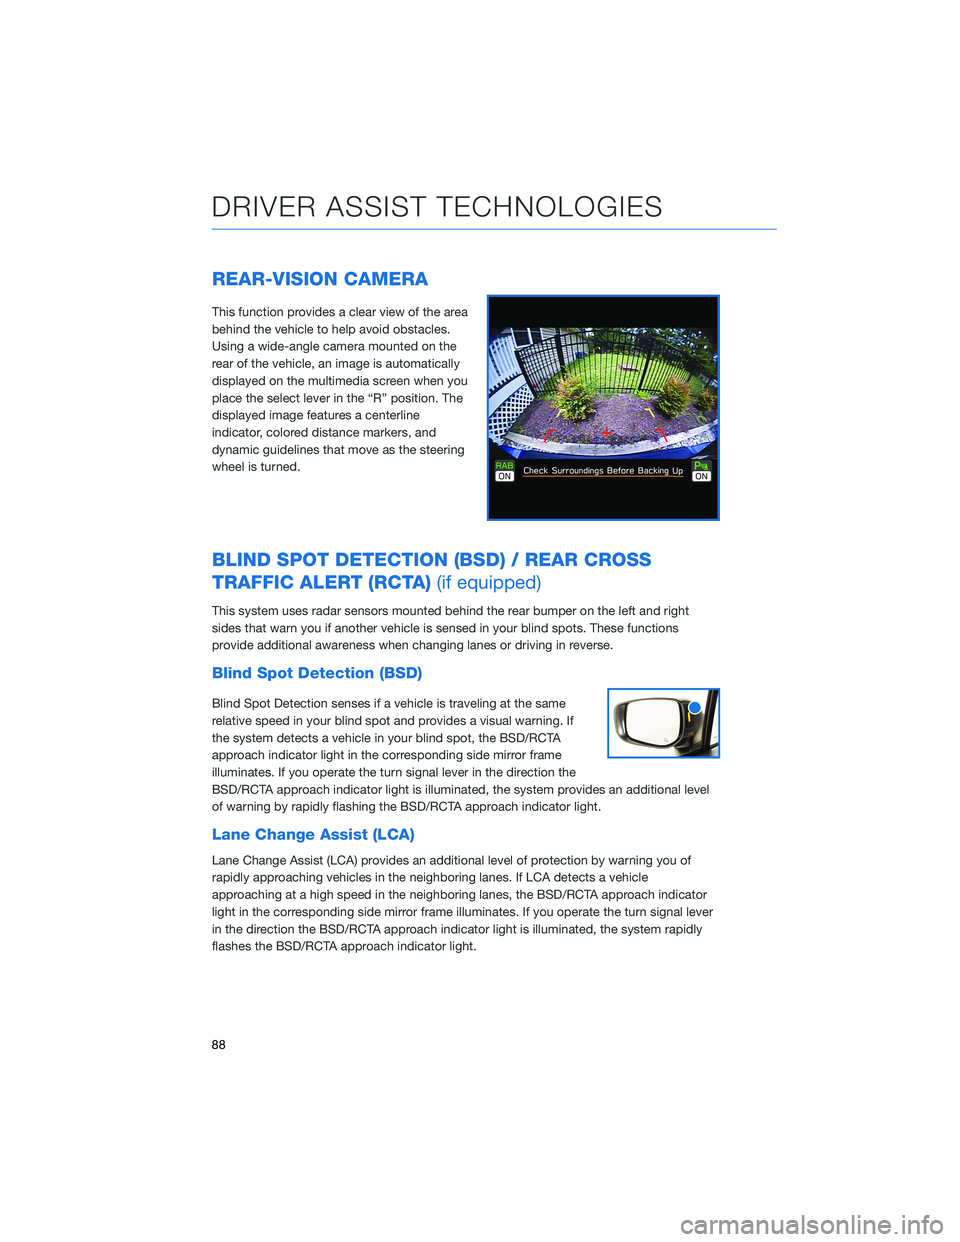
This function provides a clear view of the area
behind the vehicle to help avoid obstacles.
Using a wide-angle camera mounted on the
rear of the vehicle, an image is automatically
displayed on the multimedia screen when you
place the select lever in the “R” position. The
displayed image features a centerline
indicator, colored distance markers, and
dynamic guidelines that move as the steering
wheel is turned.
BLIND SPOT DETECTION (BSD) / REAR CROSS
TRAFFIC ALERT (RCTA)(if equipped)
This system uses radar sensors mounted behind the rear bumper on the left and right
sides that warn you if another vehicle is sensed in your blind spots. These functions
provide additional awareness when changing lanes or driving in reverse.
Blind Spot Detection (BSD)
Blind Spot Detection senses if a vehicle is traveling at the same
relative speed in your blind spot and provides a visual warning. If
the system detects a vehicle in your blind spot, the BSD/RCTA
approach indicator light in the corresponding side mirror frame
illuminates. If you operate the turn signal lever in the direction the
BSD/RCTA approach indicator light is illuminated, the system provides an additional level
of warning by rapidly flashing the BSD/RCTA approach indicator light.
Lane Change Assist (LCA)
Lane Change Assist (LCA) provides an additional level of protection by warning you of
rapidly approaching vehicles in the neighboring lanes. If LCA detects a vehicle
approaching at a high speed in the neighboring lanes, the BSD/RCTA approach indicator
light in the corresponding side mirror frame illuminates. If you operate the turn signal lever
in the direction the BSD/RCTA approach indicator light is illuminated, the system rapidly
flashes the BSD/RCTA approach indicator light.
DRIVER ASSIST TECHNOLOGIES
88
Page 122 of 132

FIRMWARE AND SOFTWARE UPDATES
For 8.0–inch Multimedia Plus and 8.0–inch Multimedia Navigation systems, you can
update the system software via a Wi-Fi connection or the aha®application on your
smartphone (depending on your smartphone communication and transfer speed).
To accurately check for updates, make sure the clock is set to “Auto” with a GPS signal
available (system with navigation) or a phone paired via Bluetooth
®(system without
navigation). See page 76 for step by step directions on setting the clock. System
functionality will be restricted during installation.
1. Connect to a Wi-Fi network or start the aha application on your smartphone (see page
108).
2. Return to the general settings screen (if needed, press the “Home” button, select
“Settings”, and then select “General”).
3. Select “Check for Updates”.
• If “Automatically Check for Updates” is turned on at the general settings screen, an
update check will be performed automatically before proceeding to the next step.
• If “Automatically Download Updates” is turned on at the general settings screen, the
software update will be downloaded automatically before proceeding to “Update
Installation”.
4. If the “Software Update Ready to Download” pop-up is displayed, select “Download
Now” to begin the download. The download status progress is displayed in the upper
right of the screen.
5. Select “Install Now” to start the installation process. The installation process will take
several minutes to complete. If you need to stop the installation process, press
“Cancel”.
6. When the installation is complete, select “I Agree” on the confirmation message to
complete the update process. By selecting “I Agree”, the system will restart
automatically.
HOW TO APPENDIX
120
Page 126 of 132
TOUCHSCREEN . . . . . . ........ 52
TOWING YOUR ALL-WHEEL DRIVE
SUBARU . . . . . . . . . . . ...... 6
TRAILER TOWING CAPACITY...... 46
TURNING OFF THE VEHICLE...... 37
Without Push-button Ignition.....37
With Push-button Ignition.......37
TURN SIGNALS . . . . . . ........ 18
V
VOICE RECOGNITION . ......... 54
Common Commands . . ........55
Tips....................54
W
WARNING AND INDICATOR LIGHTS . . 13
WELCOME . . . . . . . . . . . . . . . . . . 4
WI-FI.................... 108
Connecting to a Wi-Fi Network . . . 108
Wi-Fi Hotspot Subscription.....110
WINDSHIELD GLASS AND
DASHBOARD . . . . . . ........ 92
WINDSHIELD WIPERS . . ........ 19
X
X-MODE
®................. 35
Hill Descent Control (HDC).......37
X-MODE
®Dual Mode System
(Sport) . . . . . . . . . . . .......36
X-MODE
®Standard System . . . . . . 36
INDEX
124