Page 3 of 108

PURPOSE OF THIS GUIDE
WELCOME................. 4
IMPORTANT SAFETY
INFORMATION.............. 4
OWNER’S RESOURCES....... 4
IN CASE OF EMERGENCY..... 5
TOWING YOUR SUBARU...... 6
ENTRY AND EXIT
KEYLESS ENTRY............ 7
KEYLESS ACCESS WITH PUSH
BUTTON START............. 7
INSTRUMENT PANEL........10
GETTING COMFORTABLE
SEATING...................12
TILT AND TELESCOPIC STEERING
COLUMN...................13
POWER EXTERIOR MIRRORS . . 14
REAR VIEW MIRROR.........14
POWER WINDOWS..........15
CLIMATE CONTROL..........16
ACCESSORY CONNECTIONS . . 19
CONTROLS
INSTRUMENT PANEL SWITCHES
(LOWER LEFT)..............20
AUDIO CONTROLS...........20
CRUISE CONTROL...........21
ADAPTIVE CRUISE CONTROL . . 21
COMBINATION METER DISPLAY
CONTROLS................22
LIGHT CONTROLS...........22
TURN SIGNALS.............24
WINDSHIELD WIPERS........24
OVERHEAD CONSOLE........25
GAUGES AND WARNING
LIGHTS
COMBINATION METER.......26
WARNING AND INDICATOR
LIGHTS....................28
OPERATING THE VEHICLE
PUSH-BUTTON IGNITION
SWITCH...................29
STARTING THE VEHICLE......29
DRIVING THE VEHICLE.......29
DRIVING SYSTEMS/MODES...31
TURNING OFF THE VEHICLE...32
REFUELING
FUEL FILLER LID............33
FUEL SPECIFICATIONS AND
CAPACITY..................33
PASSENGER/CARGO AREAS
FOLDING THE REAR
SEATBACK.................34
LATCH/ANCHOR.............36
TABLE OF CONTENTS
Page 6 of 108

WELCOME
Congratulations on choosing a Subaru BRZ and welcome to the Subaru family!
Subaru is more than a car company™. We are committed to making the world a better
place, and the Subaru Love Promise is our vision to show love and respect to all people at
every interaction with Subaru. We believe in building lifelong relationships with our
customers, earning your trust and exceeding your expectations by providing customer
service with integrity and compassion.
This Getting Started Guide will introduce you to your new Subaru BRZ by providing
information on the basic operation and key features of your Subaru as well as the
STARLINK
®and EyeSight®systems in your vehicle.
IMPORTANT SAFETY INFORMATION
The Getting Started Guide is not intended as a substitute for your Owner’s Manuals. We
strongly encourage you to review your Vehicle, STARLINK®, and EyeSight®Owner’s
Manuals to ensure complete understanding.
OWNER’S RESOURCES
If you’re having difficulty using any of the functions outlined in this guide, or want to learn
more, you can get additional information from the
following sources:
Your Subaru Owner’s Manuals:
Located in the glovebox
Online Subaru Owner’s Resources:
www.subaru.com/owners
Subaru Customer Support:
www.subaru.com/customer-support
1-800-782-2783 (1-800-SUBARU3 )
PURPOSE OF THIS GUIDE
4
Page 9 of 108

KEYLESS ENTRY
1Lock/Arm
• Press the lock/arm button to lock the doors, trunk, and fuel
filler lid and to activate the security alarm. A chirp sounds
and the hazard warning lights flash once.
• If either of the doors are not fully closed, a chirp sounds for
5 seconds to alert you.
• Press the lock/arm button three times to activate the vehicle
finder function. If you are within 30 feet of your Subaru, the
horn sounds once, and the hazard warning lights flash three
times.
2Unlock/Disarm
• Press the unlock/disarm button once to unlock the driver’s
door. Two chirps sound and the hazard warning lights flash twice. To unlock all the
doors and the trunk, briefly press the button twice.
• The interior lights will illuminate when you press the unlock/disarm button if they
are set to the “DOOR” position on the overhead console.
3Trunk
• Press and hold the trunk button to open the trunk. A chirp sounds once.
4Panic Alarm
• Press the panic alarm button to sound the horn and flash the hazard warning
lights.
• Press any button on the access key fob to deactivate the panic alarm.
KEYLESS ACCESS WITH PUSH BUTTON START
The Keyless Access with Push-Button Start system features the following touch-activated
door locking or unlocking functions without the key ever leaving your pocket or purse. You
can customize the touch-activated door locking or unlocking settings using the
STARLINK
®Touchscreen by selecting “Settings” then selecting the “Car” menu in the top
bar.
Access Key Fob
ENTRY AND EXIT
7
Page 22 of 108
INSTRUMENT PANEL SWITCHES (LOWER LEFT)
1Illumination brightness (see
p. 23)
2Trunk Release (see p. 37)
For more information, please
refer to “Instruments and
Controls” and “Keys and Doors”
in your Owner’s Manual.
AUDIO CONTROLS
1Source
2Volume Up/Volume Down
3Presets/Skip
4Call
5End
6Voice Recognition
For more information about your audio
system and controls, please refer to page 47 in
this Getting Started Guide or “Quick Guide” in
your SUBARU STARLINK
®Owner’s Manual.
CONTROLS
20
Page 27 of 108

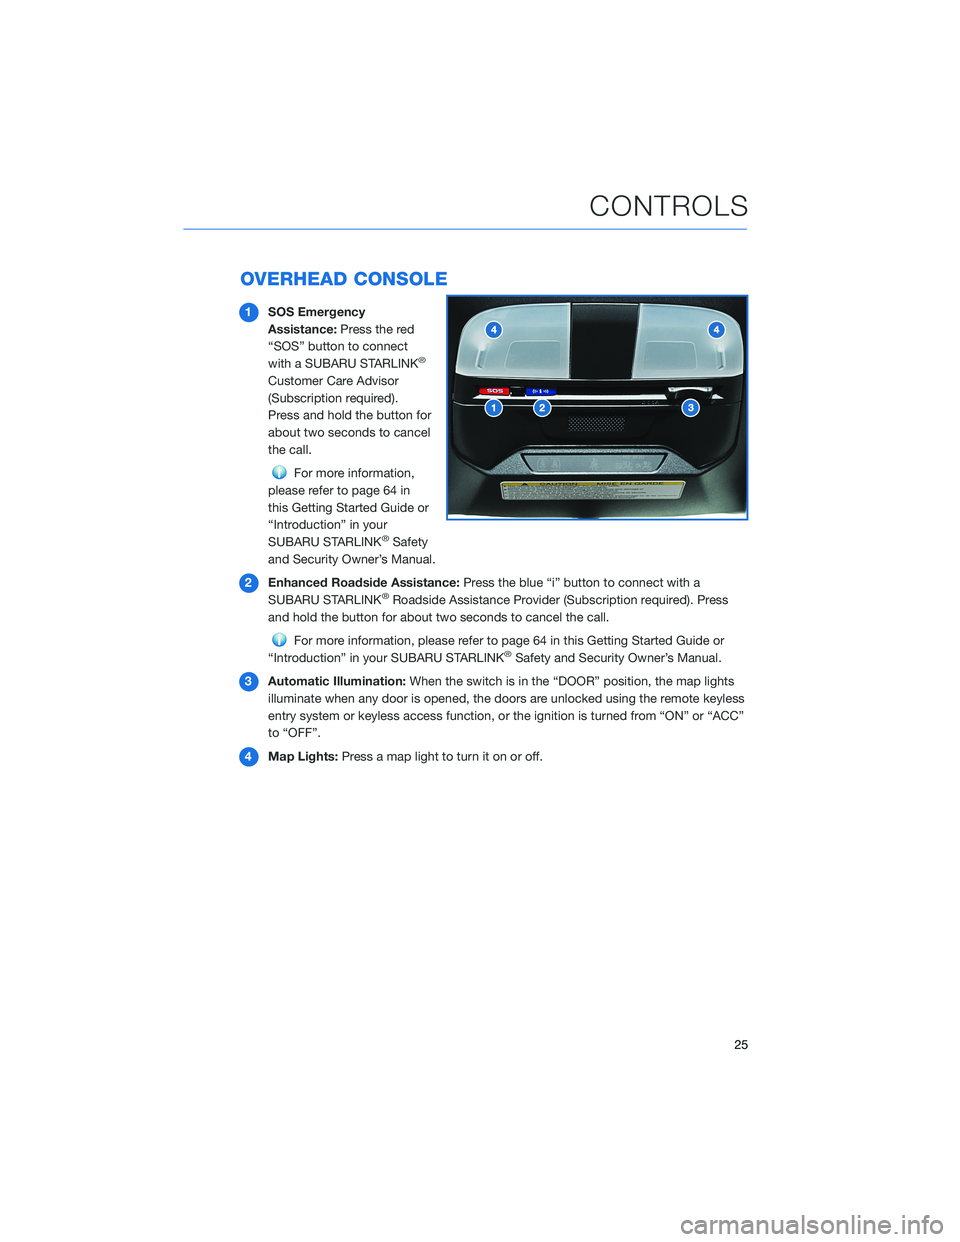
OVERHEAD CONSOLE
1SOS Emergency
Assistance:Press the red
“SOS” button to connect
with a SUBARU STARLINK
®
Customer Care Advisor
(Subscription required).
Press and hold the button for
about two seconds to cancel
the call.
For more information,
please refer to page 64 in
this Getting Started Guide or
“Introduction” in your
SUBARU STARLINK
®Safety
and Security Owner’s Manual.
2Enhanced Roadside Assistance:Press the blue “i” button to connect with a
SUBARU STARLINK
®Roadside Assistance Provider (Subscription required). Press
and hold the button for about two seconds to cancel the call.
For more information, please refer to page 64 in this Getting Started Guide or
“Introduction” in your SUBARU STARLINK®Safety and Security Owner’s Manual.
3Automatic Illumination:When the switch is in the “DOOR” position, the map lights
illuminate when any door is opened, the doors are unlocked using the remote keyless
entry system or keyless access function, or the ignition is turned from “ON” or “ACC”
to “OFF”.
4Map Lights:Press a map light to turn it on or off.
CONTROLS
25
Page 31 of 108

PUSH-BUTTON IGNITION SWITCH
Each time you press the ignition switch
without depressing the brake pedal (or clutch
pedal for manual transmission vehicles), the
ignition position will change as follows: ACC,
ON, OFF.
ACC (Accessory):Provides power to the
audio system and accessory power outlets.
ON:All electrical systems are available.
OFF:Power is switched off.
STARTING THE VEHICLE
With Push-button Ignition
To start the engine:
1. Sit in the driver’s seat with the access key fob.
2. Make sure the select lever is in the “P” position or neutral for manual transmission
vehicles.
3. Depress the brake pedal (and clutch pedal for manual transmission vehicles).
4. While depressing the brake pedal (and clutch pedal for manual transmission vehicles),
briefly press and release the push-button ignition switch.
DRIVING THE VEHICLE
6-Speed Manual Transmission
This manual transmission is a fully
synchronised 6-forward and
1-reverse speed transmission. To
shift into the “R” position, raise
and hold the slider ring, move the
lever into the “R” position, then
release the slider ring. Only pull
the slider ring up when shifting
into reverse gear.
OPERATING THE VEHICLE
29
Page 35 of 108

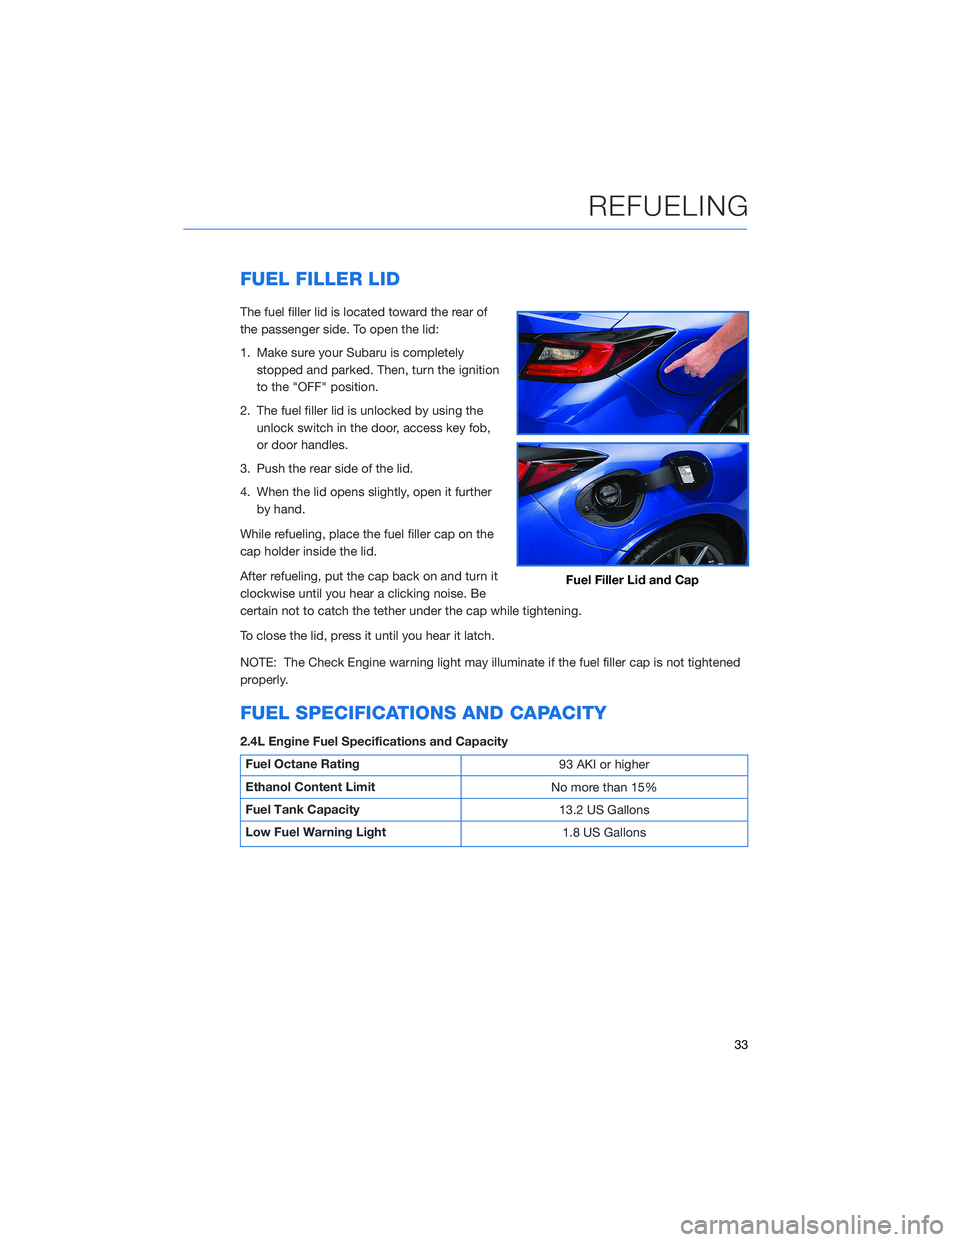
FUEL FILLER LID
The fuel filler lid is located toward the rear of
the passenger side. To open the lid:
1. Make sure your Subaru is completely
stopped and parked. Then, turn the ignition
to the "OFF" position.
2. The fuel filler lid is unlocked by using the
unlock switch in the door, access key fob,
or door handles.
3. Push the rear side of the lid.
4. When the lid opens slightly, open it further
by hand.
While refueling, place the fuel filler cap on the
cap holder inside the lid.
After refueling, put the cap back on and turn it
clockwise until you hear a clicking noise. Be
certain not to catch the tether under the cap while tightening.
To close the lid, press it until you hear it latch.
NOTE: The Check Engine warning light may illuminate if the fuel filler cap is not tightened
properly.
FUEL SPECIFICATIONS AND CAPACITY
2.4L Engine Fuel Specifications and Capacity
Fuel Octane Rating
93 AKI or higher
Ethanol Content Limit
No more than 15%
Fuel Tank Capacity
13.2 US Gallons
Low Fuel Warning Light
1.8 US Gallons
Fuel Filler Lid and Cap
REFUELING
33
Page 56 of 108
5. Type your name in using the keyboard
screen, select “Next”.
6. Select “Next” on the following screen to go
to phone pairing.
7. Select “Add Phone” to pair your phone to
the system (see page 87 and 90 in the How
To Appendix) or select your phone if it is
already paired and select “Finish” when
complete.
To edit a driver profile:
1. On the Home screen, select “Settings” and in the “General” menu, select “Driver
Profiles”.
2. Select "Edit", then select a profile. You can then edit the profile according to same
steps as creating a profile.
DRIVER PROFILE
54