Page 3 of 108

PURPOSE OF THIS GUIDE
WELCOME................. 4
IMPORTANT SAFETY
INFORMATION.............. 4
OWNER’S RESOURCES....... 4
IN CASE OF EMERGENCY..... 5
TOWING YOUR SUBARU...... 6
ENTRY AND EXIT
KEYLESS ENTRY............ 7
KEYLESS ACCESS WITH PUSH
BUTTON START............. 7
INSTRUMENT PANEL........10
GETTING COMFORTABLE
SEATING...................12
TILT AND TELESCOPIC STEERING
COLUMN...................13
POWER EXTERIOR MIRRORS . . 14
REAR VIEW MIRROR.........14
POWER WINDOWS..........15
CLIMATE CONTROL..........16
ACCESSORY CONNECTIONS . . 19
CONTROLS
INSTRUMENT PANEL SWITCHES
(LOWER LEFT)..............20
AUDIO CONTROLS...........20
CRUISE CONTROL...........21
ADAPTIVE CRUISE CONTROL . . 21
COMBINATION METER DISPLAY
CONTROLS................22
LIGHT CONTROLS...........22
TURN SIGNALS.............24
WINDSHIELD WIPERS........24
OVERHEAD CONSOLE........25
GAUGES AND WARNING
LIGHTS
COMBINATION METER.......26
WARNING AND INDICATOR
LIGHTS....................28
OPERATING THE VEHICLE
PUSH-BUTTON IGNITION
SWITCH...................29
STARTING THE VEHICLE......29
DRIVING THE VEHICLE.......29
DRIVING SYSTEMS/MODES...31
TURNING OFF THE VEHICLE...32
REFUELING
FUEL FILLER LID............33
FUEL SPECIFICATIONS AND
CAPACITY..................33
PASSENGER/CARGO AREAS
FOLDING THE REAR
SEATBACK.................34
LATCH/ANCHOR.............36
TABLE OF CONTENTS
Page 16 of 108
POWER EXTERIOR MIRRORS
The power mirror knob works with the ignition
in the “ON” or “ACC” position. Turn the knob
to “L” (left side) or “R” (right side) to select a
mirror. Push the knob in the direction you want
to move the mirror. Turn the knob back to the
center position when finished.
REAR VIEW MIRROR
Auto-dimming Mirror(if equipped)
The auto-dimming function senses distracting glare during
nighttime driving and automatically dims to eliminate the
glare and preserve your vision. Press the switch to turn
auto-dimming on or off. A green LED indicator on the
switch illuminates when the function is on.
Power Mirror Knob
GETTING COMFORTABLE
14
Page 27 of 108

OVERHEAD CONSOLE
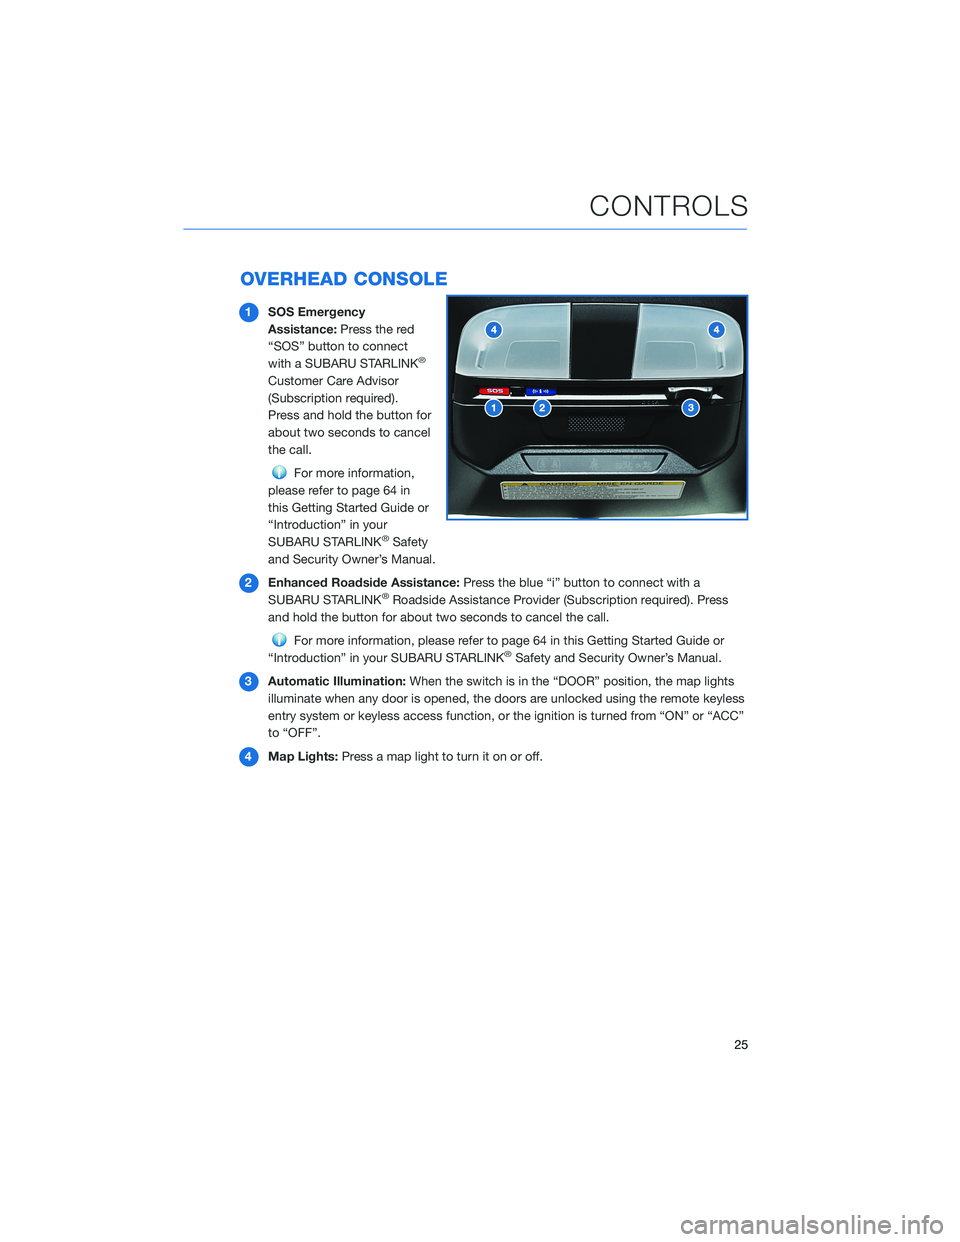
1SOS Emergency
Assistance:Press the red
“SOS” button to connect
with a SUBARU STARLINK
®
Customer Care Advisor
(Subscription required).
Press and hold the button for
about two seconds to cancel
the call.
For more information,
please refer to page 64 in
this Getting Started Guide or
“Introduction” in your
SUBARU STARLINK
®Safety
and Security Owner’s Manual.
2Enhanced Roadside Assistance:Press the blue “i” button to connect with a
SUBARU STARLINK
®Roadside Assistance Provider (Subscription required). Press
and hold the button for about two seconds to cancel the call.
For more information, please refer to page 64 in this Getting Started Guide or
“Introduction” in your SUBARU STARLINK®Safety and Security Owner’s Manual.
3Automatic Illumination:When the switch is in the “DOOR” position, the map lights
illuminate when any door is opened, the doors are unlocked using the remote keyless
entry system or keyless access function, or the ignition is turned from “ON” or “ACC”
to “OFF”.
4Map Lights:Press a map light to turn it on or off.
CONTROLS
25
Page 31 of 108

PUSH-BUTTON IGNITION SWITCH
Each time you press the ignition switch
without depressing the brake pedal (or clutch
pedal for manual transmission vehicles), the
ignition position will change as follows: ACC,
ON, OFF.
ACC (Accessory):Provides power to the
audio system and accessory power outlets.
ON:All electrical systems are available.
OFF:Power is switched off.
STARTING THE VEHICLE
With Push-button Ignition
To start the engine:
1. Sit in the driver’s seat with the access key fob.
2. Make sure the select lever is in the “P” position or neutral for manual transmission
vehicles.
3. Depress the brake pedal (and clutch pedal for manual transmission vehicles).
4. While depressing the brake pedal (and clutch pedal for manual transmission vehicles),
briefly press and release the push-button ignition switch.
DRIVING THE VEHICLE
6-Speed Manual Transmission
This manual transmission is a fully
synchronised 6-forward and
1-reverse speed transmission. To
shift into the “R” position, raise
and hold the slider ring, move the
lever into the “R” position, then
release the slider ring. Only pull
the slider ring up when shifting
into reverse gear.
OPERATING THE VEHICLE
29
Page 34 of 108

3Driving Mode Select Switch (if equipped):The following modes can be selected
with the Driving Mode selection switch to suit driving usage and conditions:
•Sport Mode:Push the switch toward the “SPORT” mode for sporty driving or
when driving in mountainous regions with lots of curves. If Sport mode is selected
with the select lever in the “D” position, the selected gear, from “D1” to “D6” is
displayed on the combination meter. To cancel sport mode, push the switch
toward “SPORT” mode again.
•Snow Mode:Push the switch toward the “SNOW” mode for accelerating and
driving on slippery road surfaces, such as snow. To cancel snow mode, push the
switch toward “SNOW” mode again.
For more information and cautions using these driving systems/modes, please refer to
“Starting and Operating” in your Owner’s Manual.
TURNING OFF THE VEHICLE
With Push-button Ignition
To stop the engine:
1. Stop your Subaru completely.
2. Move the select lever to the “P” position or set the parking brake for manual
transmission vehicles.
3. Press the ignition switch to stop the engine. For manual transmission vehicles, it is
recommended to leave the vehicle in gear (1st gear for upgrade and reverse for a
downgrade).
NOTE: The front windows will remain active for about 40 seconds and the SUBARU
STARLINK
®Multimedia System will remain on for about three minutes or until a door is
opened, whichever occurs first.
OPERATING THE VEHICLE
32
Page 35 of 108

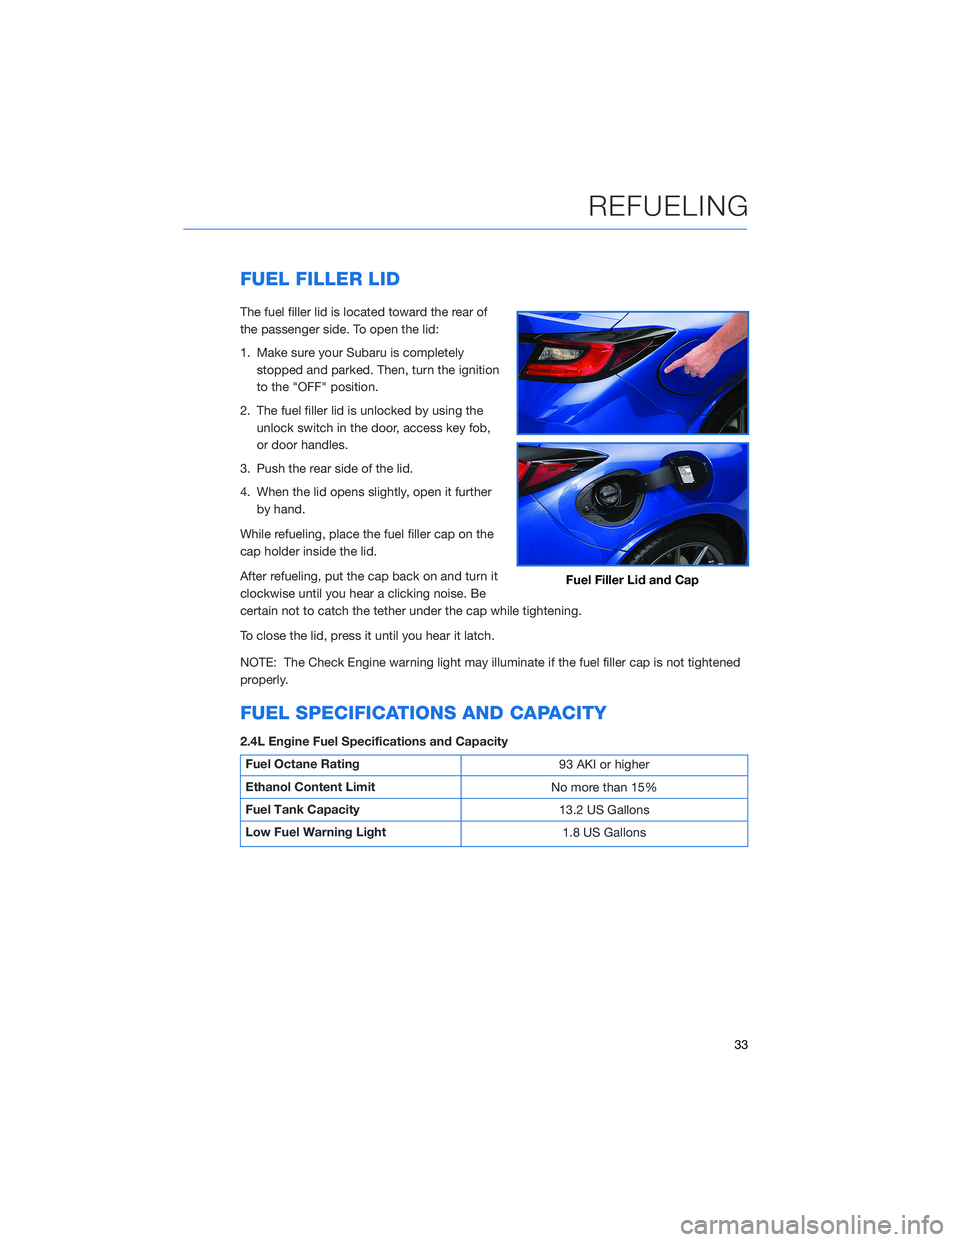
FUEL FILLER LID
The fuel filler lid is located toward the rear of
the passenger side. To open the lid:
1. Make sure your Subaru is completely
stopped and parked. Then, turn the ignition
to the "OFF" position.
2. The fuel filler lid is unlocked by using the
unlock switch in the door, access key fob,
or door handles.
3. Push the rear side of the lid.
4. When the lid opens slightly, open it further
by hand.
While refueling, place the fuel filler cap on the
cap holder inside the lid.
After refueling, put the cap back on and turn it
clockwise until you hear a clicking noise. Be
certain not to catch the tether under the cap while tightening.
To close the lid, press it until you hear it latch.
NOTE: The Check Engine warning light may illuminate if the fuel filler cap is not tightened
properly.
FUEL SPECIFICATIONS AND CAPACITY
2.4L Engine Fuel Specifications and Capacity
Fuel Octane Rating
93 AKI or higher
Ethanol Content Limit
No more than 15%
Fuel Tank Capacity
13.2 US Gallons
Low Fuel Warning Light
1.8 US Gallons
Fuel Filler Lid and Cap
REFUELING
33
Page 37 of 108
Passenger Occupant Detection and Seatbelt Reminders
To help keep your passengers
safe, your Subaru has a
passenger occupant detection
and seatbelt reminder system for
each seat, including the rear
seats.
If passengers in the rear seats do
not fasten their seatbelts while the
ignition is in the "ON" position,
the seatbelt warning lights
illuminate or blink for the specific
seat, and a warning chime may
sound.
For more information, please refer to “Seatbelt Warning Light and Chime” in your
Owner’s Manual.
PASSENGER/CARGO AREAS
35
Page 45 of 108
The TPMS set switch, located in
the glove box, can be used to
initialize the TPMS setting:
1. Adjust the tire inflation
pressure to the specified cold
tire inflation pressure level,
listed on the tire inflation
pressure label on the driver’s
side door pillar.
2. Press and hold the TPMS set
switch with the ignition in the
“ON” position until the tire
pressure monitoring light blinks
slowly 3 times in the
Combination Meter.
NOTE: Initialization cannot be performed
while the vehicle is moving.
Tire pressure specification is listed on the tire
inflation pressure label located on the driver’s
side door pillar.
TPMS Set Switch
Tire Inflation Pressure Label
ADDITIONAL SPECIFICATIONS
43