2022 RAM PROMASTER tire size
[x] Cancel search: tire sizePage 148 of 268

146SAFETY
Trailer Merge Assist — If Equipped
Trailer Merge Assist is a function of the Blind Spot
Monitoring (BSM) system that extends the blind
spot zone to work while pulling a trailer.
NOTE:When Trailer Merge Assist is activated, Rear Cross
Path is disabled.
Trailer Merge Assist consists of three sub
functions:
Automatic Trailer Detection
Trailer Length Detection
Trailer Merge Warning
Blind Spot Zones With Trailer Merge Assist
Automatic Trailer Detection
There are two modes of operation for the detection
of the trailer length:
Automatic Mode
— When “Auto Mode” is
selected, the system will use the blind spot
sensors to automatically determine the pres -
ence and length of a trailer. The presence of a
trailer will be detected using the blind spot radar
within 90 seconds of forward movement of the
vehicle. The vehicle must be moving above
6 mph (10 km/h) to activate the feature. Once
the trailer has been detected, the system will
default to the maximum blind spot zone until the
length has been verified. You will see “Auto” in
the instrument panel cluster .
Maximum Mode — When “Max Mode” is
selected, the system will default to the maximum
blind spot zone regardless of what size trailer is
attached .
NOTE:Selected setting is stored when the ignition is
placed in the OFF position. To change this setting,
it must be selected through the Uconnect Settings
Ú page 120. Trailer Length Detection
Once the trailer presence has been established,
the trailer length will be established (by making
a 90 degree turn) and then the trailer length
category (example 10-20 ft (3 m to 6 m)) will be
displayed. This can take up to 30 seconds after
completing the turn.
NOTE:During the same ignition cycle, if the vehicle is at a
standstill for a minimum of 90 seconds, a new
“trailer detection request” is enabled by the
system once the vehicle resumes motion.
The maximum trailer length supported by the
Trailer Merge Assist feature is 39.5 ft (12 m).
Trailer length is considered the forward most
portion of the trailer hitch to the rearward most
portion of the body, fascia/bumper, or ramp of the
trailer.
The maximum width supported by the Trailer
Merge Assist feature is 8.5 ft (2.59 m). Trailer
width is measured at the widest portion of the
trailer and may include wheels, tires, finders,
or rails.
1 — Vehicle
2 — Trailer
22_VF_OM_EN_USC_t.book Page 146
Page 154 of 268

152SAFETY
The TPMS will continue to warn the driver of low
tire pressure as long as the condition exists, and
will not turn off until the tire pressure is at or above
the recommended cold placard pressure. Once the
low tire pressure warning (TPMS Warning Light)
illuminates, you must increase the tire pressure to
the recommended cold placard pressure in order
for the TPMS Warning Light to turn off. The system
will automatically update and the TPMS Warning
Light will turn off once the system receives the
updated tire pressures. The vehicle may need to
be driven for up to 20 minutes above 15 mph
(24 km/h) in order for the TPMS to receive this
information.
NOTE:When filling warm tires, the tire pressure may need
to be increased up to an additional 4 psi (28 kPa)
above the recommended cold placard pressure in
order to turn the TPMS Warning Light off.
For example, your vehicle may have a recommended
cold (parked for more than three hours) placard
pressure of 30 psi (207 kPa). If the ambient
temperature is 68°F (20°C) and the measured tire
pressure is 27 psi (186 kPa), a temperature drop to
20°F (-7°C) will decrease the tire pressure to
approximately 23 psi (158 kPa). This tire pressure is
sufficiently low enough to turn on the TPMS Warning
Light. Driving the vehicle may cause the tire pressure
to rise to approximately 27 psi (186 kPa), but the TPMS Warning Light will still be on. In this situation,
the TPMS Warning Light will turn off only after the
tires are inflated to the vehicle’s recommended cold
placard pressure value.
NOTE:
The TPMS is not intended to replace normal tire
care and maintenance or to provide warning of
a tire failure or condition.
The TPMS should not be used as a tire pressure
gauge while adjusting your tire pressure.
Driving on a significantly underinflated tire
causes the tire to overheat and can lead to tire
failure. Underinflation also reduces fuel effi
-
ciency and tire tread life, and may affect the
vehicle’s handling and stopping ability.
The TPMS is not a substitute for proper tire
maintenance, and it is the driver’s responsibility
to maintain correct tire pressure using an accu -
rate tire pressure gauge, even if underinflation
has not reached the level to trigger illumination
of the TPMS Warning Light.
Seasonal temperature changes will affect tire
pressure, and the TPMS will monitor the actual
tire pressure in the tire Ú page 256.
Base System
This is the TPMS warning indicator
located in the instrument cluster.
The TPMS uses wireless technology with wheel rim
mounted electronic sensors to monitor tire
pressure levels. Sensors, mounted to each wheel
CAUTION!
The TPMS has been optimized for the original
equipment tires and wheels. TPMS pressures
and warning have been established for the tire
size equipped on your vehicle. Undesirable
system operation or sensor damage may result
when using replacement equipment that is not
of the same size, type, and/or style. After -
market wheels can cause sensor damage.
Using aftermarket tire sealants may cause the
Tire Pressure Monitoring System (TPMS)
sensor to become inoperable. After using an
aftermarket tire sealant it is recommended
that you take your vehicle to an authorized
dealership to have your sensor function
checked.
After inspecting or adjusting the tire pressure
always reinstall the valve stem cap. This will
prevent moisture and dirt from entering the
valve stem, which could damage the TPMS
sensor.
22_VF_OM_EN_USC_t.book Page 152
Page 155 of 268

SAFETY153
as part of the valve stem, transmit tire pressure
readings to the receiver module.
NOTE:It is particularly important for you to check the tire
pressure in all of the tires on your vehicle regularly
and to maintain the proper pressure.
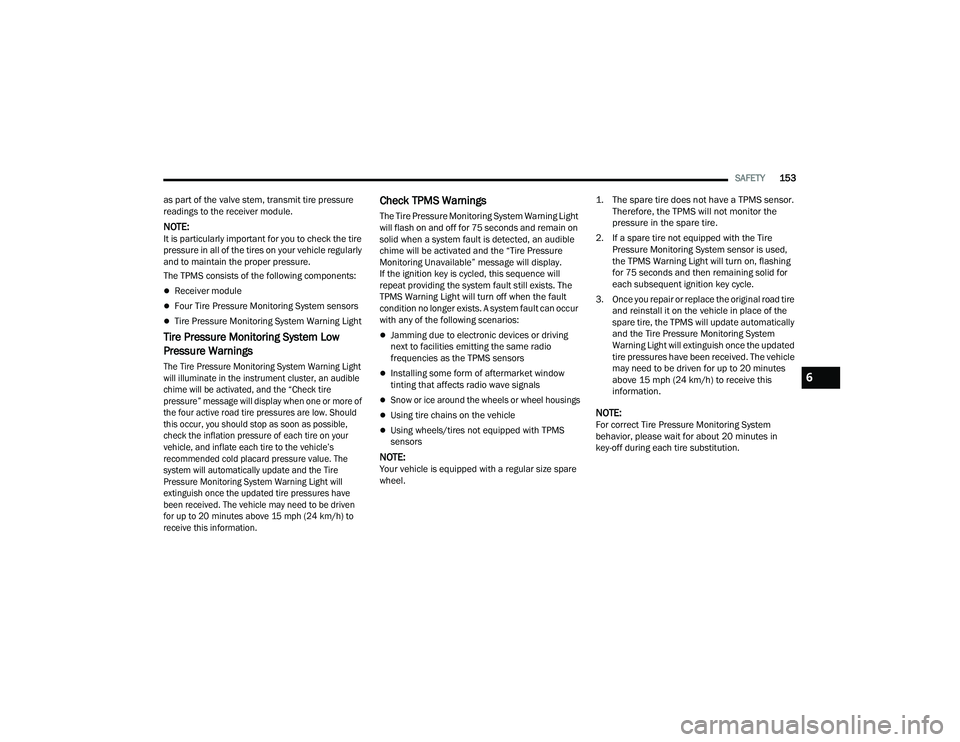
The TPMS consists of the following components:
Receiver module
Four Tire Pressure Monitoring System sensors
Tire Pressure Monitoring System Warning Light
Tire Pressure Monitoring System Low
Pressure Warnings
The Tire Pressure Monitoring System Warning Light
will illuminate in the instrument cluster, an audible
chime will be activated, and the “Check tire
pressure” message will display when one or more of
the four active road tire pressures are low. Should
this occur, you should stop as soon as possible,
check the inflation pressure of each tire on your
vehicle, and inflate each tire to the vehicle’s
recommended cold placard pressure value. The
system will automatically update and the Tire
Pressure Monitoring System Warning Light will
extinguish once the updated tire pressures have
been received. The vehicle may need to be driven
for up to 20 minutes above 15 mph (24 km/h) to
receive this information.
Check TPMS Warnings
The Tire Pressure Monitoring System Warning Light
will flash on and off for 75 seconds and remain on
solid when a system fault is detected, an audible
chime will be activated and the “Tire Pressure
Monitoring Unavailable” message will display.
If the ignition key is cycled, this sequence will
repeat providing the system fault still exists. The
TPMS Warning Light will turn off when the fault
condition no longer exists. A system fault can occur
with any of the following scenarios:
Jamming due to electronic devices or driving
next to facilities emitting the same radio
frequencies as the TPMS sensors
Installing some form of aftermarket window
tinting that affects radio wave signals
Snow or ice around the wheels or wheel housings
Using tire chains on the vehicle
Using wheels/tires not equipped with TPMS
sensors
NOTE:Your vehicle is equipped with a regular size spare
wheel.
1. The spare tire does not have a TPMS sensor.
Therefore, the TPMS will not monitor the
pressure in the spare tire.
2. If a spare tire not equipped with the Tire Pressure Monitoring System sensor is used,
the TPMS Warning Light will turn on, flashing
for 75 seconds and then remaining solid for
each subsequent ignition key cycle.
3. Once you repair or replace the original road tire and reinstall it on the vehicle in place of the
spare tire, the TPMS will update automatically
and the Tire Pressure Monitoring System
Warning Light will extinguish once the updated
tire pressures have been received. The vehicle
may need to be driven for up to 20 minutes
above 15 mph (24 km/h) to receive this
information.
NOTE:For correct Tire Pressure Monitoring System
behavior, please wait for about 20 minutes in
key-off during each tire substitution.
6
22_VF_OM_EN_USC_t.book Page 153
Page 227 of 268

SERVICING AND MAINTENANCE225
3. Remove and replace the bulbs as needed.
Dome Lamp Light Bulbs
4. Close the housing cover making sure it snaps together properly and connect the lamp.
5. Install overhead console into place making sure to seat the assembly’s forward end first
and then snapping it flush so that the tension
spring is fully seating in the housing.
TIRES
TIRE SAFETY INFORMATION
Tire safety information will cover aspects of the
following information: Tire Markings, Tire
Identification Numbers, Tire Terminology and
Definitions, Tire Pressures, and Tire Loading.
Tire Markings
Tire Markings
NOTE:
P (Passenger) — Metric tire sizing is based on US
design standards. P-Metric tires have the letter
“P” molded into the sidewall preceding the size
designation. Example: P215/65R15 95H.
European — Metric tire sizing is based on Euro -
pean design standards. Tires designed to this
standard have the tire size molded into the side -
wall beginning with the section width. The letter
"P" is absent from this tire size designation.
Example: 215/65R15 96H.
LT (Light Truck) — Metric tire sizing is based on
US design standards. The size designation for
LT-Metric tires is the same as for P-Metric tires
except for the letters “LT” that are molded into
the sidewall preceding the size designation.
Example: LT235/85R16.
Temporary spare tires are designed for tempo -
rary emergency use only. Temporary high pres -
sure compact spare tires have the letter “T” or
“S” molded into the sidewall preceding the size
designation. Example: T145/80D18 103M.
High flotation tire sizing is based on US design
standards and it begins with the tire diameter
molded into the sidewall. Example: 31x10.5
R15 LT.
1 — US DOT Safety Standards Code (TIN)
2 — Size Designation
3 — Service Description
4 — Maximum Load
5 — Maximum Pressure
6 — Treadwear, Traction and
Temperature Grades
8
22_VF_OM_EN_USC_t.book Page 225
Page 228 of 268

226SERVICING AND MAINTENANCE
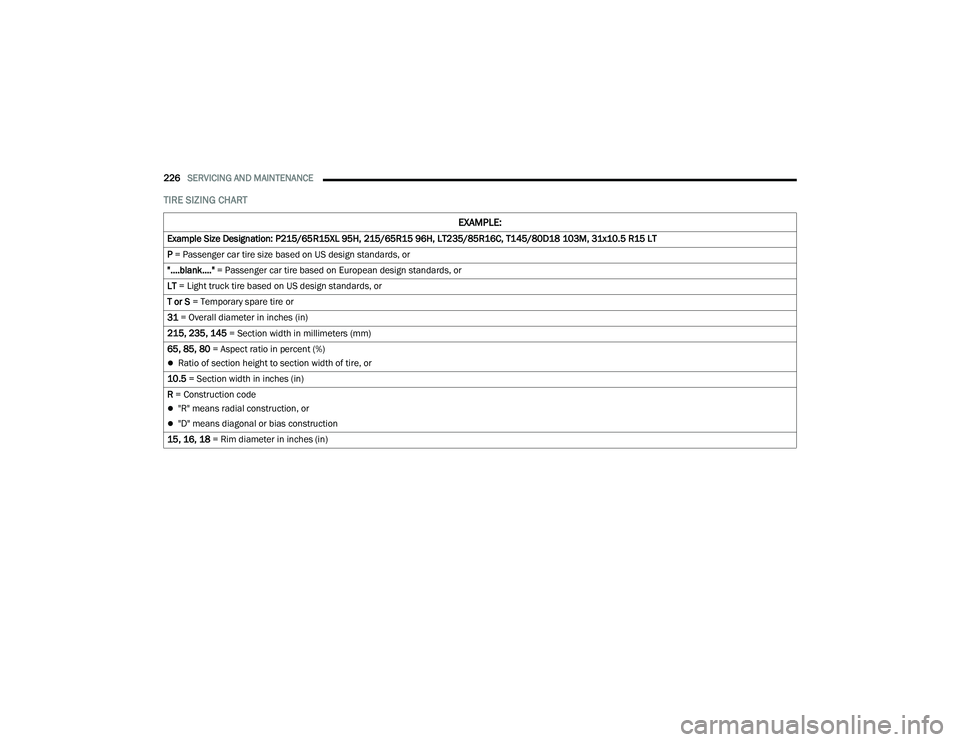
TIRE SIZING CHART
EXAMPLE:
Example Size Designation: P215/65R15XL 95H, 215/65R15 96H, LT235/85R16C, T145/80D18 103M, 31x10.5 R15 LT
P = Passenger car tire size based on US design standards, or
"....blank...." = Passenger car tire based on European design standards, or
LT = Light truck tire based on US design standards, or
T or S = Temporary spare tire or
31 = Overall diameter in inches (in)
215, 235, 145 = Section width in millimeters (mm)
65, 85, 80 = Aspect ratio in percent (%)
Ratio of section height to section width of tire, or
10.5 = Section width in inches (in)
R = Construction code
"R" means radial construction, or
"D" means diagonal or bias construction
15, 16, 18 = Rim diameter in inches (in)
22_VF_OM_EN_USC_t.book Page 226
Page 230 of 268

228SERVICING AND MAINTENANCE
Tire Identification Number (TIN)
The TIN may be found on one or both sides of the tire; however, the date code may only be on one side. Tires with white sidewalls will have the full TIN, including
the date code, located on the white sidewall side of the tire. Look for the TIN on the outboard side of black sidewall tires as mounted on the vehicle. If the TIN is
not found on the outboard side, then you will find it on the inboard side of the tire.
EXAMPLE:
DOT MA L9 ABCD 0301
DOT = Department of Transportation
This symbol certifies that the tire is in compliance with the US Department of Transportation tire safety standards and is approved for highway use
MA = Code representing the tire manufacturing location (two digits)
L9 = Code representing the tire size (two digits)
ABCD = Code used by the tire manufacturer (one to four digits)
03 = Number representing the week in which the tire was manufactured (two digits)
03 means the 3rd week
01 = Number representing the year in which the tire was manufactured (two digits)
01 means the year 2001
Prior to July 2000, tire manufacturers were only required to have one number to represent the year in which the tire was manufactured. Example: 031 could
represent the 3rd week of 1981 or 1991
22_VF_OM_EN_USC_t.book Page 228
Page 231 of 268

SERVICING AND MAINTENANCE229
Tire Terminology And Definitions
Term Definition
B-pillarThe vehicle B-pillar is the structural member of the body located behind the front door.
Cold Tire Inflation Pressure Cold tire inflation pressure is defined as the tire pressure after the vehicle has not been
driven for at least three hours, or driven less than 1 mile (1.6 km) after sitting for a minimum
of three hours. Inflation pressure is measured in units of PSI (pounds per square inch) or
kPa (kilopascals).
Maximum Inflation Pressure The maximum inflation pressure is the maximum permissible cold tire inflation pressure for
this tire. The maximum inflation pressure is molded into the sidewall.
Recommended Cold Tire Inflation Pressure The manufacturers recommended cold tire inflation pressure as shown on the tire placard.
Tire Placard A label permanently attached to the vehicle describing the vehicle’s loading capacity, the
original equipment tire sizes and the recommended cold tire inflation pressures.
8
22_VF_OM_EN_USC_t.book Page 229
Page 232 of 268

230SERVICING AND MAINTENANCE
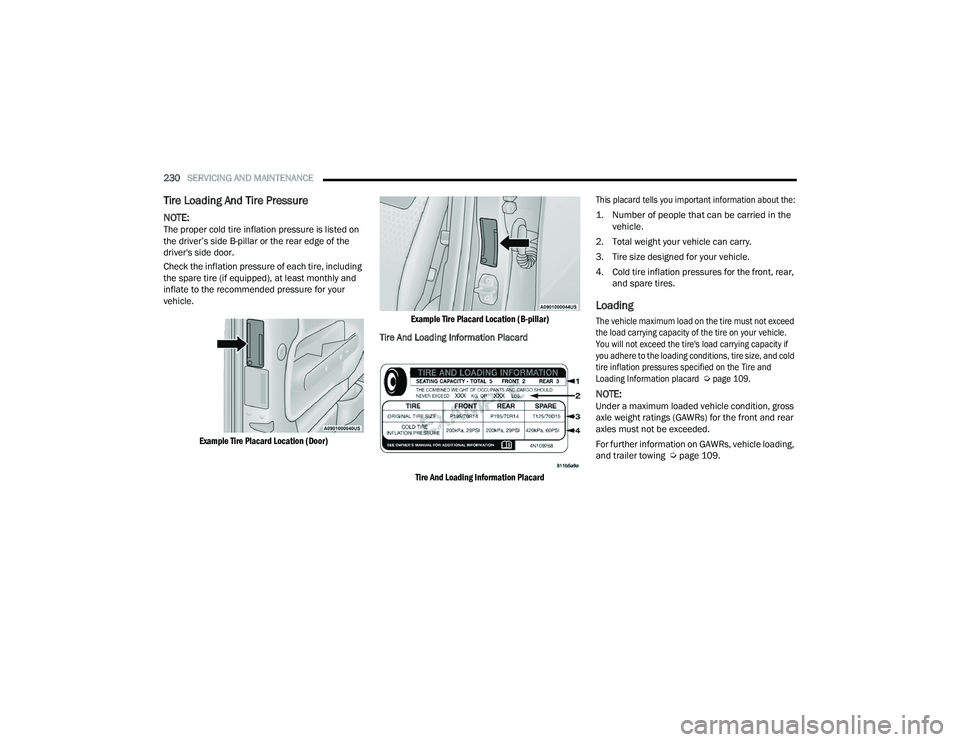
Tire Loading And Tire Pressure
NOTE:The proper cold tire inflation pressure is listed on
the driver’s side B-pillar or the rear edge of the
driver's side door.
Check the inflation pressure of each tire, including
the spare tire (if equipped), at least monthly and
inflate to the recommended pressure for your
vehicle.
Example Tire Placard Location (Door) Example Tire Placard Location (B-pillar)
Tire And Loading Information Placard
Tire And Loading Information Placard
This placard tells you important information about the:
1. Number of people that can be carried in the
vehicle.
2. Total weight your vehicle can carry.
3. Tire size designed for your vehicle.
4. Cold tire inflation pressures for the front, rear, and spare tires.
Loading
The vehicle maximum load on the tire must not exceed
the load carrying capacity of the tire on your vehicle.
You will not exceed the tire's load carrying capacity if
you adhere to the loading conditions, tire size, and cold
tire inflation pressures specified on the Tire and
Loading Information placard
Ú
page 109.
NOTE:Under a maximum loaded vehicle condition, gross
axle weight ratings (GAWRs) for the front and rear
axles must not be exceeded.
For further information on GAWRs, vehicle loading,
and trailer towing Ú page 109.
22_VF_OM_EN_USC_t.book Page 230