2022 RAM PROMASTER CITY manual transmission
[x] Cancel search: manual transmissionPage 8 of 260

6
INTRODUCTION
Dear Customer,
Congratulations on selecting your new Ram. Be assured that it represents precision workmanship, distinctive styling, and high quality. This Owner’s Manual has
been prepared with the assistance of service and engineering specialists to acquaint you with the operation and maintenance of your vehicle. It is supplemented
by customer-oriented documents. Within this information, you will find a description of the services that FCA US LLC offers to its customers as well as the details
of the terms and conditions for maintaining its validity. Please take the time to read all of these publications carefully before driving your vehicle for the first time.
Following the instructions, recommendations, tips, and important warnings in this manual will help ensure safe and enjoyable operation of your vehicle. Be sure
you are familiar with all vehicle controls, particularly those used for braking, steering, transmission, and transfer case shifting (if equipped). Learn how your
vehicle handles on different road surfaces. Your driving skills will improve with experience.
This Owner’s Manual describes all versions of this vehicle. Options and equipment dedicated to specific markets or versions are not expressly indicated in
the text. Therefore, you should only consider the information that is related to the trim level, engine, and version that you have purchased. Any content
introduced throughout the Owner’s Information, which may or may not be applicable to your vehicle, will be identified with the wording “If Equipped”. All data
contained in this publication are intended to help you use your vehicle in the best possible way. FCA US LLC aims at a constant improvement of the vehicles
produced. For this reason, it reserves the right to make changes to the model described for technical and/or commercial reasons. For further information,
contact an authorized dealer.
When it comes to service, remember that authorized dealers know your Ram best, have factory-trained technicians and genuine Mopar® parts, and care about
your satisfaction.
22_VM_OM_EN_USC_t.book Page 6
Page 58 of 260

56STARTING AND OPERATING
KEY IGNITION PARK INTERLOCK
This vehicle is equipped with a Key Ignition Park
Interlock which requires the transmission to be in
PARK before the ignition can be turned to the full
STOP (OFF/LOCK) (key removal) position. The key
can only be removed from the ignition when the
ignition is in the STOP (OFF/LOCK) position, and
once removed, the transmission is locked in PARK.
BRAKE/TRANSMISSION SHIFT
I
NTERLOCK (BTSI) SYSTEM
This vehicle is equipped with a BTSI that holds the
transmission gear selector in PARK unless the
brakes are applied. To shift the transmission out of
PARK, the ignition must be in the MAR (ON/RUN)
position (engine running or not) and the brake
pedal must be pressed. The brake pedal must also be pressed to shift from
NEUTRAL into DRIVE or REVERSE when the vehicle
is stopped or moving at low speeds.
9-SPEED AUTOMATIC TRANSMISSION
The transmission gear range (PRND) is displayed
both beside the gear selector and in the
instrument cluster display. To select a gear range,
push the lock button on the gear selector and
move the lever rearward or forward. You must also
press the brake pedal to shift the transmission out
of PARK (or NEUTRAL, when the vehicle is stopped
or moving at low speeds). Select the DRIVE range
for normal driving.
NOTE:In the event of a mismatch between the gear
selector position and the actual transmission gear
(for example, driver selects REVERSE while driving
forward), the position indicator will blink continu
-
ously until the selector is returned to the proper
position, or the requested shift can be completed.
The electronically controlled transmission adapts
its shift schedule based on driver inputs, along
with environmental and road conditions. The
transmission electronics are self-calibrating;
therefore, the first few shifts on a new vehicle may
be somewhat abrupt. This is a normal condition,
and precision shifts will develop within a few
hundred miles or kilometers. The 9-speed transmission has been developed to
meet the needs of current and future FWD/AWD
vehicles. Software and calibration is refined to
optimize the customer’s driving experience and
fuel economy. By design, some vehicle and
driveline combinations utilize NINTH gear only in
very specific driving situations and conditions.
Only shift from DRIVE to PARK or REVERSE when
the accelerator pedal is released and the vehicle is
stopped. Be sure to keep your foot on the brake
pedal when shifting between these gears.
The transmission gear selector provides PARK,
REVERSE, NEUTRAL, DRIVE, and Electronic Range
Select (ERS) shift positions. Manual downshifts can
be made using the ERS shift control. Moving the gear
selector into the ERS “-”/”+” position (beside the
DRIVE position) activates ERS mode, displays the
current gear in the instrument cluster, and prevents
automatic upshifts beyond this gear. In ERS mode,
toggling the gear selector forward “-” or rearward “+”
will change the highest available gear
Ú
page 59.
NOTE:If the gear selector cannot be moved to the PARK,
REVERSE, or NEUTRAL position (when pushed
forward) it is probably in the ERS “+”/”-” position
(beside the DRIVE position). In ERS mode, the
transmission gear limit (1, 2, 3, etc.) is displayed in
the instrument cluster. Move the gear selector to
the right (into the DRIVE [D] position) for access to
PARK, REVERSE, and NEUTRAL.
CAUTION!
Shift into or out of PARK or REVERSE only after
the vehicle has come to a complete stop.
Do not shift between PARK, REVERSE,
NEUTRAL, or DRIVE when the engine is above
idle speed.
Before shifting into any gear, make sure your
foot is firmly pressing the brake pedal.
22_VM_OM_EN_USC_t.book Page 56
Page 176 of 260

174IN CASE OF EMERGENCY
(Continued)
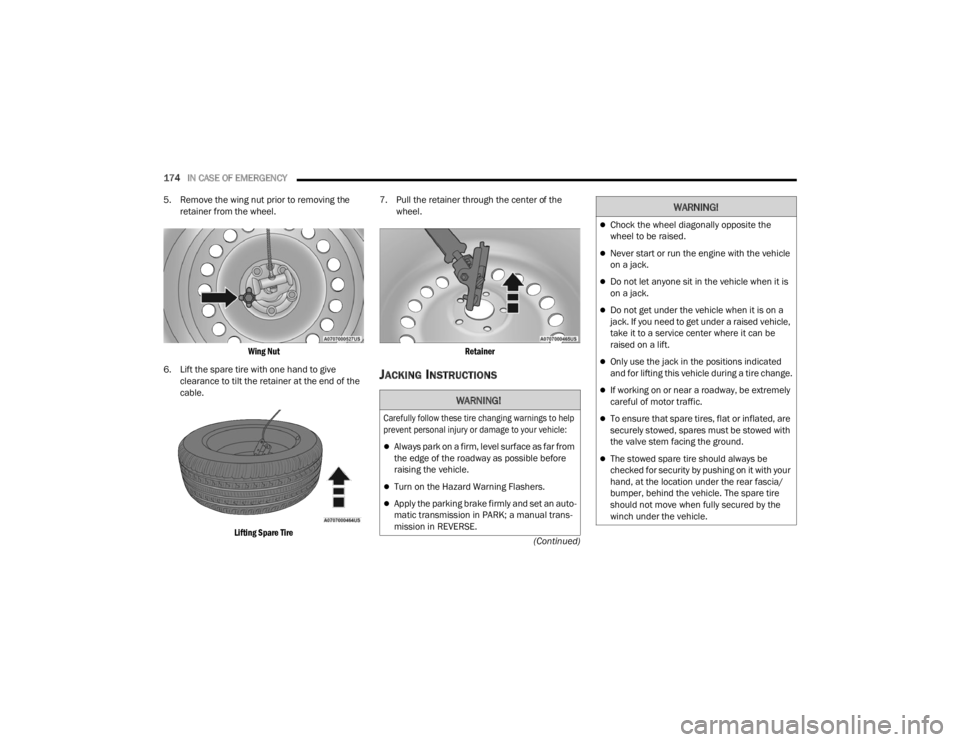
5. Remove the wing nut prior to removing the
retainer from the wheel.
Wing Nut
6. Lift the spare tire with one hand to give clearance to tilt the retainer at the end of the
cable.
Lifting Spare Tire
7. Pull the retainer through the center of the
wheel.
Retainer
JACKING INSTRUCTIONS
WARNING!
Carefully follow these tire changing warnings to help
prevent personal injury or damage to your vehicle:
Always park on a firm, level surface as far from
the edge of the roadway as possible before
raising the vehicle.
Turn on the Hazard Warning Flashers.
Apply the parking brake firmly and set an auto -
matic transmission in PARK; a manual trans -
mission in REVERSE.
Chock the wheel diagonally opposite the
wheel to be raised.
Never start or run the engine with the vehicle
on a jack.
Do not let anyone sit in the vehicle when it is
on a jack.
Do not get under the vehicle when it is on a
jack. If you need to get under a raised vehicle,
take it to a service center where it can be
raised on a lift.
Only use the jack in the positions indicated
and for lifting this vehicle during a tire change.
If working on or near a roadway, be extremely
careful of motor traffic.
To ensure that spare tires, flat or inflated, are
securely stowed, spares must be stowed with
the valve stem facing the ground.
The stowed spare tire should always be
checked for security by pushing on it with your
hand, at the location under the rear fascia/
bumper, behind the vehicle. The spare tire
should not move when fully secured by the
winch under the vehicle.
WARNING!
22_VM_OM_EN_USC_t.book Page 174
Page 186 of 260

184IN CASE OF EMERGENCY
IGNITION KEY REMOVAL OVERRIDE
This vehicle is equipped with a Key Ignition Park
Interlock which requires the transmission to be in
PARK (P) before the ignition switch can be turned
to the STOP (key removal) position.
To remove the key manually, proceed as follows:
1. Firmly apply the parking brake.
2. Remove the Allen Key located in the rear cargo
area, in the tool bag (if equipped) or on the left
side in the cargo box.
3. Unlock the steering column, pull the tilt/ telescoping control handle down.
4. Pull the steering wheel outward until it is in the end of the travel position, then lock the
steering column in position, push the control
handle up until fully engaged.
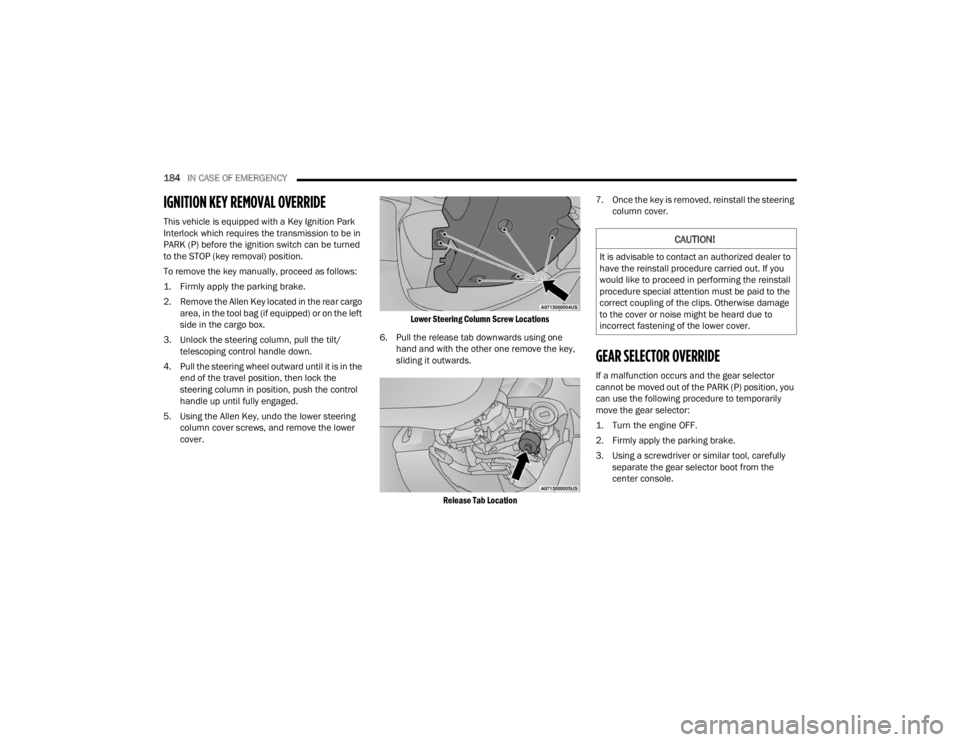
5. Using the Allen Key, undo the lower steering column cover screws, and remove the lower
cover.
Lower Steering Column Screw Locations
6. Pull the release tab downwards using one hand and with the other one remove the key,
sliding it outwards.
Release Tab Location
7. Once the key is removed, reinstall the steering
column cover.
GEAR SELECTOR OVERRIDE
If a malfunction occurs and the gear selector
cannot be moved out of the PARK (P) position, you
can use the following procedure to temporarily
move the gear selector:
1. Turn the engine OFF.
2. Firmly apply the parking brake.
3. Using a screwdriver or similar tool, carefully separate the gear selector boot from the
center console.
CAUTION!
It is advisable to contact an authorized dealer to
have the reinstall procedure carried out. If you
would like to proceed in performing the reinstall
procedure special attention must be paid to the
correct coupling of the clips. Otherwise damage
to the cover or noise might be heard due to
incorrect fastening of the lower cover.
22_VM_OM_EN_USC_t.book Page 184
Page 253 of 260

251
Power Steering Fluid
...................................... 241Pregnant Women And Seat Belts...................142Preparation For Jacking................................. 171Pretensioners Seat Belts.................................................. 142
R
Radial Ply Tires.............................................. 226Radiator Cap (Coolant Pressure Cap)............ 201Radio Operation............................................ 130Rear Camera................................................... 65Rear ParkSense System.................................. 62Recreational Towing........................................ 75Reformulated Gasoline.................................. 238Refrigerant.................................................... 197Release, Hood................................................. 36Reminder, Seat Belt...................................... 138Remote Keyless EntryProgramming Additional Key Fobs.............. 11Remote Sound System (Radio) Controls........ 128Replacement Bulbs....................................... 213Replacement Keys........................................... 11Replacement Tires......................................... 228Reporting Safety Defects............................... 244Restraints, Child............................................ 152Restraints, Head.............................................. 19Rotation, Tires............................................... 232
S
Safety Checks Inside Vehicle........................ 168Safety Checks Outside Vehicle..................... 169Safety Defects, Reporting............................. 244Safety Information, Tire................................ 217Safety Tips.................................................... 168Safety, Exhaust Gas...................................... 170Satellite Radio................................................. 92Schedule, Maintenance................................ 189Seat Belts............................................ 138, 168Adjustable Shoulder Belt.......................... 141Adjustable Upper Shoulder Anchorage..... 141
Adjustable Upper Shoulder Belt Anchorage.. 141
Child Restraints........................................ 152Energy Management Feature................... 142Front Seat............................... 138, 139, 140Inspection................................................. 168Lap/Shoulder Belt Operation.................... 140Lap/Shoulder Belt Untwisting................... 141Lap/Shoulder Belts.................................. 139Operating Instructions.............................. 140Pregnant Women...................................... 142Pretensioners........................................... 142Rear Seat................................................. 139Reminder............................................46, 138Seat Belt Pretensioner............................. 142Untwisting Procedure............................... 141
Seats................................................................16Adjustment..................................................16Heated.........................................................18Rear Folding................................................16Tilting...........................................................16Selection Of Coolant (Antifreeze).................. 240Sentry Key (Immobilizer)..................................12Service Assistance........................................ 242Service Contract............................................ 243Service Manuals........................................... 245Settings, Audio.................................................96Shift Lever Override...................................... 184ShiftingAutomatic Transmission..............................56Shoulder Belts.............................................. 139Signals, Turn.......................................... 49, 170Sirius Satellite Radio........................................92Favorites......................................................95Replay..........................................................93SiriusXM Satellite RadioBrowse in SXM.............................................95Favorites......................................................95Replay..........................................................93Snow Chains (Tire Chains)............................ 232Snow Tires.................................................... 229Spare Tires........................................... 229, 230SpecificationsFuel (Gasoline).......................................... 240Oil............................................................. 240
11
22_VM_OM_EN_USC_t.book Page 251