2022 RAM CHASSIS CAB light
[x] Cancel search: lightPage 197 of 428

MULTIMEDIA195
Display
When the Display button is pressed on the touchscreen, the system will display the options related to the theme (if equipped), brightness, and color of the
touchscreen. The available settings are:
NOTE:Depending on the vehicle’s options, feature settings may vary.
Setting Name Description
Language This setting will change the language of the Uconnect system and Instrument
Cluster Display. The available languages are English, Français, and Español.
Display Mode This setting will allow you to set the brightness manually or have the system
set it automatically. The “Auto” setting has the system automatically adjust
the display brightness. The “Manual” setting will allow the user to adjust the
brightness of the display.
Display Brightness With Headlights ON/Brightness This setting will allow you to set the brightness when the headlights are on. To
access this setting, Display Mode must be set to Manual. The “+” setting will
increase the brightness; the “-” will decrease the brightness.
Display Brightness With Headlights OFF/Brightness This setting will allow you to set the brightness when the headlights are off. To
access this setting, Display Mode must be set to Manual. The “+” setting will
increase the brightness; the “-” will decrease the brightness.
Set Theme This setting will allow you to change the display theme.
Units The available settings are “Speed” (MPH or km/h), “Distance” (mi or km),
“Fuel Consumption” (MPG [US], MPG [UK], L/100 km, or km/L), “Pressure”
(psi, kPa, or bar), “Temperature” (°C or °F), Power” (HP [US], Gal HP [UK], or
kW), and “Torque” (lb-ft or Nm) units of measurement independently.
Keyboard This setting will change the keyboard type on the display. The selectable
keyboards are “ABCDEF Keyboard”, “QWERTY Keyboard”, and “AZERTY
Keyboard”.
5
22_DPF_OM_EN_USC_t.book Page 195
Page 199 of 428

MULTIMEDIA197
Forward Collision Warning This setting will turn the Forward Collision Warning system on or off. The “Off”
setting will deactivate the FCW system. The “Warning Only” setting will provide
only an audible chime when a collision is detected. The “Warning + Active
Braking” setting will provide an audible chime and apply some brake pressure
when a collision is detected.
Pedestrian Emergency Braking This setting will turn the Pedestrian Emergency Braking system on or off.
LaneSense Warning This setting will change the distance at which the steering wheel will provide
lane departure feedback. The available settings are “Early”, “Medium”, and
“Late”.
LaneSense Strength This setting will change the strength of the steering wheel feedback during a
lane departure. The available settings are “Low”, “Medium”, and “High”.
ParkSense This setting will change the type of ParkSense alert when a close object is
detected and provide both an audible chime and a visual display.
Front ParkSense Volume This setting adjusts the volume of the Front ParkSense system. The available
settings are “Low”, “Medium”, and “High”.
Rear ParkSense Volume This setting adjusts the volume of the Rear ParkSense system. The available
settings are “Low”, “Medium”, and “High”.
Rear ParkSense Braking Assist This setting will turn the Rear ParkSense Braking Assist on or off.
Blind Spot Alert This setting will change the type of alert provided when an object is detected
in a vehicle’s blind spot. The “Off” setting will turn off Blind Spot Alert. The
“Lights” setting will activate the Blind Spot Alert lights on the outside mirrors.
The “Lights & Chime” setting will activate both the lights on the outside
mirrors and an audible chime.
Trailer Length For Blind Spot Alert This setting will auto detect the length of an attached trailer. The “Auto”
setting will have the system automatically set the trailer length. The “Max”
setting will always set the length to the maximum 39.5 ft (12 m).
Setting Name
Description
5
22_DPF_OM_EN_USC_t.book Page 197
Page 203 of 428
MULTIMEDIA201
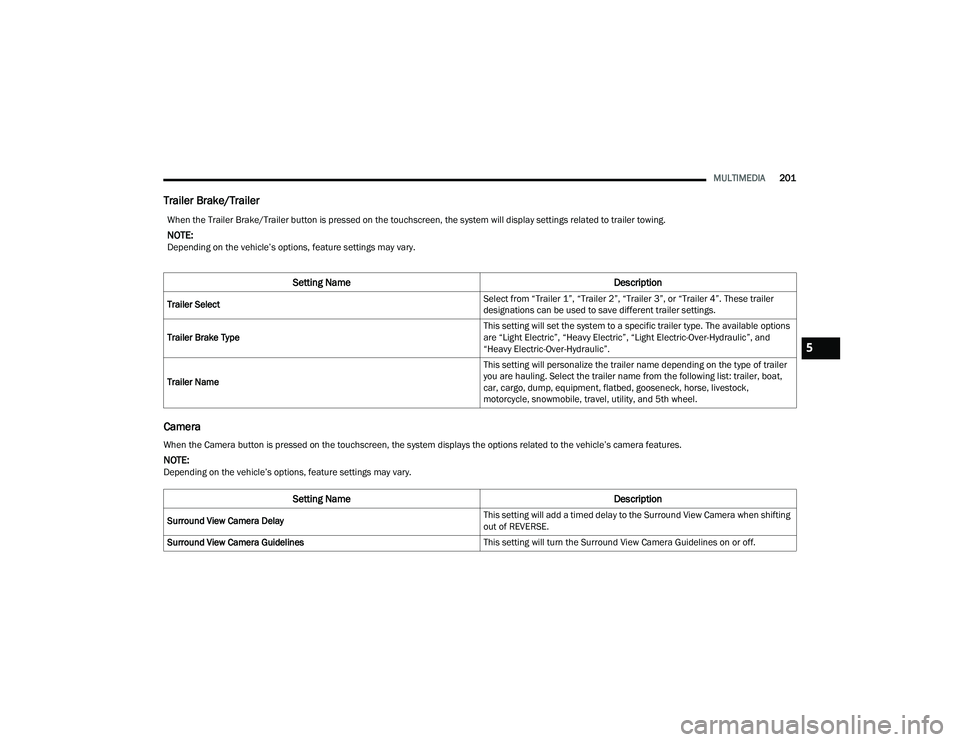
Trailer Brake/Trailer
Camera
When the Trailer Brake/Trailer button is pressed on the touchscreen, the system will display settings related to trailer towing.
NOTE:Depending on the vehicle’s options, feature settings may vary.
Setting Name Description
Trailer Select Select from “Trailer 1”, “Trailer 2”, “Trailer 3”, or “Trailer 4”. These trailer
designations can be used to save different trailer settings.
Trailer Brake Type This setting will set the system to a specific trailer type. The available options
are “Light Electric”, “Heavy Electric”, “Light Electric-Over-Hydraulic”, and
“Heavy Electric-Over-Hydraulic”.
Trailer Name This setting will personalize the trailer name depending on the type of trailer
you are hauling. Select the trailer name from the following list: trailer, boat,
car, cargo, dump, equipment, flatbed, gooseneck, horse, livestock,
motorcycle, snowmobile, travel, utility, and 5th wheel.
When the Camera button is pressed on the touchscreen, the system displays the options related to the vehicle’s camera features.
NOTE:Depending on the vehicle’s options, feature settings may vary.
Setting Name
Description
Surround View Camera Delay This setting will add a timed delay to the Surround View Camera when shifting
out of REVERSE.
Surround View Camera Guidelines This setting will turn the Surround View Camera Guidelines on or off.
5
22_DPF_OM_EN_USC_t.book Page 201
Page 204 of 428
202MULTIMEDIA
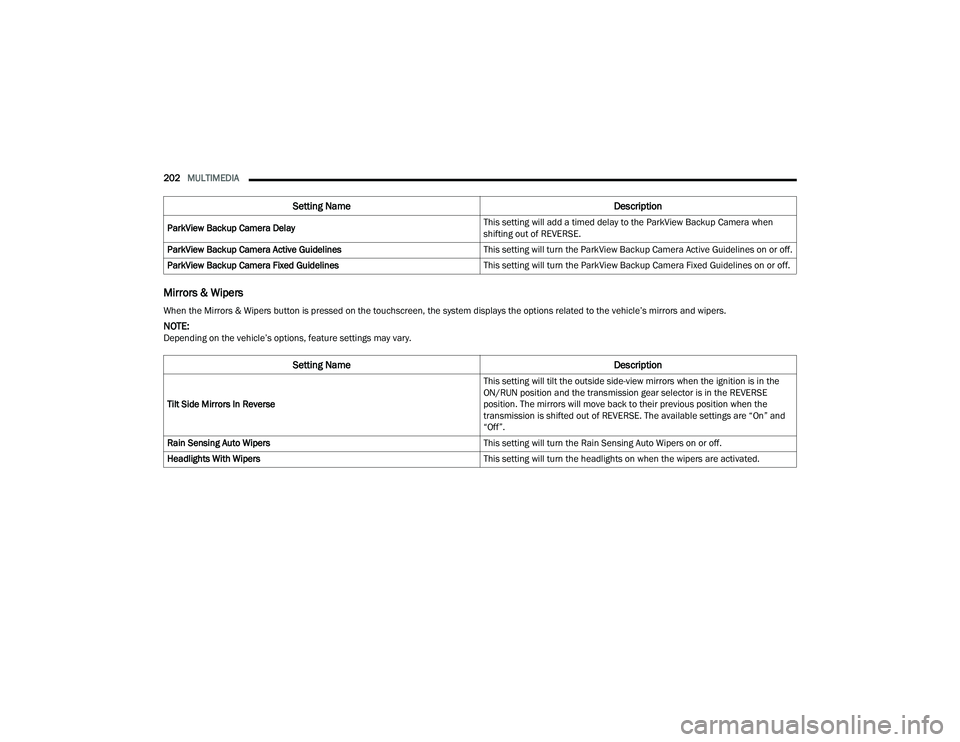
Mirrors & Wipers
ParkView Backup Camera Delay This setting will add a timed delay to the ParkView Backup Camera when
shifting out of REVERSE.
ParkView Backup Camera Active Guidelines This setting will turn the ParkView Backup Camera Active Guidelines on or off.
ParkView Backup Camera Fixed Guidelines This setting will turn the ParkView Backup Camera Fixed Guidelines on or off.
Setting NameDescription
When the Mirrors & Wipers button is pressed on the touchscreen, the system displays the options related to the vehicle’s mirrors and wipers.
NOTE:Depending on the vehicle’s options, feature settings may vary.
Setting NameDescription
Tilt Side Mirrors In Reverse This setting will tilt the outside side-view mirrors when the ignition is in the
ON/RUN position and the transmission gear selector is in the REVERSE
position. The mirrors will move back to their previous position when the
transmission is shifted out of REVERSE. The available settings are “On” and
“Off”.
Rain Sensing Auto Wipers This setting will turn the Rain Sensing Auto Wipers on or off.
Headlights With Wipers This setting will turn the headlights on when the wipers are activated.
22_DPF_OM_EN_USC_t.book Page 202
Page 205 of 428
MULTIMEDIA203
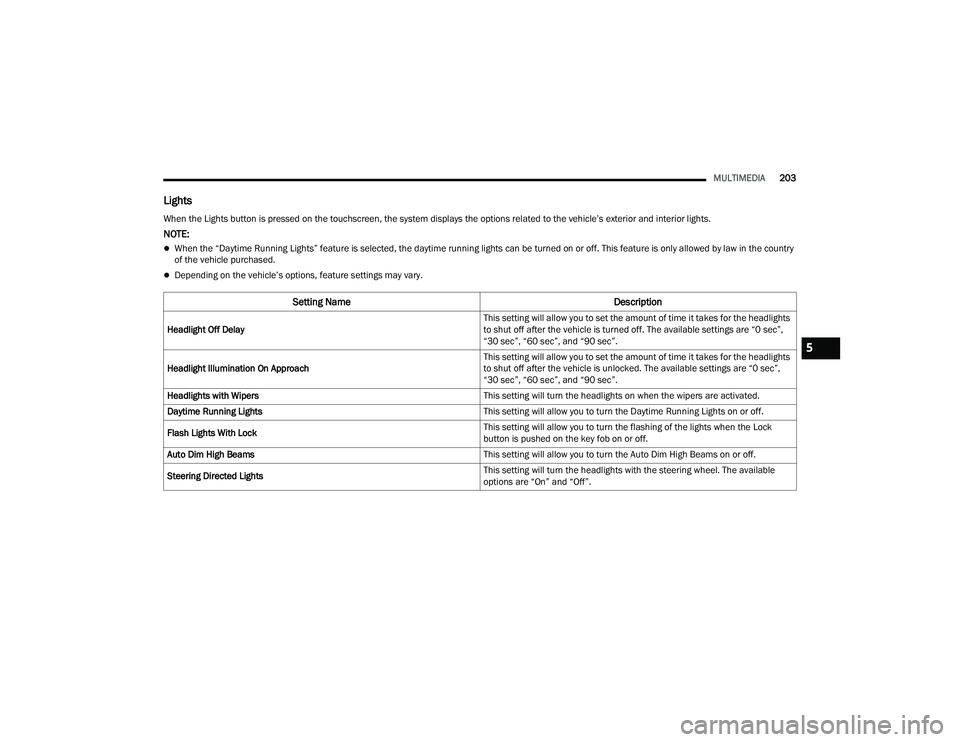
Lights
When the Lights button is pressed on the touchscreen, the system displays the options related to the vehicle’s exterior and interior lights.
NOTE:
When the “Daytime Running Lights” feature is selected, the daytime running lights can be turned on or off. This feature is only allowed by law in the country
of the vehicle purchased.
Depending on the vehicle’s options, feature settings may vary.
Setting Name Description
Headlight Off Delay This setting will allow you to set the amount of time it takes for the headlights
to shut off after the vehicle is turned off. The available settings are “0 sec”,
“30 sec”, “60 sec”, and “90 sec”.
Headlight Illumination On Approach This setting will allow you to set the amount of time it takes for the headlights
to shut off after the vehicle is unlocked. The available settings are “0 sec”,
“30 sec”, “60 sec”, and “90 sec”.
Headlights with Wipers This setting will turn the headlights on when the wipers are activated.
Daytime Running Lights This setting will allow you to turn the Daytime Running Lights on or off.
Flash Lights With Lock This setting will allow you to turn the flashing of the lights when the Lock
button is pushed on the key fob on or off.
Auto Dim High Beams This setting will allow you to turn the Auto Dim High Beams on or off.
Steering Directed Lights This setting will turn the headlights with the steering wheel. The available
options are “On” and “Off”.
5
22_DPF_OM_EN_USC_t.book Page 203
Page 206 of 428
204MULTIMEDIA
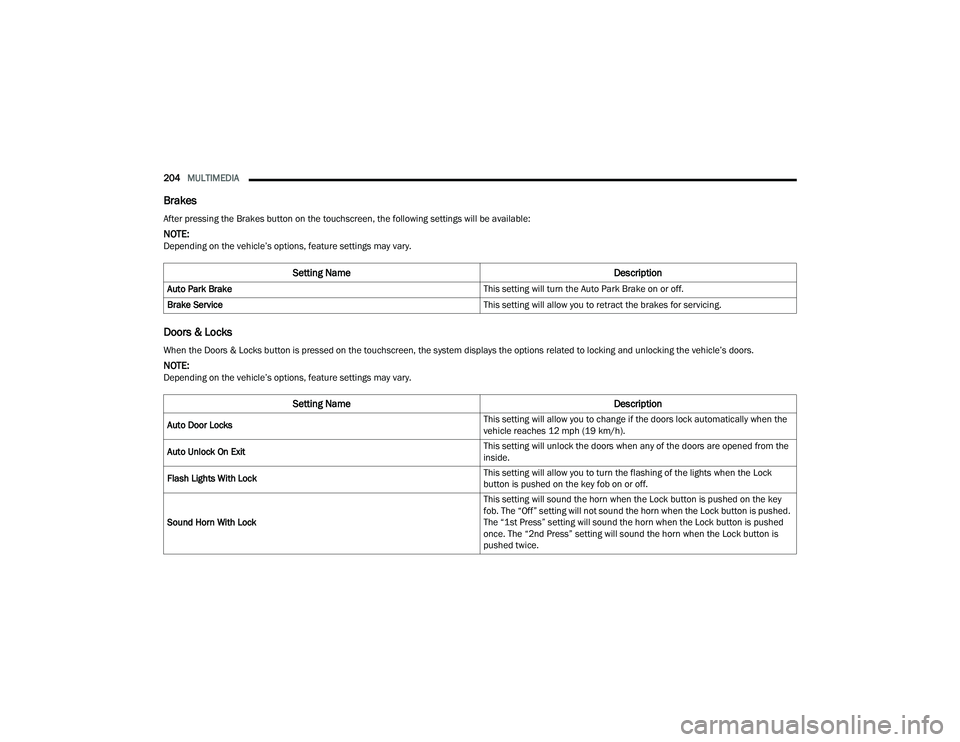
Brakes
Doors & Locks
After pressing the Brakes button on the touchscreen, the following settings will be available:
NOTE:Depending on the vehicle’s options, feature settings may vary.
Setting Name Description
Auto Park Brake This setting will turn the Auto Park Brake on or off.
Brake Service This setting will allow you to retract the brakes for servicing.
When the Doors & Locks button is pressed on the touchscreen, the system displays the options related to locking and unlocking the vehicle’s doors.
NOTE:Depending on the vehicle’s options, feature settings may vary.
Setting NameDescription
Auto Door Locks This setting will allow you to change if the doors lock automatically when the
vehicle reaches 12 mph (19 km/h).
Auto Unlock On Exit This setting will unlock the doors when any of the doors are opened from the
inside.
Flash Lights With Lock This setting will allow you to turn the flashing of the lights when the Lock
button is pushed on the key fob on or off.
Sound Horn With Lock This setting will sound the horn when the Lock button is pushed on the key
fob. The “Off” setting will not sound the horn when the Lock button is pushed.
The “1st Press” setting will sound the horn when the Lock button is pushed
once. The “2nd Press” setting will sound the horn when the Lock button is
pushed twice.
22_DPF_OM_EN_USC_t.book Page 204
Page 208 of 428
206MULTIMEDIA
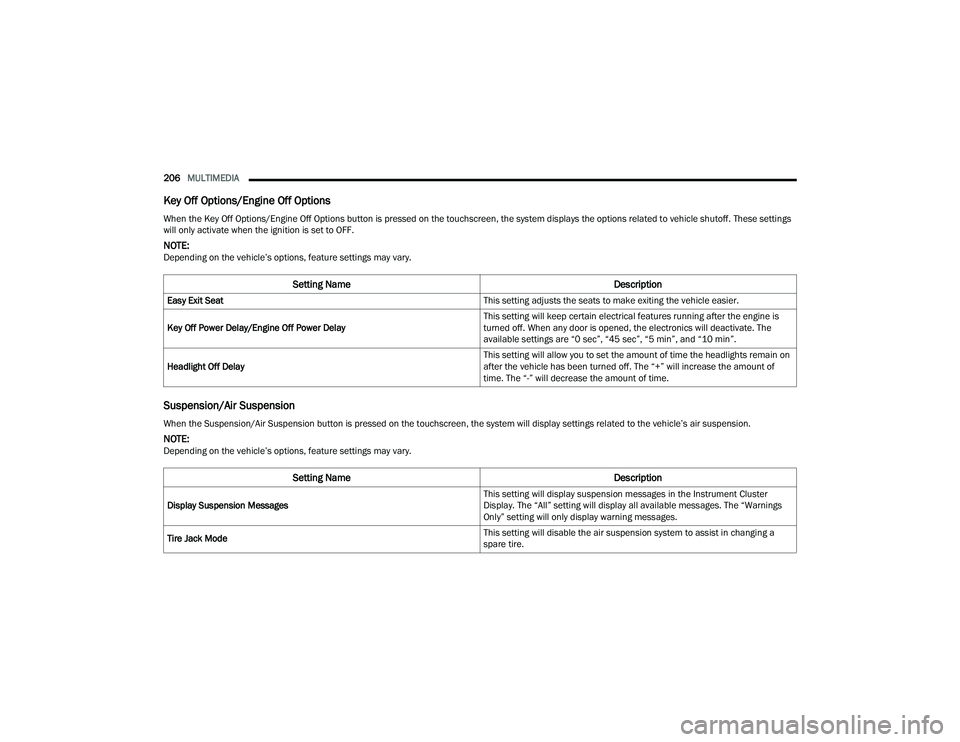
Key Off Options/Engine Off Options
Suspension/Air Suspension
When the Key Off Options/Engine Off Options button is pressed on the touchscreen, the system displays the options related to vehicle shutoff. These settings
will only activate when the ignition is set to OFF.
NOTE:Depending on the vehicle’s options, feature settings may vary.
Setting Name Description
Easy Exit Seat This setting adjusts the seats to make exiting the vehicle easier.
Key Off Power Delay/Engine Off Power Delay This setting will keep certain electrical features running after the engine is
turned off. When any door is opened, the electronics will deactivate. The
available settings are “0 sec”, “45 sec”, “5 min”, and “10 min”.
Headlight Off Delay This setting will allow you to set the amount of time the headlights remain on
after the vehicle has been turned off. The “+” will increase the amount of
time. The “-” will decrease the amount of time.
When the Suspension/Air Suspension button is pressed on the touchscreen, the system will display settings related to the vehicle’s air suspension.
NOTE:Depending on the vehicle’s options, feature settings may vary.
Setting Name
Description
Display Suspension Messages This setting will display suspension messages in the Instrument Cluster
Display. The “All” setting will display all available messages. The “Warnings
Only” setting will only display warning messages.
Tire Jack Mode This setting will disable the air suspension system to assist in changing a
spare tire.
22_DPF_OM_EN_USC_t.book Page 206
Page 214 of 428
212MULTIMEDIA
NOTE:Uconnect screen images are for illustration purposes only and may not reflect exact software for your vehicle.
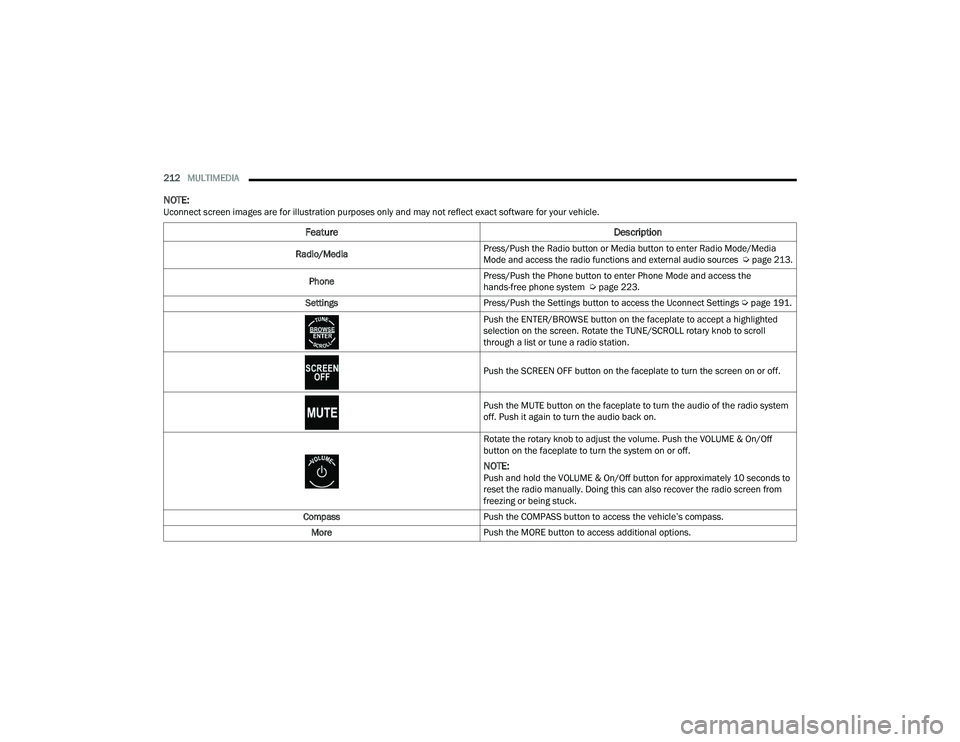
Feature Description
Radio/Media
Press/Push the Radio button or Media button to enter Radio Mode/Media
Mode and access the radio functions and external audio sources
Ú
page 213.
Phone Press/Push the Phone button to enter Phone Mode and access the
hands-free phone system Ú
page 223.
Settings Press/Push the Settings button to access the Uconnect Settings Ú page 191.
Push the ENTER/BROWSE button on the faceplate to accept a highlighted
selection on the screen. Rotate the TUNE/SCROLL rotary knob to scroll
through a list or tune a radio station.
Push the SCREEN OFF button on the faceplate to turn the screen on or off.
Push the MUTE button on the faceplate to turn the audio of the radio system
off. Push it again to turn the audio back on.
Rotate the rotary knob to adjust the volume. Push the VOLUME & On/Off
button on the faceplate to turn the system on or off.
NOTE:Push and hold the VOLUME & On/Off button for approximately 10 seconds to
reset the radio manually. Doing this can also recover the radio screen from
freezing or being stuck.
Compass Push the COMPASS button to access the vehicle’s compass.
More Push the MORE button to access additional options.
22_DPF_OM_EN_USC_t.book Page 212