2022 PEUGEOT PARTNER open bonnet
[x] Cancel search: open bonnetPage 202 of 324

200
In the event of a breakdown
Running out of fuel
(Diesel)
With Diesel engines, the fuel system must be
primed if you run out of fuel.
Before starting to prime the system, it is
essential to put at least 5 litres of Diesel into the
fuel tank.
For more information on Refuelling and
on Misfuel prevention (Diesel), refer to
the corresponding section.
For non-BlueHDi versions, the fuel system
components are located in the engine
compartment; this may be under a removable
cover.
For more information on the Engine
compartment, in particular the location
of these components under the bonnet, refer
to the corresponding section.
With 1.6 BlueHDi (Euro 6.1)
► Switch on the ignition (without starting the
engine).
►
W
ait around 6 seconds and switch off the
ignition.
►
Repeat the operation 10
times.
►
Operate the starter motor to start the engine.
If the engine does not start at the first attempt,
do not keep trying, but restart the procedure.
With 1.5 BlueHDi (Euro 6.2/6.3)
► Switch on the ignition (without starting the
engine).
►
W
ait around 1 minute and switch off the
ignition.
►
Operate the starter motor to start the engine.
If the engine does not start at the first attempt,
do not keep trying, but restart the procedure.
Non-BlueHDi engines
► Open the bonnet and then, if necessary ,
unclip the cover to access the priming pump.
► Operate the priming pump repeatedly
until resistance is felt (resistance may be
felt at the first press).
►
Operate the starter motor to start the engine
(if the engine does not start at the first attempt,
wait around 15 seconds before trying again).
►
If the engine does not start after a few
attempts, operate the priming pump again, then
the starter motor
.
►
Put the cover back in place and clip it in, then
close the bonnet.
Tool kit
► For easier access, move the seat(s) forward.
Accessing the tools
Vehicle with electric motor
With temporary puncture repair kit
The tools are located in the passenger footwell. With spare wheel
The tools are located under the right-hand front
seat.
To access the tools:
–
With non-adjustable front seat, lift the seat
cushion by placing your hand between the
cushion and the backrest.
–
With adjustable front seat, move the seat
forward as far as possible.
The jack is located in the passenger footwell.
Vehicle with Petrol or Diesel engine
With temporary puncture repair kit
The kit is located under the right-hand front seat.
With spare wheel
The jack is located under the right-hand front
seat.
The tools are located under the left-hand front
seat.
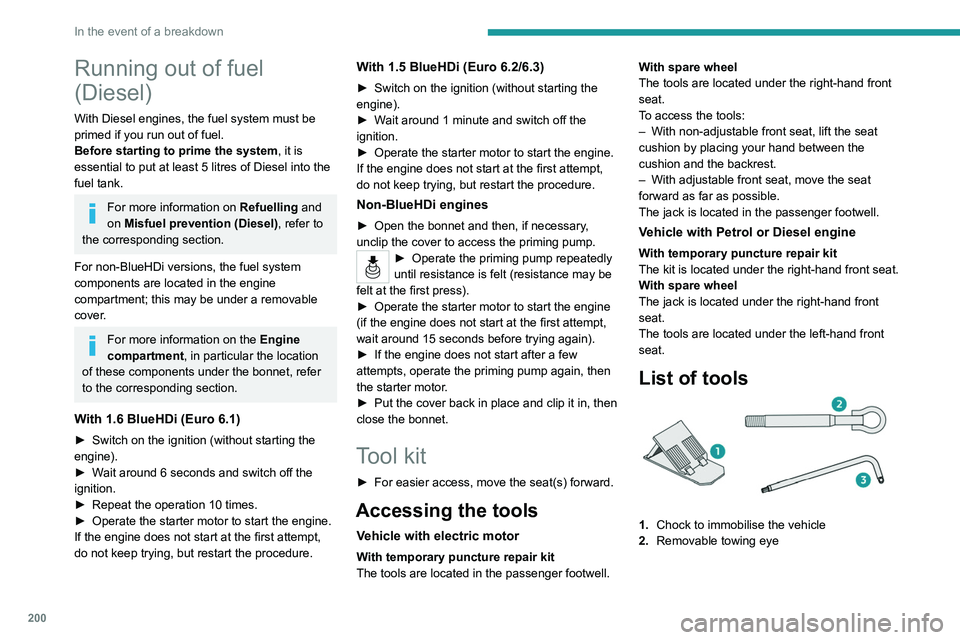
List of tools
1. Chock to immobilise the vehicle
2. Removable towing eye
Page 210 of 324

208
In the event of a breakdown
Always replace a failed bulb with a new bulb
of the same type and specification. To avoid
lighting imbalance, replace the bulbs in pairs.
Opening the bonnet/Accessing the
bulbs
Proceed with caution when the engine is hot -
risk of burns!
Take care with objects or clothing that could
be caught in the blades of the cooling fan -
risk of strangulation!
Halogen bulbs (Hx)
To ensure good quality lighting, check
that the bulb is correctly positioned in its
housing.
After changing a bulb
To refit, carry out the operations in
reverse order to removal.
Close the protective cover very carefully to
guarantee the sealing of the lamps.
Light-emitting diode (LED)
headlamps and lamps
Depending on version, the affected types of
headlamps/lamps are:
–
Daytime running lamps/sidelamps.
If you need to replace this type of bulb,
you must contact a PEUGEOT dealer or
a qualified workshop.
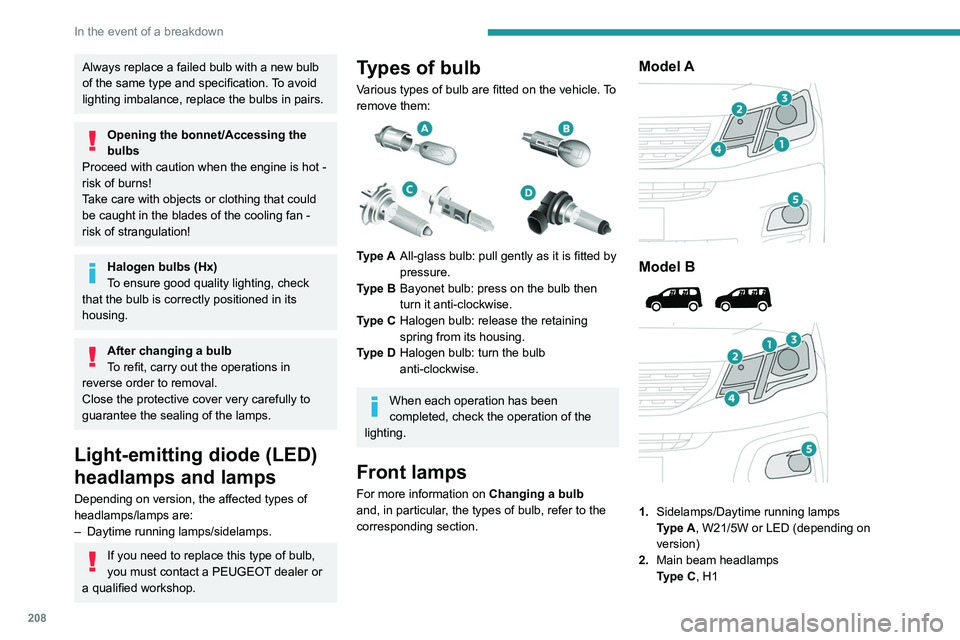
Types of bulb
Various types of bulb are fitted on the vehicle. To
remove them:
Type A All-glass bulb: pull gently as it is fitted by
pressure.
Type B Bayonet bulb: press on the bulb then
turn it anti-clockwise.
Type C Halogen bulb: release the retaining
spring from its housing.
Type D Halogen bulb: turn the bulb
anti-clockwise.
When each operation has been
completed, check the operation of the
lighting.
Front lamps
For more information on Changing a bulb
and, in particular, the types of bulb, refer to the
corresponding section.
Model A
Model B
1. Sidelamps/Daytime running lamps
Type
A, W21/5W or LED (depending on
version)
2. Main beam headlamps
Type
C, H1
Page 215 of 324

213
In the event of a breakdown
8Electric motor
Flat accessory battery
It is no longer possible to start the motor
or recharge the traction battery.
Precautions before working on the
accessory battery
Select mode
P, switch off the ignition, check
that the instrument panel is off and that the
vehicle is not being charged.
Jump-starting another vehicle
Do not use the accessory battery to
jump-start another vehicle or to charge
another vehicle's battery.
Symbols
No sparks or naked flames, no smoking.
Always protect your eyes. Explosive gases can cause blindness and injury.
Keep the vehicle's battery out of the reach
of children.
The vehicle's battery contains sulphuric acid which can make you go blind or
cause severe burns.
For more information, refer to the
handbook.
Explosive gases can be present close to
the battery.
Access to the battery
The battery is located under the bonnet.
► Open the bonnet using the interior release
lever
, then the exterior safety catch.
►
Secure the bonnet stay
.
The battery (-) terminal is not accessible.
There is a remote earth point near the battery.
For more information on the Bonnet and
the Engine , refer to the corresponding
sections.
Starting using another
battery
If the vehicle's battery is flat, the engine can be
started using a backup battery (either external or
from another vehicle) and jump leads or using a
battery booster.
Never start the engine by connecting a
battery charger.
Never use a 24
V or higher battery booster.
Check beforehand that the backup battery
has a nominal voltage of 12
V and a capacity
at least equal to that of the discharged
battery.
The two vehicles must not be in contact with
each other.
Switch off all electricity-consuming equipment
on both vehicles (audio system, wipers,
lighting, etc.).
Make sure that the jump leads are well away
from the engine’s moving parts (fan, belt,
etc.).
Do not disconnect the (+) terminal while the
engine is running.
► Connect the red cable to the (+) terminal of
flat battery A (at the metal elbow), then to the
(+) terminal of the backup battery
B or of the
booster.
Page 292 of 324

290
Alphabetical index
O
Obstacle detection 159
Oil change
192
Oil consumption
192
OIl, engine
192
On-board tools
200–201
Opening the bonnet
190
Opening the boot
32–33
Opening the doors
32–33
Overhead storage
60
P
Pads, brake 195
Paint
199, 234
Paint colour code
234
Park Assist
167
Parking brake
123, 195
Parking brake, electric
123–125, 195
Parking sensors, audible and visual
159
Parking sensors, front
160
Parking sensors, rear
159
Passenger compartment temperature pre-
conditioning (Electric)
81
Passenger's air bag
70
Pedestrian horn (Electric)
95, 118
Personalisation
12–13
Plates, identification
234
Player, Apple®
239, 251, 274
Player, USB
239, 250, 273
Port, USB 62, 239, 250–251, 269, 273
Power indicator (Electric)
9
Pressures, tyres
195, 204, 207, 234
Pre-tensioning seat belts
102
Priming pump
200
Priming the fuel system
200
Profiles
254, 278
Programmable cruise control
145
Protecting children
104, 106–108, 110, 114–116
Public fast charging station
177, 183
Puncture
202, 204
R
Radar (warnings) 138
Radio
237–239, 248–249, 272
Radio, digital (Digital Audio
Broadcasting - DAB)
238, 250, 273
Range, AdBlue®
193
RDS
238, 249, 272
Rear screen, demisting
78
Recharging the battery
214–215
Recharging the traction battery
178
Recharging the traction battery
(Electric)
174, 181, 183, 185
Recirculation, air
75–76
Recovery
216
Recovery of the vehicle
216
Reduction of electrical load
186
Regeneration of the particle filter
194
Regenerative braking (deceleration
by engine braking)
132–133
Reinitialisation of the under-inflation
detection system
137
Reinitialising the remote control
41
Reminder, key in ignition
121
Reminder, lighting on
84
Remote control
32–35, 37–38, 119
Remotely operable functions (Electric)
81, 184
Removing a wheel
205–206
Removing the mat
60
Replacing bulbs
207–208
Replacing fuses
212
Replacing the air filter
194
Replacing the oil filter
194
Replacing the passenger compartment
filter
194
Reservoir, screenwash
193
Rev counter
10, 12
Reversing camera
138, 161, 165–166
Reversing lamps
2 11
Roof
60
Roof bars
189–190
Roof flap
44
Running out of fuel (Diesel)
200
S
Safety, children 104, 106–108, 110, 114–116
Saturation of the particle filter (Diesel)
194
Screen, cold climate
186