2022 PEUGEOT 5008 headlamp
[x] Cancel search: headlampPage 144 of 292
142
Driving
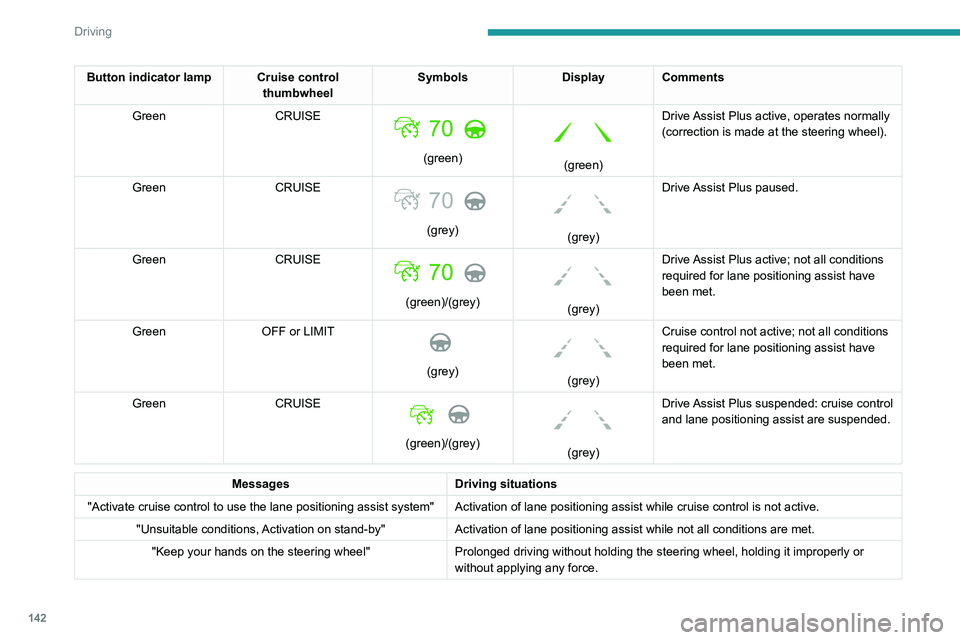
Button indicator lamp Cruise control thumbwheelSymbols
Display Comments
Green CRUISE
(green)
(green)Drive Assist Plus active, operates normally
(correction is made at the steering wheel).
Green CRUISE
70
(grey)
(grey)Drive Assist Plus paused.
Green CRUISE
(green)/(grey)
(grey)Drive Assist Plus active; not all conditions
required for lane positioning
assist have
been met.
Green OFF or LIMIT
(grey)
(grey)Cruise control not active; not all conditions
required for lane positioning
assist have
been met.
Green CRUISE
(green)/(grey)
(grey)Drive Assist Plus suspended: cruise control
and lane positioning
assist are suspended.
Messages
Driving situations
"Activate cruise control to use the lane positioning assist system" Activation of lane positioning assist while cruise control is not active.
"Unsuitable conditions, Activation on stand-by" Activation of lane positioning
assist while not all conditions are met.
"Keep your hands on the steering wheel" Prolonged driving without holding the steering wheel, holding it imprope\
rly or
without applying any force.
Operating limits
The system may issue an alert when the
vehicle is travelling on a long, straight
road with smooth road surface even if the
driver thinks they are holding the steering
wheel correctly.
The system may not operate or may produce
unsuitable corrections to the steering in the
following situations:
– Poor visibility (insufficient road lighting,
snowfall, rain, fog).
– Dazzle (headlamps of an oncoming vehicle,
low sun, reflections on a wet road surface,
leaving a tunnel, alternating light and shade).
– Windscreen area in front of the camera
dirty, misted up, frost-covered, snow-covered,
damaged or covered by a sticker.
– Lane markings eroded, partially hidden (snow,
mud) or multiple (roadworks, surface joints).
– Travelling in a tight bend.
– Winding roads.
– Presence of a tarmac joint on the road.
Page 145 of 292
143
Driving
6MessagesDriving situations
"Hold the steering wheel" Actual or imminent loss of lane positioning
assist.
"Retake control" Simultaneous loss of cruise control and lane positioning
assist.
Operating limits
The system may issue an alert when the vehicle is travelling on a long, straight
road with smooth road surface even if the
driver thinks they are holding the steering
wheel correctly.
The system may not operate or may produce
unsuitable corrections to the steering in the
following situations:
–
Poor visibility (insufficient road lighting,
snowfall, rain, fog).
–
Dazzle (headlamps of an oncoming vehicle,
low sun, reflections on a wet road surface,
leaving a tunnel, alternating light and shade).
–
Windscreen area in front of the camera
dirty
, misted up, frost-covered, snow-covered,
damaged or covered by a sticker.
–
Lane markings eroded, partially hidden (snow
,
mud) or multiple (roadworks, surface joints).
–
T
ravelling in a tight bend.
–
Winding roads.
–
Presence of a tarmac joint on the road.
Risk of undesirable operation
The system should be deactivated in the following situations:
–
Driving with a "space-saver" type spare
wheel.
–
When towing or with a bicycle carrier
attached to a towing device, particularly when
a trailer is not connected or the trailer is not
an approved type.
–
Adverse weather conditions.
–
Driving on slippery road surfaces (risk of
aquaplaning, snow
, ice).
–
In roadworks or toll booth areas.
–
Driving on racing circuits.
–
Driving on a rolling road.
Malfunction
In the event of a malfunction, the
Service warning lamp comes on
and this (orange) symbol appears on the
instrument panel, accompanied by the display of
a message and an audible signal.
Have it checked by a PEUGEOT dealer or a
qualified workshop.
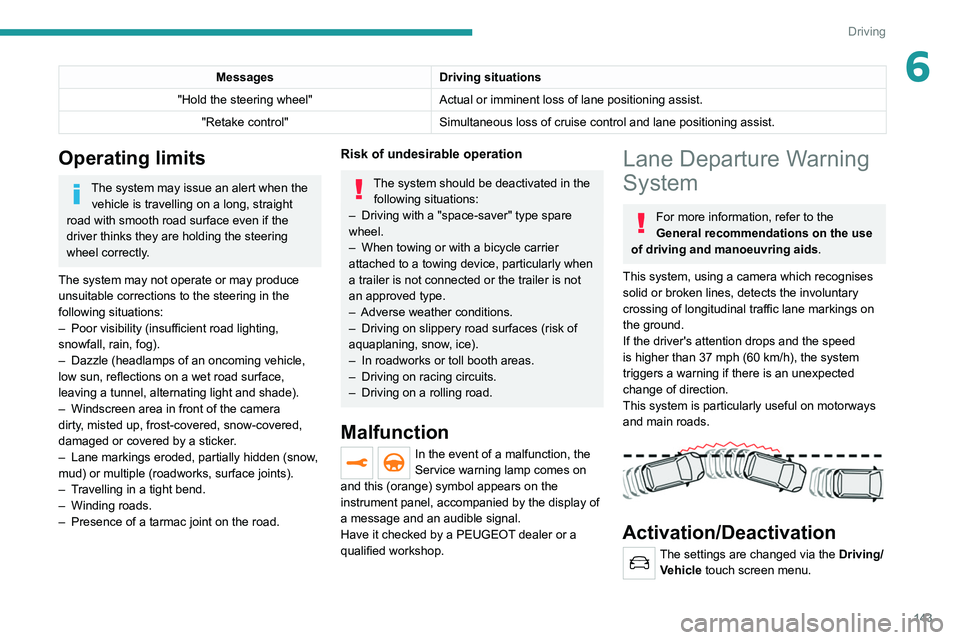
Lane Departure Warning
System
For more information, refer to the
General recommendations on the use
of driving and manoeuvring aids .
This system, using a camera which recognises
solid or broken lines, detects the involuntary
crossing of longitudinal traffic lane markings on
the ground.
If the driver's attention drops and the speed
is higher than 37 mph (60
km/h), the system
triggers a warning if there is an unexpected
change of direction.
This system is particularly useful on motorways
and main roads.
Activation/Deactivation
The settings are changed via the Driving/ Vehicle touch screen menu.
Page 176 of 292

174
Practical information
Observe the legislation in force in the
country where you are driving.
Vehicle equipped with motorised
tailgate with Hands-Free Access
function
To avoid unintentionally opening the tailgate
while operating the towing device:
–
Deactivate this function in advance in your
vehicle's configuration menu.
–
Or remove the electronic key from the
recognition zone, with the tailgate closed.
Towing device with quickly detachable towball
Presentation
No tools are required to install or remove this
genuine towing device.
1. Carrier
2. Protective plug
3. Connection socket
4. Safety eye
5. Detachable towball
6. Locking/unlocking wheel
7. Security key lock
8. Label to note the key references
A. Locked position (the green marks are
opposite each other); the wheel is in contact
with the towball (no gap).
B. Unlocked position (red mark opposite the green mark); the wheel is no longer
in contact with the towball (gap of around
5
mm).
Affix the enclosed label in a clearly visible location, close to the carrier or in the
boot.
Trailers with LED lamps are not compatible with the wiring harness of this
device.
To ensure complete safety while driving with a Towing device , refer to the
corresponding section.
Before each use
Verify that the towball is correctly fitted,
checking the follow points:
–
The green mark on the wheel is in line with
the green mark on the towball.
–
The wheel is in contact with the towball
(position A
).
–
The security key lock is closed and the
key removed; the wheel can no longer be
operated.
–
The towball must not be able to move in
its carrier; test by attempting to shake it with
your hand.
If the towball is not locked, the trailer can
become detached - risk of an accident!
During use
Never release the locking system with a
trailer or load carrier on the towball.
Never exceed the maximum authorised
weight for the vehicle - the Gross Train
Weight or GTW.
Always comply with the maximum authorised
load on the towing device: if it is exceeded,
this device may become detached from the
vehicle - risk of an accident!
Before driving, check the headlamp height
adjustment and check that the lamps on the
trailer operate correctly.
For more information on Headlamp height
adjustment, refer to the corresponding
section.
After use
When travelling without a trailer or
load carrier, remove the towball and fit the
protective plug into the carrier, to provide
clear visibility of the number plate and/or its
lighting.
Fitting the towball
► Below the rear bumper, remove the protective
plug 2 from the carrier 1.
Page 177 of 292
175
Practical information
7this device may become detached from the
vehicle - risk of an accident!
Before driving, check the headlamp height
adjustment and check that the lamps on the
trailer operate correctly.
For more information on Headlamp height
adjustment, refer to the corresponding
section.
After use
When travelling without a trailer or
load carrier, remove the towball and fit the
protective plug into the carrier, to provide
clear visibility of the number plate and/or its
lighting.
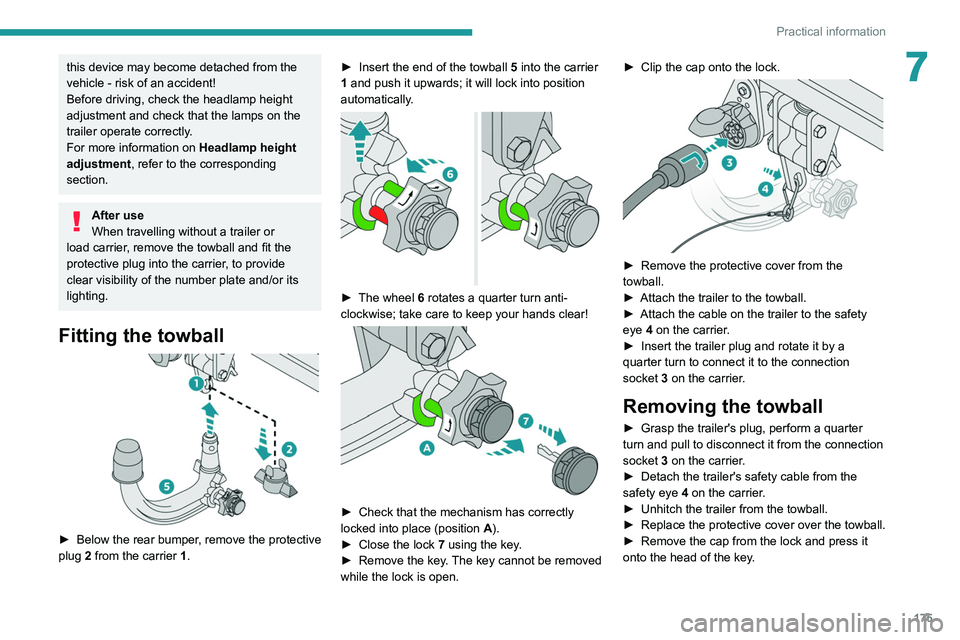
Fitting the towball
► Below the rear bumper , remove the protective
plug 2 from the carrier 1. ►
Insert the end of the towball
5 into the carrier
1 and push it upwards; it will lock into position
automatically.
► The wheel 6 rotates a quarter turn anti-
clockwise; take care to keep your hands clear!
► Check that the mechanism has correctly
locked into place (position A
).
►
Close the lock 7
using the key.
►
Remove the key
. The key cannot be removed
while the lock is open. ►
Clip the cap onto the lock.
► Remove the protective cover from the
towball.
►
Attach the trailer to the towball.
►
Attach the cable on the trailer to the safety
eye
4 on the carrier.
►
Insert the trailer plug and rotate it by a
quarter turn to connect it to the connection
socket
3 on the carrier.
Removing the towball
► Grasp the trailer's plug, perform a quarter
turn and pull to disconnect it from the connection
socket
3 on the carrier.
►
Detach the trailer's safety cable from the
safety eye
4 on the carrier.
►
Unhitch the trailer from the towball.
►
Replace the protective cover over the towball.
►
Remove the cap from the lock and press it
onto the head of the key
.
Page 180 of 292
178
Practical information
Rechargeable hybrid vehicles
The use of snow chains is only
authorised on the front wheels.
The driving mode selector must be on the
4WD position (depending on version).
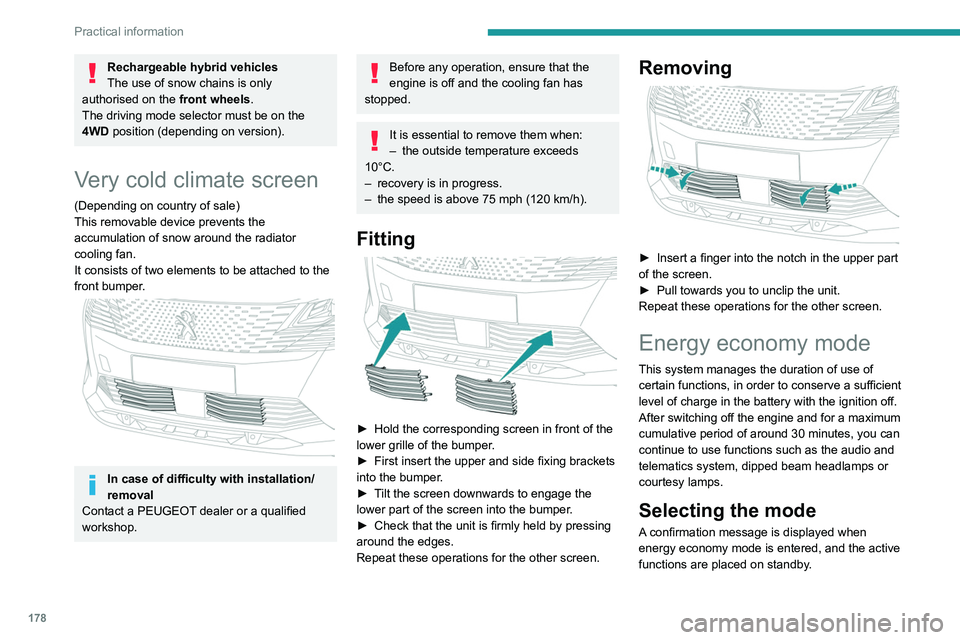
Very cold climate screen
(Depending on country of sale)
This removable device prevents the
accumulation of snow around the radiator
cooling fan.
It consists of two elements to be attached to the
front bumper.
In case of difficulty with installation/
removal
Contact a PEUGEOT dealer or a qualified
workshop.
Before any operation, ensure that the
engine is off and the cooling fan has
stopped.
It is essential to remove them when:
– the outside temperature exceeds
10°C.
–
recovery is in progress.
–
the speed is above 75 mph (120
km/h).
Fitting
► Hold the corresponding screen in front of the
lower grille of the bumper .
►
First insert the upper and side fixing brackets
into the bumper
.
►
T
ilt the screen downwards to engage the
lower part of the screen into the bumper.
►
Check that the unit is firmly held by pressing
around the edges.
Repeat these operations for the other screen.
Removing
► Insert a finger into the notch in the upper part
of the screen.
►
Pull towards you to unclip the unit.
Repeat these operations for the other screen.
Energy economy mode
This system manages the duration of use of
certain functions, in order to conserve a sufficient
level of charge in the battery with the ignition off.
After switching off the engine and for a maximum
cumulative period of around 30 minutes, you can
continue to use functions such as the audio and
telematics system, dipped beam headlamps or
courtesy lamps.
Selecting the mode
A confirmation message is displayed when
energy economy mode is entered, and the active
functions are placed on standby.
If a telephone call is in progress at the
time, it will be maintained for around 10
minutes via the audio system’s hands-free
system.
Exiting the mode
These functions are automatically reactivated the
next time the vehicle is used.
To restore the use of these functions
immediately, start the engine and let it run:
– For less than 10 minutes, to use the
equipment for approximately 5 minutes.
– For more than 10 minutes, to use the
equipment for approximately 30 minutes.
Let the engine run for the specified duration to
ensure that the battery charge is sufficient.
To recharge the battery, avoid repeatedly or
continuously restarting the engine.
A flat battery prevents the engine from starting.
For more information on the 12 V battery,
refer to the corresponding section.
Load reduction mode
This system manages the use of certain
functions according to the level of charge
remaining in the battery.
When the vehicle is being driven, the load
reduction function temporarily deactivates certain
Page 202 of 292
200
In the event of a breakdown
Model with Full
LED technology headlamps
1.Dipped beam headlamps/Main beam
headlamps
2. Static cornering lamps
3. Daytime running lamps/Sidelamps /Direction
indicators
Rear lamps
Do not exceed the maximum authorised
speed of 50 mph (80 km/h) or the maximum
distance of 50 miles (80 km).
Driving with more than one "space-saver"
type spare wheel is prohibited.
Go to a PEUGEOT dealer or a qualified
workshop.
Have the tightening of the spare wheel's bolts
and its tyre pressure checked.
Have the punctured tyre examined. After
inspection, the technician will advise you on
whether the tyre can be repaired or if it must
be replaced.
Changing a bulb
In some weather conditions (e.g. low
temperature or humidity), misting on the
internal surface of the glass of the headlamps
and rear lamps is normal, and will disappear
after the lamps have been on for a few
minutes.
The headlamps have polycarbonate lenses with a protective coating:
–
Do not clean them with a dry or abrasive
cloth, nor with detergent or solvent
products.
–
Use a sponge and soapy water or a pH
neutral product.
– When using a high-pressure washer on
persistent marks, do not keep the lance
directed towards the headlamps, lamps or
their edges for too long, so as not to damage
their protective coating and seals.
Changing a bulb must only be done with
the ignition off and after the headlamp /
lamp has been switched off for several
minutes - risk of serious burns!
Do not touch the bulb directly with your
fingers; use a lint-free cloth.
It is essential only to use anti-ultraviolet
(UV) type bulbs, so as not to damage the
headlamp.
Always replace a failed bulb with a new bulb
of the same type and specification. To avoid
lighting imbalance, replace the bulbs in pairs.
Refitting the lamp units
Perform the operations in the reverse
order to dismantling.
Light-emitting diode (LED)
headlamps and lamps
Depending on version, the affected types of
headlamps/lamps are:
–
"LED" technology headlamps.
–
Full LED technology headlamps.
–
Direction indicator side repeaters.
–
Side spotlamps.
– LED technology rear lamps.
– Third brake lamp.
–
Number plate lamps.
If you need to replace this type of bulb,
you must contact a PEUGEOT dealer or
a qualified workshop.
Do not touch the LED or "Full LED"
technology headlamps - risk of electrocution!
Front lamps
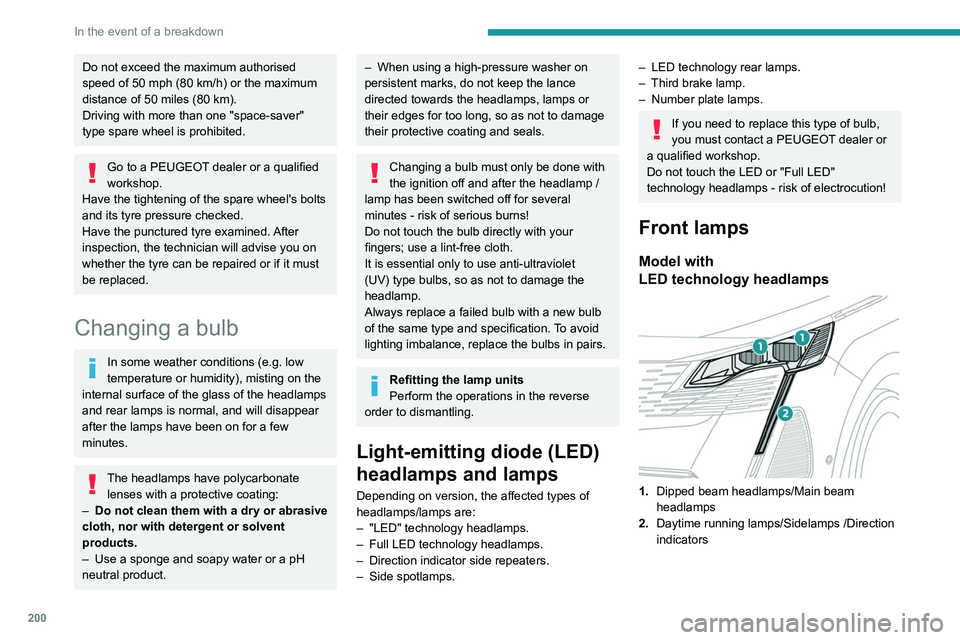
Model with
LED technology headlamps
1.Dipped beam headlamps/Main beam
headlamps
2. Daytime running lamps/Sidelamps /Direction
indicators
Page 203 of 292
201
In the event of a breakdown
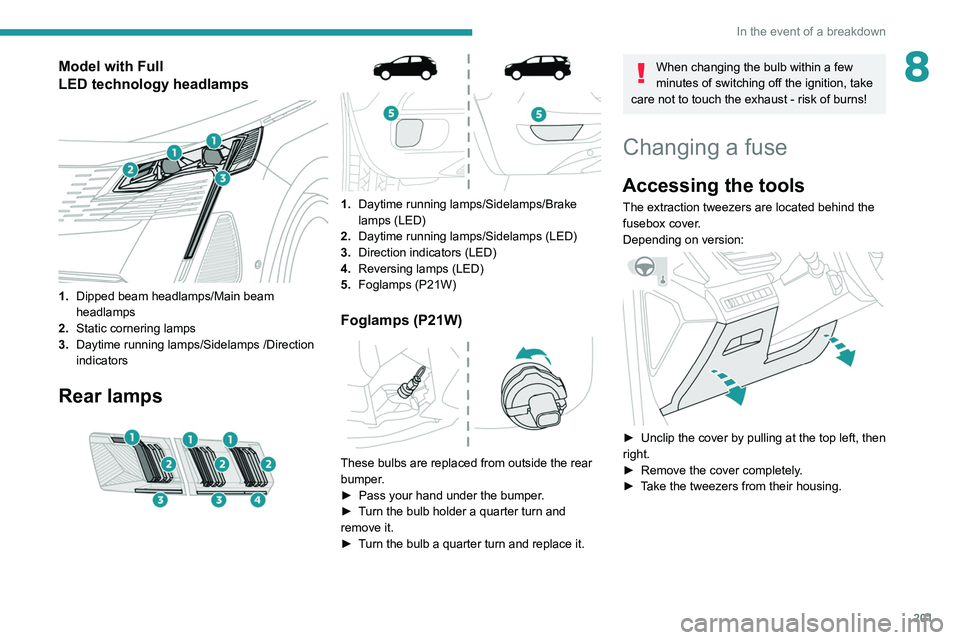
8Model with Full
LED technology headlamps
1.Dipped beam headlamps/Main beam
headlamps
2. Static cornering lamps
3. Daytime running lamps/Sidelamps /Direction
indicators
Rear lamps
1. Daytime running lamps/Sidelamps/Brake
lamps (LED)
2. Daytime running lamps/Sidelamps (LED)
3. Direction indicators (LED)
4. Reversing lamps
(LED)
5. Foglamps (P21W)
Foglamps (P21W)
These bulbs are replaced from outside the rear
bumper.
►
Pass your hand under the bumper
.
►
T
urn the bulb holder a quarter turn and
remove it.
►
T
urn the bulb a quarter turn and replace it.
When changing the bulb within a few
minutes of switching off the ignition, take
care not to touch the exhaust - risk of burns!
Changing a fuse
Accessing the tools
The extraction tweezers are located behind the
fusebox cover.
Depending on version:
► Unclip the cover by pulling at the top left, then
right.
►
Remove the cover completely
.
►
T
ake the tweezers from their housing.
Page 206 of 292

204
In the event of a breakdown
Accessing the fuses
Version 1 (Full)
Box 1Fuse N° Rating (A)Functions
F14 15 AScreenwash pump.
F15 5 APower steering.
F20 25 AScreenwash pump.
F22 15 AHorn.
F23 15 ARight-hand main beam headlamp.
F24 15 ALeft-hand main beam headlamp.
Box 2 Fuse N° Rating (A)Functions
F8 30 ADiesel emissions control system (AdBlue)
F12 15 AAutomatic gearbox.
F14 5 AAutomatic gearbox.
Version 2 (Eco)
Fuse N° Rating (A)Functions
F4 15 AHorn
F5 20 AWindscreen wash pump
F6 20 ARear screenwash pump
F8 20 ARear wiper
F10 30 ALocks
F 11 30 ALocks
F14 5 AAlarm siren
F17 5 AInstrument panel
F22 3 ARain/sunshine sensor
F24 5 AReversing camera - Parking sensors
F25 5 AAirbags
F27 5 AAlarm
F28 5 AEmergency and assistance calls
F29 20 ATouch screen - Audio/navigation system
F32 15 ACigarette lighter
F36 5 AGlove box lighting
Engine compartment fuses
The fusebox is placed in the engine
compartment near the battery.