2022 PEUGEOT 308 height adjustment
[x] Cancel search: height adjustmentPage 4 of 260

2
Contents
■
Overview
■
Eco-driving
1InstrumentsDriver information 10
Matrix instrument panel 10
Digital instrument panels 10
Warning and indicator lamps 12
Indicators 18
Manual test 21
Total distance recorder 22
Trip computer 22
10-inch touch screen 23
i-Toggles 25
Remotely operable additional functions
(Rechargeable hybrid)
25
2AccessRemote control / Key 27
Proximity Keyless Entry and Start 29
Central locking 31
Back-up procedures 32
Doors 34
Boot 34
Motorised tailgate (SW) 35
Alarm 38
Electric windows 40
Sunroof 41
3Ease of use and comfortDriving position 43
Front seats 44
Steering wheel adjustment 48
Heated steering wheel 48
Mirrors 48
Rear bench seat 50
Heating and Ventilation 52
Dual-zone automatic air conditioning 53
Front demisting - defrosting 56
Rear screen demisting/defrosting 56
Heated windscreen 56
Temperature pre-conditioning
(Rechargeable hybrid)
57
Front fittings 58
Courtesy lamps 61
Interior ambient lighting 62
Rear fittings 62
Boot fittings 63
4Lighting and visibilityExterior lighting control stalk 67
Direction indicators 68
Headlamp beam height adjustment 68
Automatic illumination of headlamps 69
Guide-me-home and welcome lighting 69
Automatic lighting systems - General
recommendations
70
Automatic headlamp dipping 70
Peugeot Matrix LED Technology 2.0 71
Wiper control stalk 73
Intermittent wipers 75
Automatic wipers 75
Changing a wiper blade 76
5SafetyGeneral safety recommendations 78
Hazard warning lamps 78
Horn 79
Pedestrian horn (Rechargeable hybrid) 79
Emergency or assistance 79
Electronic stability control (ESC) 81
Seat belts 84
Airbags 86
Child seats 88
Deactivating the front passenger airbag 90
ISOFIX child seats 91
i-Size child seats 93
Installing child seats 93
Child lock 96
6DrivingDriving recommendations 97
Starting / Switching off the engine
with the key
99
Starting/Switching off the engine with
Keyless Entry and Start
100
Starting rechargeable hybrid vehicles 101
Electric parking brake 102
Manual gearbox 104
Automatic gearbox 105
Driving modes 107
Hill start assist 109
Gear shift indicator 11 0
Stop & Start 11 0
Tyre under-inflation detection 111
Driving and manoeuvring aids - General
recommendations
11 3
Steering wheel with hands-on detection 11 4
Shortcuts for driving aids 11 5
Page 7 of 260

5
Overview
1.Exterior lighting controls/Direction indicators/
Instrument panel display page/Service
indicator
2. Wiper controls/Screenwash/Trip computer
3. Automatic gearbox control paddles
4. Speed limiter/Cruise control/Adaptive cruise
control/Drive Assist Plus or Drive Assist 2.0
controls
A. Increase/Decrease the speed setting
Display and adjustment of the distance
setting to the vehicle in front (Adaptive cruise
control)
B. Select/Deselect the Cruise control
Select/Deselect the Adaptive cruise control/
Drive Assist Plus
C. Start/Pause the Speed limiter or Cruise
control with the speed setting saved
Confirmation of vehicle restart after automatic
stop (Adaptive cruise control with Stop&Go
function)
D. Select/Deselect the Speed limiter
E. Activation of the Speed limiter or Cruise
control with the speed setting saved
Use the speed suggested by the Road signs
recognition function
5. Horn/Driver front airbag
6. Audio system setting controls
F. Press: Display favourite radio stations/media
Up/Down: previous/next radio/media/
smartphone selection
Press: validation of a selection
G. Increase/Decrease the volume H.
Pick up/Hang up
Access to the Phone application's call log
I. Short press: system voice commands
Long press: smartphone voice commands
Side control bar
1. LED technology headlamps beam height
adjustment
2. Dynamic stability control/Traction control
3. Motorised tailgate (SW)
4. Heated windscreen
5. Heated steering wheel
6. Opening the fuel filler flap
7. Temperature pre-conditioning operation
indicator lamp
Centre control bars
1. Automatic air conditioning system controls/
HOME button
or
i-Toggles/HOME button
2. Audio system controls
3. Shortcuts for driving aids
4. Access to the Climate application
5. Windscreen and front windows demisting
6. Recirculation of interior air
7. Rear screen de-icing
8. Switching automatic air conditioning off
9. Hazard warning lamps
Page 45 of 260
43
Ease of use and comfort
3Driving position
Correct seating position
Adopting a good driving position contributes to
improving driver comfort and protection.
It also optimises interior and exterior visibility as
well as access to controls.
Certain seat adjustments described in this
section depend on the trim level and the country
in which the vehicle is sold.
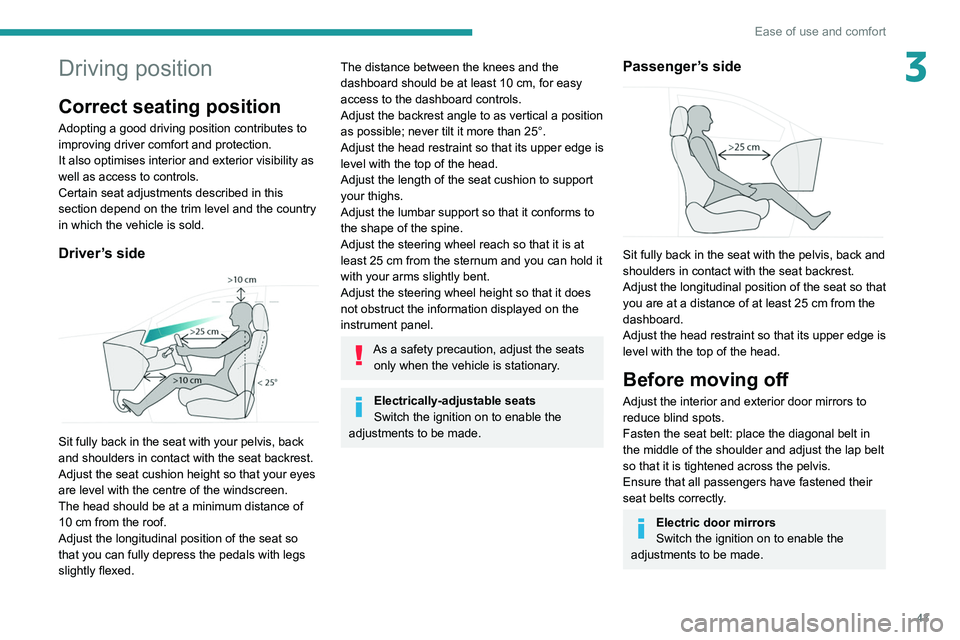
Driver’s side
Sit fully back in the seat with your pelvis, back
and shoulders in contact with the seat backrest.
Adjust the seat cushion height so that your eyes
are level with the centre of the windscreen.
The head should be at a minimum distance of
10 cm from the roof.
Adjust the longitudinal position of the seat so
that you can fully depress the pedals with legs
slightly flexed.
The distance between the knees and the
dashboard should be at least 10 cm, for easy
access to the dashboard controls.
Adjust the backrest angle to as vertical a position
as possible; never tilt it more than 25°.
Adjust the head restraint so that its upper edge is
level with the top of the head.
Adjust the length of the seat cushion to support
your thighs.
Adjust the lumbar support so that it conforms to
the shape of the spine.
Adjust the steering wheel reach so that it is at
least 25
cm from the sternum and you can hold it
with your arms slightly bent.
Adjust the steering wheel height so that it does
not obstruct the information displayed on the
instrument panel.
As a safety precaution, adjust the seats only when the vehicle is stationary.
Electrically-adjustable seats
Switch the ignition on to enable the
adjustments to be made.
Passenger’s side
Sit fully back in the seat with the pelvis, back and
shoulders in contact with the seat backrest.
Adjust the longitudinal position of the seat so that
you are at a distance of at least 25
cm from the
dashboard.
Adjust the head restraint so that its upper edge is
level with the top of the head.
Before moving off
Adjust the interior and exterior door mirrors to
reduce blind spots.
Fasten the seat belt: place the diagonal belt in
the middle of the shoulder and adjust the lap belt
so that it is tightened across the pelvis.
Ensure that all passengers have fastened their
seat belts correctly.
Electric door mirrors
Switch the ignition on to enable the
adjustments to be made.
Page 46 of 260
44
Ease of use and comfort
When driving
Maintain a good driving position and hold the
steering wheel with both hands at the 'quarter to
three' position, so that you can easily and quickly
reach the controls behind and near the steering
wheel.
Never adjust the seats or steering wheel
when driving.
Always keep your feet on the floor.
Front seats
Before moving the seat backwards,
ensure that there is no person or object
that might prevent the full travel of the seat.
There is a risk of trapping or pinching
passengers if present in the rear seats or of
jamming the seat if large objects are placed
on the floor behind the seat.
Front head restraints
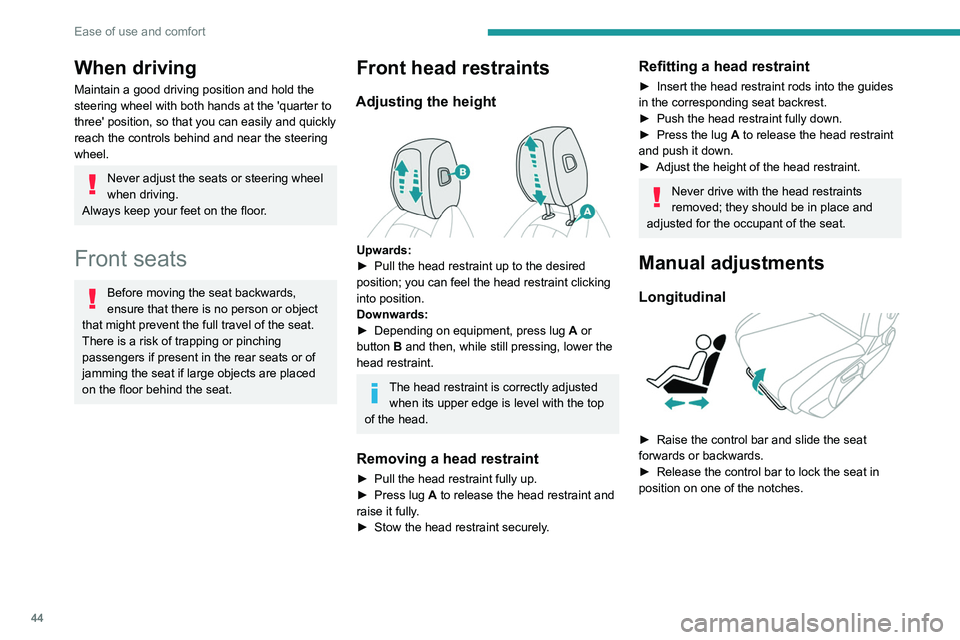
Adjusting the height
Upwards:
► Pull the head restraint up to the desired
position; you can feel the head restraint clicking
into position.
Downwards:
►
Depending on equipment, press lug A
or
button B and then, while still pressing, lower the
head restraint.
The head restraint is correctly adjusted when its upper edge is level with the top
of the head.
Removing a head restraint
► Pull the head restraint fully up.
► Press lug A to release the head restraint and
raise it fully.
►
Stow the head restraint securely
.
Refitting a head restraint
► Insert the head restraint rods into the guides
in the corresponding seat backrest.
►
Push the head restraint fully down.
►
Press the lug
A to release the head restraint
and push it down.
►
Adjust the height of the head restraint.
Never drive with the head restraints
removed; they should be in place and
adjusted for the occupant of the seat.
Manual adjustments
Longitudinal
► Raise the control bar and slide the seat
forwards or backwards.
►
Release the control bar to lock the seat in
position on one of the notches.
Page 47 of 260
45
Ease of use and comfort
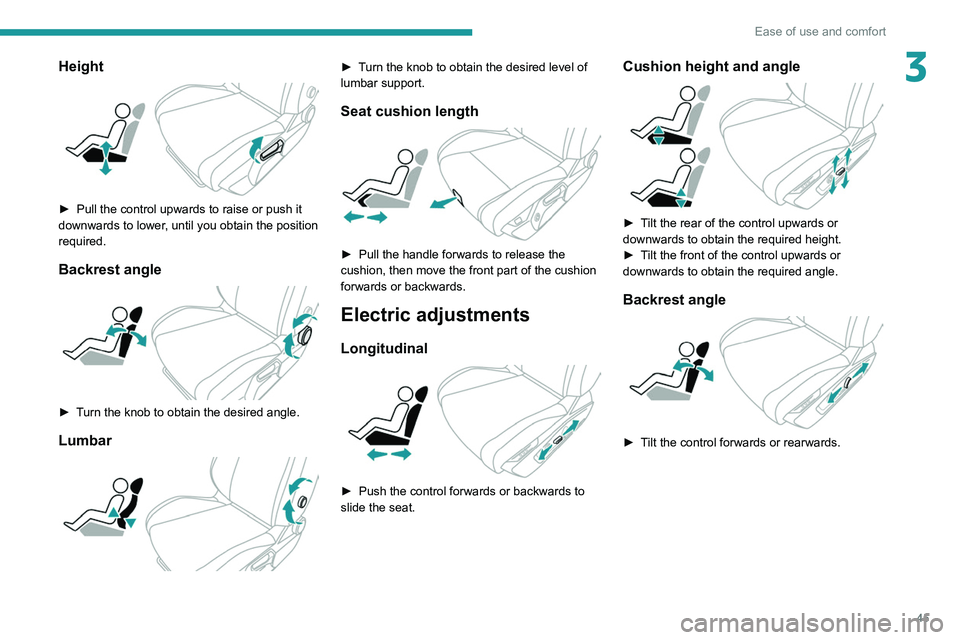
3Height
► Pull the control upwards to raise or push it
downwards to lower , until you obtain the position
required.
Backrest angle
► Turn the knob to obtain the desired angle.
Lumbar
► Turn the knob to obtain the desired level of
lumbar support.
Seat cushion length
► Pull the handle forwards to release the
cushion, then move the front part of the cushion
forwards or backwards.
Electric adjustments
Longitudinal
► Push the control forwards or backwards to
slide the seat.
Cushion height and angle
► Tilt the rear of the control upwards or
downwards to obtain the required height.
►
T
ilt the front of the control upwards or
downwards to obtain the required angle.
Backrest angle
► Tilt the control forwards or rearwards.
Page 50 of 260
48
Ease of use and comfort
Steering wheel
adjustment
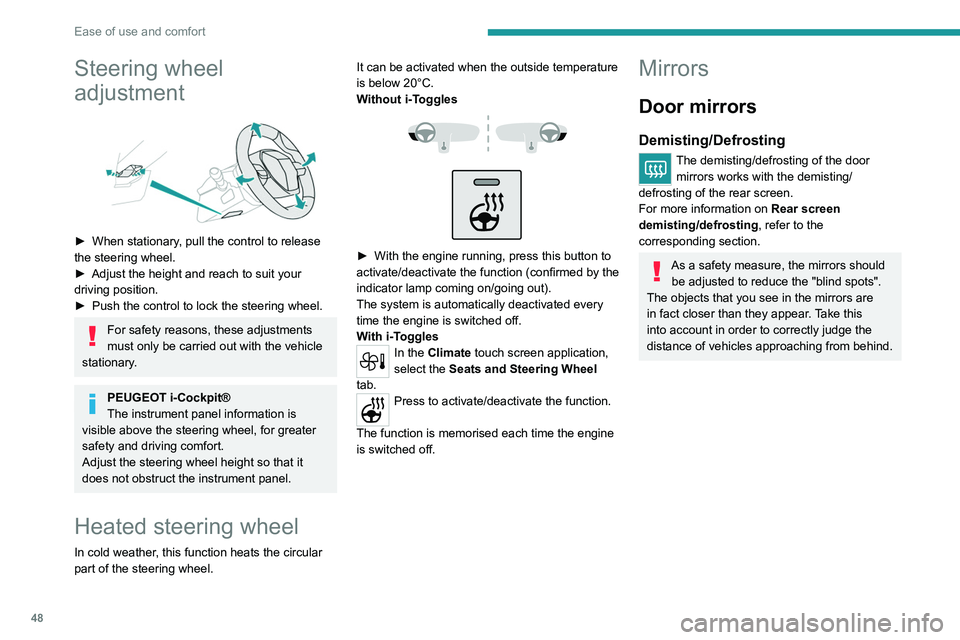
► When stationary, pull the control to release
the steering wheel.
►
Adjust the height and reach to suit your
driving position.
►
Push the control to lock the steering wheel.
For safety reasons, these adjustments
must only be carried out with the vehicle
stationary.
PEUGEOT i-Cockpit®
The instrument panel information is
visible above the steering wheel, for greater
safety and driving comfort.
Adjust the steering wheel height so that it
does not obstruct the instrument panel.
Heated steering wheel
In cold weather, this function heats the circular
part of the steering wheel. It can be activated when the outside temperature
is below 20°C.
Without
i-Toggles
► With the engine running, press this button to
activate/deactivate the function (confirmed by the
indicator lamp coming on/going out).
The system is automatically deactivated every
time the engine is switched off.
W
ith i-Toggles
In the Climate touch screen application,
select the Seats and Steering Wheel
tab.
Press to activate/deactivate the function.
The function is memorised each time the engine
is switched off.
Mirrors
Door mirrors
Demisting/Defrosting
The demisting/defrosting of the door mirrors works with the demisting/
defrosting of the rear screen.
For more information on Rear screen
demisting/defrosting , refer to the
corresponding section.
As a safety measure, the mirrors should be adjusted to reduce the "blind spots".
The objects that you see in the mirrors are
in fact closer than they appear. Take this
into account in order to correctly judge the
distance of vehicles approaching from behind.
Page 70 of 260
68
Lighting and visibility
Never look too closely at the light beam
of LED technology lamps - risk of serious
eye injury!
Travelling abroad
Vehicles equipped with manual
headlamp beam height adjustment:
If planning to use your vehicle in a country
that drives on the other side of the road, the
dipped beam headlamps must be adjusted to
avoid dazzling oncoming drivers. Consult a
PEUGEOT dealer or a qualified workshop.
Daytime running lamps/
Sidelamps
These LED lamps at the front of the vehicle light
up automatically when the engine starts.
They perform the following functions:
–
Daytime running lamps (lighting control stalk
at position
"AUTO" with adequate ambient light).
–
Sidelamps (lighting control stalk at position
"
AUTO" with low ambient light or "Sidelamps
only" or "Dipped/main beam headlamps").
In daytime running lamps mode, the
diodes are brighter.
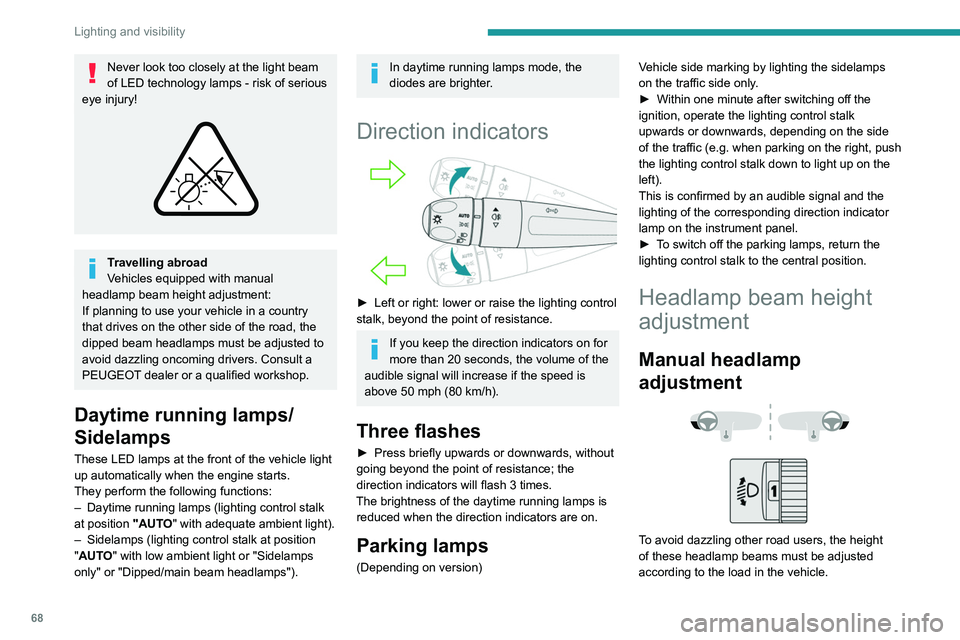
Direction indicators
► Left or right: lower or raise the lighting control
stalk, beyond the point of resistance.
If you keep the direction indicators on for
more than 20 seconds, the volume of the
audible signal will increase if the speed is
above 50 mph (80 km/h).
Three flashes
► Press briefly upwards or downwards, without
going beyond the point of resistance; the
direction indicators will flash 3 times.
The brightness of the daytime running lamps is reduced when the direction indicators are on.
Parking lamps
(Depending on version) Vehicle side marking by lighting the sidelamps
on the traffic side only.
►
Within one minute after switching off the
ignition, operate the lighting control stalk
upwards or downwards, depending on the side
of the traffic (e.g.
when parking on the right, push
the lighting control stalk down to light up on the
left).
This is confirmed by an audible signal and the
lighting of the corresponding direction indicator
lamp on the instrument panel.
►
T
o switch off the parking lamps, return the
lighting control stalk to the central position.
Headlamp beam height
adjustment
Manual headlamp
adjustment
To avoid dazzling other road users, the height
of these headlamp beams must be adjusted
according to the load in the vehicle.
Page 71 of 260

69
Lighting and visibility
40 (Initial setting)Driver only or driver + front passenger
1 5 people
2 5 people + load in the boot
3 Driver only + load in the boot
4 5 6 Not used
Automatic Peugeot Matrix
LED Technology 2.0
headlamp adjustment
This system automatically adjusts the height of
the headlamp beams according to the load in the
vehicle.
In the event of a malfunction, this warning
lamp lights up on the instrument panel,
accompanied by the display of a message and
an audible signal.
The system places the headlamp beams in the
lowest position.
Have it checked by a PEUGEOT dealer or a
qualified workshop.
Do not touch the Peugeot Matrix LED
Technology 2.0 headlamps - risk of
electrocution!
Automatic illumination of lamps
With the lighting control stalk in the “ AUTO”
position and if a low level of exterior brightness
is detected by the rain/sunshine sensor, the
sidelamps and dipped beam headlamps are
switched on automatically, without any action on
the part of the driver. They may also come on if
rain is detected, at the same time as automatic
operation of the windscreen wipers.
As soon as the brightness returns to a sufficient
level or after the windscreen wipers are switched
off, the lamps are switched off automatically.
Malfunction
In the event of a malfunction of the rain/
sunshine sensor, the vehicle’s lamps
come on and this warning lamp is displayed on
the instrument panel, accompanied by an
audible signal and/or the display of a message.
Have it checked by a PEUGEOT dealer or a
qualified workshop.
Do not cover the rain/sunshine sensor
located at the top centre of the
windscreen behind the interior rear view
mirror; the associated functions would no
longer be controlled.
In fog or snow, the rain/sunshine sensor
may detect sufficient light. For this
reason, the lighting will not come on
automatically.
The inner surface of the windscreen may become misted up and affect the proper
operation of the rain/sunshine sensor.
In humid and cold weather, demist the
windscreen regularly.
Guide-me-home and
welcome lighting
Guide-me-home lighting
Automatic
With the ring of the lighting control stalk in the
"AUTO” position and when the light is poor, the
dipped beam headlamps come on automatically
when the ignition is switched off.
You can activate/deactivate and adjust the duration of the guide-me-home
lighting in the Settings
> Vehicle touch screen
application.
Manual