2022 PEUGEOT 308 seats
[x] Cancel search: seatsPage 94 of 260
92
Safety
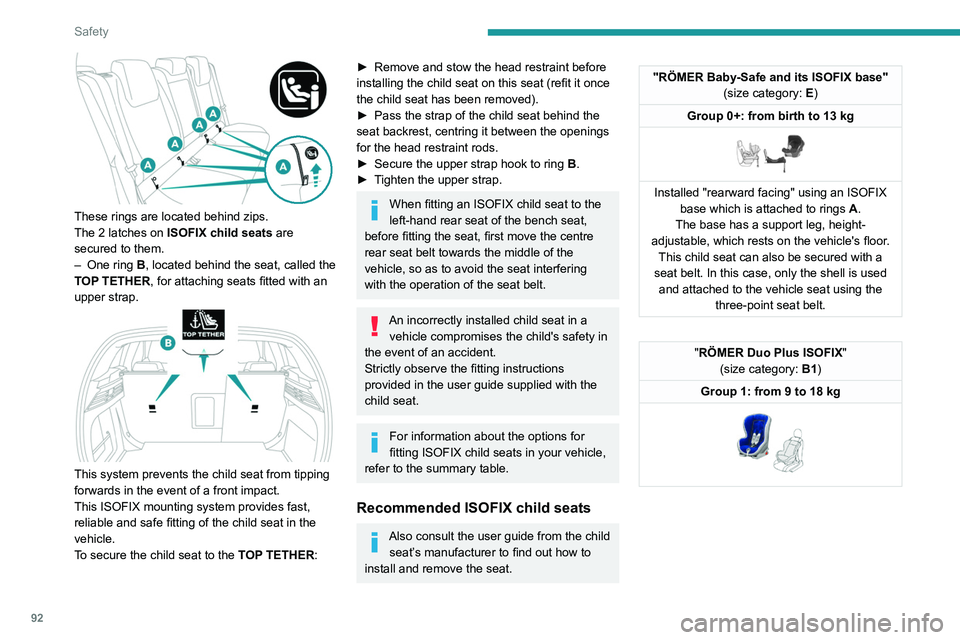
These rings are located behind zips.
The 2 latches on ISOFIX child seats are
secured to them.
–
One ring
B, located behind the seat, called the
TOP TETHER, for attaching seats fitted with an
upper strap.
This system prevents the child seat from tipping
forwards in the event of a front impact.
This ISOFIX mounting system provides fast,
reliable and safe fitting of the child seat in the
vehicle.
To secure the child seat to the TOP TETHER:
► Remove and stow the head restraint before
installing the child seat on this seat (refit it once
the child seat has been removed).
►
Pass the strap of the child seat behind the
seat backrest, centring it between the openings
for the head restraint rods.
►
Secure the upper strap hook to ring
B
.
►
T
ighten the upper strap.
When fitting an ISOFIX child seat to the
left-hand rear seat of the bench seat,
before fitting the seat, first move the centre
rear seat belt towards the middle of the
vehicle, so as to avoid the seat interfering
with the operation of the seat belt.
An incorrectly installed child seat in a vehicle compromises the child's safety in
the event of an accident.
Strictly observe the fitting instructions
provided in the user guide supplied with the
child seat.
For information about the options for
fitting ISOFIX child seats in your vehicle,
refer to the summary table.
Recommended ISOFIX child seats
Also consult the user guide from the child seat’s manufacturer to find out how to
install and remove the seat.
"RÖMER Baby-Safe and its ISOFIX base" (size category: E)
Group 0+: from birth to 13 kg
Installed "rearward facing" using an ISOFIX base which is attached to rings A .
The base has a support leg, height-
adjustable, which rests on the vehicle's floor. This child seat can also be secured with a
seat belt. In this case, only the shell is used and attached to the vehicle seat using the three-point seat belt.
"RÖMER Duo Plus ISOFIX "
(size category: B1)
Group 1: from 9 to 18 kg
Page 95 of 260
93
Safety
5"RÖMER Duo Plus ISOFIX"
(size category: B1)
Group 1: from 9 to 18 kg
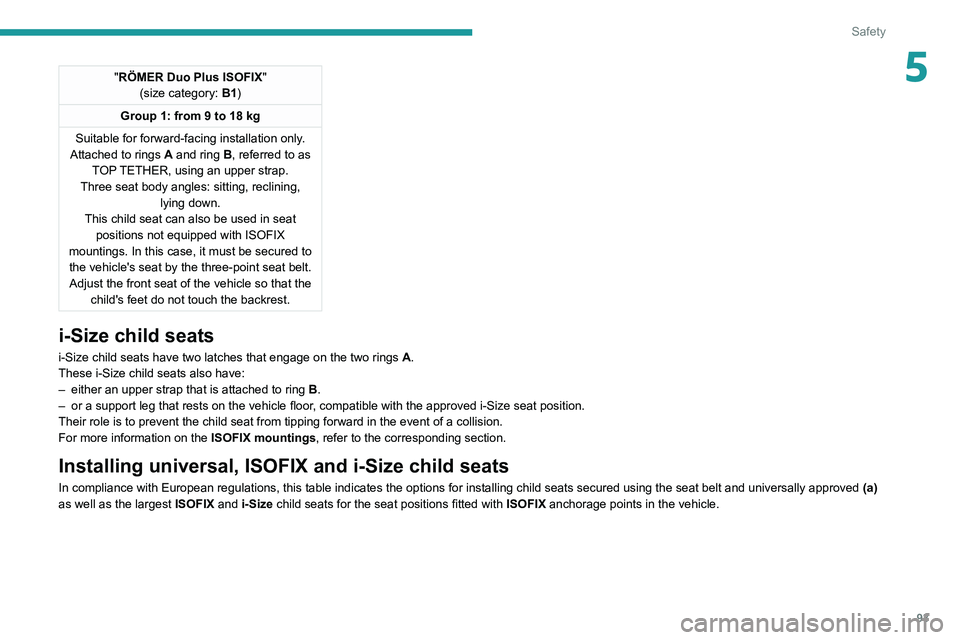
Suitable for forward-facing installation only.
Attached to rings
A and ring B, referred to as
TOP TETHER, using an upper strap.
Three seat body angles: sitting, reclining, lying down.
This child seat can also be used in seat positions not equipped with ISOFIX
mountings. In this case, it must be secured to the vehicle's seat by the three-point seat belt. Adjust the front seat of the vehicle so that the child's feet do not touch the backrest.
i-Size child seats
i-Size child seats have two latches that engage on the two rings A.
These i-Size child seats also have:
–
either an upper strap that is attached to ring B
.
–
or a support leg that rests on the vehicle floor
, compatible with the approved i-Size seat position.
Their role is to prevent the child seat from tipping forward in the even\
t of a collision.
For more information on the ISOFIX mountings, refer to the corresponding section.
Installing universal, ISOFIX and i-Size child seats
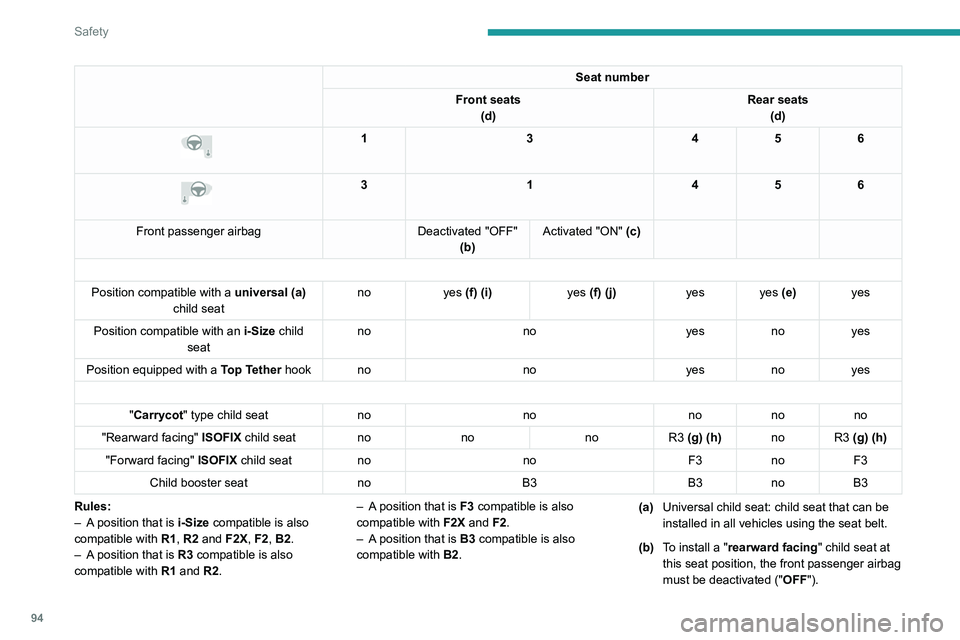
In compliance with European regulations, this table indicates the option\
s for installing child seats secured using the seat belt and universally\
approved (a)
as well as the largest ISOFIX and i-Size child seats for the seat positions fitted with ISOFIX anchorage points in the vehicle.
Page 96 of 260
94
Safety
Seat number
Front seats (d) Rear seats
(d)
1 3456
3 1456
Front passenger airbag Deactivated "OFF"
(b) Activated "ON" (c)
Position compatible with a universal (a)
child seat no
yes (f) (i) yes (f) (j)yes yes (e) yes
Position compatible with an i-Size child
seat no
noyesnoyes
Position equipped with a Top Tether hook no noyesnoyes
"Carrycot " type child seat nonononono
"Rearward facing" ISOFIX child seat nono noR3 (g) (h) no R3 (g) (h)
"Forward facing" ISOFIX child seat no noF3noF3
Child booster seat noB3 B3noB3
Rules:
–
A
position that is i-Size compatible is also
compatible with R1, R2 and F2X, F2, B2.
–
A
position that is R3 compatible is also
compatible with R1 and R2. –
A
position that is F3 compatible is also
compatible with F2X and F2.
–
A
position that is B3 compatible is also
compatible with B2. (a)
Universal child seat: child seat that can be
installed in all vehicles using the seat belt.
(b) To install a "rearward facing" child seat at
this seat position, the front passenger airbag
must be deactivated ("OFF").
Page 98 of 260
96
Safety
For seat adjustments, refer to the table
"Installing universal, ISOFIX and i-Size child
seats".
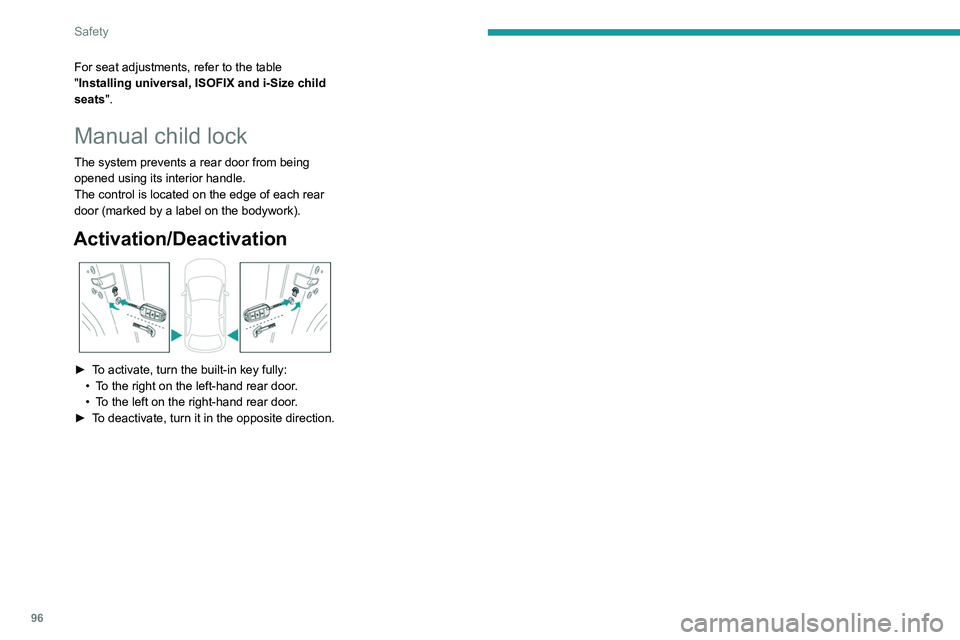
Manual child lock
The system prevents a rear door from being
opened using its interior handle.
The control is located on the edge of each rear
door (marked by a label on the bodywork).
Activation/Deactivation
► To activate, turn the built-in key fully:
• T o the right on the left-hand rear door.
•
T
o the left on the right-hand rear door.
►
T
o deactivate, turn it in the opposite direction.
Page 179 of 260

177
Practical information
7Bodywork
High-gloss paint
Do not use abrasive products, solvents,
petrol or oil to clean the bodywork.
Never use an abrasive sponge to clean
stubborn stains - risk of scratching the
paintwork!
Do not apply polish in strong sunshine, or to
plastic or rubber parts.
Use a soft cloth and soapy water or a pH
neutral product.
Gently wipe the bodywork with a clean
microfibre cloth.
Apply polish with the vehicle clean and dry.
Comply with the instructions for use stated on
the product.
Decals
(Depending on version)
Do not use a high-pressure washer to
clean the vehicle - risk of damaging or
detaching the decals!
Use a high-flow hose (temperature
between 25°C and 40°C).
Place the jet of water perpendicular to the
surface to be cleaned.
Rinse the vehicle with demineralised water.
Textile
The dashboard, door panels and seats may
contain parts made of textile material.
Maintenance
Do not use aggressive cleaning products
(e.g. alcohol, solvent or ammonia).
Do not use steam-cleaning systems - risk of
affecting the adhesion of the fabrics!
Remove dust from the textile parts
regularly with a dry cloth, soft brush or
vacuum cleaner
.
Rub down the
textile parts once per year with
a clean, damp cloth. After leaving overnight to
dry, brush with a soft-bristled brush.
Stain removal
Do not rub the stain or it may spread or
you may cause the substance to
penetrate the surface.
Act quickly by reducing the stain from its edges inwards.
Remove as much substance or solids as
possible using a spoon or spatula, and
remove
as much liquid as possible using
absorbent paper.
Product/Procedure to use depending
on the type of stain:
–
Grease, oil and ink: clean with a pH-neutral
detergent.
–
V
omit: clean with sparkling mineral water.
–
Blood: spread flour over the stain and allow
to dry; remove with a slightly damp cloth.
–
Mud: allow to dry and then remove with a
slightly damp cloth.
–
Cake, chocolate, ice cream: clean with
lukewarm water
.
–
Sugary and/or alcoholic drinks: clean with
lukewarm water
, or lemon juice if the stain is
persistent.
–
Hair gel, coffee, tomato sauce, vinegar:
clean with lukewarm water and lemon juice.
For solid substances, then use a soft brush or
vacuum cleaner
.
For liquid substances, then use a damp
microfibre cloth and then dry with another
cloth.
Alcantara®
Alcantara® is an elegant and practical material
which is very resistant and easy to maintain.
Do not use printed cloths or
printed absorbent paper.
Do not use steam-cleaning systems.
Page 182 of 260
180
In the event of a breakdown
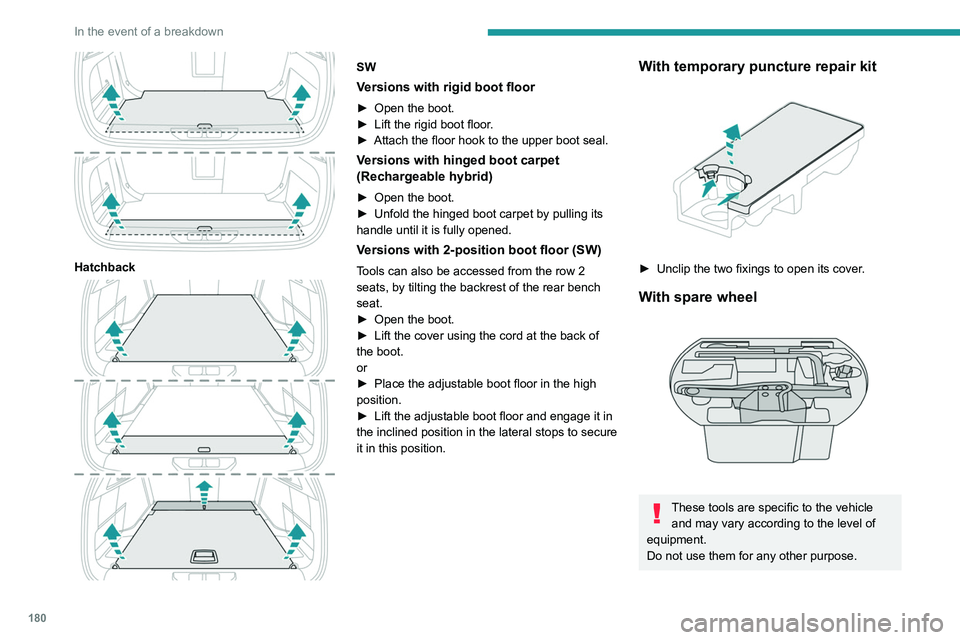
Hatchback
SW
Versions with rigid boot floor
► Open the boot.
► Lift the rigid boot floor .
►
Attach the floor hook to the upper boot seal.
Versions with hinged boot carpet
(Rechargeable hybrid)
► Open the boot.
► Unfold the hinged boot carpet by pulling its
handle until it is fully opened.
Versions with 2-position boot floor (SW)
Tools can also be accessed from the row 2
seats, by tilting the backrest of the rear bench
seat.
►
Open the boot.
►
Lift the cover using the cord at the back of
the boot.
or
►
Place the adjustable boot floor in the high
position.
►
Lift the adjustable boot floor and engage it in
the inclined position in the lateral stops to secure
it in this position.
With temporary puncture repair kit
► Unclip the two fixings to open its cover .
With spare wheel
These tools are specific to the vehicle
and may vary according to the level of
equipment.
Do not use them for any other purpose.
Page 226 of 260
224
Alphabetical index
Checking tyre pressures
(using the kit)
132, 134
Checks
120, 171–173
Checks, routine
171–173
Child lock
47
Children
36, 91–93
Children (safety)
47
Child seats
36, 88–91
Child seats, conventional
42, 44, 46
Child seats, i-Size
44, 46
Child seats, ISOFIX
91–93, 46
Cleaning (advice)
104, 176–178
Closing the boot
17, 21
Closing the doors
30–31, 21
Collision Risk Alert
135–136
Configuration, vehicle
10, 23
Connection, Bluetooth
212–213
Connectivity
168
Consumption figures
23
Container, AdBlue®
125
Control, emergency boot release
21
Control, emergency door
19
Control, heated seats
46–47
Controls, steering mounted
105–106
Control stalk, lighting
67–68
Control stalk, wipers
73–75
Control unit
154–156, 111
Courtesy lamp, front
37
Courtesy lamps
37
Cruise control
117–118, 120–122
Cruise control, adaptive
117–118, 122–123Cruise control by speed limit
recognition
117–118
D
Date (setting) 169
Daytime running lamps
25
Deactivating the passenger airbag
38, 41
Deadlocking
15, 17
Deferred charging
24, 112
Deferred charging (Rechargeable
hybrid)
24–25, 105, 110
Defrosting
24, 32
Defrosting, front
32
Demisting
24, 32
Demisting, front
32
Demisting, rear
32
Demisting, rear screen
32
Diagnosis, vehicle
20
Dials and gauges
9
Digital instrument panel
9
Dimensions
153
Dipstick
18, 121
Direction indicators
25, 139
Display screen, instrument panel
10–11
Domestic charging
107
Domestic charging (Rechargeable hybrid)
111
Doors
21
Drive Assist Plus
122–123
Driver’s attention warning
138–139
Driving
43–44, 97–98, 65
Driving abroad 29
Driving aids camera (warnings)
64
Driving aid shortcuts
66
Driving aids (recommendations)
64
Driving economically
7
Driving modes
107–108
Driving positions (storing)
22
Dynamic stability control (DSC)
33
E
EBFD 32
Eco-driving (advice)
7
ECO mode
59
Economy mode
11 8
Electronic brake force distribution (EBFD)
32
Emergency braking assistance (EBA)
33
Emergency call
79–80
Emergency switching off
101–102
Emergency warning lamps
29, 130
Emissions control system, SCR
19, 124
Energy economy mode
11 8
Energy flows
23
Energy recovery
20, 57
Engine
124
Engine compartment
168–169
Engine, Diesel
102, 120, 130
Engine, petrol
60, 120
Engines
148
Environment
7, 20
e-Save function (energy reserve)
24
Page 227 of 260
225
Alphabetical index
ESC (electronic stability control) 32
Expanded traffic sign recognition
69
Exterior lighting
27
F
Fatigue detection 138–139
Favourite driving functions
66
Filling the AdBlue® tank
122, 125
Filling the fuel tank
151–152
Filter, air
123
Filter, oil
123
Filter, particle
171–172
Filter, passenger compartment
28, 123
Fitting a wheel
185–186
Fitting roof bars
11 6
Fittings, boot
39
Fittings, interior
34
Fittings, rear
38
Flap, charging
11 2
Flap, fuel filler
151–152
Flashing indicators
25
Flat bed (recovery)
146
Floor, boot, adjustable
41
Fluid, brake
122
Fluid, engine coolant
122
Foglamps, rear
24, 139
Folding the rear seats
50–52
Frequency (radio)
166
Fuel
7, 102
Fuel consumption
7, 20
Fuel tank 151–152
Fuses
140
G
Gauge, fuel 102
Gearbox, automatic
105–107, 60, 123, 140
Gearbox, manual
55, 60, 123
Gear lever
55
Gear lever, manual gearbox
55
Gear shift indicator ~ Gear efficiency
indicator
61
Glove box
34
H
Hands-free access 36–37
Hands-free tailgate
36–37
Hazard warning lamps
29, 130
Headlamp adjustment
25
Headlamps, automatic dipping
70–71
Headlamps, automatic illumination
26
Headlamps, halogen
25
Headlamps, main beam
27
Head restraints, front
20
Head restraints, rear
50–52
Heated steering wheel
24
Heating
28
Heating, programmable
24, 33
Hi-Fi system
36
High voltage 103
Hill start assist
60
Histogramme, fuel consumption
24–25
Horn
30
I
Ignition 52, 168
Ignition on
52
Ignition switch
99–100
Immobiliser, electronic
49
Indicator, AdBlue® range
18
Indicator, coolant temperature
18
Indicator, engine oil level
18
Indicators, direction
25
Inflating tyres
124, 154
Inflating tyres and accessories
(using the kit)
132, 134
Information, vehicle
9, 171
Infrared camera
65
Instrument panel
9, 21, 65
Instrument panel, matrix
9
Instrument panels
9
ISOFIX mountings
42, 44, 46
J
Jack 180–181, 135
Jump starting
141