2022 PEUGEOT 308 belt
[x] Cancel search: beltPage 94 of 260
92
Safety
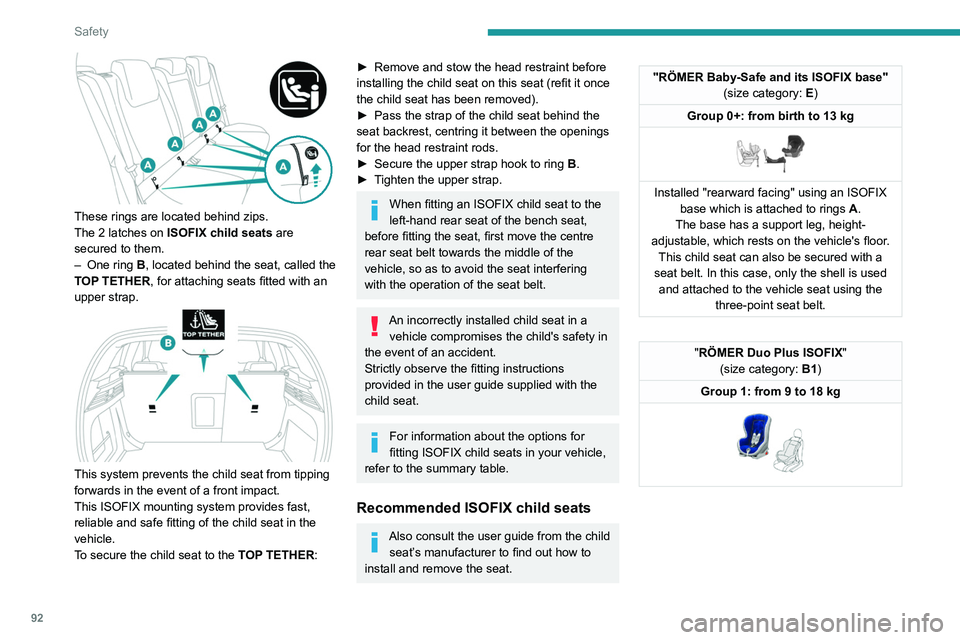
These rings are located behind zips.
The 2 latches on ISOFIX child seats are
secured to them.
–
One ring
B, located behind the seat, called the
TOP TETHER, for attaching seats fitted with an
upper strap.
This system prevents the child seat from tipping
forwards in the event of a front impact.
This ISOFIX mounting system provides fast,
reliable and safe fitting of the child seat in the
vehicle.
To secure the child seat to the TOP TETHER:
► Remove and stow the head restraint before
installing the child seat on this seat (refit it once
the child seat has been removed).
►
Pass the strap of the child seat behind the
seat backrest, centring it between the openings
for the head restraint rods.
►
Secure the upper strap hook to ring
B
.
►
T
ighten the upper strap.
When fitting an ISOFIX child seat to the
left-hand rear seat of the bench seat,
before fitting the seat, first move the centre
rear seat belt towards the middle of the
vehicle, so as to avoid the seat interfering
with the operation of the seat belt.
An incorrectly installed child seat in a vehicle compromises the child's safety in
the event of an accident.
Strictly observe the fitting instructions
provided in the user guide supplied with the
child seat.
For information about the options for
fitting ISOFIX child seats in your vehicle,
refer to the summary table.
Recommended ISOFIX child seats
Also consult the user guide from the child seat’s manufacturer to find out how to
install and remove the seat.
"RÖMER Baby-Safe and its ISOFIX base" (size category: E)
Group 0+: from birth to 13 kg
Installed "rearward facing" using an ISOFIX base which is attached to rings A .
The base has a support leg, height-
adjustable, which rests on the vehicle's floor. This child seat can also be secured with a
seat belt. In this case, only the shell is used and attached to the vehicle seat using the three-point seat belt.
"RÖMER Duo Plus ISOFIX "
(size category: B1)
Group 1: from 9 to 18 kg
Page 95 of 260
93
Safety
5"RÖMER Duo Plus ISOFIX"
(size category: B1)
Group 1: from 9 to 18 kg
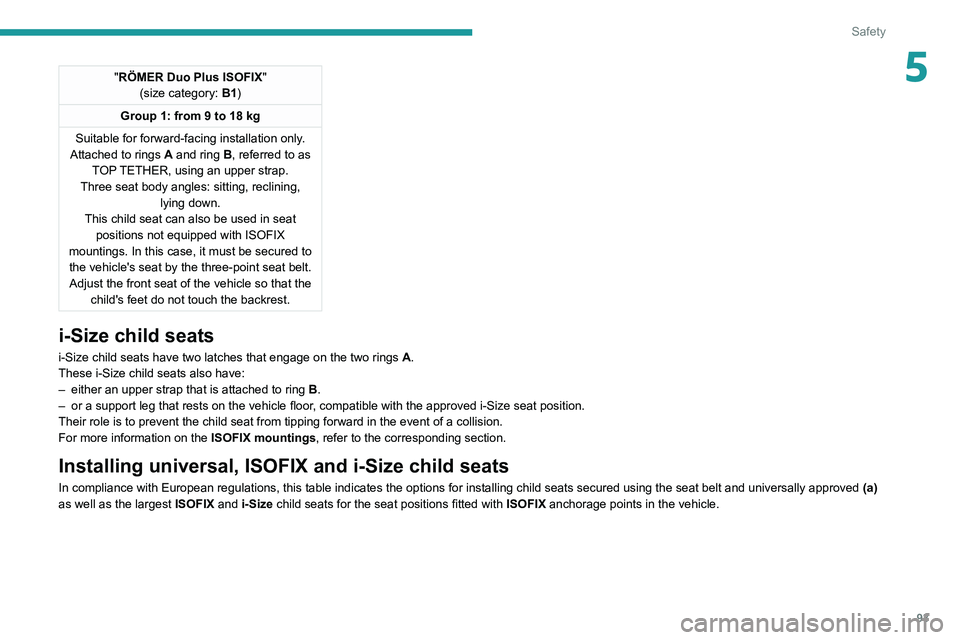
Suitable for forward-facing installation only.
Attached to rings
A and ring B, referred to as
TOP TETHER, using an upper strap.
Three seat body angles: sitting, reclining, lying down.
This child seat can also be used in seat positions not equipped with ISOFIX
mountings. In this case, it must be secured to the vehicle's seat by the three-point seat belt. Adjust the front seat of the vehicle so that the child's feet do not touch the backrest.
i-Size child seats
i-Size child seats have two latches that engage on the two rings A.
These i-Size child seats also have:
–
either an upper strap that is attached to ring B
.
–
or a support leg that rests on the vehicle floor
, compatible with the approved i-Size seat position.
Their role is to prevent the child seat from tipping forward in the even\
t of a collision.
For more information on the ISOFIX mountings, refer to the corresponding section.
Installing universal, ISOFIX and i-Size child seats
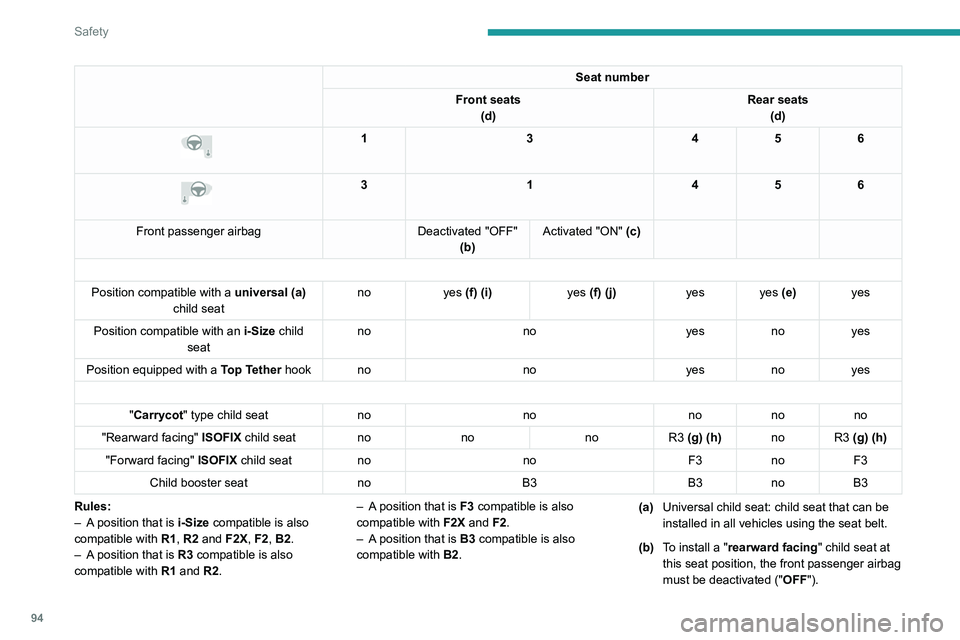
In compliance with European regulations, this table indicates the option\
s for installing child seats secured using the seat belt and universally\
approved (a)
as well as the largest ISOFIX and i-Size child seats for the seat positions fitted with ISOFIX anchorage points in the vehicle.
Page 96 of 260
94
Safety
Seat number
Front seats (d) Rear seats
(d)
1 3456
3 1456
Front passenger airbag Deactivated "OFF"
(b) Activated "ON" (c)
Position compatible with a universal (a)
child seat no
yes (f) (i) yes (f) (j)yes yes (e) yes
Position compatible with an i-Size child
seat no
noyesnoyes
Position equipped with a Top Tether hook no noyesnoyes
"Carrycot " type child seat nonononono
"Rearward facing" ISOFIX child seat nono noR3 (g) (h) no R3 (g) (h)
"Forward facing" ISOFIX child seat no noF3noF3
Child booster seat noB3 B3noB3
Rules:
–
A
position that is i-Size compatible is also
compatible with R1, R2 and F2X, F2, B2.
–
A
position that is R3 compatible is also
compatible with R1 and R2. –
A
position that is F3 compatible is also
compatible with F2X and F2.
–
A
position that is B3 compatible is also
compatible with B2. (a)
Universal child seat: child seat that can be
installed in all vehicles using the seat belt.
(b) To install a "rearward facing" child seat at
this seat position, the front passenger airbag
must be deactivated ("OFF").
Page 97 of 260

95
Safety
5(c)Only a "forward facing" child seat is
authorised at this seat position with the front
passenger airbag activated (" ON").
(d) Depending on version, refer to the
legislation in force in your country before
installing a child in this seat position.
(e) Never install a child seat with a support leg
on the centre rear seat.
(f) For a seat with height adjustment, adjust
the seat to the highest position and move it
fully back.
(g) Adjust the driver's seat to the highest
position.
(h) Adjust the passenger seat to the
intermediate forward longitudinal position.
(i) For a universal " rearward facing" and/or
"forward facing" (U) child seat in groups 0,
0+, 1, 2 or 3.
(j) For a universal " forward facing" (UF) child
seat in groups 1, 2 or 3.
KeySeat position where the installation of a
child seat is forbidden.
Front passenger airbag deactivated.
Front passenger airbag activated.
Seat position suitable for the installation
of a child seat secured using the seat belt and universally approved "rearward facing"
and/or "forward facing"
(U) for all sizes and
weight groups.
Seat position suitable for the installation
of a child seat secured using the seat belt
and universally approved "forward facing"
(UF) for groups 1, 2 & 3 only.
Seat position authorised for the
installation of an i-Size child seat.
Seat position not suitable for the
installation of a child seat with support
leg.
Presence of a Top Tether anchorage
point at the rear of the backrest,
authorising the installation of a universal ISOFIX
child seat.
"Rearward facing" ISOFIX child seat:
–
R1
: ISOFIX child seat for a baby.
–
R2
: ISOFIXreduced size child seat.
–
R3
: ISOFIXlarge size child seat.
"Forward facing" ISOFIX child seat:
–
F2X
: ISOFIX child seat for toddlers.
–
F2
: ISOFIXreduced height child seat.
–
F3
: ISOFIXfull height child seat.
Booster child seat:
–
B2
: reduced width
booster seat.
–
B3
: full width
booster seat.
Seat position where the installation of an
ISOFIX child seat
is forbidden.
Page 112 of 260
11 0
Driving
Have it checked by a PEUGEOT dealer or a
qualified workshop.
Gear shift indicator
(Depending on engine)
This system is designed to reduce fuel
consumption by recommending the most suitable
gear.
Operation
Depending on the driving situation and
the vehicle's equipment, the system may
recommend skipping one or more gears.
Gear engagement recommendations are
not to be considered mandatory. Indeed, the
configuration of the road, the traffic density and
safety remain determining factors when choosing
the best gear. Therefore, the driver remains
responsible for deciding whether or not to follow
the system’s advice.
The system cannot be deactivated.
With an automatic gearbox, the system is
only active in manual operation.
The information appears on the instrument panel, in the form of an arrow
and the recommended gear.
The system adapts the gear change instructions according to the driving
conditions (e.g. slope, load) and driving style
(e.g. power demand, acceleration, braking).
The system never suggests:
–
engaging first gear;
–
engaging reverse gear
.
Stop & Start
The Stop & Start function puts the engine temporarily into standby - STOP mode - during
phases when the vehicle is stationary (e.g.
red
lights, traffic jams). The engine automatically
restarts - START mode - as soon as the driver
indicates the intention of moving off again.
Primarily designed for urban use, the function
is intended to reduce fuel consumption and
exhaust emissions as well as the noise level
when stationary.
The function does not affect the functionalities of
the vehicle, in particular the braking.
Deactivation/Reactivation
By default, the function is activated when the
ignition is switched on.
It is configured in the ADAS touch screen
application.
or
Direct access to the Shortcuts for driving aids .
The display of a message on the instrument
panel confirms the change of state.
If the function is deactivated while the engine is
in STOP mode, it will restart immediately.
Associated indicator lamps
Function activated
Function deactivated or malfunction
Opening the bonnet
Before doing anything under the bonnet,
deactivate the Stop & Start system to avoid
any risk of injury caused by the engine
restarting automatically.
Driving on flooded roads
Before entering into a flooded area, it is
strongly recommended that you deactivate
the Stop & Start system.
For more information on Driving
recommendations, particularly on flooded
roads, refer to the corresponding section.
Operation
Main conditions for operation
– The driver ’s door must be closed.
– The driver's seat belt must be fastened.
–
The level of charge in the battery must be
sufficient.
–
The temperature of the engine must be within
its nominal operating range.
Page 126 of 260
124
Driving
cruise control may temporarily reduce the
distance to the target vehicle to facilitate
overtaking, without exceeding the speed
setting.
Steering-mounted controls
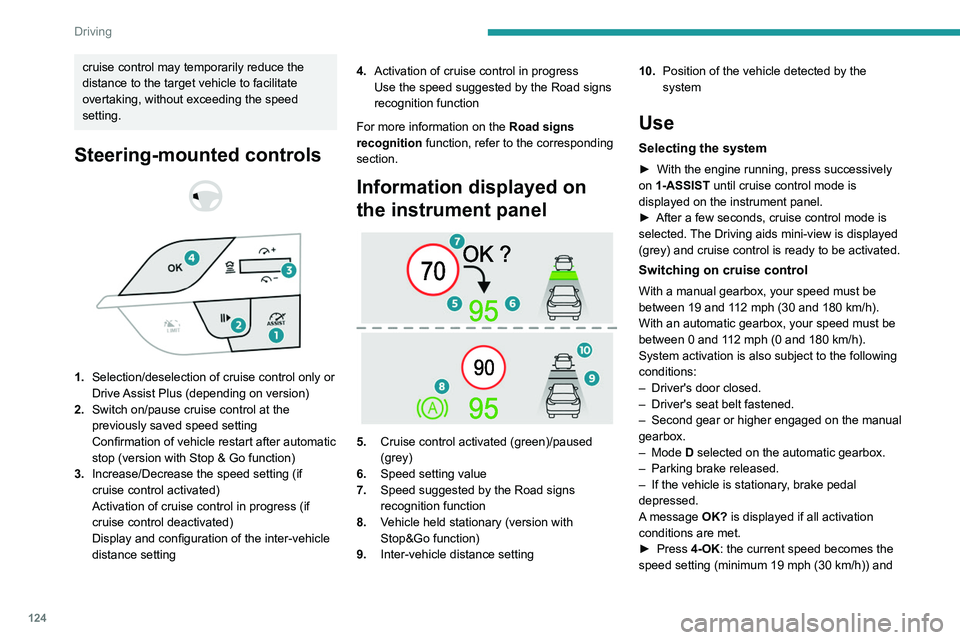
1. Selection/deselection of cruise control only or
Drive Assist Plus (depending on version)
2. Switch on/pause cruise control at the
previously saved speed setting
Confirmation of vehicle restart after automatic
stop (version with Stop & Go function)
3. Increase/Decrease the speed setting (if
cruise control activated)
Activation of cruise control in progress (if
cruise control deactivated)
Display and configuration of the inter-vehicle
distance setting 4.
Activation of cruise control in progress
Use the speed suggested by the Road signs
recognition function
For more information on the Road signs
recognition
function, refer to the corresponding
section.
Information displayed on
the instrument panel
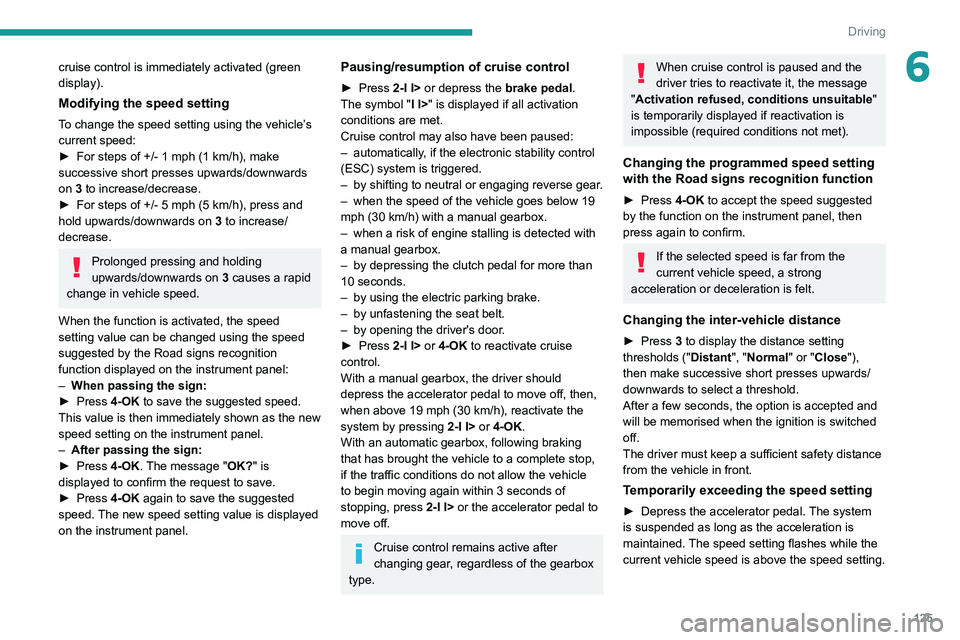
5. Cruise control activated (green)/paused
(grey)
6. Speed setting value
7. Speed suggested by the Road signs
recognition function
8. Vehicle held stationary (version with
Stop&Go function)
9. Inter-vehicle distance setting 10.
Position of the vehicle detected by the
system
Use
Selecting the system
► With the engine running, press successively
on 1-ASSIST until cruise control mode is
displayed on the instrument panel.
►
After a few seconds, cruise control mode is
selected.
The Driving aids mini-view is displayed
(grey) and cruise control is ready to be activated.
Switching on cruise control
With a manual gearbox, your speed must be
between 19 and 112 mph (30 and 180 km/h).
With an automatic gearbox, your speed must be
between 0 and 112
mph (0 and 180 km/h).
System activation is also subject to the following
conditions:
–
Driver's door closed.
–
Driver's seat belt fastened.
–
Second
gear or higher engaged on the manual
gearbox.
–
Mode D selected on the automatic gearbox.
–
Parking brake released.
–
If the vehicle is stationary
, brake pedal
depressed.
A message OK? is displayed if all activation
conditions are met.
►
Press
4-OK: the current speed becomes the
speed setting (minimum 19 mph (30
km/h)) and
Page 127 of 260
125
Driving
6cruise control is immediately activated (green
display).
Modifying the speed setting
To change the speed setting using the vehicle’s
current speed:
►
For steps of +/- 1 mph (1 km/h), make
successive short presses upwards/downwards
on
3 to increase/decrease.
►
For steps of +/- 5 mph (5
km/h), press and
hold upwards/downwards on 3 to increase/
decrease.
Prolonged pressing and holding
upwards/downwards on 3 causes a rapid
change in vehicle speed.
When the function is activated, the speed
setting value can be changed using the speed
suggested by the
Road signs recognition
function displayed on the instrument panel:
–
When passing the sign:
►
Press
4-OK to save the suggested speed.
This value is then immediately shown as the new
speed setting on the instrument panel.
–
After passing the sign:
►
Press
4-OK. The message "OK?" is
displayed to confirm the request to save.
►
Press
4-OK again to save the suggested
speed. The new speed setting value is displayed
on the instrument panel.
Pausing/resumption of cruise control
► Press 2-I I> or depress the brake pedal.
The symbol "I I>" is displayed if all activation
conditions are met.
Cruise control may also have been paused:
–
automatically
, if the electronic stability control
(ESC) system is triggered.
–
by shifting to neutral or engaging reverse gear
.
–
when the speed of the vehicle goes below 19
mph (30
km/h) with a manual gearbox.
–
when a risk of engine stalling is detected with
a manual gearbox.
–
by depressing the clutch pedal for more than
10 seconds.
–
by using the electric parking brake.
–
by unfastening the seat belt.
–
by opening the driver's door
.
►
Press
2-I I> or 4-OK to reactivate cruise
control.
With a manual gearbox, the driver should
depress the accelerator pedal to move off, then,
when above 19 mph (30
km/h), reactivate the
system by pressing 2-I I> or 4-OK.
With an automatic gearbox, following braking
that has brought the vehicle to a complete stop,
if the traffic conditions do not allow the vehicle
to begin moving again within 3
seconds of
stopping, press
2-I I>
or the accelerator pedal to
move off.
Cruise control remains active after
changing gear, regardless of the gearbox
type.
When cruise control is paused and the
driver tries to reactivate it, the message
"Activation refused, conditions unsuitable "
is temporarily displayed if reactivation is
impossible (required conditions not met).
Changing the programmed speed setting
with the Road signs recognition function
► Press 4-OK to accept the speed suggested
by the function on the instrument panel, then
press again to confirm.
If the selected speed is far from the
current vehicle speed, a strong
acceleration or deceleration is felt.
Changing the inter-vehicle distance
► Press 3 to display the distance setting
thresholds (" Distant", "Normal" or "Close"),
then make successive short presses upwards/
downwards to select a threshold.
After a few seconds, the option is accepted and
will be memorised when the ignition is switched
off.
The driver must keep a sufficient safety distance
from the vehicle in front.
Temporarily exceeding the speed setting
► Depress the accelerator pedal. The system
is suspended as long as the acceleration is
maintained. The speed setting flashes while the
current vehicle speed is above the speed setting.
Page 138 of 260
136
Driving
It is the driver's responsibility to continuously
monitor traffic conditions in accordance with
applicable driving regulations.
As soon as the system detects a potential obstacle, it prepares the braking
circuit in case automatic braking is needed.
This may cause a slight noise and a slight
sensation of deceleration.
Deactivation/Activation
By default, the system is automatically activated
at every engine start.
It is configured in the ADAS touch screen
application.
Deactivation of the system is signalled by
the illumination of this warning lamp,
accompanied by the display of a message.
Operating conditions and
limits
Vehicle moving forward.
ESC system operational.
ASR system activated.
Seat belts fastened for all passengers.
Stabilised speed on roads with few bends.
In the following cases, deactivating the system
via the driving aids configuration application is
advised:
–
Carrying long objects on roof bars.
– Before using an automatic car wash, with the
engine running.
–
When changing
a wheel, working near a wheel
or inside the engine compartment.
–
Before placing the vehicle on a rolling road in
a workshop.
–
T
owed vehicle, engine running.
–
Following
an impact to the windscreen close to
the detection camera.
The system is automatically deactivated when the use of certain types of
"space-saver" spare wheel (smaller diameter)
is detected, or if a fault with the brake pedal
switch or at least two brake lamps is detected.
It can be dangerous to drive if the brake
lamps are not in perfect working order.
The driver must not overload the vehicle (keep within the GVW and GTW limits,
and load height limits for roof bars).
It is possible that warnings are not given,
are given too late or seem unjustified.
The driver must always stay in control of the
vehicle and be prepared to react at any time
to avoid an accident.
Following an impact, the system is
automatically deactivated.
Have it checked by a PEUGEOT dealer or a
qualified workshop.
Collision Risk Alert
This function warns the driver that their vehicle
is at risk of a collision with the vehicle in front, or
with a pedestrian or cyclist present in their traffic
lane.
Modifying the alert trigger threshold
The trigger threshold determines the sensitivity
with which the function warns of the risk of
collision.
It is configured in the ADAS touch screen
application.
►
Select one of the 3 preset
thresholds:
"Far", "Medium" or "Near".
The selected threshold is memorised when the
ignition is switched off.
Operation
Depending on the degree of risk of collision
detected by the system and the alert trigger
threshold chosen by the driver, several different
levels of alert may be triggered and displayed on
the instrument panel.
The system takes account of the vehicle
dynamics, the speed of your vehicle and the one
in front, the environmental conditions and the
operation of the vehicle (actions on the pedals,
steering wheel, etc.) to trigger the alert at the
most relevant moment.
(orange)
Level 1: visual alert only, warning you
that the vehicle in front is very close.