2022 PEUGEOT 308 steering
[x] Cancel search: steeringPage 26 of 260

24
Instruments
► Depending on the pages displayed on the
screen, with or without the context menu, scroll
the text by swiping with your finger
, as with a
smartphone.
Show/Hide context menu
Return to the previous page
►
T
o change the status of a function, press the
description for the corresponding line (change
confirmed by the slider moving to the right/left:
function activated/deactivated).
Access additional information on the function
Access to function parameters
Adding/Removing shortcuts
Short press, ignition off: system on/off.
Short press, ignition on: mute/restore
sound.
Long press, ignition on: start standby mode
(mute sound, screens and clock display off).
Rotation: volume adjustment.
Applications
From the home page, press this button to
access the applications wall.
From any page, press the touch screen
with three fingers to display the
applications wall. To obtain information about the other
applications not listed here, refer to the sections
describing the audio and telematic systems.
ADAS
Activation/Deactivation and configuration
of the driving aid functions.
Climate
Settings for temperature, air flow, etc.
For more information on Dual-zone automatic
air conditioning , refer to the corresponding
section.
Activation/Deactivation of the heated steering
wheel.
For more information on the Heated steering
wheel, refer to the corresponding section.
Seat Options
Activation/Deactivation and configuration
of the seat comfort functions (heating and
massages).
For more information on the Heated seats
or on the Multi-point massages, refer to the
corresponding section.
Settings
Main settings for the audio system, touch
screen and digital instrument panel.
Activation/Deactivation and configuration of
the exterior lighting, vehicle access and safety
functions.
Energy
Access to the rechargeable hybrid system
features (energy flow, consumption statistics,
deferred charging, e
- SAVE function).
Energy application
Energy Flow
The page shows the operation of the
rechargeable hybrid system in real time.
1.Active driving mode
2. Petrol engine
3. Electric motor
4. Traction battery charge level
The energy flows have a specific colour for each
type of driving:
–
Blue: 100% electrical energy
.
–
White: energy from the petrol engine.
–
Green: energy recovery
.
Statistics
This page shows electrical energy and fuel
consumption statistics.
Page 31 of 260
29
Access
2Remote lighting of the
lamps
Availability of this function depends on version.► Press this button. The sidelamps,
dipped beam headlamps, number plate
lamps and door mirror spotlamps come on for 30
seconds.
Pressing again before the end of the timed
period switches off the lamps immediately.
Advice
Remote control
The remote control is a sensitive, high-
frequency device; avoid handling it in your
pocket, due to the risk of unintentionally
unlocking the vehicle.
Avoid pressing the remote control buttons
while out of range of the vehicle, due to
the risk of rendering the remote control
inoperative. It would then be necessary to
reset it.
The remote control does not work
when the
key is in the ignition switch, even when the
ignition is switched off.
Anti-theft protection
Do not modify the electronic vehicle
immobiliser, as this might result in
malfunctions.
For vehicles with a key ignition switch,
remember to remove the key and turn the
steering wheel to engage the steering lock.
Locking the vehicle
Driving with the doors locked could make
it more difficult for the emergency services
to enter the passenger compartment in an
emergency.
As a safety precaution, remove the key from
the ignition or take the electronic key with you
when leaving the vehicle, even for a short
time.
Purchasing a second-hand vehicle
Have the key codes memorised by a
PEUGEOT dealer, to ensure that the keys
in your possession are the only ones able to
start the vehicle.
Proximity Keyless Entry
and Start
This is a Keyless Entry and Start system.
It enables automatic vehicle locking/unlocking
simply by detecting the electronic key.
As long as the driver has the electronic key
on their person, the vehicle unlocks as they
approach and locks when they walk away.
If the electronic key is present in an area
between 2 and 5 m from the vehicle for more than 30 minutes, the system is deactivated to
preserve the battery.
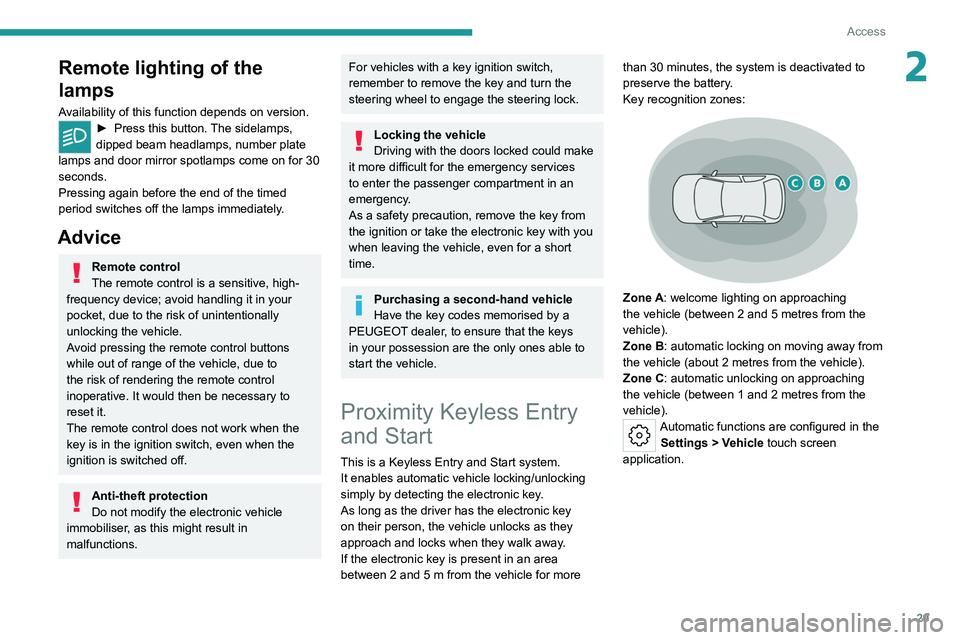
Key recognition zones:
Zone A: welcome lighting on approaching
the vehicle (between 2 and 5
metres from the
vehicle).
Zone B: automatic locking on moving away from
the vehicle (about 2
metres from the vehicle).
Zone C: automatic unlocking on approaching
the vehicle (between 1 and 2
metres from the
vehicle).
Automatic functions are configured in the Settings > Vehicle touch screen
application.
Page 36 of 260
34
Access
► Turn the key to position 2 (Ignition on).
► Immediately press the closed padlock button
for a few seconds.
►
Switch off the ignition and remove the key
from the ignition switch.
The remote control is now fully operational
again.
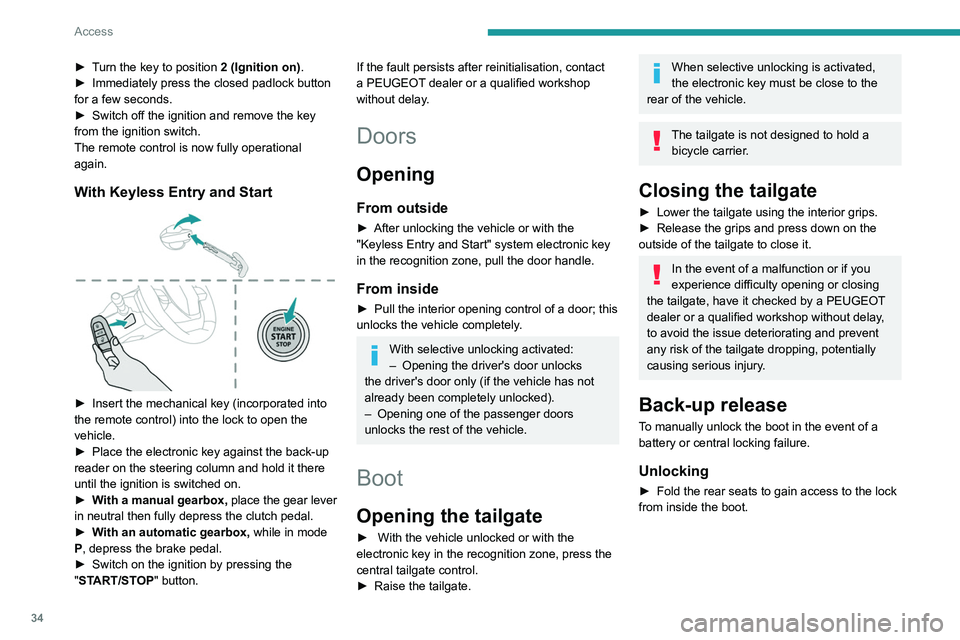
With Keyless Entry and Start
► Insert the mechanical key (incorporated into
the remote control) into the lock to open the
vehicle.
►
Place the electronic key against the back-up
reader on the steering column and hold it there
until the ignition is switched on.
►
W
ith a manual gearbox, place the gear lever
in neutral then fully depress the clutch pedal.
►
W
ith an automatic gearbox, while in mode
P, depress the brake pedal.
►
Switch on the ignition by pressing the
"
START/STOP" button.
If the fault persists after reinitialisation, contact
a PEUGEOT dealer or a qualified workshop
without delay.
Doors
Opening
From outside
► After unlocking the vehicle or with the
"Keyless Entry and Start" system electronic key
in the recognition zone, pull the door handle.
From inside
► Pull the interior opening control of a door; this
unlocks the vehicle completely .
With selective unlocking activated:
– Opening the driver's door unlocks
the driver's door only (if the vehicle has not
already been completely unlocked).
–
Opening one of the passenger doors
unlocks the rest of the vehicle.
Boot
Opening the tailgate
► With the vehicle unlocked or with the
electronic key in the recognition zone, press the
central tailgate control.
►
Raise the tailgate.
When selective unlocking is activated,
the electronic key must be close to the
rear of the vehicle.
The tailgate is not designed to hold a bicycle carrier.
Closing the tailgate
► Lower the tailgate using the interior grips.
► Release the grips and press down on the
outside of the tailgate to close it.
In the event of a malfunction or if you
experience difficulty opening or closing
the tailgate, have it checked by a PEUGEOT
dealer or a qualified workshop without delay,
to avoid the issue deteriorating and prevent
any risk of the tailgate dropping, potentially
causing serious injury.
Back-up release
To manually unlock the boot in the event of a
battery or central locking failure.
Unlocking
► Fold the rear seats to gain access to the lock
from inside the boot.
Page 45 of 260
43
Ease of use and comfort
3Driving position
Correct seating position
Adopting a good driving position contributes to
improving driver comfort and protection.
It also optimises interior and exterior visibility as
well as access to controls.
Certain seat adjustments described in this
section depend on the trim level and the country
in which the vehicle is sold.
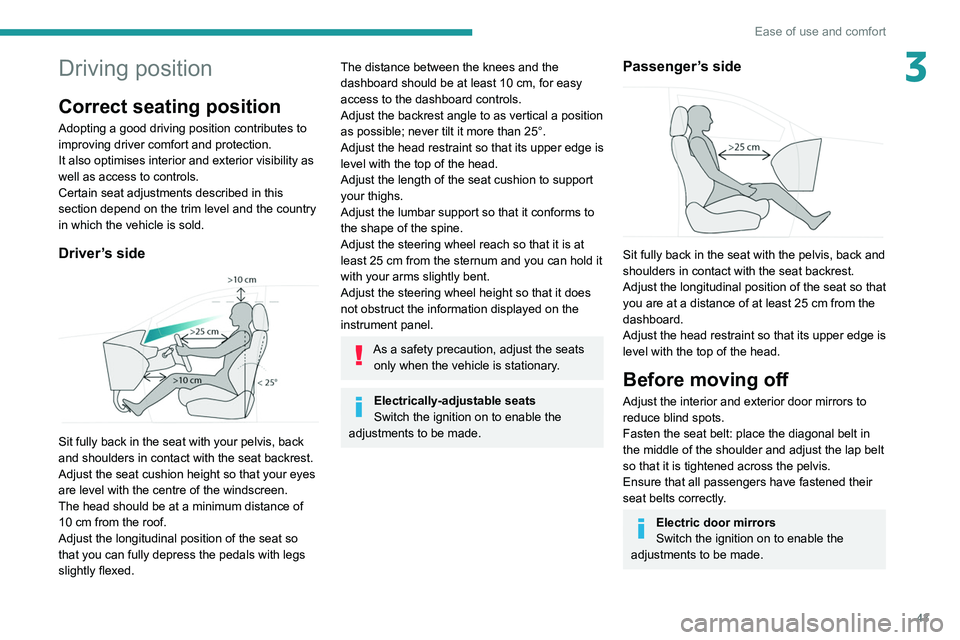
Driver’s side
Sit fully back in the seat with your pelvis, back
and shoulders in contact with the seat backrest.
Adjust the seat cushion height so that your eyes
are level with the centre of the windscreen.
The head should be at a minimum distance of
10 cm from the roof.
Adjust the longitudinal position of the seat so
that you can fully depress the pedals with legs
slightly flexed.
The distance between the knees and the
dashboard should be at least 10 cm, for easy
access to the dashboard controls.
Adjust the backrest angle to as vertical a position
as possible; never tilt it more than 25°.
Adjust the head restraint so that its upper edge is
level with the top of the head.
Adjust the length of the seat cushion to support
your thighs.
Adjust the lumbar support so that it conforms to
the shape of the spine.
Adjust the steering wheel reach so that it is at
least 25
cm from the sternum and you can hold it
with your arms slightly bent.
Adjust the steering wheel height so that it does
not obstruct the information displayed on the
instrument panel.
As a safety precaution, adjust the seats only when the vehicle is stationary.
Electrically-adjustable seats
Switch the ignition on to enable the
adjustments to be made.
Passenger’s side
Sit fully back in the seat with the pelvis, back and
shoulders in contact with the seat backrest.
Adjust the longitudinal position of the seat so that
you are at a distance of at least 25
cm from the
dashboard.
Adjust the head restraint so that its upper edge is
level with the top of the head.
Before moving off
Adjust the interior and exterior door mirrors to
reduce blind spots.
Fasten the seat belt: place the diagonal belt in
the middle of the shoulder and adjust the lap belt
so that it is tightened across the pelvis.
Ensure that all passengers have fastened their
seat belts correctly.
Electric door mirrors
Switch the ignition on to enable the
adjustments to be made.
Page 46 of 260
44
Ease of use and comfort
When driving
Maintain a good driving position and hold the
steering wheel with both hands at the 'quarter to
three' position, so that you can easily and quickly
reach the controls behind and near the steering
wheel.
Never adjust the seats or steering wheel
when driving.
Always keep your feet on the floor.
Front seats
Before moving the seat backwards,
ensure that there is no person or object
that might prevent the full travel of the seat.
There is a risk of trapping or pinching
passengers if present in the rear seats or of
jamming the seat if large objects are placed
on the floor behind the seat.
Front head restraints
Adjusting the height
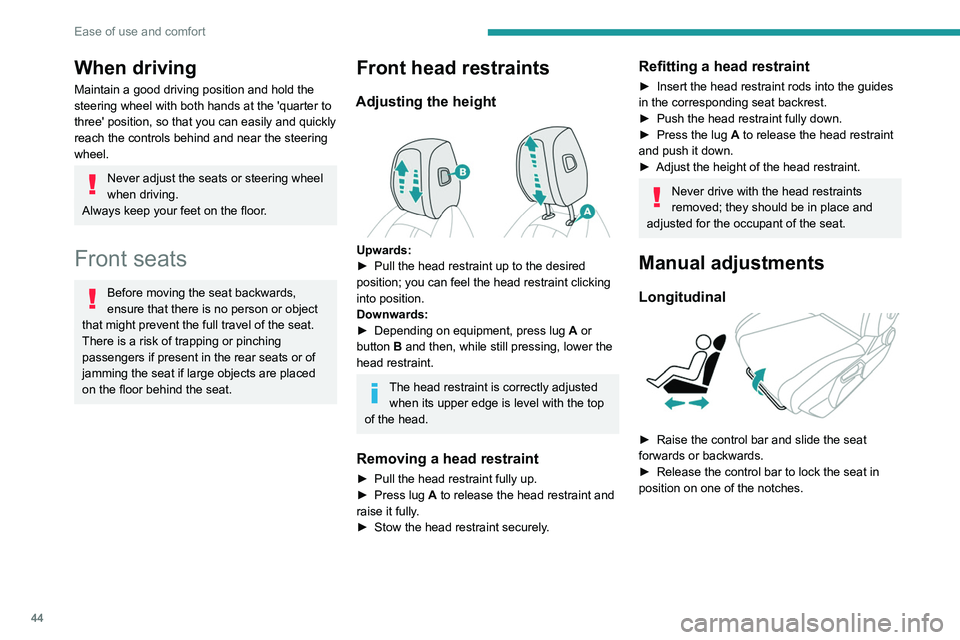
Upwards:
► Pull the head restraint up to the desired
position; you can feel the head restraint clicking
into position.
Downwards:
►
Depending on equipment, press lug A
or
button B and then, while still pressing, lower the
head restraint.
The head restraint is correctly adjusted when its upper edge is level with the top
of the head.
Removing a head restraint
► Pull the head restraint fully up.
► Press lug A to release the head restraint and
raise it fully.
►
Stow the head restraint securely
.
Refitting a head restraint
► Insert the head restraint rods into the guides
in the corresponding seat backrest.
►
Push the head restraint fully down.
►
Press the lug
A to release the head restraint
and push it down.
►
Adjust the height of the head restraint.
Never drive with the head restraints
removed; they should be in place and
adjusted for the occupant of the seat.
Manual adjustments
Longitudinal
► Raise the control bar and slide the seat
forwards or backwards.
►
Release the control bar to lock the seat in
position on one of the notches.
Page 50 of 260
48
Ease of use and comfort
Steering wheel
adjustment
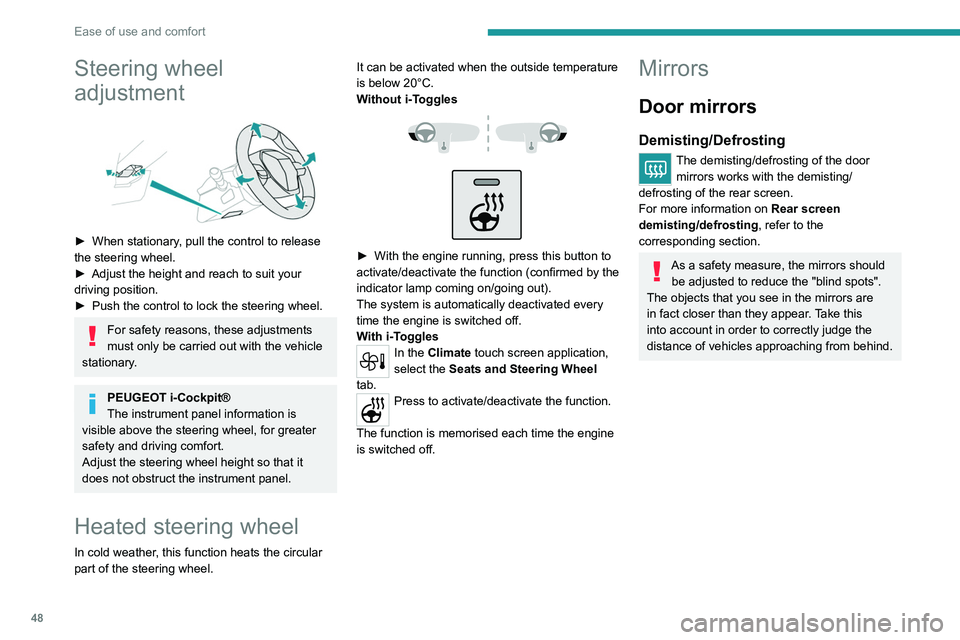
► When stationary, pull the control to release
the steering wheel.
►
Adjust the height and reach to suit your
driving position.
►
Push the control to lock the steering wheel.
For safety reasons, these adjustments
must only be carried out with the vehicle
stationary.
PEUGEOT i-Cockpit®
The instrument panel information is
visible above the steering wheel, for greater
safety and driving comfort.
Adjust the steering wheel height so that it
does not obstruct the instrument panel.
Heated steering wheel
In cold weather, this function heats the circular
part of the steering wheel. It can be activated when the outside temperature
is below 20°C.
Without
i-Toggles
► With the engine running, press this button to
activate/deactivate the function (confirmed by the
indicator lamp coming on/going out).
The system is automatically deactivated every
time the engine is switched off.
W
ith i-Toggles
In the Climate touch screen application,
select the Seats and Steering Wheel
tab.
Press to activate/deactivate the function.
The function is memorised each time the engine
is switched off.
Mirrors
Door mirrors
Demisting/Defrosting
The demisting/defrosting of the door mirrors works with the demisting/
defrosting of the rear screen.
For more information on Rear screen
demisting/defrosting , refer to the
corresponding section.
As a safety measure, the mirrors should be adjusted to reduce the "blind spots".
The objects that you see in the mirrors are
in fact closer than they appear. Take this
into account in order to correctly judge the
distance of vehicles approaching from behind.
Page 61 of 260
59
Ease of use and comfort
3allows a smartphone to be connected by Android
Auto® or CarPlay®, enabling certain smartphone
applications to be used on the touch screen.
For best results, use a cable made or approved
by the device manufacturer.
These applications can be managed using the
steering-mounted controls or the audio system
controls.
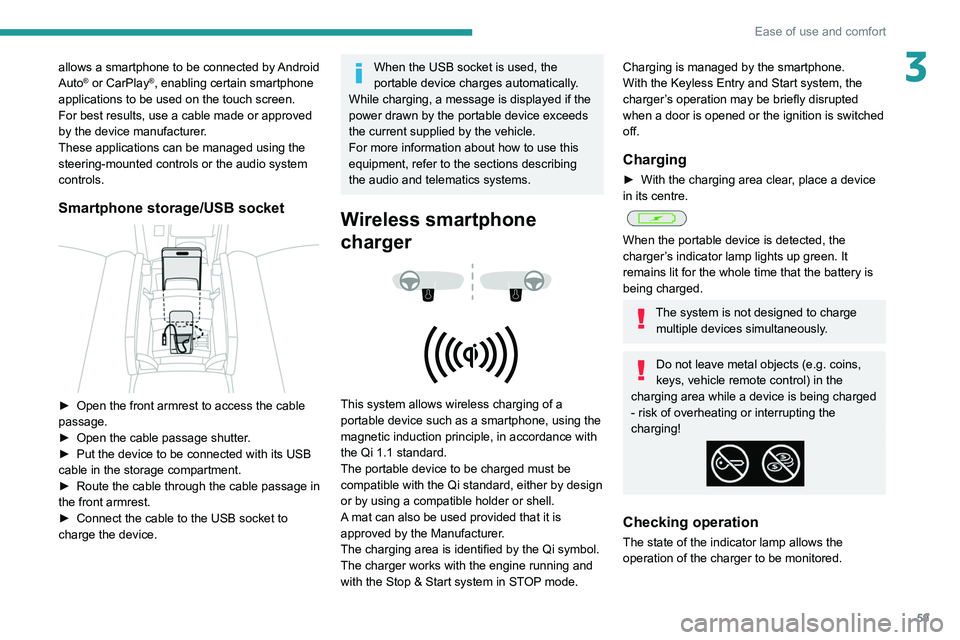
Smartphone storage/USB socket
► Open the front armrest to access the cable
passage.
►
Open the cable passage shutter
.
►
Put the device to be connected with its USB
cable in the storage compartment.
►
Route the cable through the cable passage in
the front armrest.
►
Connect the cable to the USB socket to
charge the device.
When the USB socket is used, the
portable device charges automatically.
While charging, a message is displayed if the
power drawn by the portable device exceeds
the current supplied by the vehicle.
For more information about how to use this
equipment, refer to the sections describing
the audio and telematics systems.
Wireless smartphone
charger
This system allows wireless charging of a
portable device such as a smartphone, using the
magnetic induction principle, in accordance with
the Qi 1.1 standard.
The portable device to be charged must be
compatible with the Qi standard, either by design
or by using a compatible holder or shell.
A mat can also be used provided that it is
approved by the Manufacturer.
The charging area is identified by the Qi symbol.
The charger works with the engine running and
with the Stop & Start system in STOP mode.
Charging is managed by the smartphone.
With the Keyless Entry and Start system, the
charger’s operation may be briefly disrupted
when a door is opened or the ignition is switched
off.
Charging
► With the charging area clear , place a device
in its centre.
When the portable device is detected, the
charger’s indicator lamp lights up green. It
remains lit for the whole time that the battery is
being charged.
The system is not designed to charge multiple devices simultaneously.
Do not leave metal objects (e.g. coins,
keys, vehicle remote control) in the
charging area while a device is being charged
- risk of overheating or interrupting the
charging!
Checking operation
The state of the indicator lamp allows the
operation of the charger to be monitored.
Page 81 of 260

79
Safety
5Horn
► Press the central part of the steering wheel.
Pedestrian horn
(Rechargeable hybrid)
This system alerts pedestrians that the vehicle is approaching, when driving in Electric mode
(100% electric driving).
The pedestrian horn operates once the vehicle
is moving and at speeds of up to 19 mph
(30
km/h), in forward or reverse gear.
This function cannot be deactivated.
Malfunction
In the event of a malfunction, this warning
lamp lights up on the instrument panel.
* In accordance with the general conditions of use of the service, available from dealers an\
d subject to technological and technical limitations.
** Depend ing on the geographic coverage provided by the "eCall (SOS)" and "ASSISTANCE" systems.
The list of countries covered and the telematic services provided is ava\
ilable from dealers or on the website for your country. Have it checked by a PEUGEOT dealer or a
qualified workshop.
Emergency or assistance
call
1. eCall (SOS)
2. ASSISTANCE
eCall (SOS)
Your vehicle may be fitted with the eCall (SOS)
system either as standard or as an option.
The eCall
(SOS) system provides direct contact
to the emergency services and is fully built
into the vehicle. This contact is made either
automatically via the sensors built into the
vehicle, or by pressing button 1.
According to the country of sale, the eCall (SOS)
system corresponds to the systems PE112,
ERAGLONASS, 999, etc.
The eCall
(SOS) system is activated by default.
►
T
o make an emergency call manually, press
button 1 for more than 2 seconds.
The lit indicator lamp and a voice message
confirm that the call has been made to the
emergency services*.
The eCall
(SOS) system immediately locates
your vehicle and puts you in contact with the
appropriate emergency services**.
►
Pressing again immediately cancels the
request.
The indicator lamp flashes while the vehicle
data is being sent, and then remains lit when
communication is established.
In the event that a serious accident is
detected by the sensors built into the
vehicle, such as the airbag control unit, an
emergency call is made automatically.
The eCall (SOS) system is a public
service and is free-of-charge.