2022 PEUGEOT 301 light
[x] Cancel search: lightPage 85 of 148
83
In the event of a breakdown
8
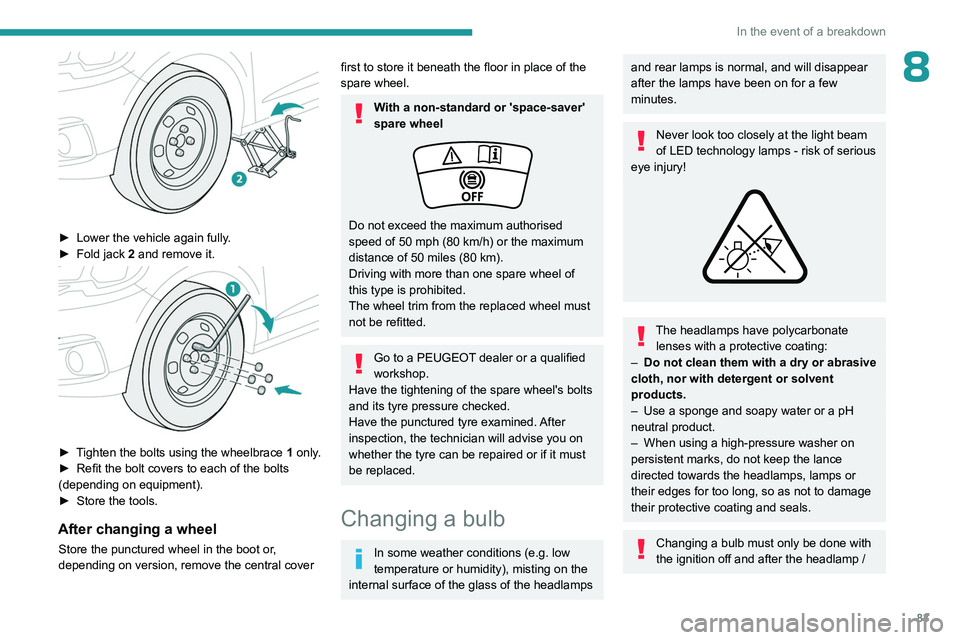
► Lower the vehicle again fully.
► Fold jack 2 and remove it.
► Tighten the bolts using the wheelbrace 1 only.
► Refit the bolt covers to each of the bolts
(depending on equipment).
►
Store the tools.
After changing a wheel
Store the punctured wheel in the boot or,
depending on version, remove the central cover
first to store it beneath the floor in place of the
spare wheel.
With a non-standard or 'space-saver'
spare wheel
Do not exceed the maximum authorised
speed of 50 mph (80 km/h) or the maximum
distance of 50 miles (80 km).
Driving with more than one spare wheel of
this type is prohibited.
The wheel trim from the replaced wheel must
not be refitted.
Go to a PEUGEOT dealer or a qualified
workshop.
Have the tightening of the spare wheel's bolts
and its tyre pressure checked.
Have the punctured tyre examined. After
inspection, the technician will advise you on
whether the tyre can be repaired or if it must
be replaced.
Changing a bulb
In some weather conditions (e.g. low
temperature or humidity), misting on the
internal surface of the glass of the headlamps
and rear lamps is normal, and will disappear
after the lamps have been on for a few
minutes.
Never look too closely at the light beam
of LED technology lamps - risk of serious
eye injury!
The headlamps have polycarbonate lenses with a protective coating:
–
Do not clean them with a dry or abrasive
cloth, nor with detergent or solvent
products.
–
Use a sponge and soapy water or a pH
neutral product.
–
When using a high-pressure washer on
persistent marks, do not keep the lance
directed towards the headlamps, lamps or
their edges for too long, so as not to damage
their protective coating and seals.
Changing a bulb must only be done with
the ignition off and after the headlamp /
Page 86 of 148
84
In the event of a breakdown
lamp has been switched off for several
minutes - risk of serious burns!
Do not touch the bulb directly with your
fingers; use a lint-free cloth.
It is essential only to use anti-ultraviolet
(UV) type bulbs, so as not to damage the
headlamp.
Always replace a failed bulb with a new bulb
of the same type and specification. To avoid
lighting imbalance, replace the bulbs in pairs.
Refitting the lamp units
Perform the operations in the reverse
order to dismantling.
Light-emitting diode (LED)
headlamps and lamps
Depending on version, the affected types of
headlamps/lamps are:
–
Daytime running lamps/sidelamps.
If you need to replace this type of bulb,
you must contact a PEUGEOT dealer or
a qualified workshop.
Do not touch the LED technology bulbs - risk
of electrocution!
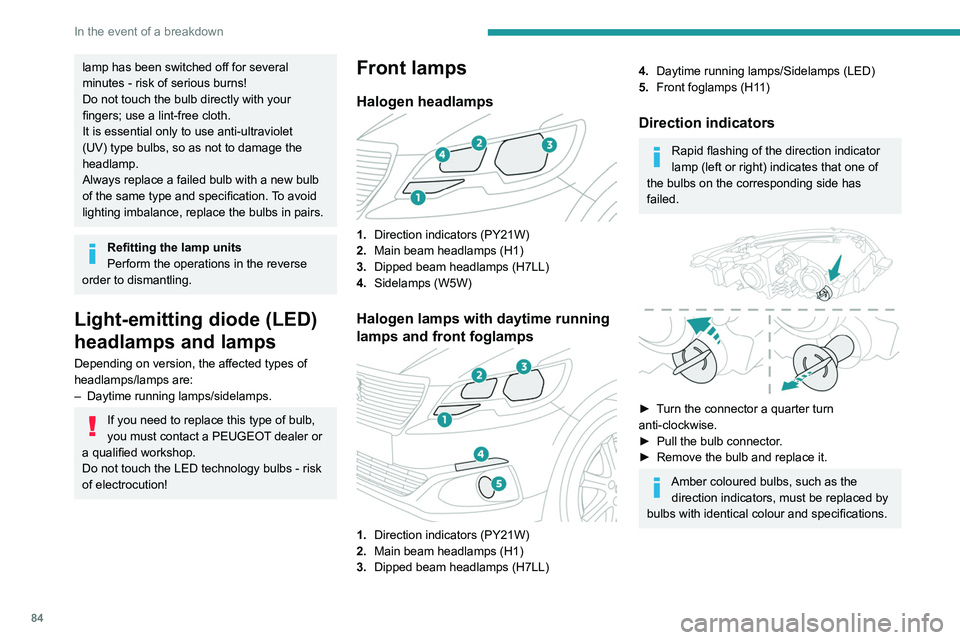
Front lamps
Halogen headlamps
1. Direction indicators (PY21W)
2. Main beam headlamps (H1)
3. Dipped beam headlamps (H7LL)
4. Sidelamps (W5W)
Halogen lamps with daytime running
lamps and front foglamps
1.Direction indicators (PY21W)
2. Main beam headlamps (H1)
3. Dipped beam headlamps (H7LL)
4.Daytime running lamps/Sidelamps (LED)
5. Front foglamps (H11)
Direction indicators
Rapid flashing of the direction indicator
lamp (left or right) indicates that one of
the bulbs on the corresponding side has
failed.
► Turn the connector a quarter turn
anti-clockwise.
►
Pull the bulb connector
.
►
Remove the bulb and replace it.
Amber coloured bulbs, such as the direction indicators, must be replaced by
bulbs with identical colour and specifications.
Page 91 of 148

89
In the event of a breakdown
8
For access to the (+) terminal:
► Release the bonnet by pulling the internal
release lever
, then the external safety catch.
►
Raise the bonnet.
(+)
Positive terminal with a quick-release
terminal.
(-) Negative terminal.
As the battery's negative terminal is not
accessible, a remote earth point is located on
the engine.
Starting using another battery
If the vehicle's battery is flat, the engine can be
started using a backup battery (either external or
from another vehicle) and jump leads or using a
battery booster.
Never start the engine by connecting a
battery charger.
Never use a 24
V or higher battery booster.
Check beforehand that the backup battery
has a nominal voltage of 12
V and a capacity
at least equal to that of the discharged
battery.
The two vehicles must not be in contact with
each other.
Switch off all electricity-consuming equipment
on both vehicles (audio system, wipers,
lighting, etc.).
Make sure that the jump leads are well away
from the engine’s moving parts (fan, belt,
etc.).
Do not disconnect the (+) terminal while the
engine is running.
► Lift the plastic cover on the (+) terminal, if the
vehicle has one.
►
Connect the red cable to the (+) terminal of
flat battery
A (at the metal elbow), then to the
(+) terminal of the backup battery
B or of the
booster.
►
Connect one end of the green or black cable
to the (-) terminal of the backup battery
B or of
the booster (or to an earth point on the assisting
vehicle).
►
Connect the other end of the green or black
cable to the earth point
C
.
►
Start the engine on the assisting vehicle and
leave it running for a few minutes.
►
Operate the starter on the broken down
vehicle and let the engine run.
If the engine does not start immediately
, switch
off the ignition and wait a few moments before
trying again.
►
W
ait for it to return to idle.
►
Disconnect the jump leads in reverse order.
►
Refit the plastic cover to the (+) terminal, if
the vehicle has one.
►
Allow the engine to run for at least
30
minutes, with the vehicle stationary, so that
the battery reaches an adequate state of charge.
Driving immediately without having
reached a sufficient level of charge may
affect some of the vehicle's functions (e.g.
Stop & Start).
Charging the battery using a battery
charger
For optimum service life of the battery, it is
essential to maintain an adequate state of
charge.
In some circumstances, it may be necessary to
charge the battery:
–
When using the vehicle mainly for short
journeys.
Page 92 of 148
90
In the event of a breakdown
– If the vehicle is to be taken off the road for
several weeks.
Consult a PEUGEOT
dealer or a qualified
workshop.
To charge the vehicle's battery yourself, use only a charger compatible with
lead-acid batteries with a nominal voltage of
12
V.
Follow the instructions provided by the
manufacturer of the charger.
Never reverse polarities.
It is not necessary to disconnect the
battery.
►
Switch the ignition off.
►
Switch off all electrical consumers (audio
system, lighting, wipers, etc.).
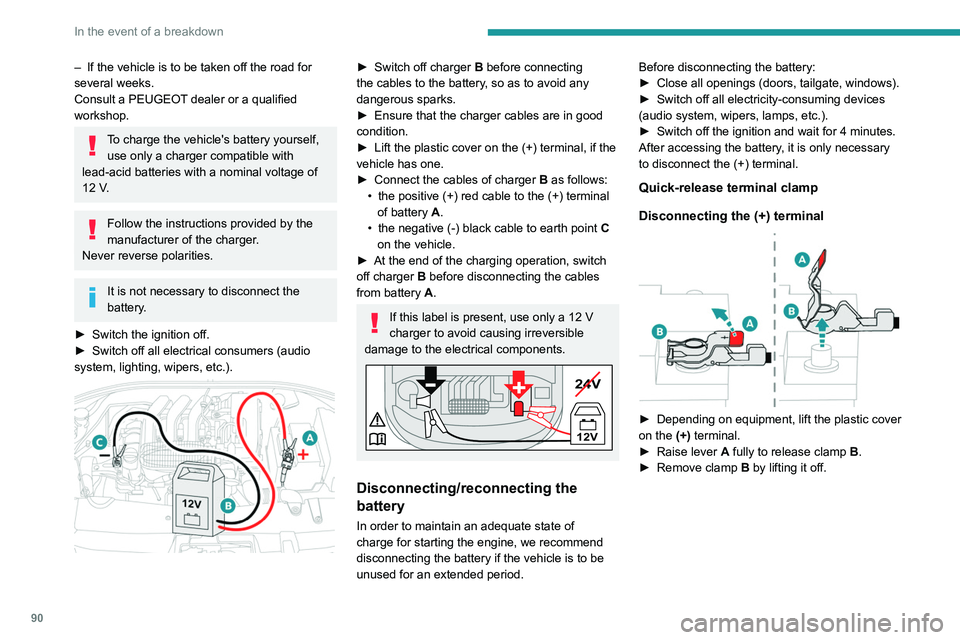
► Switch off charger B before connecting
the cables to the battery, so as to avoid any
dangerous sparks.
►
Ensure that the charger cables are in good
condition.
►
Lift the plastic cover on the (+) terminal, if the
vehicle has one.
►
Connect the cables of charger B
as follows:
•
the positive (+) red cable to the (+) terminal
of battery
A.
•
the negative (-) black cable to earth point C
on the vehicle.
►
At the end of the charging operation, switch
off charger B
before disconnecting the cables
from battery A.
If this label is present, use only a 12 V
charger to avoid causing irreversible
damage to the electrical components.
24V
12V
+
Disconnecting/reconnecting the
battery
In order to maintain an adequate state of
charge for starting the engine, we recommend
disconnecting the battery if the vehicle is to be
unused for an extended period. Before disconnecting the battery:
►
Close all openings (doors, tailgate, windows).
►
Switch off all electricity-consuming devices
(audio system, wipers, lamps, etc.).
►
Switch off the ignition and wait for 4
minutes.
After accessing the battery, it is only necessary
to disconnect the (+) terminal.
Quick-release terminal clamp
Disconnecting the (+) terminal
► Depending on equipment, lift the plastic cover
on the (+) terminal.
►
Raise lever
A
fully to release clamp
B
.
►
Remove clamp
B
by lifting it off.
Page 95 of 148
93
Technical data
9Engine technical data and
towed loads
Engines
The engine characteristics are given in the
vehicle's registration document, as well as in
sales brochures.
Only the values available at the time of
publication are presented in the tables.
Contact a PEUGEOT dealer or a qualified
workshop to obtain missing values.
The maximum power corresponds to the value type-approved on a test bed, under
conditions defined by European legislation
(Directive 1999/99/EC).
For more information, contact a PEUGEOT
dealer or a qualified workshop.
Weights and towed loads
The weights and towed loads relating to
the vehicle are indicated on the registration
document, as well as in sales brochures.
These values are also indicated on the
manufacturer's plate or label.
For more information, contact a PEUGEOT
dealer or a qualified workshop.
The GTW (Gross Train Weight) and towed load
values indicated are valid up to a maximum
altitude of 1,000 metres. The towed load value
must be reduced by 10% for each additional
1,000 metres of altitude.
The maximum authorised nose weight
corresponds to the weight permitted on the
towball.
When exterior temperatures are high, the
vehicle performance may be limited in
order to protect the engine. When the exterior
temperature is higher than 37°C, reduce the
towed weight.
Towing even with a lightly loaded vehicle can adversely affect its road holding.
Braking distances are increased when towing
a trailer.
When using a vehicle to tow, never exceed
a speed of 62 mph (100
km/h) (observe the
local legislation in force).
Page 111 of 148
109
PEUGEOT Connect Radio
11
In the "Settings" menu, it is possible to
create a profile for an individual or for a
group of people with shared interests, and
configure a wide range of settings (radio
presets, audio settings, ambiences, etc.).
Settings are applied automatically.
In very hot conditions, the volume may
be limited to protect the system. It may
enter standby mode (with the screen and
sound off) for 5 minutes or more.
The system will resume normal operation
when the temperature in the passenger
compartment has dropped.
Steering mounted controls
Steering mounted controls -
Type 1
Radio:
Select the previous/next preset radio
station.
Select the previous/next item in a menu or a list.
Media:
Select the previous/next track.
Select the previous/next item in a menu or a list.
Radio:
Short press: display the list of radio
stations.
Long press: update the list.
Media:
Short press: display the list of folders.
Long press: display the available sorting options.
Change audio source (radio; USB; AUX if
equipment connected; CD; streaming).
Confirm a selection.
Increase volume.
Decrease volume.
Mute/restore sound by simultaneously
pressing the increase and decrease
volume buttons.
Steering mounted controls -
Type 2
Voice commands:
This control is located on the steering
wheel or at the end of the lighting control stalk
(depending on equipment).
Short press, smartphone voice commands via
the system.
Increase volume.
Decrease volume.
Mute by pressing the volume increase
and decrease buttons simultaneously
(depending on equipment).
Restore the sound by pressing one of the two
volume buttons.
Media (short press): change the
multimedia source.
Telephone (short press): start telephone
call.
Call in progress (short press): access
telephone menu.
Telephone (long press): reject an incoming call,
end call; when no call is in progress, access
telephone menu.
Radio (rotate): automatic search for the
previous/next station.
Media (rotate): previous/next track, move in a
list.
Page 124 of 148
122
Vehicle data recording and privacy
Comfort and infotainment
functions
Comfort settings and personalised settings
may be saved in the vehicle and modified or
reinitialised at any time.
Depending on the vehicle's equipment level,
this
may
include:
–
Seat and steering wheel position settings.
–
Chassis and air conditioning settings.
–
Personalised settings such as the interior
lighting.
Y
ou can enter your own data into the functions
of your vehicle's audio and telematic system, as
part of the selected functionalities.
Depending on the vehicle's equipment level,
this
may
include:
–
Multimedia data such as music, videos or
photos to be read by an integrated multimedia
system.
–
Address book data to be used with an
integrated hands-free system or with an
integrated navigation system.
–
Entered destinations.
–
Data regarding the use of online services.
This data for the comfort and infotainment
functions may be stored locally in the vehicle
or saved to a device that you have connected
to the vehicle (e.g.
smartphone, USB memory
stick or MP3 player). Data that you have entered
yourself may be deleted at any time.
This data may also be transmitted outside the
vehicle at your request, particularly when using online services in line with the settings that you
have selected. Smartphone integration
(e.g.
Android
Auto
® or
Apple
®CarPlay®)
If your vehicle is equipped accordingly, you can
connect your smartphone or another mobile
device to the vehicle in order to operate it using
the vehicle's integrated controls. Images and
sounds from the smartphone can be transmitted
through the audio and telematics system.
Specific information is simultaneously sent
to your smartphone. Depending on the type
of
integration, this includes data such as location,
day/night mode and other general information
about the vehicle. For more information, please
refer to the user instructions for the vehicle or the
audio and telematics system.
Integrating a smartphone allows you to use
its applications, such as a navigation app or
music player. No other
integration between
the smartphone and the vehicle is possible, in
particular active access to vehicle data. How the
data is processed subsequently is determined
by the supplier of the application being used.
The ability the change settings depends on the
application in question and on the operating
system installed on your smartphone.
Online services
If your vehicle is connected to a wireless
network, data can be exchanged between
your vehicle and other systems. Connection
to a wireless network is made possible
via a
transmitter located in your vehicle or a mobile
device that you have provided (e.g.
smartphone).
The online services can be used via this wireless
connection.
These include online services and
applications (apps) provided to you by the
Manufacturer or other suppliers.
Exclusive services
As regards the Manufacturer's online services,
the corresponding functions are described by
the Manufacturer in an appropriate medium
(e.g.
handbook, Manufacturer's website) and the
information about data protection is provided.
Personal data may be used for online services.
The exchange of data for this purpose takes
place over a secure connection, using for
example the Manufacturer's dedicated computer
systems. The collection, processing and use of
personal data for the development of services
are carried out solely on the basis of a legal
authorisation, for example in the case of a
legal emergency call system or a contractual
agreement or else under a consent agreement.
You can activate or deactivate the services and
functions (some may be chargeable) and, in
some cases, the vehicle's entire connection to
the wireless network. This does not include the
Page 126 of 148
124
Alphabetical index
A
ABS 36
Accessories
35
Additive, Diesel
74–75
Adjusting headlamps
33
Adjusting head restraints
21
Adjusting seat
21–22
Adjusting the date
12, 119
Adjusting the headlamp beam height
33
Adjusting the height and reach of the
steering wheel
23
Adjusting the time
12, 118
Advice on care and maintenance
76
Advice on driving
6, 49–50
Airbags
39–41, 43
Airbags, curtain
40
Airbags, front
40–41, 43
Airbags, lateral
40–41
Air conditioning
24
Air conditioning, electronic (with
display screen)
26–27
Air conditioning, manual (without
display screen)
25
Air vents
24
Alarm
19–20
Anti-lock braking system (ABS)
36
Antitheft / Immobiliser
16
Armrest, front
28–29
Ashtray, portable
28
Assistance, emergency braking
36
Audio streaming (Bluetooth)
102–103, 114
B
Battery 88
Battery, 12 V
69, 74–75, 88–90
Battery, charging
88–89
Battery, remote control
17
Blanking screen (snow shield)
70
Bluetooth (hands-free)
102, 116
Bluetooth (telephone)
116–117
Bodywork
77
Bonnet
71–72
Boot
18–19
Boot (opening)
15
Brake discs
75
Brake lamps
86
Brakes
75
Braking assistance system
36
Brightness
11 8
Bulbs (changing)
83–84, 86
C
Capacity, fuel tank 67
Care of the bodywork
77
CD
100
CD, MP3
100
Central locking
16
Changing a bulb
83–84, 86
Changing a fuse
87
Changing a wheel
80
Changing a wiper blade
33–34
Changing the remote control battery 17
Changing to free-wheeling
76
Checking the levels
73–74
Checks
72, 74–75
Checks, routine
74–75
Child lock
44, 47–48
Children
38, 44–47
Children (safety)
48
Child seats
38, 41–44
Child seats, conventional
43
Child seats, ISOFIX
45–47
Cigar lighter
29
Cleaning (advice)
76–78
Clock
12
Closing the boot
18–19
Closing the doors
18
Connection, Apple CarPlay
11 5
Connection, Bluetooth
116–117
Connection, MirrorLink
11 5
Control, emergency boot release
19
Control, emergency door
17
Control stalk, lighting
31
Control stalk, wipers
33
Courtesy lamps
30
Cruise control
62–64
D
DAB (Digital Audio Broadcasting) -
Digital radio
11 3
Date (setting)
12, 119