2022 PEUGEOT 301 ignition
[x] Cancel search: ignitionPage 85 of 148
83
In the event of a breakdown
8
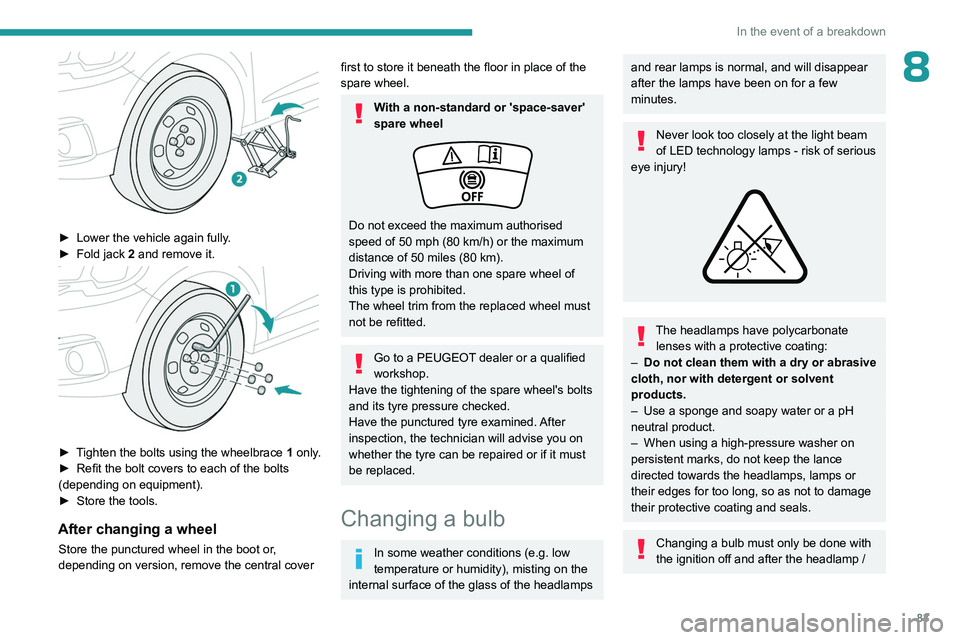
► Lower the vehicle again fully.
► Fold jack 2 and remove it.
► Tighten the bolts using the wheelbrace 1 only.
► Refit the bolt covers to each of the bolts
(depending on equipment).
►
Store the tools.
After changing a wheel
Store the punctured wheel in the boot or,
depending on version, remove the central cover
first to store it beneath the floor in place of the
spare wheel.
With a non-standard or 'space-saver'
spare wheel
Do not exceed the maximum authorised
speed of 50 mph (80 km/h) or the maximum
distance of 50 miles (80 km).
Driving with more than one spare wheel of
this type is prohibited.
The wheel trim from the replaced wheel must
not be refitted.
Go to a PEUGEOT dealer or a qualified
workshop.
Have the tightening of the spare wheel's bolts
and its tyre pressure checked.
Have the punctured tyre examined. After
inspection, the technician will advise you on
whether the tyre can be repaired or if it must
be replaced.
Changing a bulb
In some weather conditions (e.g. low
temperature or humidity), misting on the
internal surface of the glass of the headlamps
and rear lamps is normal, and will disappear
after the lamps have been on for a few
minutes.
Never look too closely at the light beam
of LED technology lamps - risk of serious
eye injury!
The headlamps have polycarbonate lenses with a protective coating:
–
Do not clean them with a dry or abrasive
cloth, nor with detergent or solvent
products.
–
Use a sponge and soapy water or a pH
neutral product.
–
When using a high-pressure washer on
persistent marks, do not keep the lance
directed towards the headlamps, lamps or
their edges for too long, so as not to damage
their protective coating and seals.
Changing a bulb must only be done with
the ignition off and after the headlamp /
Page 91 of 148

89
In the event of a breakdown
8
For access to the (+) terminal:
► Release the bonnet by pulling the internal
release lever
, then the external safety catch.
►
Raise the bonnet.
(+)
Positive terminal with a quick-release
terminal.
(-) Negative terminal.
As the battery's negative terminal is not
accessible, a remote earth point is located on
the engine.
Starting using another battery
If the vehicle's battery is flat, the engine can be
started using a backup battery (either external or
from another vehicle) and jump leads or using a
battery booster.
Never start the engine by connecting a
battery charger.
Never use a 24
V or higher battery booster.
Check beforehand that the backup battery
has a nominal voltage of 12
V and a capacity
at least equal to that of the discharged
battery.
The two vehicles must not be in contact with
each other.
Switch off all electricity-consuming equipment
on both vehicles (audio system, wipers,
lighting, etc.).
Make sure that the jump leads are well away
from the engine’s moving parts (fan, belt,
etc.).
Do not disconnect the (+) terminal while the
engine is running.
► Lift the plastic cover on the (+) terminal, if the
vehicle has one.
►
Connect the red cable to the (+) terminal of
flat battery
A (at the metal elbow), then to the
(+) terminal of the backup battery
B or of the
booster.
►
Connect one end of the green or black cable
to the (-) terminal of the backup battery
B or of
the booster (or to an earth point on the assisting
vehicle).
►
Connect the other end of the green or black
cable to the earth point
C
.
►
Start the engine on the assisting vehicle and
leave it running for a few minutes.
►
Operate the starter on the broken down
vehicle and let the engine run.
If the engine does not start immediately
, switch
off the ignition and wait a few moments before
trying again.
►
W
ait for it to return to idle.
►
Disconnect the jump leads in reverse order.
►
Refit the plastic cover to the (+) terminal, if
the vehicle has one.
►
Allow the engine to run for at least
30
minutes, with the vehicle stationary, so that
the battery reaches an adequate state of charge.
Driving immediately without having
reached a sufficient level of charge may
affect some of the vehicle's functions (e.g.
Stop & Start).
Charging the battery using a battery
charger
For optimum service life of the battery, it is
essential to maintain an adequate state of
charge.
In some circumstances, it may be necessary to
charge the battery:
–
When using the vehicle mainly for short
journeys.
Page 92 of 148
90
In the event of a breakdown
– If the vehicle is to be taken off the road for
several weeks.
Consult a PEUGEOT
dealer or a qualified
workshop.
To charge the vehicle's battery yourself, use only a charger compatible with
lead-acid batteries with a nominal voltage of
12
V.
Follow the instructions provided by the
manufacturer of the charger.
Never reverse polarities.
It is not necessary to disconnect the
battery.
►
Switch the ignition off.
►
Switch off all electrical consumers (audio
system, lighting, wipers, etc.).
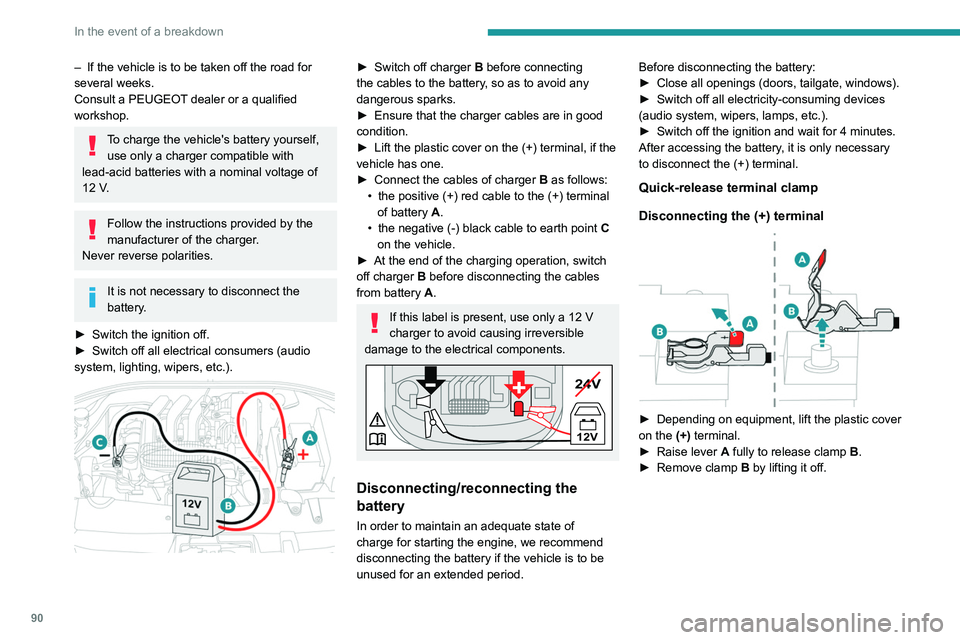
► Switch off charger B before connecting
the cables to the battery, so as to avoid any
dangerous sparks.
►
Ensure that the charger cables are in good
condition.
►
Lift the plastic cover on the (+) terminal, if the
vehicle has one.
►
Connect the cables of charger B
as follows:
•
the positive (+) red cable to the (+) terminal
of battery
A.
•
the negative (-) black cable to earth point C
on the vehicle.
►
At the end of the charging operation, switch
off charger B
before disconnecting the cables
from battery A.
If this label is present, use only a 12 V
charger to avoid causing irreversible
damage to the electrical components.
24V
12V
+
Disconnecting/reconnecting the
battery
In order to maintain an adequate state of
charge for starting the engine, we recommend
disconnecting the battery if the vehicle is to be
unused for an extended period. Before disconnecting the battery:
►
Close all openings (doors, tailgate, windows).
►
Switch off all electricity-consuming devices
(audio system, wipers, lamps, etc.).
►
Switch off the ignition and wait for 4
minutes.
After accessing the battery, it is only necessary
to disconnect the (+) terminal.
Quick-release terminal clamp
Disconnecting the (+) terminal
► Depending on equipment, lift the plastic cover
on the (+) terminal.
►
Raise lever
A
fully to release clamp
B
.
►
Remove clamp
B
by lifting it off.
Page 93 of 148
91
In the event of a breakdown
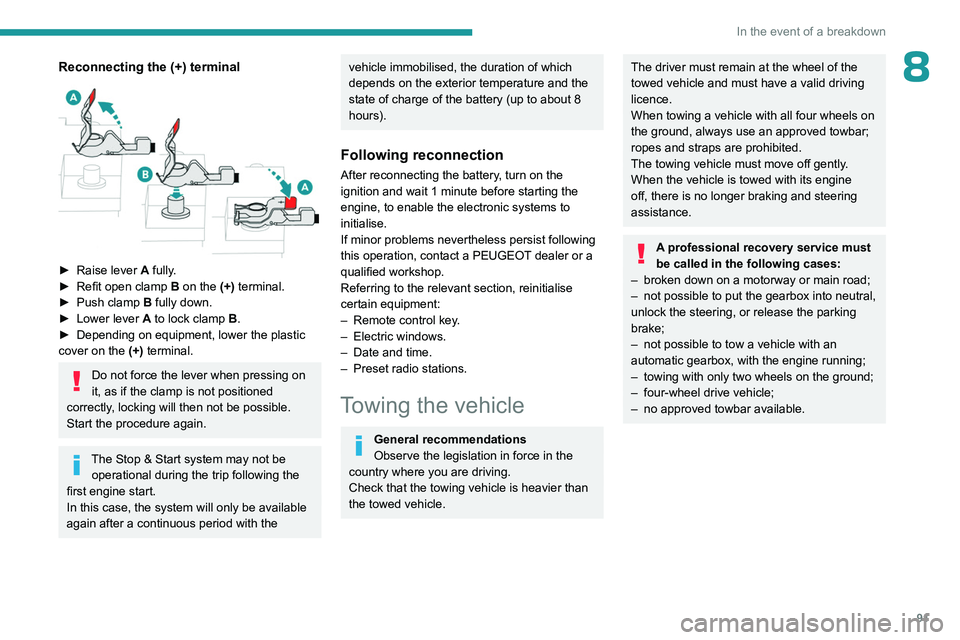
8Reconnecting the (+) terminal
► Raise lever A fully.
► Refit open clamp B on the (+) terminal.
►
Push clamp
B fully down.
►
Lower lever
A
to lock clamp B.
►
Depending on equipment, lower the plastic
cover on the
(+) terminal.
Do not force the lever when pressing on
it, as if the clamp is not positioned
correctly, locking will then not be possible.
Start the procedure again.
The Stop & Start system may not be operational during the trip following the
first engine start.
In this case, the system will only be available
again after a continuous period with the
vehicle immobilised, the duration of which
depends on the exterior temperature and the
state of charge of the battery (up to about 8
hours).
Following reconnection
After reconnecting the battery, turn on the
ignition and wait 1 minute before starting the
engine, to enable the electronic systems to
initialise.
If minor problems nevertheless persist following
this operation, contact a PEUGEOT dealer or a
qualified workshop.
Referring to the relevant section, reinitialise
certain equipment:
–
Remote control key
.
–
Electric windows.
–
Date and time.
–
Preset radio stations.
Towing the vehicle
General recommendations
Observe the legislation in force in the
country where you are driving.
Check that the towing vehicle is heavier than
the towed vehicle.
The driver must remain at the wheel of the
towed vehicle and must have a valid driving
licence.
When towing a vehicle with all four wheels on
the ground, always use an approved towbar;
ropes and straps are prohibited.
The towing vehicle must move off gently.
When the vehicle is towed with its engine
off, there is no longer braking and steering
assistance.
A professional recovery service must
be called in the following cases:
–
broken down on a motorway or main road;
–
not possible to put the gearbox into neutral,
unlock the steering, or release the parking
brake;
–
not possible to tow a vehicle with an
automatic gearbox, with the engine running;
–
towing with only two wheels on the ground;
–
four-wheel drive vehicle;
–
no approved towbar available.
Page 100 of 148
98
Bluetooth® audio system
Bluetooth® audio system
As a safety measure and because it requires sustained attention by the driver,
the pairing of a Bluetooth mobile telephone
with the Bluetooth hands-free system of your
audio system must be done with the vehicle
stationary and the ignition on.
Your audio system is coded in such a way that it will only operate in your
vehicle.
All work on the system must be carried out
exclusively by a dealer or qualified workshop,
to avoid any risk of electrocution, fire or
mechanical faults.
To avoid discharging the battery, the audio system may switch off after a few
minutes if the engine is not running.
First steps
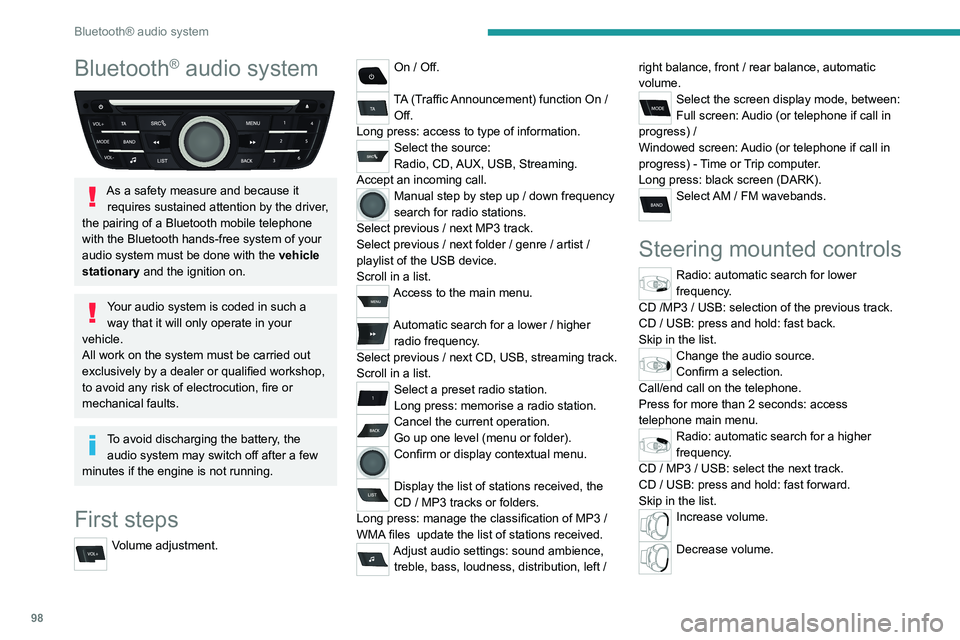
Volume adjustment.
On / Off.
TA (Traffic Announcement) function On /
Off.
Long press: access to type of information.
Select the source:
Radio, CD, AUX, USB, Streaming.
Accept an incoming call.
Manual step by step up / down frequency
search for radio stations.
Select previous
/ next MP3 track.
Select previous
/ next folder / genre / artist /
playlist of the USB device.
Scroll in a list.
Access to the main menu.
Automatic search for a lower / higher
radio frequency .
Select previous
/ next CD, USB, streaming track.
Scroll in a list.
Select a preset radio station.
Long press: memorise a radio station.
Cancel the current operation.
Go up one level (menu or folder).
Confirm or display contextual menu.
Display the list of stations received, the
CD
/ MP3 tracks or folders.
Long press: manage the classification of MP3
/
WMA files
update the list of stations received.
Adjust audio settings: sound ambience, treble, bass, loudness, distribution, left / right balance, front
/ rear balance, automatic
volume.
Select the screen display mode, between:
Full screen: Audio (or telephone if call in
progress)
/
Windowed screen: Audio (or telephone if call in
progress)
- Time or Trip computer.
Long press: black screen (DARK).
Select AM / FM wavebands.
Steering mounted controls
Radio: automatic search for lower
frequency.
CD /MP3 / USB: selection of the previous track.
CD / USB: press and hold: fast back.
Skip in the list.
Change the audio source.
Confirm a selection.
Call/end call on the telephone.
Press for more than 2 seconds: access
telephone main menu.
Radio: automatic search for a higher
frequency.
CD / MP3 / USB: select the next track.
CD / USB: press and hold: fast forward.
Skip in the list.
Increase volume.
Decrease volume.
Page 102 of 148
100
Bluetooth® audio system
Screen C
With the radio displayed on the screen,
press OK to display the contextual menu.
Turn the thumb wheel to select '’RADIO TEXT'', press to save.
Media
Audio CD
Playing a CD
Insert 12 cm diameter circular compact
discs only.
Some anti-pirating systems, on original discs
or CDs copied using a personal recorder, may
cause faults which are no reflection on the
quality of the original player.
Without pressing the EJECT button, insert a CD
in the player, play begins automatically.
To play a disc which has already been inserted, press the SRC/TEL button
several times and select " CD".
Press one of the buttons to select
a track on the CD.
Press LIST to display the list of tracks on
the CD.
Press and hold one of these
buttons for fast forward or fast
back.
CD, USB
Information and advice
The audio system will only play files with extension ".mp3" or ".wma" and a
compression rate that is constant or variable
between 32 Kbps and 320 Kbps.
File names should have less than 20
characters, avoiding special characters
(e.g.: “
? ; ù) so as to avoid any reading or
display problems.
Playlists accepted are types .m3u and
.pls.
The number of files is limited to 5 000 in 500
directories on a maximum of 8 levels.
On a single disc, the CD player can read
up to 255 MP3 files spread over 8
directory levels. However, it is recommended
that this be kept to 2 levels so as to limit the
time taken to access and play the CD.
The folder structure is not observed during
playback.
In order to be able to play a burned CDR
or CDRW, select standards ISO 9660
level 1, 2 or Joliet if possible when burning the
CD.
If the disc is burned in another format, it may not
be played correctly.
It is recommended that the same burning
standard is always used on an individual disc,
with the lowest speed possible (4x maximum) for
the best acoustic quality.
In the particular case of a multi-session CD, the
Joliet standard is recommended.
Do not connect a hard disk or USB
device other than audio players to the
USB port. This may cause damage to your
installation.
Playing a compilation
Insert an MP3 compilation in the CD player or
connect a memory stick to the USB port, directly
or via an extension lead.
The system creates playlists (temporary memory); this operation can take from a
few seconds to several minutes.
The playlists are updated every time the
ignition is switched off or a USB memory stick
is connected.
Play starts automatically after a certain
amount of time depending on the capacity of
the USB memory stick.
Use only USB memory sticks formatted FAT
32 (File Allocation Table).
On first connection, the order suggested is
by folder. When connecting again, the order
previously chosen is retained.
To play a disc or memory stick which has already been inserted, press the SRC/
TEL button repeatedly and select " CD" or "USB".
Page 104 of 148
102
Bluetooth® audio system
Streaming - Playing audio
files via Bluetooth
Depending on the compatibility of the
phone
Streaming allows music files on a
telephone to be heard via the vehicle's
speakers.
The telephone must support the appropriate
Bluetooth profiles (Profiles A2DP / AVRCP).
Pair/connect the telephone: see the
TELEPHONE section.
Activate the streaming source by pressing SRC/TEL. Control of playback is via the
audio system. The contextual information can be
displayed in the screen.
In certain cases, playing of the audio files
must be initiated from the telephone.
The audio quality depends on the quality of
transmission by the telephone.
Play mode
The play modes available are: – Normal Normal: the tracks are played
in order
, depending on the classification of the
selected files.
–
Random Random: the tracks in an album or
folder are played in a random order
.
– Random all Random all: all of the tracks
saved in the media are played in random
order
.
–
Repeat Repeat: the tracks played are only
those from the current album or folder
.
Press the thumb wheel to access the
contextual menu.
or
Press MENU.
Select “Multimedia" and confirm.
Select “Media settings" and confirm.
Select “Read mode" and confirm.
Choose the desired playback method then
press the thumb wheel to validate and save the
changes.
Telephone
Pairing a telephone
First connection
The services offered depend on the network, the SIM card and the
compatibility of the Bluetooth telephone used.
Check the instructions for your telephone and
with your service provider for the services to
which you have access.
As a safety measure and because they require prolonged attention on the part of
the driver, the operations for pairing of the
Bluetooth mobile telephone with the Bluetooth
hands-free system of your audio system must
be carried out with the vehicle stationary
and the ignition on.
For more information (compatibility, more
help, ...), visit the Manufacturer's website in
your country.
Activate the telephone's Bluetooth function
and ensure that it is "visible to all" (refer to the
telephone user guide).
Press MENU.
Select “Bluetooth connection " and confirm.Select “Search for a device".
A window is displayed with “ Search in
progress…".
Select the telephone to be connected
from the list. Only one telephone can be
connected at a time.
In some cases, the reference number of
the telephone or the Bluetooth address
may appear instead of the name of the
telephone.
Page 110 of 148
108
PEUGEOT Connect Radio
PEUGEOT Connect
Radio
Multimedia audio system -
Applications - Bluetooth
®
telephone
The functions and settings described
vary according to the vehicle version and
configuration, as well as the country of sale.
For safety reasons and because they
require sustained attention by the driver,
the following operations must be carried out
with the vehicle stationary and the ignition
on:
–
Pairing the smartphone with the system via
Bluetooth.
–
Using the smartphone.
–
Connecting to the CarPlay® or Android
Auto applications (certain applications stop
displaying when the vehicle is moving).
–
Changing the system settings and
configuration.
The system is protected so that it only operates in the vehicle.
The message Energy economy mode is
displayed when the system is about to go into
standby.
The system’s Open Source Software (OSS) source codes are available at the
following addresses:
https://www.groupe-psa.com/fr/oss/
https://www.groupe-psa.com/en/oss/
First steps
With the engine running, a press mutes
the sound.
With the ignition off, a press turns the system on.
Increase or decrease the volume using
the wheel or the "plus" or "minus" buttons
(depending on the equipment).
Use the buttons on either side of or below the
touch screen to access the menus, then press
the virtual buttons on the touch screen.
Depending on the model, use the "Source" and
"Menu" buttons on the left of the touch screen to
access the menus, then press the virtual buttons
on the touch screen.
At all times it is possible to display the rolling
menus by pressing the screen briefly with three
fingers.
All touch-sensitive areas on the screen are
white.
On pages with multiple tabs at the bottom of the
screen, you can switch between pages either
by tapping the tab for the desired page or by
swiping the pages to the left or right with your
finger.
Press in the shaded area to go back up a level
or confirm.
Press the back arrow to go back a level or
confirm.
The touch screen is of the "capacitive" type.
To clean the screen, use a soft, non-abrasive
cloth (e.g. spectacles cloth) with no additional
product.
Do not use sharp objects on the screen.
Do not touch the screen with wet hands.
Certain information is displayed permanently in
the upper bar of the touch screen:
–
Air conditioning status information (depending
on version), and direct access to the
corresponding menu.
–
Radio Media and
Telephone menu status
information.
–
Privacy status information.
–
Access to the touch screen and digital
instrument panel settings.
Audio source selection (depending on
equipment):
–
FM/DAB/AM radio stations (depending on
equipment).
–
T
elephone connected via Bluetooth and
Bluetooth multimedia broadcast (streaming).
–
USB Memory stick.
–
Media player connected via the auxiliary
socket (depending on equipment).