2022 PEUGEOT 301 parking brake
[x] Cancel search: parking brakePage 78 of 148

76
Practical information
brake must be adjusted, even between two
services.
This system must be checked by a PEUGEOT
dealer or a qualified workshop.
Wheels and tyres
The inflation pressure of all tyres, including the spare wheel, must be
checked on "cold” tyres.
The pressures indicated on the tyre pressure
label are valid for "cold" tyres. If you have driven
for more than 10 minutes or more than 6 miles
(10 kilometres) at over 31 mph (50
km/h), add
0.3 bar (30 kPa) to the values indicated on the
label.
Under-inflation increases energy
consumption. Non-compliant tyre
pressures cause tyres to wear prematurely
and have an adverse effect on the vehicle's
road holding - risk of accident!
Driving with worn or damaged tyres reduces the
braking and road holding performance of the
vehicle. Regularly check the condition of the
tyres (tread and sidewalls) and rims as well as
the presence of the valve caps.
When the wear indicators no longer appear set
back from the tread, the depth of the grooves is
less than 1.6 mm; replace the tyres as soon as
possible.
Using different size wheels and tyres from those
specified can affect the lifetime of tyres, wheel
rotation, ground clearance, the speedometer
reading and have an adverse effect on road
holding.
Fitting different tyres on the front and rear axles
can cause the ESC to mistime.
Always mark the direction of rotation on the tyres
that will be stored when fitting winter or summer
tyres. Store them in a cool, dry place and away
from direct exposure to the sun's rays.
Winter or 4-seasons tyres can be
identified by this symbol on their
sidewalls.
Free-wheeling
In certain situations, it is necessary to put the
vehicle into free-wheeling mode (e.g. towing, on
a rolling road, automatic car wash (Wash mode),
rail or sea transport).
Never leave the vehicle unattended with
the vehicle into free-wheeling mode.
With manual or automatic
gearbox and manual parking
brake
/
To release them
► With the vehicle stationary and engine
running, depress the brake pedal.
► With a manual gearbox, place the gear lever
into neutral.
►
With an automatic gearbox, place the gear
selector to mode
N.
►
Release the parking brake.
►
Release the brake pedal, then switch off the
engine.
Reverting to normal operation
► Apply the parking brake.
► With an automatic gearbox, place the gear
selector to mode
P.
Advice on care and maintenance
General recommendations
Observe the following recommendations to avoid
damaging the vehicle.
Exterior
Never use a high-pressure jet wash in
the engine compartment - risk of
damaging the electrical components!
Do not wash the vehicle in bright sunshine or
extremely cold conditions.
When washing the vehicle in an
automatic roller-brush car wash, be sure
Page 83 of 148

81
In the event of a breakdown
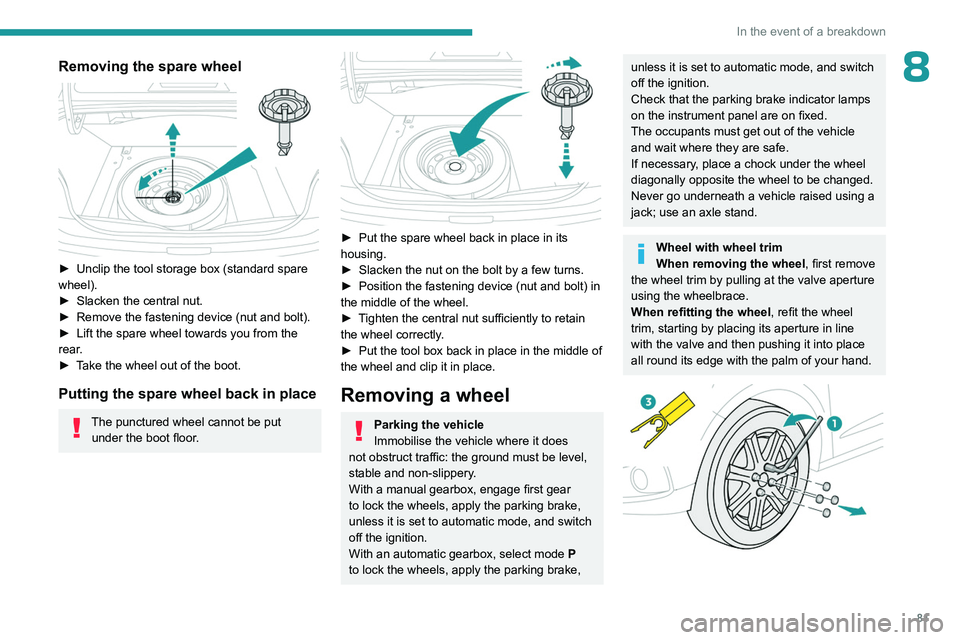
8Removing the spare wheel
► Unclip the tool storage box (standard spare
wheel).
►
Slacken the central nut.
►
Remove the fastening device (nut and bolt).
►
Lift the spare wheel towards you from the
rear
.
►
T
ake the wheel out of the boot.
Putting the spare wheel back in place
The punctured wheel cannot be put under the boot floor.
► Put the spare wheel back in place in its
housing.
►
Slacken the nut on the bolt by a few turns.
►
Position the fastening device (nut and bolt) in
the middle of the wheel.
►
T
ighten the central nut sufficiently to retain
the wheel correctly.
►
Put the tool box back in place in the middle of
the wheel and clip it in place.
Removing a wheel
Parking the vehicle
Immobilise the vehicle where it does
not obstruct traffic: the ground must be level,
stable and non-slippery.
With a manual gearbox, engage first gear
to lock the wheels, apply the parking brake,
unless it is set to automatic mode, and switch
off the ignition.
With an automatic gearbox, select mode
P
to lock the wheels, apply the parking brake,
unless it is set to automatic mode, and switch
off the ignition.
Check that the parking brake indicator lamps
on the instrument panel are on fixed.
The occupants must get out of the vehicle
and wait where they are safe.
If necessary, place a chock under the wheel
diagonally opposite the wheel to be changed.
Never go underneath a vehicle raised using a
jack; use an axle stand.
Wheel with wheel trim
When removing the wheel , first remove
the wheel trim by pulling at the valve aperture
using the wheelbrace.
When refitting the wheel , refit the wheel
trim, starting by placing its aperture in line
with the valve and then pushing it into place
all round its edge with the palm of your hand.
Page 93 of 148

91
In the event of a breakdown
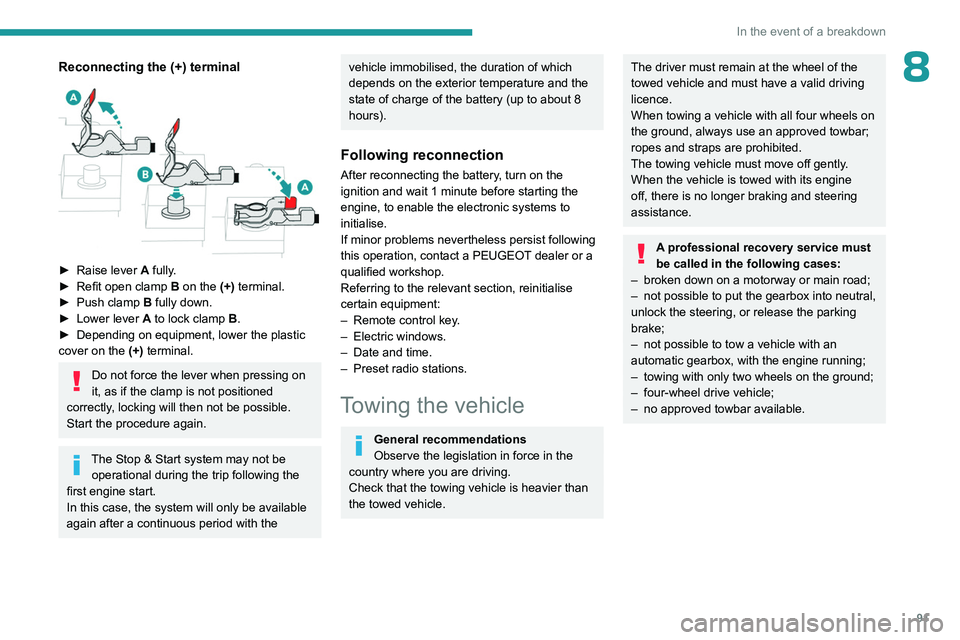
8Reconnecting the (+) terminal
► Raise lever A fully.
► Refit open clamp B on the (+) terminal.
►
Push clamp
B fully down.
►
Lower lever
A
to lock clamp B.
►
Depending on equipment, lower the plastic
cover on the
(+) terminal.
Do not force the lever when pressing on
it, as if the clamp is not positioned
correctly, locking will then not be possible.
Start the procedure again.
The Stop & Start system may not be operational during the trip following the
first engine start.
In this case, the system will only be available
again after a continuous period with the
vehicle immobilised, the duration of which
depends on the exterior temperature and the
state of charge of the battery (up to about 8
hours).
Following reconnection
After reconnecting the battery, turn on the
ignition and wait 1 minute before starting the
engine, to enable the electronic systems to
initialise.
If minor problems nevertheless persist following
this operation, contact a PEUGEOT dealer or a
qualified workshop.
Referring to the relevant section, reinitialise
certain equipment:
–
Remote control key
.
–
Electric windows.
–
Date and time.
–
Preset radio stations.
Towing the vehicle
General recommendations
Observe the legislation in force in the
country where you are driving.
Check that the towing vehicle is heavier than
the towed vehicle.
The driver must remain at the wheel of the
towed vehicle and must have a valid driving
licence.
When towing a vehicle with all four wheels on
the ground, always use an approved towbar;
ropes and straps are prohibited.
The towing vehicle must move off gently.
When the vehicle is towed with its engine
off, there is no longer braking and steering
assistance.
A professional recovery service must
be called in the following cases:
–
broken down on a motorway or main road;
–
not possible to put the gearbox into neutral,
unlock the steering, or release the parking
brake;
–
not possible to tow a vehicle with an
automatic gearbox, with the engine running;
–
towing with only two wheels on the ground;
–
four-wheel drive vehicle;
–
no approved towbar available.
Page 94 of 148

92
In the event of a breakdown
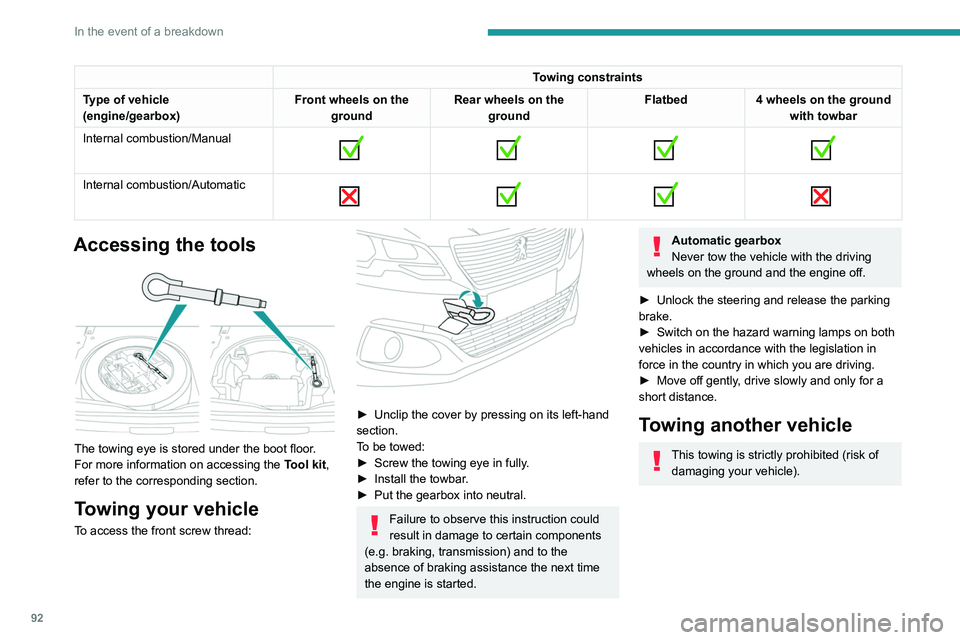
Towing constraints
Type of vehicle
(engine/gearbox) Front wheels on the
ground Rear wheels on the
ground Flatbed
4 wheels on the ground
with towbar
Internal combustion/Manual
Internal combustion/Automatic
Accessing the tools
The towing eye is stored under the boot floor.
For more information on accessing the
Tool kit,
refer to the corresponding section.
Towing your vehicle
To access the front screw thread:
► Unclip the cover by pressing on its left-hand
section.
T
o be towed:
►
Screw the towing eye in fully
.
►
Install the towbar
.
►
Put the gearbox into neutral.
Failure to observe this instruction could
result in damage to certain components
(e.g. braking, transmission) and to the
absence of braking assistance the next time
the engine is started.
Automatic gearbox
Never tow the vehicle with the driving
wheels on the ground and the engine off.
►
Unlock the steering and release the parking
brake.
►
Switch on the hazard warning lamps on both
vehicles in accordance with the legislation in
force in the country in which you are driving.
►
Move off gently
, drive slowly and only for a
short distance.
Towing another vehicle
This towing is strictly prohibited (risk of damaging your vehicle).
Page 128 of 148

126
Alphabetical index
ISOFIX mountings 45, 47
J
Jack 79–80
Jump starting
89
K
Key 15–17
Key, electronic
15
Key with remote control
15, 51
Kit, hands-free
102, 116
Kit, temporary puncture repair
79
Klaxon
36
L
Labels, identification 96
Leather (care)
78
LEDs - Light-emitting diodes
32, 84
Level, brake fluid
74
Level, Diesel additive
74–75
Level, engine coolant
74
Level, engine oil
73
Levels and checks
72–74
Level, screenwash fluid
33, 74
Light-emitting diodes - LEDs
32, 84
Lighting, exterior
31
Lighting, guide-me home 32
Lighting, interior
30
Loading
70–71
Load reduction mode
69
Locating your vehicle
16
Locking
16
Locking from the inside
16
Locking the doors
16–17
M
Maintenance (advice) 76
Maintenance, routine
61, 74
Manoeuvring aids (recommendations)
60
Map reading lamps
30
Markings, identification
96
Mat
61
Menu
11 5
Menu, main
99
Menus (audio)
11 0 – 111
Mirror, rear view
24
Mirrors, door
23–24, 28
Misfuel prevention
68
Mountings, ISOFIX
45, 47
MP3 CD
100
N
Number plate lamps 87
O
Obstacle detection 64
Oil change
73
Oil consumption
73
Oil, engine
73
On-board tools
79
Opening the bonnet
71–72
Opening the boot
15, 18–19
Opening the doors
15, 18
P
Pads, brake 75
Paint
77, 96
Paint colour code
96
Parking brake
52, 75
Parking sensors, audible and visual
64
Plates, identification
96
Player, Apple®
11 4
Player, MP3 CD
100
Player, USB
100, 113
Port, USB
29, 100–101, 113, 115
Pressures, tyres
76, 97
Pre-tensioning (seat belts)
38
Priming pump
79
Priming the fuel system
79
Profiles
11 8
Protecting children
40–47
Puncture
80