Page 174 of 635

Do not use the outlet located in the truck
box with accessories that exceed 120 volt.
Do not use double adapters or more than
one electrical accessory. When the dual
wall bed liner is installed (if so equipped),
the power outlet is still accessible through
the access door in the bed liner.
CAUTION
• Operation of the 120 volt system with
the ignition in the ON position and
the engine not running (idle) will
drain the battery charge. This could
lead to a dead battery or no start
condition.
• The outlet and plug may be hot dur-
ing or immediately af ter use.
• Use power outlets with the engine
running to avoid discharging the ve-
hicle battery.
• Do not use double adaptors or more
than one electrical accessory.
• Avoid using power outlets when the
air conditioner, headlights or rear
window defroster is on.
• Before inserting or disconnecting a
plug, be sure the electrical accessory
being used is turned OFF. •
Push the plug in as far as it will go. If
good contact is not made, the plug
may overheat or the internal tem-
perature fuse may open.
• When not in use, be sure to close the
cap. Do not allow water or any other
liquid to contact the outlet.
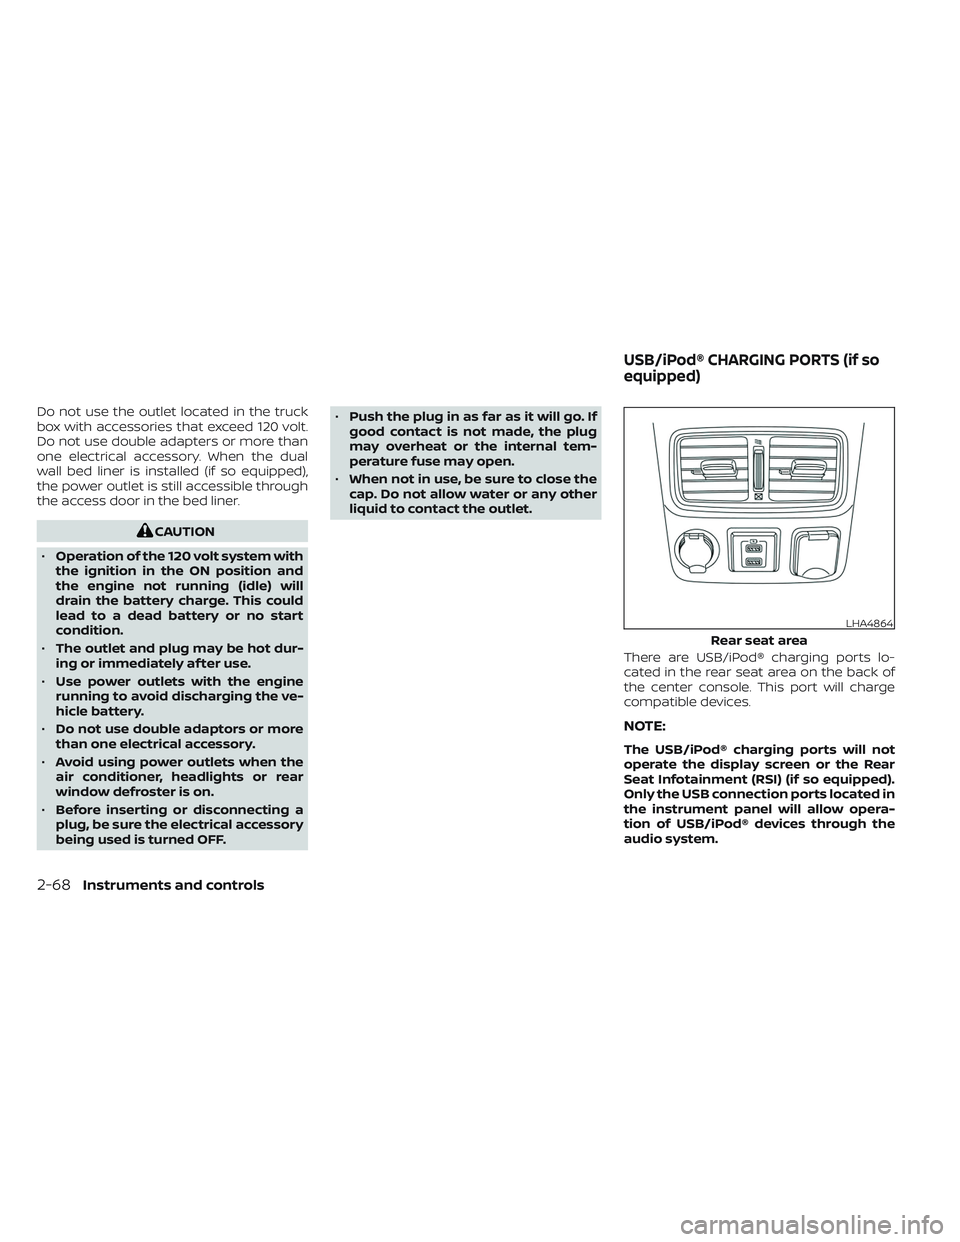
There are USB/iPod® charging ports lo-
cated in the rear seat area on the back of
the center console. This port will charge
compatible devices.
NOTE:
The USB/iPod® charging ports will not
operate the display screen or the Rear
Seat Infotainment (RSI) (if so equipped).
Only the USB connection ports located in
the instrument panel will allow opera-
tion of USB/iPod® devices through the
audio system.
LHA4864
Rear seat area
USB/iPod® CHARGING PORTS (if so
equipped)
2-68Instruments and controls
Page 175 of 635
The extended storage switch is used when
shipping the vehicle. It is located in the fuse
panel inside the glove box. To reach it, open
the glove box
O1on the instrument panel,
then open the fuse panel cover
O2.
If any electrical equipment does not oper-
ate, ensure the extended storage switch is
ON by pushing it fully in place, as shown.
LIC3502LIC3266
Pulled position
LIC3268
Pushed position
EXTENDED STORAGE SWITCH
Instruments and controls2-69
Page 187 of 635

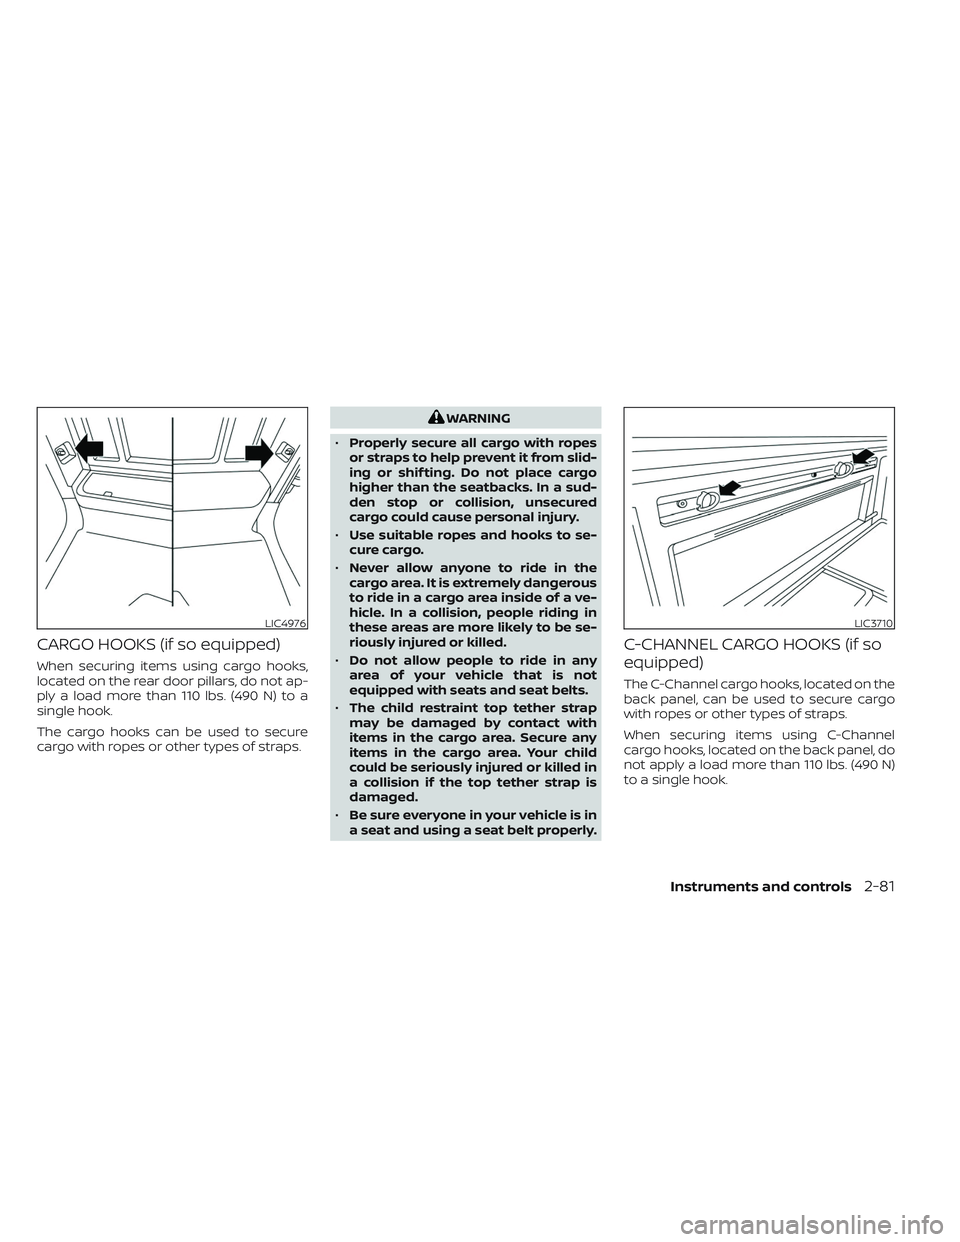
CARGO HOOKS (if so equipped)
When securing items using cargo hooks,
located on the rear door pillars, do not ap-
ply a load more than 110 lbs. (490 N) to a
single hook.
The cargo hooks can be used to secure
cargo with ropes or other types of straps.
WARNING
• Properly secure all cargo with ropes
or straps to help prevent it from slid-
ing or shif ting. Do not place cargo
higher than the seatbacks. In a sud-
den stop or collision, unsecured
cargo could cause personal injury.
• Use suitable ropes and hooks to se-
cure cargo.
• Never allow anyone to ride in the
cargo area. It is extremely dangerous
to ride in a cargo area inside of a ve-
hicle. In a collision, people riding in
these areas are more likely to be se-
riously injured or killed.
• Do not allow people to ride in any
area of your vehicle that is not
equipped with seats and seat belts.
• The child restraint top tether strap
may be damaged by contact with
items in the cargo area. Secure any
items in the cargo area. Your child
could be seriously injured or killed in
a collision if the top tether strap is
damaged.
• Be sure everyone in your vehicle is in
a seat and using a seat belt properly.
C-CHANNEL CARGO HOOKS (if so
equipped)
The C-Channel cargo hooks, located on the
back panel, can be used to secure cargo
with ropes or other types of straps.
When securing items using C-Channel
cargo hooks, located on the back panel, do
not apply a load more than 110 lbs. (490 N)
to a single hook.
LIC4976LIC3710
Instruments and controls2-81
Page 188 of 635

WARNING
• Properly secure all cargo with ropes
or straps to help prevent it from slid-
ing or shif ting. Do not place cargo
higher than the seatbacks. In a sud-
den stop or collision, unsecured
cargo could cause personal injury.
• Use suitable ropes and hooks to se-
cure cargo.
• Never allow anyone to ride in the
cargo area. It is extremely dangerous
to ride in a cargo area inside of a ve-
hicle. In a collision, people riding in
these areas are more likely to be se-
riously injured or killed.
• Do not allow people to ride in any
area of your vehicle that is not
equipped with seats and seat belts.
• The child restraint top tether strap
may be damaged by contact with
items in the cargo area. Secure any
items in the cargo area. Your child
could be seriously injured or killed in
a collision if the top tether strap is
damaged.
• Be sure everyone in your vehicle is in
a seat and using a seat belt properly.POWER WINDOWS
WARNING
• Make sure that all passengers have
their hands, etc., inside the vehicle
while it is in motion and before clos-
ing the windows. Use the window
lock switch to prevent unexpected
use of the power windows.
• To help avoid risk of injury or death
through unintended operation of the
vehicle and/or its systems, including
entrapment in windows or inadver-
tent door lock activation, do not
leave children, people who require
the assistance of others or pets unat-
tended in your vehicle. Additionally,
the temperature inside a closed ve-
hicle on a warm day can quickly be-
come high enough to cause a signifi-
cant risk of injury or death to people
and pets.
The power windows operate when the ig-
nition switch is placed in the ON position or
for a period of time af ter the ignition switch
is placed in the OFF position. If the driver's
or passenger's door is opened during this
period of time, the power to the windows is
canceled.
Driver's side power window switch
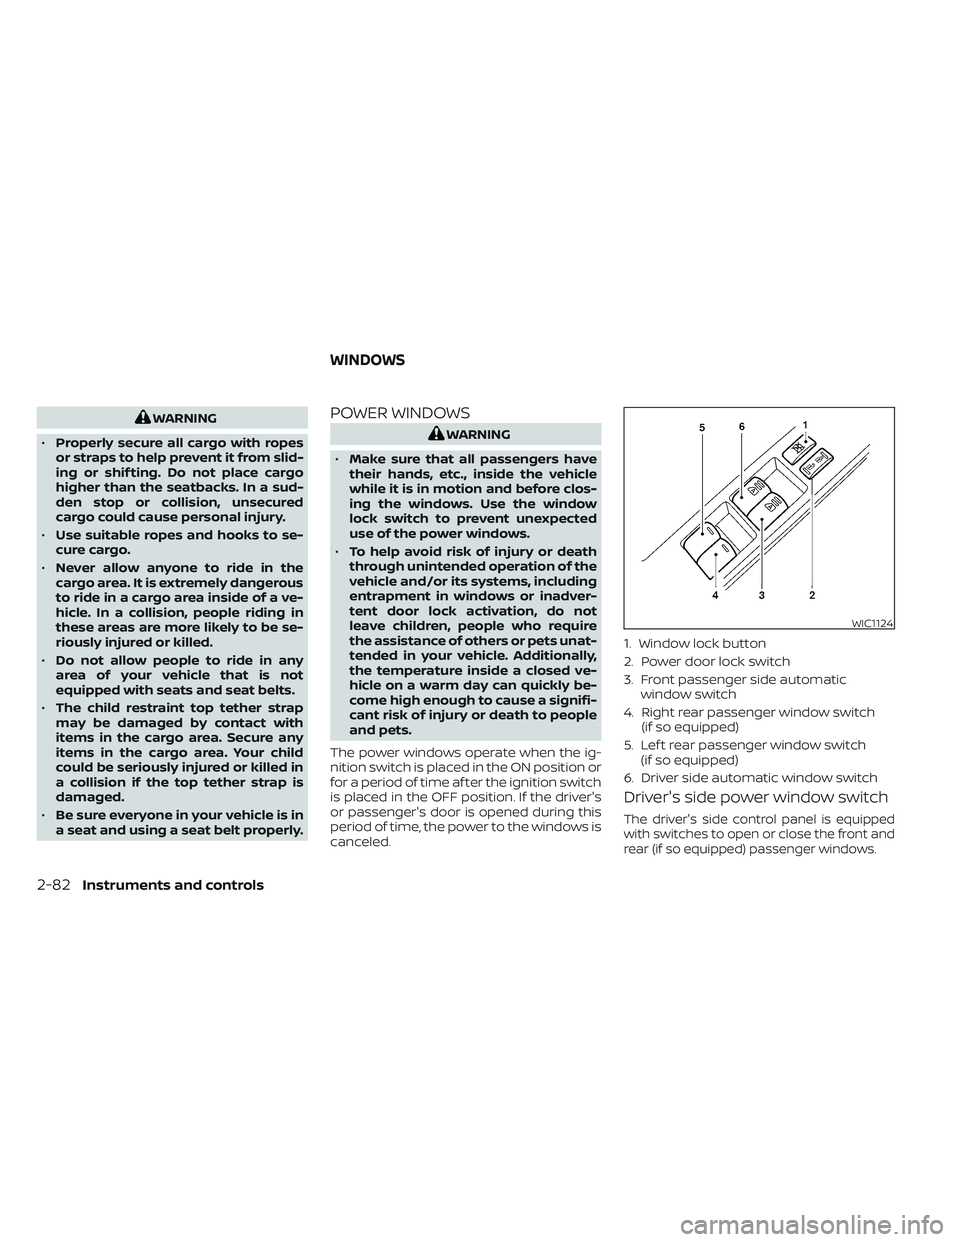
The driver's side control panel is equipped
with switches to open or close the front and
rear (if so equipped) passenger windows.
WIC1124
1. Window lock button
2. Power door lock switch
3. Front passenger side automatic window switch
4. Right rear passenger window switch (if so equipped)
5. Lef t rear passenger window switch (if so equipped)
6. Driver side automatic window switch
WINDOWS
2-82Instruments and controls
Page 213 of 635

• Doors and the tailgate lock (if soequipped) do not lock with the door
handle request switch (if so equipped)
if the Intelligent Key is inside the ve-
hicle. A beep will sound to warn you.
However, when an Intelligent Key is in-
side the vehicle, doors can be locked
with another Intelligent Key.
WARNING
Af ter locking the doors using the re-
quest switch (if so equipped), make
sure that the doors have been securely
locked by operating the door handles.
Failure to follow these instructions may
result in inadvertently unlocking the
doors, which may decrease the safety
and security of your vehicle.
CAUTION
• When locking the doors using the re-
quest switch (if so equipped), make
sure to have the Intelligent Key in
your possession before operating
the request switch (if so equipped) to
prevent the Intelligent Key from be-
ing lef t in the vehicle. •
The request switch (if so equipped) is
operational only when the Intelligent
Key has been detected by the Intelli-
gent Key system.
Lockout protection
To prevent the Intelligent Key from being
accidentally locked in the vehicle, lockout
protection is equipped with the Intelligent
Key system.
When any door is open, the doors are
locked, and then the Intelligent Key is put
inside the vehicle and all the doors are
closed; a chime will sound and the lock will
automatically unlock.
NOTE:
The doors may not lock when the Intelli-
gent Key is in the same hand that is op-
erating the request switch (if so
equipped) to lock the door. Put the Intel-
ligent Key in a purse, pocket or your
other hand.
CAUTION
The lockout protection may not func-
tion under the following conditions:
• When the Intelligent Key is placed on
top of the instrument panel.
• When the Intelligent Key is placed in-
side the glove box or a storage bin.
• When the Intelligent Key is placed in-
side the door pockets.
• When the Intelligent Key is placed in-
side or near metallic materials.
Pre-driving checks and adjustments3-13
Page 223 of 635
1. Pull the hood lock release handleO1lo-
cated below the driver side instrument
panel. The hood will spring up slightly.
2. Push the lever at the front of the hood to the side
O2as illustrated with your fin-
gertips and raise the hood.
When closing the hood, lower it slowly and
make sure it locks into place.
WARNING
• Make sure the hood is completely
closed and latched before driving.
Failure to do so could cause the hood
to fly open and result in an accident.
• If you see steam or smoke coming
from the engine compartment, to
avoid injury do not open the hood.
LPD3094LPD2593
King Cab® models only
HOOD FUEL-FILLER DOOR
Pre-driving checks and adjustments3-23
Page 283 of 635

To turn system off
Press the ON-OFF button.
Rear window and/or outside
mirror defroster switch (if so
equipped)
For additional information, see “Rear win-
dow and/or outside mirror defroster
switch” (P. 2-44).
OPERATING TIPS
The sunload sensor (if so equipped)O1, lo-
cated on the top center of the instrument
panel, helps the system maintain a con-
stant temperature. Do not put anything on
or around this sensor. • When the climate system is in automatic
operation and the engine coolant tem-
perature and outside air temperature are
low, the air flow outlet may default to de-
froster mode for approximately 2 min-
utes 30 seconds. This is not a malfunc-
tion. Af ter the engine coolant
temperature warms up, the air flow outlet
will return to foot mode and operation will
continue normally.
• When the outside and interior cabin tem- peratures are moderate to high, the in-
take setting may default to turn off air
recirculation to allow fresh air into the
passenger compartment. You may no-
tice air flow from the foot mode, bi-level
mode, or side demist vent outlets for a
maximum of 15 seconds. This may occur
when previous climate setting was sys-
tem off. This is not a malfunction. Af ter
the initial warm air is expelled, the intake
will return to automatic control, air flow
outlet will return to previous settings, and
operation will continue normally. To exit,
press any climate control button.
• Keep the windows closed while the air conditioner is in operation.
• If you feel that the air flow mode you have selected and the outlets the air is coming
out do not match, select the
mode.
LHA4126
Monitor, climate, audio, phone and voice recognition systems4-41
Page 354 of 635
LDW SYSTEM OPERATION
The LDW system provides a lane departure
warning function when the vehicle is driven
at speeds of approximately 37 mph (60
km/h) and above and the lane markings
are clear. When the vehicle approaches ei-
ther the lef t or the right side of the traveling
lane, the steering wheel will vibrate and the
LDW indicator on the instrument panel will
blink to alert the driver.
The warning function will stop when the
vehicle returns inside of the lane markers.
LSD3705
5-28Starting and driving