Page 110 of 635

2. Turn signal switch (P. 2-51)Wiper and washer switch (P. 2-41) 3. Steering wheel switch for audio
control*
Bluetooth® Hands-Free Phone System* Vehicle information display control")
1. Vents (P. 4-28)
2. Turn signal switch (P. 2-51)Wiper and washer switch (P. 2-41) 3. Steering wheel switch for audio
control*
Bluetooth® Hands-Free Phone System* Vehicle information display controls
(P. 2-23)
4. Driver supplemental air bag (P. 1-53) Horn (P. 2-52)
5. Meters and gauges (P. 2-6) Warning and indicator lights (P. 2-12)
Vehicle information display (P. 2-23)
6. Cruise control switches (if so equipped)
(P. 5-49)
Intelligent Cruise Control (ICC) switches
(if so equipped) (P. 5-51)
7. Shif t lever (P. 5-20) Tow mode switch (P. 2-63)
8. Audio controls*
9. Center display (P. 4-2)
10. Climate controls (P. 4-28)
11. Front passenger supplemental air bag
(P. 1-53)
12. Glove box (P. 2-73)
13. Front passenger supplemental knee air
bag (P. 1-80)
14. Front passenger air bag status light
(if so equipped) (P. 1-63)
15. Power outlet (P. 2-65)
16. Climate control seat switch
(if so equipped) (P. 2-53)
Heated front seat switches
(if so equipped) (P. 2-54)
17. Heated steering wheel switch
(if so equipped) (P. 2-57)
Warning systems switch (P. 2-57)
LII2656
INSTRUMENT PANEL
2-4Instruments and controls
Page 113 of 635
Speedometer
The speedometer indicates the vehicle
speed.
Odometer/Twin trip odometer
The odometer and the twin trip odometer
O1are displayed in the vehicle information
display when the ignition switch is placed
in the ON position.
The odometer records the total distance
the vehicle has been driven.
The twin trip odometer records the dis-
tance of individual trips.
Changing the display
Push the TRIP RESET switchO2on the lef t
side of the instrument panel to change the
display as follows:
ODO →Trip
→Trip→ ODO
Resetting the trip odometer
Pushing the TRIP RESET switchO2for
about 2 seconds resets the currently dis-
played trip odometer to zero.
LIC2218LIC2921
Instruments and controls2-7
Page 151 of 635
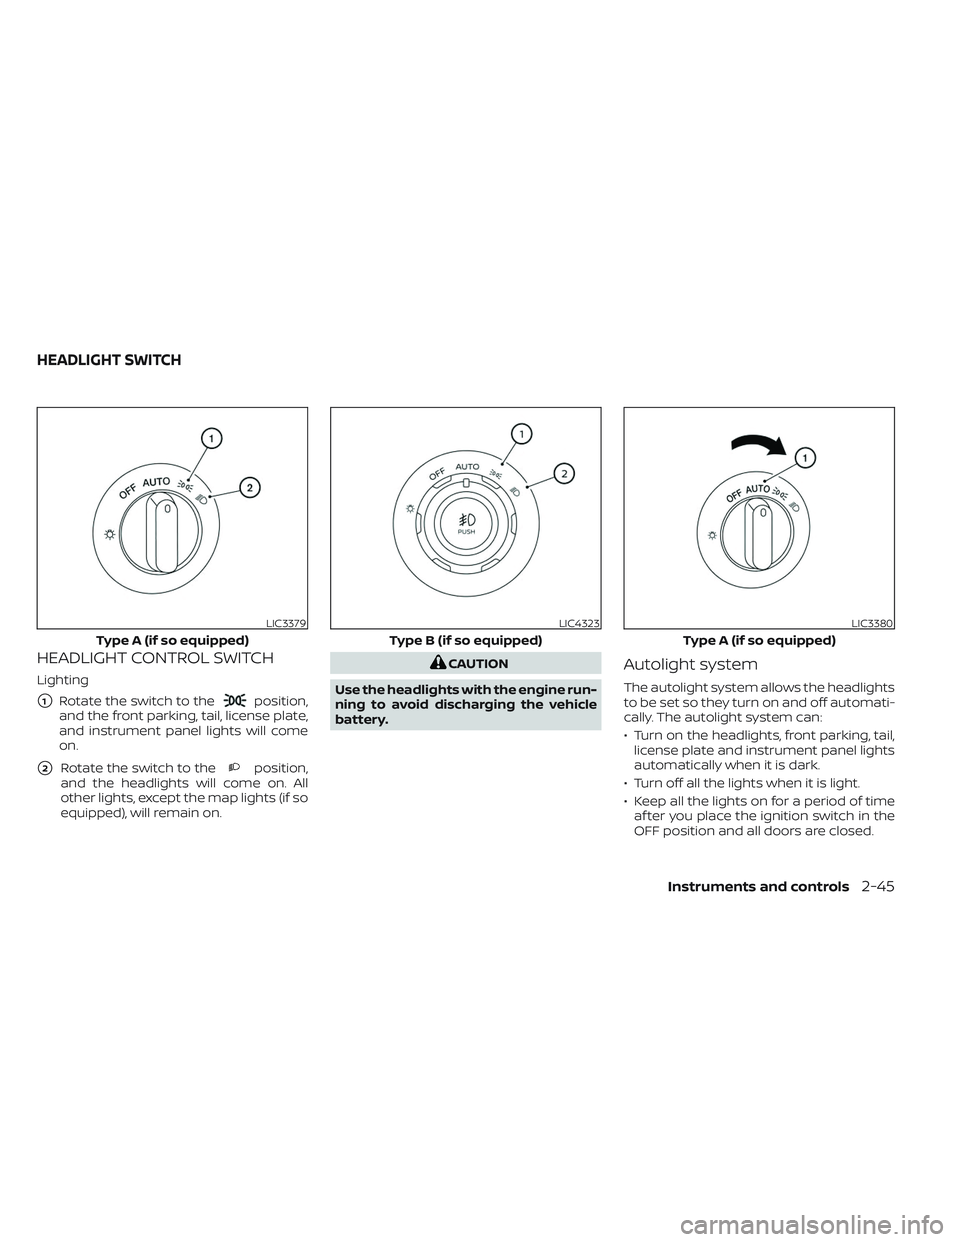
HEADLIGHT CONTROL SWITCH
Lighting
�1Rotate the switch to theposition,
and the front parking, tail, license plate,
and instrument panel lights will come
on.
�2Rotate the switch to theposition,
and the headlights will come on. All
other lights, except the map lights (if so
equipped), will remain on.
CAUTION
Use the headlights with the engine run-
ning to avoid discharging the vehicle
battery.Autolight system
The autolight system allows the headlights
to be set so they turn on and off automati-
cally. The autolight system can:
• Turn on the headlights, front parking, tail, license plate and instrument panel lights
automatically when it is dark.
• Turn off all the lights when it is light.
• Keep all the lights on for a period of time af ter you place the ignition switch in the
OFF position and all doors are closed.
LIC3379
Type A (if so equipped)
LIC4323
Type B (if so equipped)
LIC3380
Type A (if so equipped)
HEADLIGHT SWITCH
Instruments and controls2-45
Page 152 of 635
.
To turn")
NOTE:
Autolight activation sensitivity and the
time delay for autolight shutoff can be
adjusted. For additional information, see
“How to use the vehicle information dis-
play ” (P. 2-23).
To turn on the autolight system:
1. Turn the headlight switch to the AUTOposition
O1.
2. Place the ignition switch in the ON position. 3. The autolight system automatically
turns the headlights on and off.
Initially, if the ignition switch is placed in the
OFF position and a door is opened and lef t
open, the headlights remain on for a period
of time. If another door is opened while the
headlights are on, then the timer is reset.
To turn the autolight system off, turn the
switch to the OFF,
,orposition.
The headlights will turn on automatically at
twilight or in rainy weather (when the wind-
shield wiper is operated continuously).
If the ignition switch is placed in the OFF
position and one of the doors is opened
and this condition is continued, the head-
lights remain on for 5 minutes. Be sure you do not put anything on top
of the autolight sensor
O1located on the
top side of the instrument panel. The au-
tolight sensor controls the autolight; if it
is covered, the autolight sensor reacts as
if it is dark out and the headlights will
illuminate. If this occurs while parked
with the engine off and the ignition
switch placed in the ON position, your
vehicle's battery could become
discharged.
LIC4324
Type B (if so equipped)
LIC3487
2-46Instruments and controls
Page 157 of 635
INSTRUMENT BRIGHTNESS
CONTROL
Press the “+” button to increase the bright-
ness of instrument panel lights.
Press the “-” button to decrease the bright-
ness of instrument panel lights.
TURN SIGNAL SWITCH
Turn signal
�1Move the lever up or down to signal the
turning direction. When the turn is com-
pleted, the turn signal cancels
automatically.
Lane change signal
�2Move the lever up or down until the turn
signal begins to flash, but the lever
does not latch, to signal a lane change.
Hold the lever until the lane change is
completed. Move the lever up or down until the turn
signal begins to flash, but the lever does
not latch, and release the lever. The turn
signal will automatically flash three times.
Choose the appropriate method to signal
a lane change based on road and traffic
conditions.
NOTE:
The 3 flash pass turn indicator may be
disabled. For additional information, see
“Vehicle information display ” (P. 2-23).
LIC3176LIC3061
Instruments and controls2-51
Page 168 of 635

CAUTION
• Use power outlets with the engine
running to avoid discharging the ve-
hicle battery.
• Do not attempt to use this while
driving.
• Do not use double adapters or more
than one electrical accessory, doing
so could significantly drain the bat-
tery of your vehicle.
The Parking Aids system switch on the in-
strument panel allows the driver to turn
the following systems (if so equipped) on
and off. To turn the systems on and off, the
ignition switch must be in the ON position.
• Front and rear sonar system
• Moving Object Detection (MOD)
• Rear Automatic Braking (RAB)
• Rear Cross Traffic Alert (RCTA)
The indicator light on the switch will illumi-
nate when the systems are turned on. If the indicator light flashes when the Front
and rear sonar system, MOD, RAB, or RCTA
systems are not turned off, it may indicate
a malfunction in one or more of these sys-
tems (if so equipped).
The Front and rear sonar system, MOD,
RAB, or RCTA systems will be turned on
automatically under the following
conditions:
• When the ignition switch is switched from
the OFF position to the ON position.
• When the shif t lever is shif ted into the R (Reverse) position.
The automatic turning on function can be
turned on and off for these systems in the
vehicle information display. For additional
information, see “Settings” (P. 2-24).
For additional information, see “Front and
rear sonar system” (P. 5-124), ”Rear Auto-
matic Braking (RAB)” (P. 5-75), “Rear Cross
Traffic Alert (RCTA)” (P. 5-42), or “Moving Ob-
ject Detection (MOD)” (P. 4-23).
LIC3596
PARKING AIDS SYSTEM SWITCH
2-62Instruments and controls
Page 169 of 635

Tow mode should be used when pulling a
heavy trailer or hauling a heavy load. Driv-
ing the vehicle in the tow mode with no
trailer/load or light trailer/light load will not
cause any damage. However, fuel
economy may be reduced, and the
transmission/engine driving characteris-
tics may feel unusual.
Push the tow mode switch to activate tow
mode. The TOW indicator light illuminates
when tow mode is selected. Push the tow
mode switch again to turn tow mode off.
Tow mode is automatically canceled when the
ignition switch is placed in the OFF position.
For additional information, see “Tow mode”
(P. 10-53).The Emergency call (SOS) system button
is used in combination with a
NissanConnect® Services subscription to
call for assistance in case of an emergency.
Pushing the button will (with a paid sub-
scription) reach a Response Specialist that
will provide assistance based on the situa-
tion described by the vehicle’s occupant.
For additional information, or to enroll your
vehicle, refer to www.NissanUSA.com/
connect or call 855–426–6628.
The TBCU on the instrument panel allows
the driver to adjust the braking force ap-
plied to the trailer brakes.
For additional information, see “Towing a
trailer” (P. 10-32).
LIC3381LIC3376LIC3382
TOW MODE SWITCH
EMERGENCY CALL (SOS) BUTTON (if
so equipped) TRAILER BRAKE CONTROLLER UNIT
(TBCU) (if so equipped)
Instruments and controls2-63
Page 171 of 635
, an")
12V OUTLETS
The power outlets are for powering electri-
cal accessories such as cellular
telephones.
The power outlets located on the instru-
ment panel, inside the center armrest (if so
equipped), and on the back of the center
console (if so equipped) are powered only
when the ignition switch is placed in the
ACC or ON position.
Open the cap to use a power outlet.
CAUTION
• The outlet and plug may be hot dur-
ing or immediately af ter use.
• Only certain power outlets are de-
signed for use with a cigarette lighter
unit. Do not use any other power out-
let for an accessory lighter. It is rec-
ommended that you visit a NISSAN
dealer for additional information.
• Do not use with accessories that ex-
ceed a 12 volt, 120W (10A) power draw.
• Do not use double adapters or more
than one electrical accessory. •
Use power outlets with the engine
running to avoid discharging the ve-
hicle battery.
•
Avoid using power outlets when the
air conditioner, headlights, or rear win-
dow defroster (if so equipped) is on.
• Before inserting or disconnecting a
plug, be sure the electrical accessory
being used is turned OFF.
• Push the plug in as far as it will go. If
good contact is not made, the plug
may overheat or the internal tem-
perature fuse may open.
LIC4326
Instrument panel
LIC3385
Inside center console (if so equipped)
LIC3784
Rear center console (if so equipped)
POWER OUTLETS
Instruments and controls2-65