2022 NISSAN TITAN lock
[x] Cancel search: lockPage 249 of 635
object when backing up to the positionOA
if the object projects over the actual back-
ing up course.
HOW TO PARK WITH PREDICTED
COURSE LINES
WARNING
• If the tires are replaced with different
sized tires, the predicted course lines
may be displayed incorrectly.
• On a snow-covered or slippery road,
there may be a difference between
the predicted course line and the ac-
tual course line.
• If the battery is disconnected or be-
comes discharged, the predicted
course lines may be displayed incor-
rectly. If this occurs, please perform
the following procedures:
– Turn the steering wheel from lock
to lock while the engine is
running.
– Drive the vehicle on a straight road
for more than 5 minutes.
• When the steering wheel is turned
with the ignition switch in the ACC
position, the predicted course lines
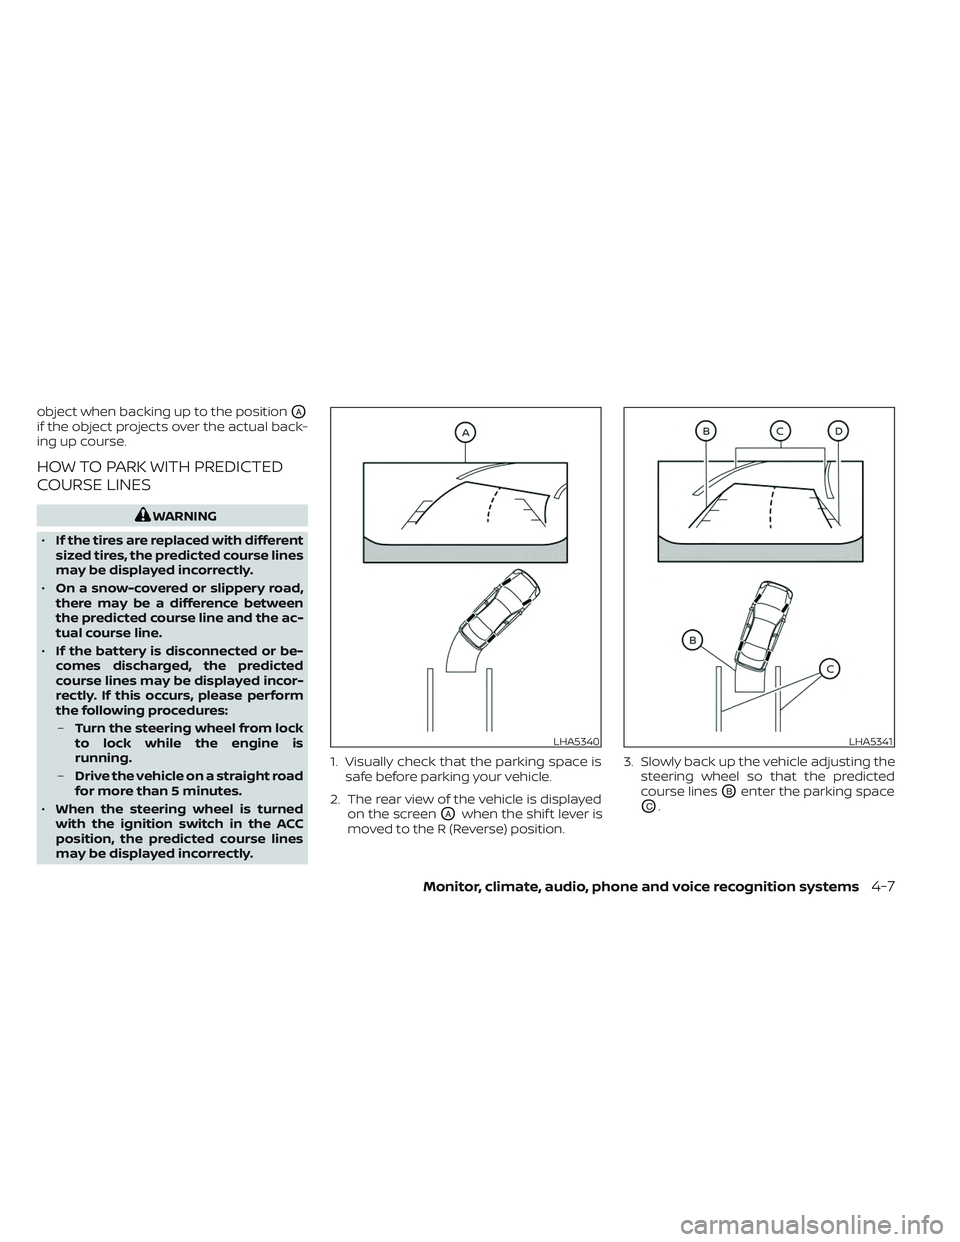
may be displayed incorrectly. 1. Visually check that the parking space is
safe before parking your vehicle.
2. The rear view of the vehicle is displayed on the screen
OAwhen the shif t lever is
moved to the R (Reverse) position. 3. Slowly back up the vehicle adjusting the
steering wheel so that the predicted
course lines
OBenter the parking space
OC.
LHA5340LHA5341
Monitor, climate, audio, phone and voice recognition systems4-7
Page 259 of 635
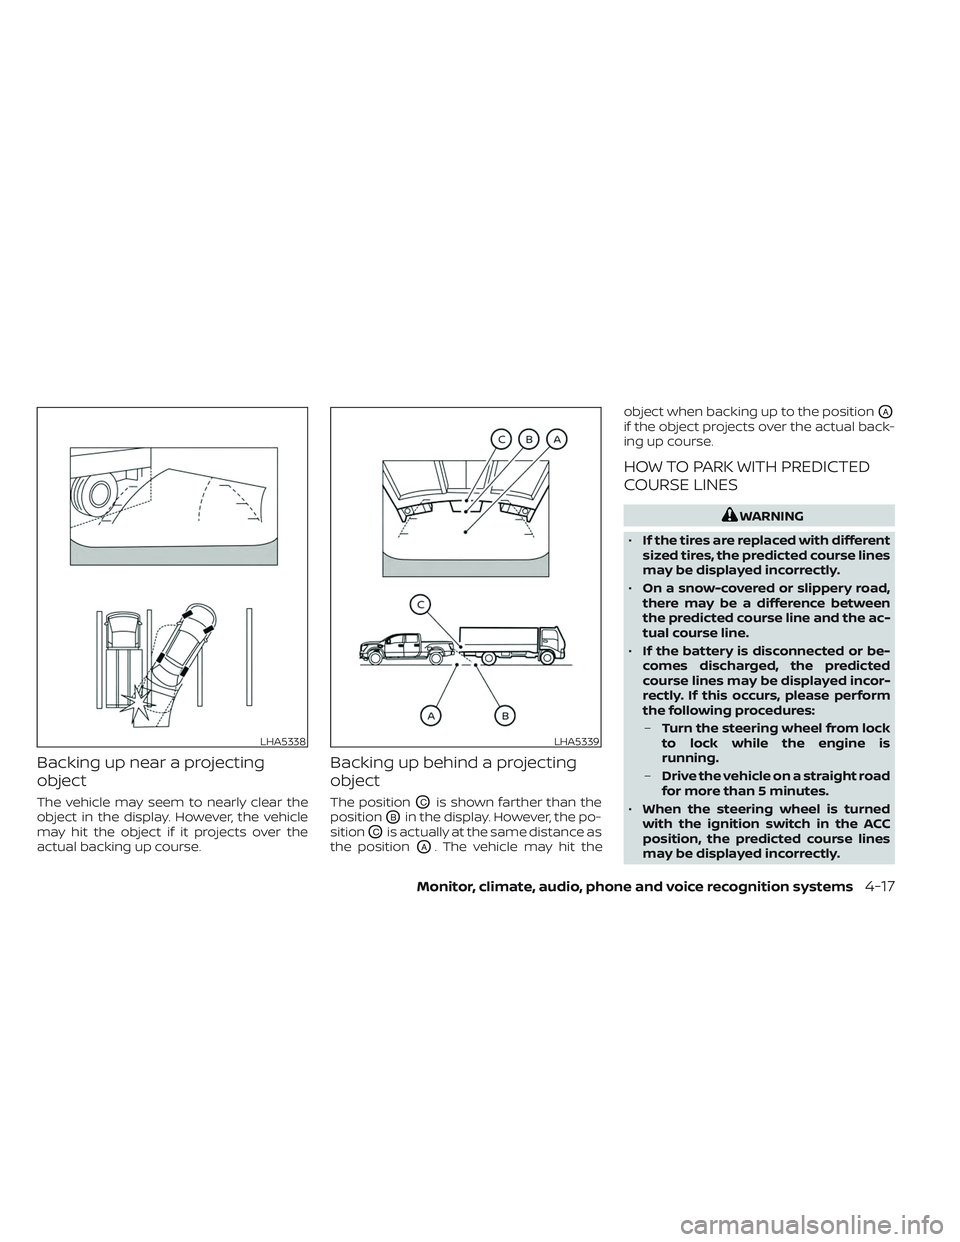
Backing up near a projecting
object
The vehicle may seem to nearly clear the
object in the display. However, the vehicle
may hit the object if it projects over the
actual backing up course.
Backing up behind a projecting
object
The positionOCis shown farther than the
position
OBin the display. However, the po-
sition
OCis actually at the same distance as
the position
OA. The vehicle may hit the object when backing up to the position
OA
if the object projects over the actual back-
ing up course.
HOW TO PARK WITH PREDICTED
COURSE LINES
WARNING
• If the tires are replaced with different
sized tires, the predicted course lines
may be displayed incorrectly.
• On a snow-covered or slippery road,
there may be a difference between
the predicted course line and the ac-
tual course line.
• If the battery is disconnected or be-
comes discharged, the predicted
course lines may be displayed incor-
rectly. If this occurs, please perform
the following procedures:
– Turn the steering wheel from lock
to lock while the engine is
running.
– Drive the vehicle on a straight road
for more than 5 minutes.
• When the steering wheel is turned
with the ignition switch in the ACC
position, the predicted course lines
may be displayed incorrectly.
LHA5338LHA5339
Monitor, climate, audio, phone and voice recognition systems4-17
Page 268 of 635
4. Toggle ON or OFF “Moving Object” usingthe ENTER button.
You can also turn the MOD on or off by
pressing the Parking Aids system switch (if
so equipped).
MOD SYSTEM LIMITATIONS
WARNING
Listed below are the system limitations
for MOD. Failure to operate the vehicle
in accordance with these system limi-
tations could result in serious injury or
death.
• Do not use the MOD system when
towing a trailer. The system may not
function properly.
• Excessive noise (for example, audio
system volume or open vehicle win-
dow) will interfere with the chime
sound, and it may not be heard.
• The MOD system performance will be
limited according to environmental
conditions and surrounding objects
such as:
– When there is low contrast be-
tween background and the mov-
ing objects. –
When there is a blinking source of
light.
– When strong light such as another
vehicle’s headlight or sunlight is
present.
– When camera orientation is not in
its usual position, such as when a
mirror is folded.
– When there is dirt, water drops or
snow on the camera lens.
– When the position of the moving
objects in the display is not
changed.
• The MOD system might detect flow-
ing water droplets on the camera
lens, white smoke from the muffler,
moving shadows, etc.
• The MOD system may not function
properly depending on the speed, di-
rection, distance or shape of the
moving objects.
• If your vehicle sustains damage to
the parts where the camera is in-
stalled, leaving it misaligned or bent,
the sensing zone may be altered and
the MOD system may not detect ob-
jects properly. •
When the temperature is extremely
high or low, the screen may not dis-
play objects clearly. This is not a
malfunction.
NOTE:
The blue MOD icon will change to or-
ange if one of the following has oc-
curred:
• When the system is malfunctioning.
• When the component temperature reaches a high level (icon will blink).
• When the RearView camera has de- tected a blockage (icon will blink).
If the icon light continues to illuminate
orange, have the MOD system checked. It
is recommended that you visit a NISSAN
dealer for this service.
4-26Monitor, climate, audio, phone and voice recognition systems
Page 273 of 635
• To quickly remove ice or fog from the win-dows, turn thefan speed control dial
to the highest setting and the tempera-
ture control to the full HOT position.
• When the
position is selected, the air
conditioner automatically turns on if the
outside temperature is approximately at
or below freezing. This dehumidifies the
air which helps defog the windshield. The
mode automatically turns off, allow-
ing outside air to be drawn into the pas-
senger compartment to further improve
the defogging performance. Under this
condition, the indicator light on the A/C
button indicator will not turn on if the user
had selected the A/C off. Turning off the
air conditioning via the A/C button is not
allowed In this mode. If the A/C button
indicator was on when entering this
mode, and the A/C button is selected in
this mode, the A/C button indicator will
turn off, but the A/C compressor will still
be automatically enabled. The recircula-
tion button indicator will not illuminate if
the button is pressed in this mode.
Bi-level heating
The bi-level mode directs warmed air to
the side and center vents and to the front
and rear floor outlets.
1. Press the
button to the off position.
The indicator light on thebutton
willgooff.
2. Press the
air flow control button.
3. Turn the
fan speed control dial to
the desired position.
4. Turn the temperature control dial to the desired position.
Heating and defogging
This mode heats the interior and defogs
the windshield.
1. Press the
air flow control button.
2. Turn the
fan speed control dial to
the desired position.
3. Turn the temperature control dial to the desired position between the middle
and the hot position. • When the
position is selected, the
air conditioner automatically turns on if
the outside temperature is approxi-
mately at or below freezing. Under this
condition, the indicator light on the A/C
button indicator will not turn on if the user
had selected A/C off. Turning off the air
conditioning via the A/C button is not al-
lowed in this mode. If the A/C button indi-
cator was on when entering this mode,
and the A/C button is selected in this
mode, the A/C compressor will still be
automatically enabled. It is recom-
mended that
mode be turned off for
maximum defogging. The recirculation
button can be selected in this mode to
block outside odors. However, for maxi-
mum defogging in this mode, it is recom-
mended to turn recirculation off when
possible.
Operating tips
Clear snow and ice from the wiper blades
and air inlet in front of the windshield.
This improves heater operation.
Monitor, climate, audio, phone and voice recognition systems4-31
Page 282 of 635
• for maximum cooling when using the airconditioning system.
Press the AUTO button to return to auto-
matic mode.
The air recirculation button will not be acti-
vated when the air conditioner is in
mode.
When the outside temperature exceeds
approximately 70°F (21°C), the air condition-
ing system may default to air recirculation
mode automatically to reduce overall
power consumption. To exit air recircula-
tion mode, select the fresh air intake but-
ton to enter fresh air mode.
In Floor/Defrost mode, the recirculation
button can be selected to block outside
odors. However, for maximum defogging in
this mode, it is recommended to turn recir-
culation off when possible.
Fresh air intake
Press thefresh air intake button to
draw outside air into the passenger
compartment.
Automatic intake air control
In the AUTO mode, the intake air will be
controlled automatically. When the outside
temperature exceeds approximately 70°F
(21°C), the air conditioning system may de-
fault to air recirculation mode automati-
cally to reduce overall power consumption.
To exit air recirculation mode, select the
fresh air intake button to enter fresh air
mode. The air recirculation indicator will
turn off, the fresh air indicator will turn on.
To manually control the intake air, press the
fresh air intake button. To return to the
automatic control mode if thefresh
air indicator is illuminated, press and hold
the
fresh air intake button for about 2
seconds. The fresh air indicator and air re-
circulation indicator lights will flash twice,
and then the intake air will be controlled
automatically. To return to the automatic
control mode if the
air recirculation
icon is illuminated, press and hold the
air recirculation button for about 2 sec-
onds. Theair recirculation indicator
andfresh air intake indicator lights will
flash twice and the intake air will be con-
trolled automatically. When OFF is selected,
the intake door is automatically forced to
recirculate. To get fresh air in OFF mode,
select the
fresh air intake button. The MODE can be changed in OFF mode to
direct the flow of incoming air if intake is set
to
fresh.
A/C (air conditioner) button
Start the engine, turn thefan speed
control buttons to the desired position and
press the
button to turn on the air
conditioner. To turn off the air conditioner,
press the
button again. In auto
mode, the air conditioner will be on even if
the
button indicator is off at tem-
peratures approximately at or above
freezing.
The air conditioner cooling function op-
erates only when the engine is running.
Air flow control
Press the MODE button to manually control
air flow and select the air outlet.
— Air flows from center and side
vents.
— Air flows from center and sidevents and foot outlets.
— Air flows mainly from foot outlets.— Air flows from defroster and footoutlets.
4-40Monitor, climate, audio, phone and voice recognition systems
Page 286 of 635
• HDMI 1.4 Input with MHL 2.0 Support
• Exclusive Slingplayer® Application
• 3.5mm Stereo Headphone Output
• Front Panel Capacitive Touch Controls
• Infrared Wireless Headphones
• Full-Function Slimline Remote Control
• Monitor Screen Sharing
GETTING STARTED
Turning the monitor on or off
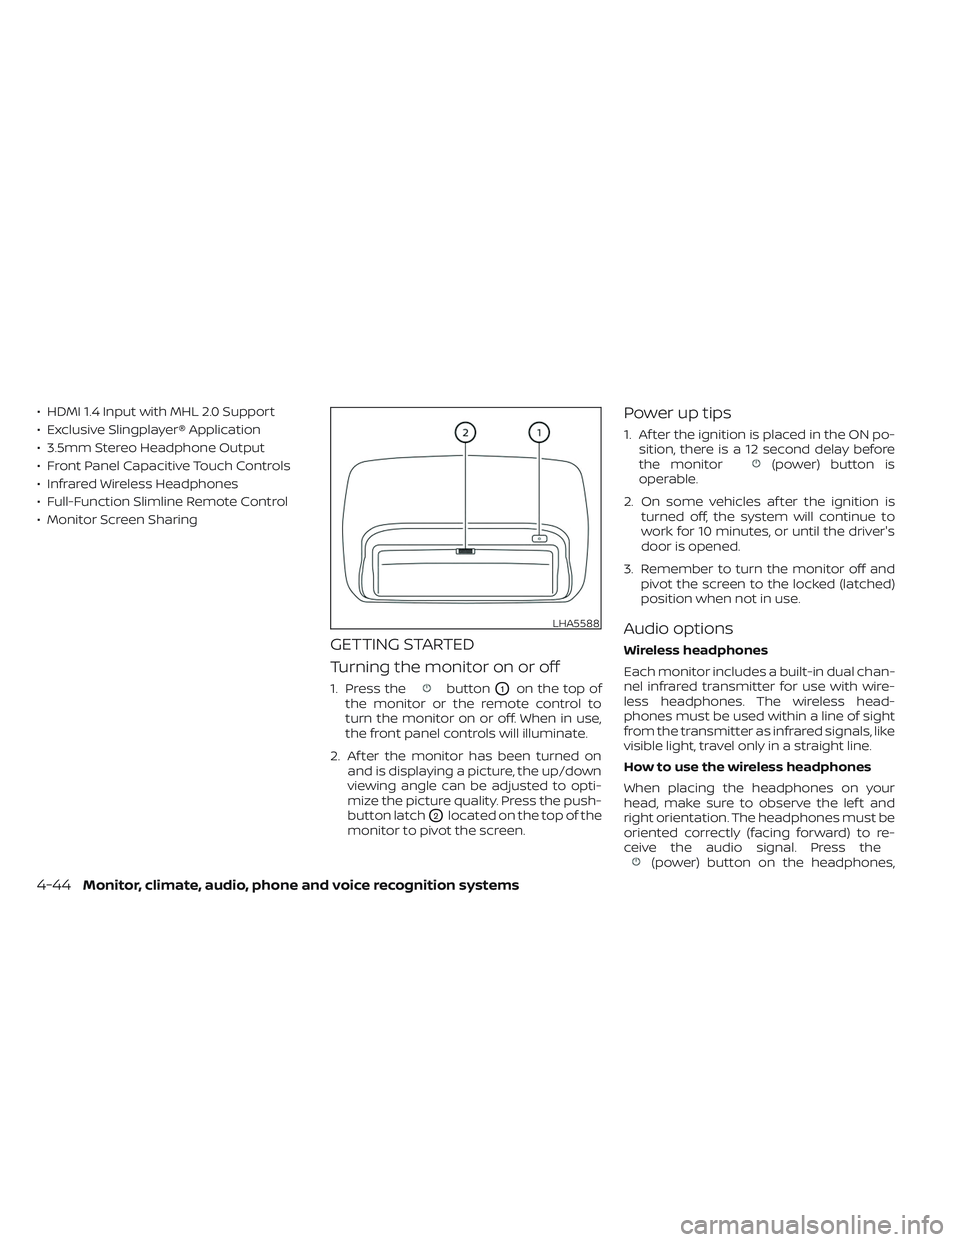
1. Press thebuttonO1on the top of
the monitor or the remote control to
turn the monitor on or off. When in use,
the front panel controls will illuminate.
2. Af ter the monitor has been turned on and is displaying a picture, the up/down
viewing angle can be adjusted to opti-
mize the picture quality. Press the push-
button latch
O2located on the top of the
monitor to pivot the screen.
Power up tips
1. Af ter the ignition is placed in the ON po- sition, there is a 12 second delay before
the monitor
(power) button is
operable.
2. On some vehicles af ter the ignition is turned off, the system will continue to
work for 10 minutes, or until the driver's
door is opened.
3. Remember to turn the monitor off and pivot the screen to the locked (latched)
position when not in use.
Audio options
Wireless headphones
Each monitor includes a built-in dual chan-
nel infrared transmitter for use with wire-
less headphones. The wireless head-
phones must be used within a line of sight
from the transmitter as infrared signals, like
visible light, travel only in a straight line.
How to use the wireless headphones
When placing the headphones on your
head, make sure to observe the lef t and
right orientation. The headphones must be
oriented correctly (facing forward) to re-
ceive the audio signal. Press the
(power) button on the headphones,
LHA5588
4-44Monitor, climate, audio, phone and voice recognition systems
Page 289 of 635

CONTROL DESCRIPTION
1.SD Card Slot
Play videos, music, and images stored on
most SD cards. The full-size SD card slot is accessible on
the lef t side of the monitor when the
screen is in the open position.2.
Screen latch
Press the push-button latch located on
the top of the monitor to pivot the
screen. Remember to turn the monitor
off and pivot the screen to the locked
(latched) position when not in use.
3. Power (Monitor A)
Press this button to turn the monitor on.
Press again to turn the monitor off. Press
and hold for 6 seconds to reset the sys-
tem (Monitor A only)
Power (Monitor B)
Press this button to turn the monitor on.
Press again to turn the monitor off.
4. Front panel controls
Capacitive-touch buttons provide user
interface navigation, Select, Back, and
Home functions.
5. Monitor screen display
Includes an 8-inch TFT Liquid Crystal
Display with 1024 x 600 resolution.
6. HDMI port
Connect an external audio/video source
using a full-size HDMI connector. Sup-
ports MHL 2.0 playback and charging.
LHA5995
Monitor A (Driver’s Side)
Monitor, climate, audio, phone and voice recognition systems4-47
Page 291 of 635
REMOTE CONTROL OPERATION
Before use
Before attempting to operate your remote
control, turn the remote control face down
and remove the battery insulator by pulling
the clear plastic tab away from the remote
control.
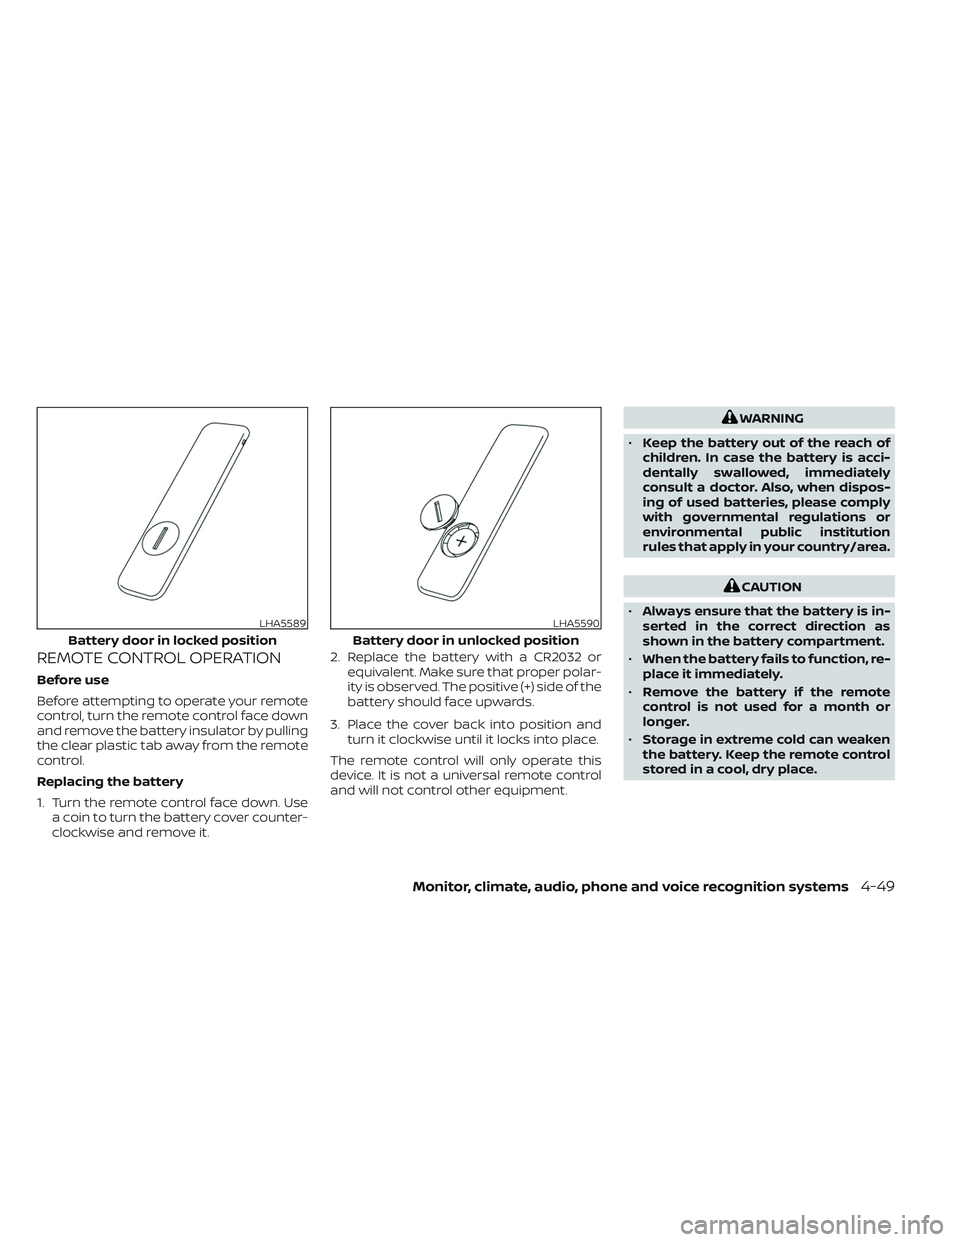
Replacing the battery
1. Turn the remote control face down. Usea coin to turn the battery cover counter-
clockwise and remove it. 2. Replace the battery with a CR2032 or
equivalent. Make sure that proper polar-
ity is observed. The positive (+) side of the
battery should face upwards.
3. Place the cover back into position and turn it clockwise until it locks into place.
The remote control will only operate this
device. It is not a universal remote control
and will not control other equipment.
WARNING
• Keep the battery out of the reach of
children. In case the battery is acci-
dentally swallowed, immediately
consult a doctor. Also, when dispos-
ing of used batteries, please comply
with governmental regulations or
environmental public institution
rules that apply in your country/area.
CAUTION
• Always ensure that the battery is in-
serted in the correct direction as
shown in the battery compartment.
• When the battery fails to function, re-
place it immediately.
• Remove the battery if the remote
control is not used for a month or
longer.
• Storage in extreme cold can weaken
the battery. Keep the remote control
stored in a cool, dry place.
LHA5589
Battery door in locked position
LHA5590
Battery door in unlocked position
Monitor, climate, audio, phone and voice recognition systems4-49