2022 NISSAN SENTRA start stop button
[x] Cancel search: start stop buttonPage 120 of 528

Low Oil Pressure: See Owner’s Manual
This warning appears in the message area
of the vehicle information display if low oil
pressure is detected. This gauge is not de-
signed to indicate low oil level.The low oil
pressure warning is not designed to indi-
cate a low oil level. Use the dipstick to
check the oil level. For additional informa-
tion, refer to “Engine oil” in the “Do-it-
yourself ” section of this manual.
Low Washer Fluid
This warning illuminates when the
windshield-washer fluid is at a low level.
Add windshield-washer fluid as necessary.
For additional information, refer to
“Windshield-washer fluid” in the “Do-it-
yourself ” section of this manual.
Tire Pressure Low - Add Air
This warning appears when the low tire
pressure warning light in the meter illumi-
nates and low tire pressure is detected. The
warning appears each time the ignition
switch is placed in the ON position as long
as the low tire pressure warning light re-
mains illuminated. If this warning appears,
stop the vehicle and adjust the tire pres-
sures of all four tires to the recommended
COLD tire pressure shown on the Tire and
Loading Information label. For additional information, refer to “Low tire pressure
warning light” in this section and “Tire Pres-
sure Monitoring System (TPMS)” in the
“Starting and driving” section of this
manual.
TPMS Error: See Owner’s Manual
This warning appears when there is an er-
ror with your TPMS. If this warning comes
on, have the system checked. It is recom-
mended that you visit a NISSAN dealer for
this service.
Door/Trunk Open
This warning illuminates when a door has
been opened.
Power will turn off to save the battery
This message appears in the vehicle infor-
mation display af ter a period of time if the
ignition switch is in the ON position and if
the vehicle is in P (Park). For additional infor-
mation, refer to “Push-button ignition
switch positions” in the “Starting and driv-
ing” section of this manual.
Power turned off to save the battery
This message appears af ter the ignition
switch is automatically turned off. For addi-
tional information, refer to “Push-button ig-
nition switch positions” in the “Starting and
driving” section of this manual.
Reminder: Turn OFF Headlights
This warning appears when the headlights
are lef t in the ON position when exiting the
vehicle. Place the headlight switch in the
OFF or AUTO position. For additional infor-
mation, refer to “Headlight and turn signal
switch” in this section.
Headlight System Error: See Owner’s
Manual (if so equipped)
This warning appears when the LED head-
lights are not functioning properly.
If this warning appears, have your system
checked. It is recommended that you visit a
NISSAN dealer for this service.
Engine Oil Service due i
n–––km
This distance to oil change is displayed if
the distance to oil change is less than 100
km (62 miles).
BSW/RCTA System Malfunction: See
Owner’s Manual
This warning appears when the Blind Spot
Warning/Rear Cross Traffic Alert systems
are not functioning properly. For additional
information, refer to “Blind Spot Warning
(BSW)” and “Rear Cross Traffic Alert (RCTA)”
in the “Starting and driving” section of this
manual.
2-30Instruments and controls
Page 137 of 528
will be a small reserve of fuel in the tank
when the fuel gauge needle reaches 0
(Empty).
Loose Fuel Cap
This warning appears when the fuel-filler
cap is not tightened correctly af ter the ve-
hicle has been refueled. For additional in-
formation, refer to “Fuel-filler cap” in the
“Pre-driving checks and adjustments” sec-
tion of this manual.
EngineOilServiceduein–––km
This distance to oil change is displayed if
the distance to oil change is less than 100
km (62 miles).
Low Washer Fluid (if so equipped)
This warning illuminates when the
windshield-washer fluid is at a low level.
Add windshield-washer fluid as necessary.
For additional information, refer to
“Windshield-washer fluid” in the “Do-it-
yourself ” section of this manual.
Tire Pressure Low - Add Air
This warning appears when the low tire
pressure warning light in the meter illumi-
nates and low tire pressure is detected. The
warning appears each time the ignition
switch is placed in the ON position as long
as the low tire pressure warning light re-mains illuminated. If this warning appears,
stop the vehicle and adjust the tire pres-
sures of all four tires to the recommended
COLD tire pressure shown on the Tire and
Loading Information label. For additional
information, refer to “Low tire pressure
warning light” in this section and “Tire Pres-
sure Monitoring System (TPMS)” in the
“Starting and driving” section of this
manual.
Door/Trunk Open
This warning illuminates when a door or
the trunk has been opened.
Timer Alert — Time for a break?
This indicator appears when the set time is
reached. The time can be set up to six
hours. For additional information, refer to
“Settings” in this section.
Low outside temperature indicator
This indicator appears if the outside tem-
perature is below 3°C (37°F). The tempera-
ture can be changed to display in Celsius or
Fahrenheit. For additional information, re-
fer to “Settings” in this section.
Power will turn off to save the battery
This message appears in the vehicle infor-
mation display af ter a period of time if the
ignition switch is in the AUTO ACC or the ON
position and if the vehicle is in P (Park). For
additional information, refer to “Push-
button ignition switch positions” in the
“Starting and driving” section of this
manual.
Power turned off to save the battery
This message appears af ter the ignition
switch is automatically turned off. For addi-
tional information, refer to “Push-button ig-
nition switch positions” in the “Starting and
driving” section of this manual.
Reminder: Turn OFF Headlights
This warning appears when the headlights
are lef t in the ON position when exiting the
vehicle. Place the headlight switch in the
OFF or AUTO position. For additional infor-
mation, refer to “Headlight and turn signal
switch” in this section.
Headlight System Error See Owner’s
Manual (if so equipped)
This warning illuminates when there is an
error with the system. For additional infor-
mation, refer to “Headlight and turn signal
switch” in this section.
Instruments and controls2-47
Page 143 of 528
Vehicle security system activation
The vehicle security system will give the
following alarm:
• The headlights blink and the horn soundsintermittently.
• The alarm automatically turns off af ter a period of time. However, the alarm reacti-
vates if the vehicle is tampered with
again. The alarm can be shut off by un-
locking the driver's door or trunk lid with
the key, or by pressing the
button on
the Intelligent Key.
The alarm is activated by:
• opening the door or trunk lid without us- ing the key or Intelligent Key (even if the
door is unlocked by releasing the door
inside lock switch).
How to stop an activated alarm
The alarm stops only by unlocking a door
or the trunk with the mechanical key (if so
equipped), pressing the
button on the
Intelligent Key, or pushing the request
switch (if so equipped) on the driver's or
passenger's door with the Intelligent Key in
range of the door handle.
NISSAN VEHICLE IMMOBILIZER
SYSTEM
The NISSAN Vehicle Immobilizer System
will not allow the engine to start without
the use of a registered key.
If the engine fails to start using a registered
key (for example, when interference is
caused by another registered key, an auto-
mated toll road device or automatic pay-
ment device on the key ring), restart the
engine using the following procedures:
1. Leave the ignition switch in the ON posi- tion for approximately 5 seconds.
2. Place the ignition switch in the OFF or LOCK position and wait approximately
10 seconds.
3. Repeat steps 1 and 2.
4. Restart the engine while holding the de- vice (which may have caused the inter-
ference) separate from the registered
key.
If the no start condition re-occurs, NISSAN
recommends placing the registered key on
a separate key ring to avoid interference
from other devices.
Never leave these keys in the vehicle. FCC Notice:
For USA:
This device complies with Part 15 of the
FCC Rules. Operation is subject to the fol-
lowing two conditions: (1) This device
may not cause harmful interference, and
(2) this device must accept any interfer-
ence received, including interference
that may cause undesired operation.
NOTE:
Changes or modifications not expressly
approved by the party responsible for
compliance could void the user's author-
ity to operate the equipment.
For Canada:
This device complies with Industry
Canada licence-exempt RSS standard(s).
Operation is subject to the following two
conditions: (1) this device may not cause
interference, and (2) this device must ac-
cept any interference received, including
interference that may cause undesired
operation of the device.
Instruments and controls2-53
Page 192 of 528
CONDITIONS THE REMOTE ENGINE
START WILL NOT WORK
The Remote Engine Start will not operate if
any of the following conditions are present:
• “Remote Engine Start” is turned off in the“Vehicle Settings” menu of the vehicle in-
formation display.
• The ignition switch is placed in the ON position.
• The hood is not securely closed.
• The hazard indicator lights are on.
• The engine is still running. The engine must be completely stopped. Wait at
least 6 seconds if the engine goes from
running to off. This is not applicable when
extending engine run time.
• The
button is not pressed and held
for at least 2 seconds.
• The
button is not pressed and held
within 5 seconds of pressing the lock but-
ton.
• The brake is pressed.
• The doors are not closed and locked.
• The trunk is open.
• The Key System Error warning shows in the vehicle information display.
• The alarm sounds due to illegal entry into the vehicle. • Two Remote Engine Starts, or a single
Remote Engine Start with an extension,
have already been used.
• The vehicle is not in P (Park).
• There is a detected registered key already inside of the vehicle.
• The Remote Engine Start function has been switched to the OFF position in “Ve-
hicle Settings” of the vehicle information
display. For additional information, refer
to “Vehicle information display” in the “In-
struments and controls” section of this
manual.
The Remote Engine Start may display a
warning or indicator in the vehicle informa-
tion display. For additional information, re-
fer to “Vehicle information display” in the
“Instruments and controls” section of this
manual.
3-22Pre-driving checks and adjustments
Page 297 of 528
WARNING
Do not operate the push-button igni-
tion switch while driving the vehicle ex-
cept in an emergency. (The engine will
stop when the ignition switch is pushed
three consecutive times in quick suc-
cession or the ignition switch is pushed
and held for more than 2 seconds.) If
the engine stops while the vehicle is
being driven, this could lead to a crash
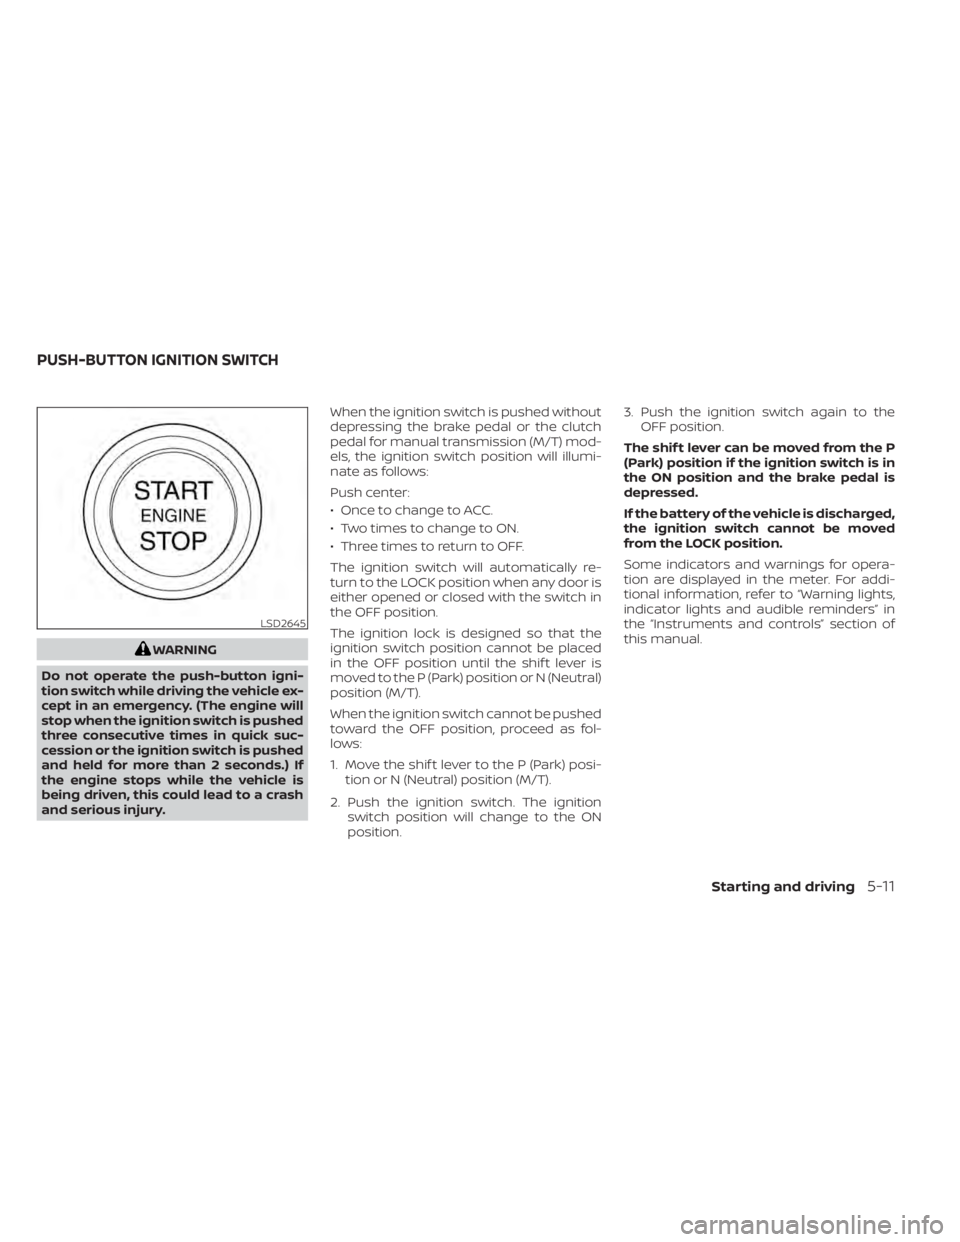
and serious injury. When the ignition switch is pushed without
depressing the brake pedal or the clutch
pedal for manual transmission (M/T) mod-
els, the ignition switch position will illumi-
nate as follows:
Push center:
• Once to change to ACC.
• Two times to change to ON.
• Three times to return to OFF.
The ignition switch will automatically re-
turn to the LOCK position when any door is
either opened or closed with the switch in
the OFF position.
The ignition lock is designed so that the
ignition switch position cannot be placed
in the OFF position until the shif t lever is
moved to the P (Park) position or N (Neutral)
position (M/T).
When the ignition switch cannot be pushed
toward the OFF position, proceed as fol-
lows:
1. Move the shif t lever to the P (Park) posi-
tion or N (Neutral) position (M/T).
2. Push the ignition switch. The ignition switch position will change to the ON
position. 3. Push the ignition switch again to the
OFF position.
The shif t lever can be moved from the P
(Park) position if the ignition switch is in
the ON position and the brake pedal is
depressed.
If the battery of the vehicle is discharged,
the ignition switch cannot be moved
from the LOCK position.
Some indicators and warnings for opera-
tion are displayed in the meter. For addi-
tional information, refer to “Warning lights,
indicator lights and audible reminders” in
the “Instruments and controls” section of
this manual.
LSD2645
PUSH-BUTTON IGNITION SWITCH
Starting and driving5-11
Page 303 of 528
CAUTION
To avoid possible damage to your ve-
hicle, when stopping the vehicle on an
uphill grade, do not hold the vehicle by
depressing the accelerator pedal. The
foot brake should be used for this pur-
pose.
1. Af ter starting the engine, fully depress the foot brake pedal before moving the
shif t lever out of the P (Park) position.
2. Keep the foot brake pedal depressed and move the shif t lever into a driving
gear.
3. Release the foot brake, then gradually start the vehicle in motion.
4. Stop the vehicle completely before mov- ing the shif t lever into the P (Park)
position.
The Continuously Variable Transmission
is designed so the foot brake pedal MUST
be depressed before shif ting from P
(Park) to any drive position while the ig-
nition switch is in the ON position.
The shif t lever cannot be moved out of P
(Park) and into any of the other gear po-
sitions if the ignition switch is placed in
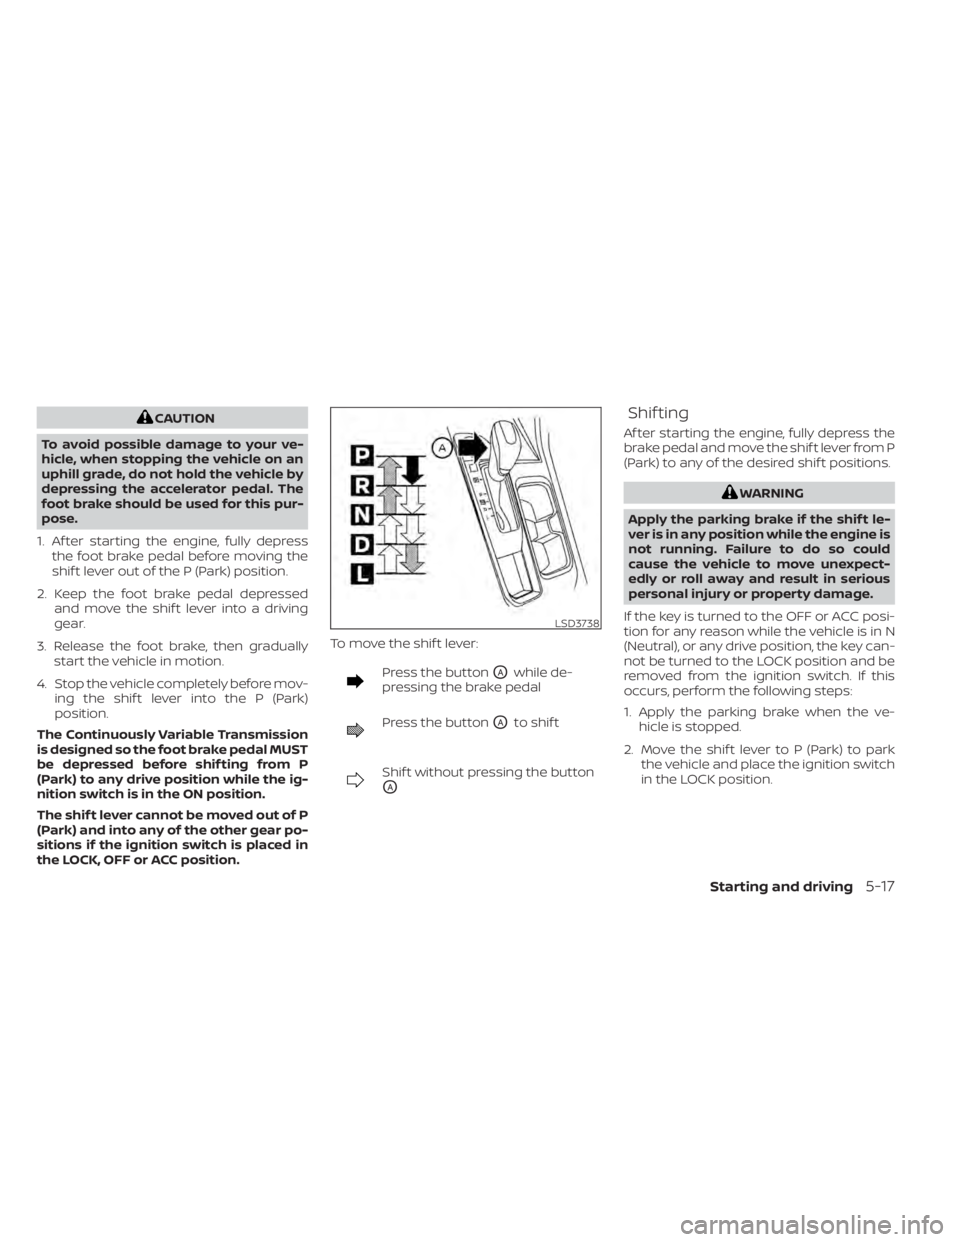
the LOCK, OFF or ACC position. To move the shif t lever:
Press the buttonOAwhile de-
pressing the brake pedal
Press the buttonOAto shif t
Shif t without pressing the button
OA
Shif ting
Af ter starting the engine, fully depress the
brake pedal and move the shif t lever from P
(Park) to any of the desired shif t positions.
LSD3738
Page 304 of 528
P (Park)
CAUTION
To prevent transmission damage, use
the P (Park) position only when the ve-
hicle is completely stopped.
Use the P (Park) shif t lever position when
the vehicle is parked or when starting the
engine. Make sure the vehicle is completely
stopped. The brake pedal must be de-
pressed and the shif t lever button
pressed in to move the shif t lever from N
(Neutral) or any drive position to P (Park).
Apply the parking brake. When parking on a
hill, apply the parking brake first, then place
the shif t lever into the P (Park) position.
R (Reverse)
CAUTION
To prevent transmission damage, use
the R (Reverse) position only when the
vehicle is completely stopped.
Use the R (Reverse) position to back up.
Make sure the vehicle is completely
stopped before selecting the R (Reverse)
position. The brake pedal must be de-
pressed and the shif t lever button pressed in to move the shif t lever from P
(Park), N (Neutral) or any drive position to
R (Reverse).
N (Neutral)
Neither forward nor reverse gear is en-
gaged. The engine can be started in this
position. You may shif t to N (Neutral) and
restart a stalled engine while the vehicle is
moving.
D (Drive)
Use this position for all normal forward
driving.
L (Low) (if so equipped)
Use this position for maximum engine
braking on steep downhill gradients/
climbing steep slopes and whenever ap-
proaching sharp bends. Do not use the L
(Low) position in any other circumstances.
Manual shif t mode (if so
equipped)
When the shif t lever is in the manual shif t
gate, the transmission is ready for the
manual shif t mode. Shif t ranges can be
selected manually by moving the shif t le-
ver up or down. To cancel manual shif t
mode, return the shif t lever to the D (Drive)position. The transmission returns to auto-
matic driving mode.
When the shif t lever is shif ted from D (Drive)
to the manual shif t gate with the vehicle
stopped or while driving, the transmission
enters the manual shif t mode. Shif t ranges
can be selected manually. In the manual
shif t mode, the shif t range is displayed on
the position indicator in the meter. When
moving the shif t lever to the manual shif t
gate, the position indicator displays 1 (1st)
up to 7 (7th) depending on vehicle speed.
Shif t ranges up or down one by one as
follows:
1⇔
2⇔ 3⇔ 4⇔ 5⇔ 6⇔ 7
M7 (7th)
Use this position for all normal forward
driving at highway speeds.
M6 (6th) and M5 (5th)
Use this position when driving up long
slopes or for engine braking when driving
down long slopes.
M4 (4th), M3 (3rd) and M2 (2nd)
Use for hill climbing or engine braking on
downhill grades.
5-18Starting and driving
Page 305 of 528

M1 (1st)
Use this position when climbing steep hills
slowly or driving slowly through deep snow,
sand or mud, or for maximum engine brak-
ing on steep downhill grades.
• Remember not to drive at high speeds forextended periods of time in lower than
the 6th range. This reduces fuel economy.
When shif ting up
Move the shif t lever to the + (up) side. (Shif ts
to higher range.)
When shif ting down
Move the shif t lever to the − (down) side.
(Shif ts to lower range.)
• Moving the shif t lever rapidly to the same side twice will shif t the ranges in succes-
sion.
• The transmission will automatically downshif t the gears. (For example, if you
select the 3rd range, the transmission will
shif t down between the 3rd and 1st
gears.)
When canceling the manual shif t mode
Return the shif t lever to the D (Drive) posi-
tion to return the transmission to the nor-
mal driving mode. •
In the manual shif t mode, the trans-
mission may not shif t to the selected
gear. This helps maintain driving per-
formance and reduces the chance of
vehicle damage or loss of control.
• When this situation occurs, the Con-
tinuously Variable Transmission (CVT)
position indicator light will blink and
the chime will sound.
• In the manual shif t mode, the trans-
mission may shif t up automatically to a
higher range than selected if the en-
gine speed is too high. When the ve-
hicle speed decreases, the transmis-
sion automatically shif ts down and
shif ts to 1st gear before the vehicle
comes to a stop.
• CVT operation is limited to automatic drive mode when CVT fluid temperature
is extremely low even if manual shif t
mode is selected. This is not a malfunc-
tion. When CVT fluid warms up, manual
mode can be selected.
• When the CVT fluid temperature is high, the shif t range may upshif t in lower rpm
than usual. This is not a malfunction.
Shif t lock release
If the battery charge is low or discharged,
the shif t lever may not be moved from the
P (Park) position even with the brake pedal
depressed and the shif t lever button
pressed.
It will be necessary to jump start or have
your battery charged. For additional infor-
mation, refer to “Jump starting” in the “In
case of emergency” section of this manual.
It is recommended that you contact a
NISSAN dealer or a professional towing ser-
vice.
LSD3739