2022 NISSAN SENTRA engine
[x] Cancel search: enginePage 191 of 528
The Remote Engine Start operating range
is approximately 197 f t (60 m) from the ve-
hicle.
REMOTE STARTING THE VEHICLE
To use the Remote Engine Start feature to
start the engine perform the following:
1. Aim the Intelligent Key at the vehicle.
2. Press the
button to lock all doors.
3. Within 5 seconds press and hold the
button until the turn signal lights
flash and the tail lamps turn on. If the
vehicle is not within view press and hold
the
button for at least 2 seconds.
The following events will occur when the
engine starts:
• The parking lights will turn on and remain on as long as the engine is running.
• The doors will be locked and the climate control system may come on.
• The engine will continue to run for 10 min- utes. Repeat the steps to extend the time
for an additional 10 minutes. For addi-
tional information, refer to “Extending en-
gine run time” in this section.
Depress and hold the brake then push the
push-button ignition switch to the ON po-
sition before driving. For additional infor- mation, refer to “Driving the vehicle” in the
“Starting and driving” section of this
manual.
EXTENDING ENGINE RUN TIME
The Remote Engine Start feature can be
extended one time by performing the
steps listed in “Remote starting the vehicle”
in this section. Run time will be calculated
as follows:
• The first 10 minute run time will start
when the Remote Engine Start function is
performed.
• The second 10 minutes will start immedi- ately when the Remote Engine Start
function is performed again. For example,
if the engine has been running for 5 min-
utes, and 10 minutes are added, the en-
gine will run for a total of 15 minutes.
• Extending engine run time will bring you to the two Remote Engine Start limit.
A maximum of two Remote Engine Starts,
or a single start with an extension, are al-
lowed between ignition cycles.
The ignition switch must be cycled to the
ON position and then back to the OFF po-
sition before the Remote Engine Start pro-
cedure can be used again.
CANCELING A REMOTE ENGINE
START
To cancel a Remote Engine Start, perform
one of the following:
• Aim the Intelligent Key at the vehicle and press
until the parking lights turn off.
• Turn on the hazard warning flashers.
• Cycle the ignition switch on and then off.
• The extended engine run time has ex- pired.
• The first 10 minute timer has expired.
• The engine hood has been opened.
• The shif t lever is moved out of park.
• The alarm sounds due to illegal entry into the vehicle.
• The ignition switch is pushed without an Intelligent Key in the vehicle.
• The ignition switch is pushed with an In- telligent Key in the vehicle but the brake
pedal is not depressed.
Pre-driving checks and adjustments3-21
Page 192 of 528
CONDITIONS THE REMOTE ENGINE
START WILL NOT WORK
The Remote Engine Start will not operate if
any of the following conditions are present:
• “Remote Engine Start” is turned off in the“Vehicle Settings” menu of the vehicle in-
formation display.
• The ignition switch is placed in the ON position.
• The hood is not securely closed.
• The hazard indicator lights are on.
• The engine is still running. The engine must be completely stopped. Wait at
least 6 seconds if the engine goes from
running to off. This is not applicable when
extending engine run time.
• The
button is not pressed and held
for at least 2 seconds.
• The
button is not pressed and held
within 5 seconds of pressing the lock but-
ton.
• The brake is pressed.
• The doors are not closed and locked.
• The trunk is open.
• The Key System Error warning shows in the vehicle information display.
• The alarm sounds due to illegal entry into the vehicle. • Two Remote Engine Starts, or a single
Remote Engine Start with an extension,
have already been used.
• The vehicle is not in P (Park).
• There is a detected registered key already inside of the vehicle.
• The Remote Engine Start function has been switched to the OFF position in “Ve-
hicle Settings” of the vehicle information
display. For additional information, refer
to “Vehicle information display” in the “In-
struments and controls” section of this
manual.
The Remote Engine Start may display a
warning or indicator in the vehicle informa-
tion display. For additional information, re-
fer to “Vehicle information display” in the
“Instruments and controls” section of this
manual.
3-22Pre-driving checks and adjustments
Page 193 of 528
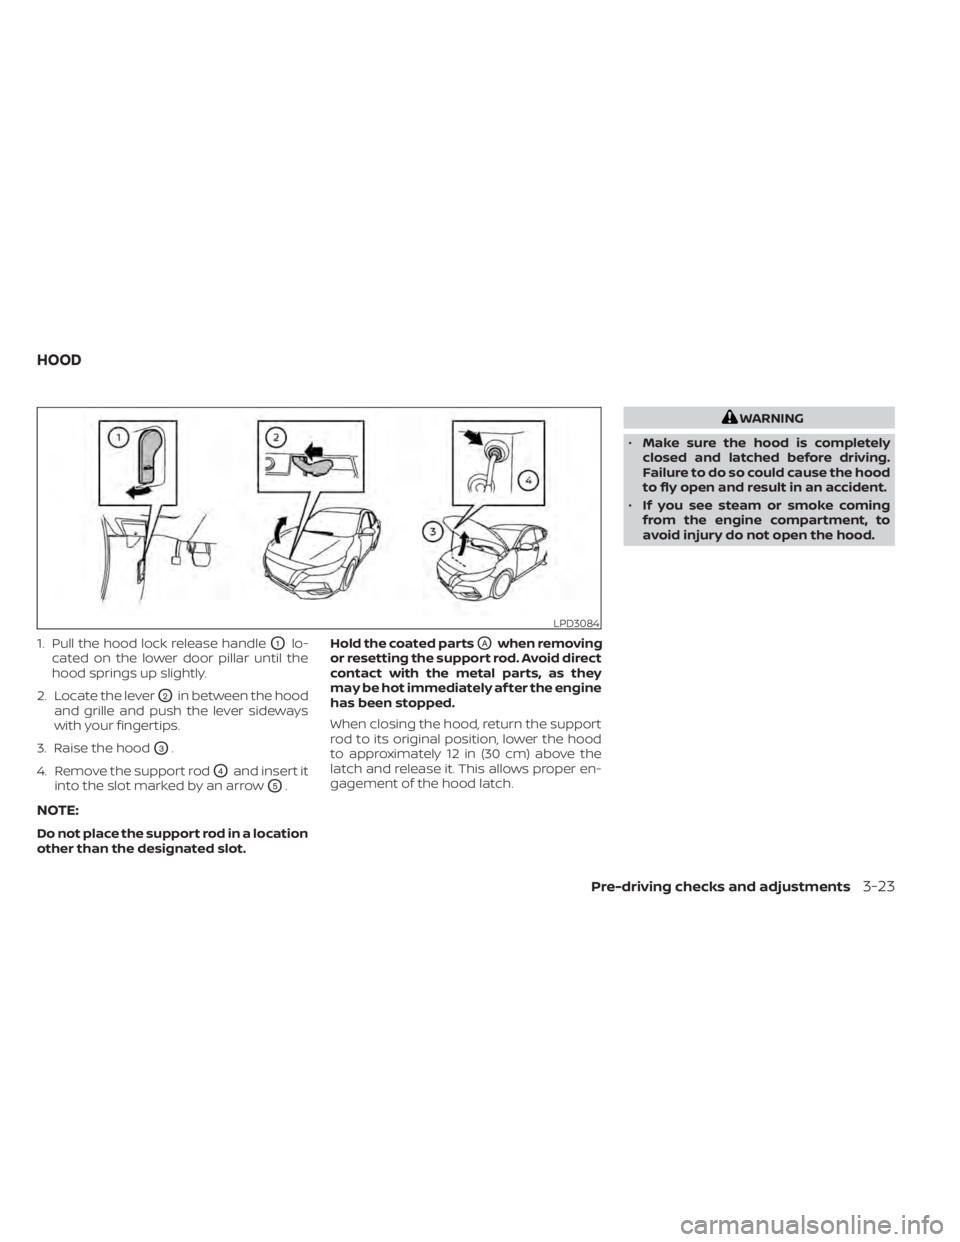
1. Pull the hood lock release handleO1lo-
cated on the lower door pillar until the
hood springs up slightly.
2. Locate the lever
O2in between the hood
and grille and push the lever sideways
with your fingertips.
3. Raise the hood
O3.
4. Remove the support rod
O4and insert it
into the slot marked by an arrow
O5.
NOTE:
Do not place the support rod in a location
other than the designated slot. Hold the coated parts
OAwhen removing
or resetting the support rod. Avoid direct
contact with the metal parts, as they
may be hot immediately af ter the engine
has been stopped.
When closing the hood, return the support
rod to its original position, lower the hood
to approximately 12 in (30 cm) above the
latch and release it. This allows proper en-
gagement of the hood latch.
Pre-driving checks and adjustments3-23
Page 205 of 528
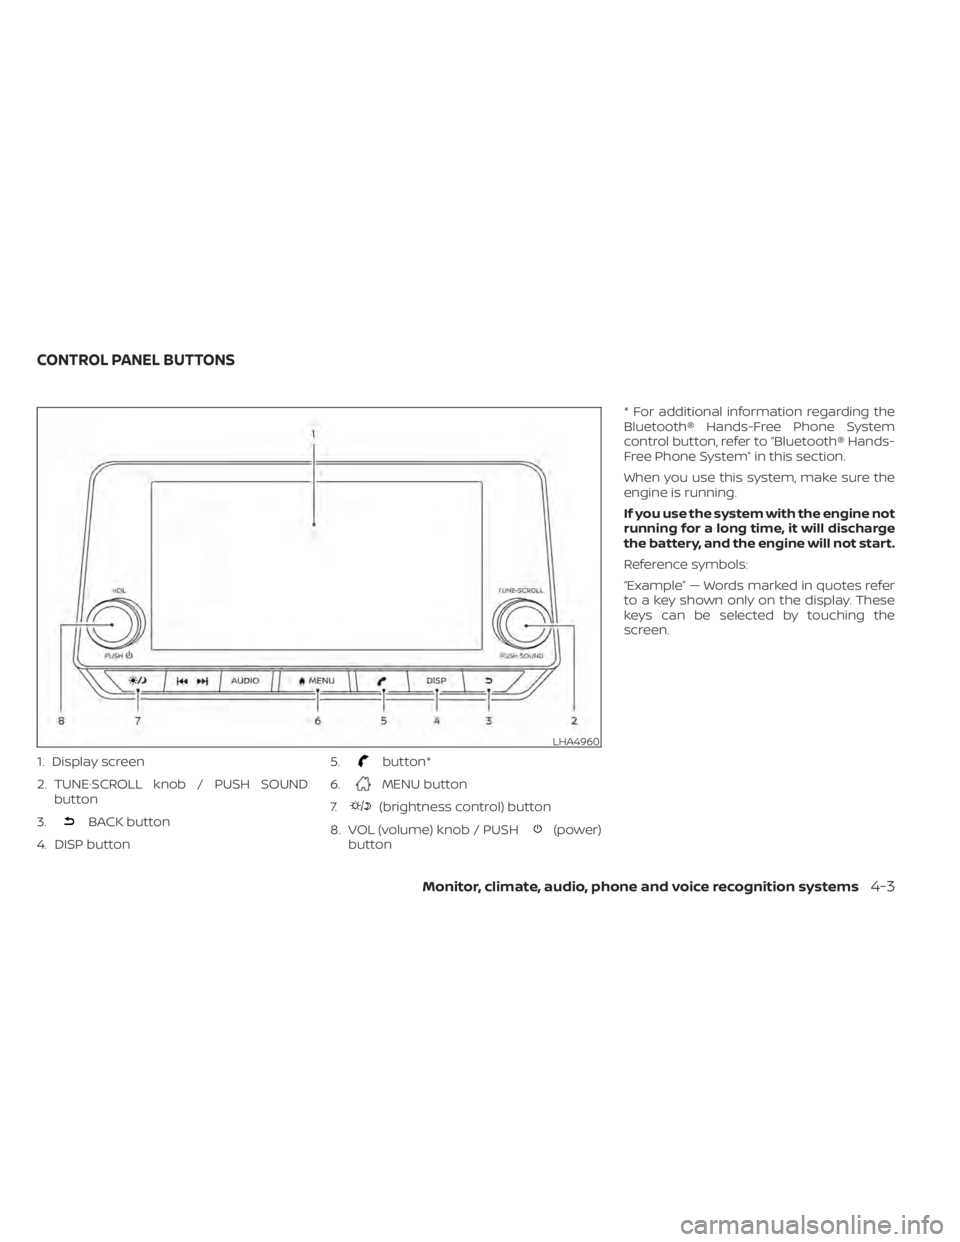
1. Display screen
2. TUNE·SCROLL knob / PUSH SOUNDbutton
3.
BACK button
4. DISP button 5.
button*
6.
MENU button
7.
(brightness control) button
8. VOL (volume) knob / PUSH
(power)
button * For additional information regarding the
Bluetooth® Hands-Free Phone System
control button, refer to “Bluetooth® Hands-
Free Phone System” in this section.
When you use this system, make sure the
engine is running.
If you use the system with the engine not
running for a long time, it will discharge
the battery, and the engine will not start.
Reference symbols:
“Example” — Words marked in quotes refer
to a key shown only on the display. These
keys can be selected by touching the
screen.
LHA4960
CONTROL PANEL BUTTONS
Monitor, climate, audio, phone and voice recognition systems4-3
Page 236 of 528
CONTROLS
Fan speed control dial
Thefan speed control dial turns the
fan on and off, and controls fan speed.
Air flow control buttons
The air flow control buttons allow you to
select the air flow outlets.
— Air flows from center and side vents.— Air flows from center and side vents
and foot outlets.
— Air flows mainly from foot outlets.— Air flows from defroster outlets andfoot outlets.
— Air flows mainly from defrosteroutlets.
Temperature control dial
The temperature control dial allows you to
adjust the temperature of the outlet air. To
lower the temperature, turn the dial to the
lef t. To increase the temperature, turn the
dial to the right.
Turn the dial to the MAX A/C position for
maximum cooling. Air will flow from center
and side vents.
Air recirculation button
On position (Indicator light on):
Interior air is recirculated inside the vehicle.
Press the
button to the on position
when:
• driving on a dusty road.
• to prevent traffic fumes from entering passenger compartment.
• for maximum cooling when using the air conditioner.
Off position (Indicator light off ):
Outside air is drawn into the passenger
compartment and distributed through the
selected outlet.
Use the off position for normal heater or air
conditioner operation.
A/C (air conditioner) button
Start the engine, turn thefan speed
control dial to the desired position and
press the
button to turn on the air
conditioner. To turn off the air conditioner,
press the
button again.
The air conditioner cooling function op-
erates only when the engine is running.
Rear window and outside mirror
(if so equipped) defroster switch
For additional information, refer to “Rear
window and outside mirror (if so equipped)
defroster switch” in the “Instruments and
controls” section of this manual.
Heated seat switches (if so
equipped)
For additional information, refer to “Heated
seat switches” in the “Instruments and con-
trols” section of this manual.
HEATER OPERATION
Heating
This mode is used to direct heated air to the
foot outlets. Some air also flows from the
defrost outlets and the side vent outlets.
1. Press thebutton to the off position
for normal heating.
2. Press the
air flow control button.
3. Turn the
fan speed control dial to
the desired position.
4. Turn the temperature control dial to the desired position between the middle
and the hot position.
4-34Monitor, climate, audio, phone and voice recognition systems
Page 237 of 528
Ventilation
This mode directs outside air to the side
and center vents.
1. Press the
button to the off position.
2. Press the
air flow control button.
3. Turn the
fan speed control dial to
the desired position.
4. Turn the temperature control dial to the desired position.
Defrosting or defogging
This mode directs the air to the defrost
outlets to defrost/defog the windows.
1. Press the defrost/defog button
.
2. Turn the
fan speed control dial to
the desired position.
3. Turn the temperature control dial to the desired position between the middle
and the hot position.
• To quickly remove ice or fog from the win- dows, turn the
fan speed control dial
to the highest setting and the tempera-
ture control to the full HOT position. • When the
position is selected, the air
conditioner automatically turns on if the
outside temperature is more than 36°F
(2°C). This dehumidifies the air which
helps defog the windshield. The
mode automatically turns off, allowing
outside air to be drawn into the passen-
ger compartment to further improve the
defogging performance. The recircula-
tion mode cannot be activated in the
position.
Bi-level heating
The bi-level mode directs warmed air to
the side and center vents and to the front
and rear floor outlets.
1. Press the
button to the off position.
2. Press the
air flow control button.
3. Turn the
fan speed control dial to
the desired position.
4. Turn the temperature control dial to the desired position.
Heating and defogging
This mode heats the interior and defogs
the windshield.
1. Press the
air flow control button. 2. Turn the
fan speed control dial to
the desired position.
3. Turn the temperature control dial to the desired position between the middle
and the hot position.
• When the
position is selected, the
air conditioner automatically turns on if
the outside temperature is more than
36°F (2°C). This dehumidifies the air which
helps defog the windshield. The
mode automatically turns off, allowing
outside air to be drawn into the passen-
ger compartment to further improve the
defogging performance.
Operating tips
Clear snow and ice from the wiper blades
and air inlet in front of the windshield.
This improves heater operation.
AIR CONDITIONER OPERATION
Start the engine, turn thefan speed
control dial to the desired position, and
press the
button to activate the air
conditioner. When the air conditioner is on,
cooling and dehumidif ying functions are
added to the heater operation.
The air conditioner cooling function op-
erates only when the engine is running.
Monitor, climate, audio, phone and voice recognition systems4-35
Page 238 of 528
Cooling
This mode is used to cool and dehumidif y
the air.
1. Press the
button to the off position.
2. Press the
air flow control button.
3. Turn the
fan speed control dial to
the desired position.
4. Press the A/C button. The indicator light comes on.
5. Turn the temperature control dial to the desired position.
• For quick cooling when the outside tem- perature is high, press the
button to
the ON position. Be sure to return the
to the off position for normal cooling.
MAX A/C may be used for quick cooling.
Dehumidified heating
This mode is used to heat and dehumidif y
the air.
1. Press the
button to the off position.
2. Press the
air flow control button.
3. Turn the
fan speed control dial to
the desired position.
4. Press the A/C (air conditioner) button. The indicator light comes on. 5. Turn the temperature control dial to the
desired position.
Dehumidified defogging
This mode is used to defog the windows
and dehumidif y the air.
1. Press the
air flow control button.
2. Turn the
fan speed control dial to
the desired position.
• When the
orare selected, the
air conditioner automatically turns on if
the outside temperature is more than
36°F (2°C). This dehumidifies the air which
helps defog the windshield. The
mode automatically turns off, allowing
outside air to be drawn into the passen-
ger compartment to further improve the
defogging performance.
3. Turn the temperature control dial to the desired position.
Operating tips
• Keep the windows closed while the airconditioner is in operation. • Af ter parking in the sun, drive for 2 or 3
minutes with the windows open to vent
hot air from the passenger compart-
ment. Then, close the windows. This al-
lows the air conditioner to cool the inte-
rior more quickly.
• The air conditioning system should be operated for approximately 10 minutes at
least once a month. This helps prevent
damage to the system due to lack of lu-
brication.
• A visible mist may be seen coming from the ventilators in hot, humid conditions
as the air is cooled rapidly. This does not
indicate a malfunction.
• If the engine coolant temperature gauge indicates engine coolant temperature
over the normal range, turn the air condi-
tioner off. For additional information, refer
to “If your vehicle overheats” in the “In case
of emergency” section of this manual.
• When Remote Engine Start (if so equipped) is activated, the manual cli-
mate control system will default to the
last used heating or cooling mode.
4-36Monitor, climate, audio, phone and voice recognition systems
Page 243 of 528
NOTE:
• Odors from inside and outside the ve-hicle can build up in the air conditioner
unit. Odor can enter the passenger
compartment through the vents.
• When parking, set the heater and air conditioner controls to turn off air re-
circulation to allow fresh air into the
passenger compartment. This should
help reduce odors inside the vehicle.
AUTOMATIC OPERATION
Cooling and/or dehumidified
heating (AUTO)
This mode may be used all year round as
the system automatically works to keep a
constant temperature. Air flow distribution,
air intake control, and fan speed are also
controlled automatically.
1. Press the AUTO button on.
2.
Turn the temperature control dial to the lef t
or right to set the desired temperature.
• Adjust the temperature display to about 75°F (24°C) for normal operation.
•
The temperature of the passenger com-
partment will be maintained automatically.
Air flow distribution, air intake control and fan
speed are also controlled automatically.
• A visible mist may be seen coming from the vents in hot, humid conditions as the
air is cooled rapidly. This does not indicate
a malfunction.
3. You can individually set driver's and front passenger's side temperature using
each temperature control dial. To syn-
chronize the driver’s and front passen-
ger’s temperature settings, press the
SYNC button.
Heating (A/C OFF)
The air conditioner does not activate. When
you need to heat only, use this mode.
1. Press the AUTO button.
2. Turn the temperature control dial to set the desired temperature.
• The temperature of the passenger com- partment will be maintained automati-
cally. Air flow distribution and fan speed
are also controlled automatically.
• Do not set the temperature lower than the outside air temperature. Otherwise,
the system may not work properly.
• Not recommended if windows fog up.
Dehumidified defrosting or
defogging
1. Press thefront defroster button on.
2. Turn the temperature control dial to set the desired temperature.
• To quickly remove ice from the outside of the windows, use the
fan speed con-
trol buttons to set the fan speed to maxi-
mum.
• As soon as possible af ter the windshield is clean, press the AUTO button to return
to the automatic mode.
• When the
front defroster button is
pressed, the air conditioner will automati-
cally be turned on at outside tempera-
tures above 36°F (2°C). The air recirculate
mode automatically turns off, allowing
outside air to be drawn into the passen-
ger compartment to further improve the
defogging performance.
Remote Engine Start with
Intelligent Climate Control (if so
equipped)
Vehicles equipped with automatic climate
controls and Remote Engine Start function
may go into automatic heating or cooling
Monitor, climate, audio, phone and voice recognition systems4-41