2022 NISSAN SENTRA oil
[x] Cancel search: oilPage 444 of 528
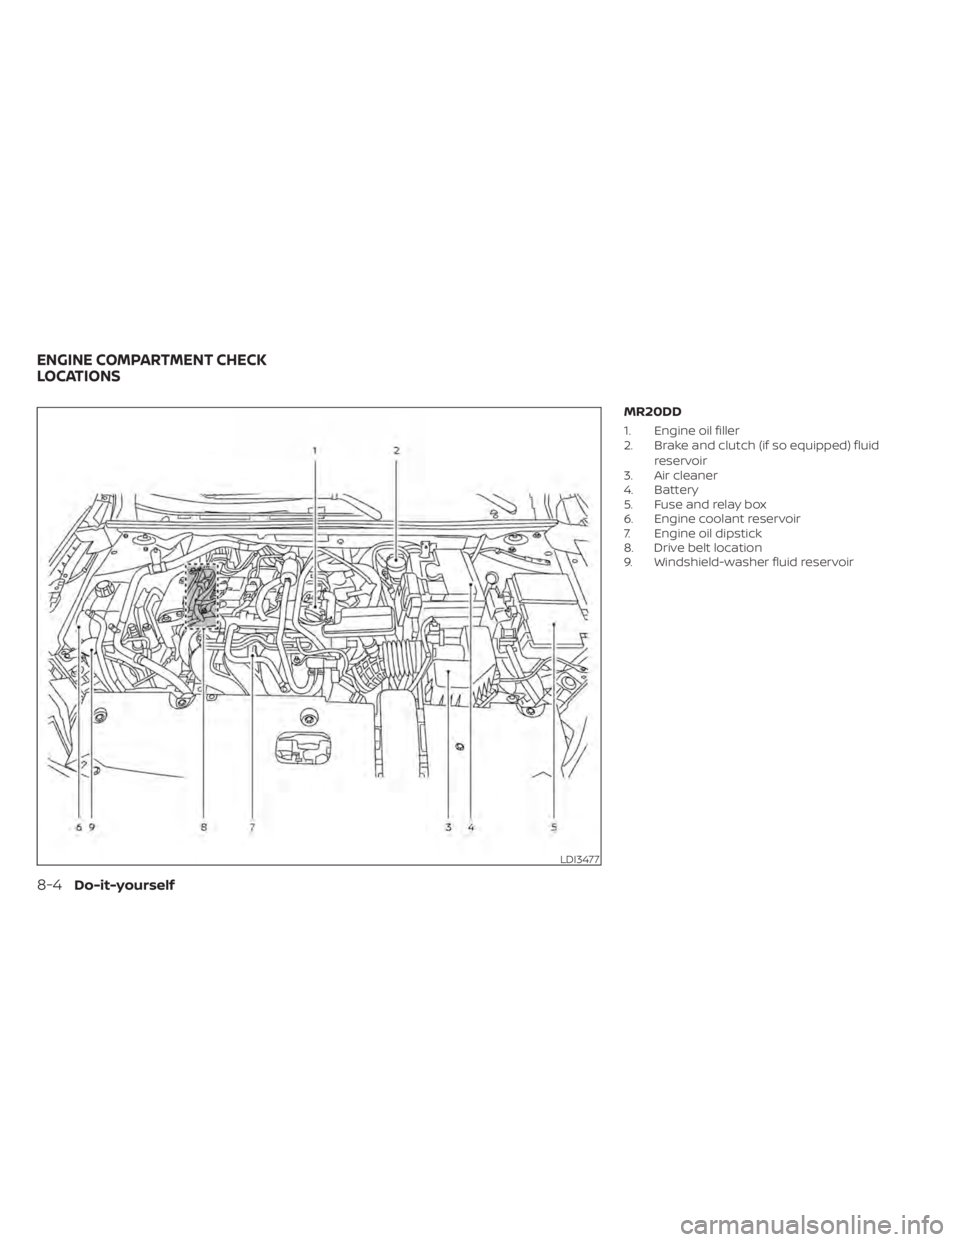
MR20DD
1. Engine oil filler
2. Brake and clutch (if so equipped) fluidreservoir
3. Air cleaner
4. Battery
5. Fuse and relay box
6. Engine coolant reservoir
7. Engine oil dipstick
8. Drive belt location
9. Windshield-washer fluid reservoir
LDI3477
ENGINE COMPARTMENT CHECK
LOCATIONS
Page 447 of 528
CHECKING ENGINE OIL LEVEL
1. Park the vehicle on a level surface andapply the parking brake.
2. Start the engine and let it idle until it reaches operating temperature.
3. Turn off the engine. Wait more than 10
minutes for the oil to drain back into
the oil pan.
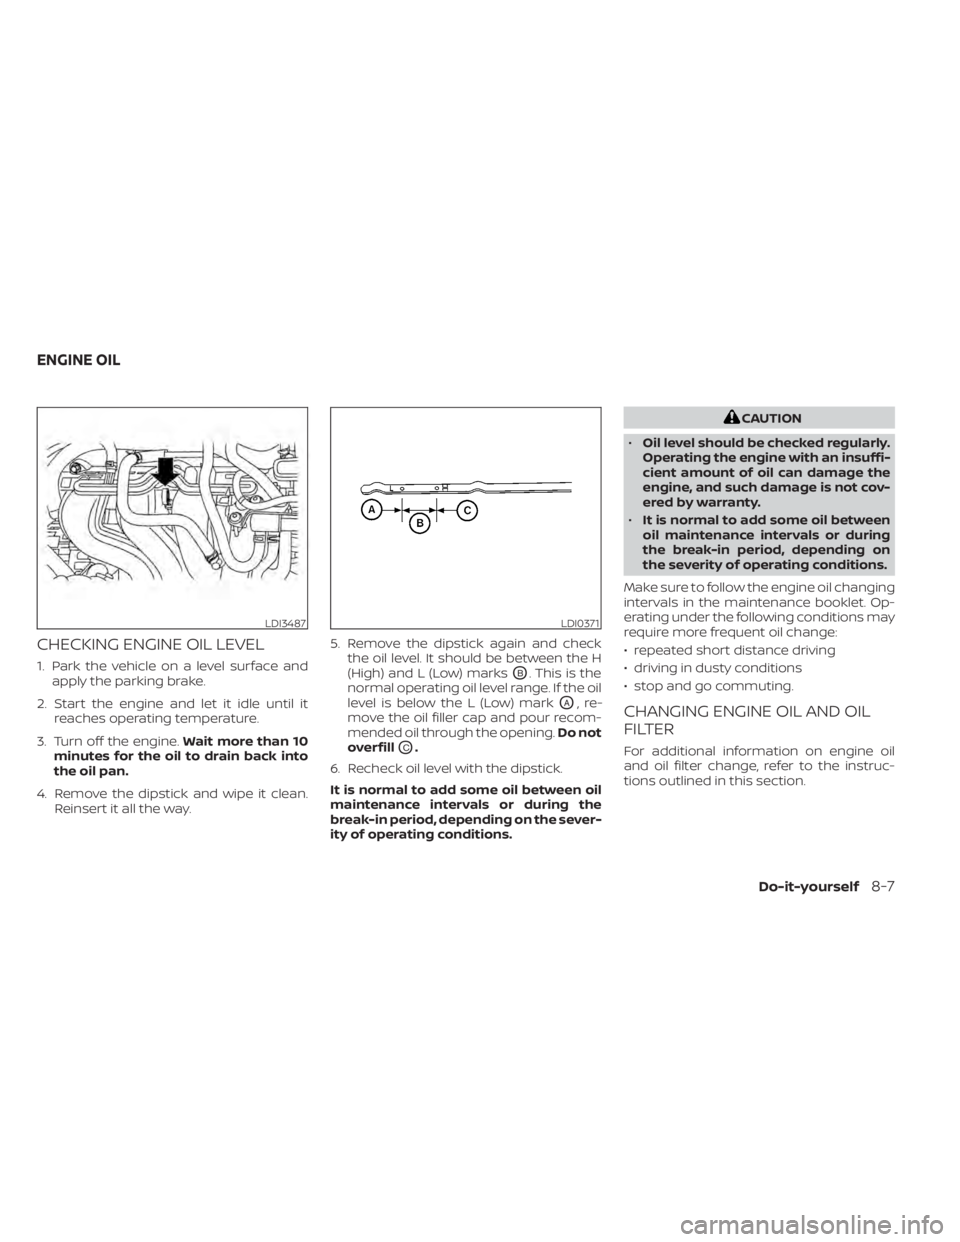
4. Remove the dipstick and wipe it clean. Reinsert it all the way. 5. Remove the dipstick again and check
the oil level. It should be between the H
(High) and L (Low) marksOB. This is the
normal operating oil level range. If the oil
level is below the L (Low) mark
OA,re-
move the oil filler cap and pour recom-
mended oil through the opening. Do not
overfill
OC.
6. Recheck oil level with the dipstick.
It is normal to add some oil between oil
maintenance intervals or during the
break-in period, depending on the sever-
ity of operating conditions.
CAUTION
• Oil level should be checked regularly.
Operating the engine with an insuffi-
cient amount of oil can damage the
engine, and such damage is not cov-
ered by warranty.
• It is normal to add some oil between
oil maintenance intervals or during
the break-in period, depending on
the severity of operating conditions.
Make sure to follow the engine oil changing
intervals in the maintenance booklet. Op-
erating under the following conditions may
require more frequent oil change:
• repeated short distance driving
• driving in dusty conditions
• stop and go commuting.
CHANGING ENGINE OIL AND OIL
FILTER
For additional information on engine oil
and oil filter change, refer to the instruc-
tions outlined in this section.
LDI3487LDI0371
ENGINE OIL
Do-it-yourself8-7
Page 449 of 528
WARNING
• Prolonged and repeated contact
with used engine oil may cause skin
cancer.
• Try to avoid direct skin contact with
used oil. If skin contact is made, wash
thoroughly with soap or hand
cleaner as soon as possible.
• Keep used engine oil out of reach of
children.
4. Loosen the oil filter with an oil filter wrench by turning it counterclockwise.
Remove the oil filter by turning it by
hand.
5. Wipe the engine oil filter mounting sur- face with a clean rag.
Page 465 of 528
•Only touch the base when handling
the bulb. Never touch the glass enve-
lope. Touching the glass could sig-
nificantly affect bulb life and/or
headlight performance.
• High pressure halogen gas is sealed
inside the halogen bulb. The bulb
may break if the glass envelope is
scratched or the bulb is dropped.
• Use the same number and wattage
as shown in the chart.
WARNING
Do not touch bulb by hand while it is lit
or right af ter being turned off. Burning
may result.
CAUTION
• Do not touch glass surface of the bulb
with bare hands or allow oil or grease to
get on it to prevent damage to bulb.
• Do not leave the bulb out of the lamp
reflector for a long time because dust,
moisture, smoke, etc. may affect the
performance of the lamp.
• Fog may temporarily form inside the
lens of the exterior lights in the rain or in a car wash. A temperature difference
between the inside and the outside of
the lens causes the fog. This is not a
malfunction. If large drops of water col-
lect inside the lens, it is recommended
that you visit a NISSAN dealer for ser-
vicing.
Replacing the LED headlight bulb
(if so equipped)
If LED headlight bulb replacement is re-
quired, it is recommended that you visit a
NISSAN dealer for this service.
TURN SIGNAL BULB
To replace the turn signal bulb follow the
instructions listed in the “Replacing the
halogen headlight bulb” found in this sec-
tion.
FOG LIGHTS (if so equipped)
For additional information on fog light bulb
replacement, refer to the instructions out-
lined in this section.
Replacing the fog light bulb
If fog light bulb replacement is required, it is
recommended that you visit a NISSAN
dealer for this service.
Page 466 of 528
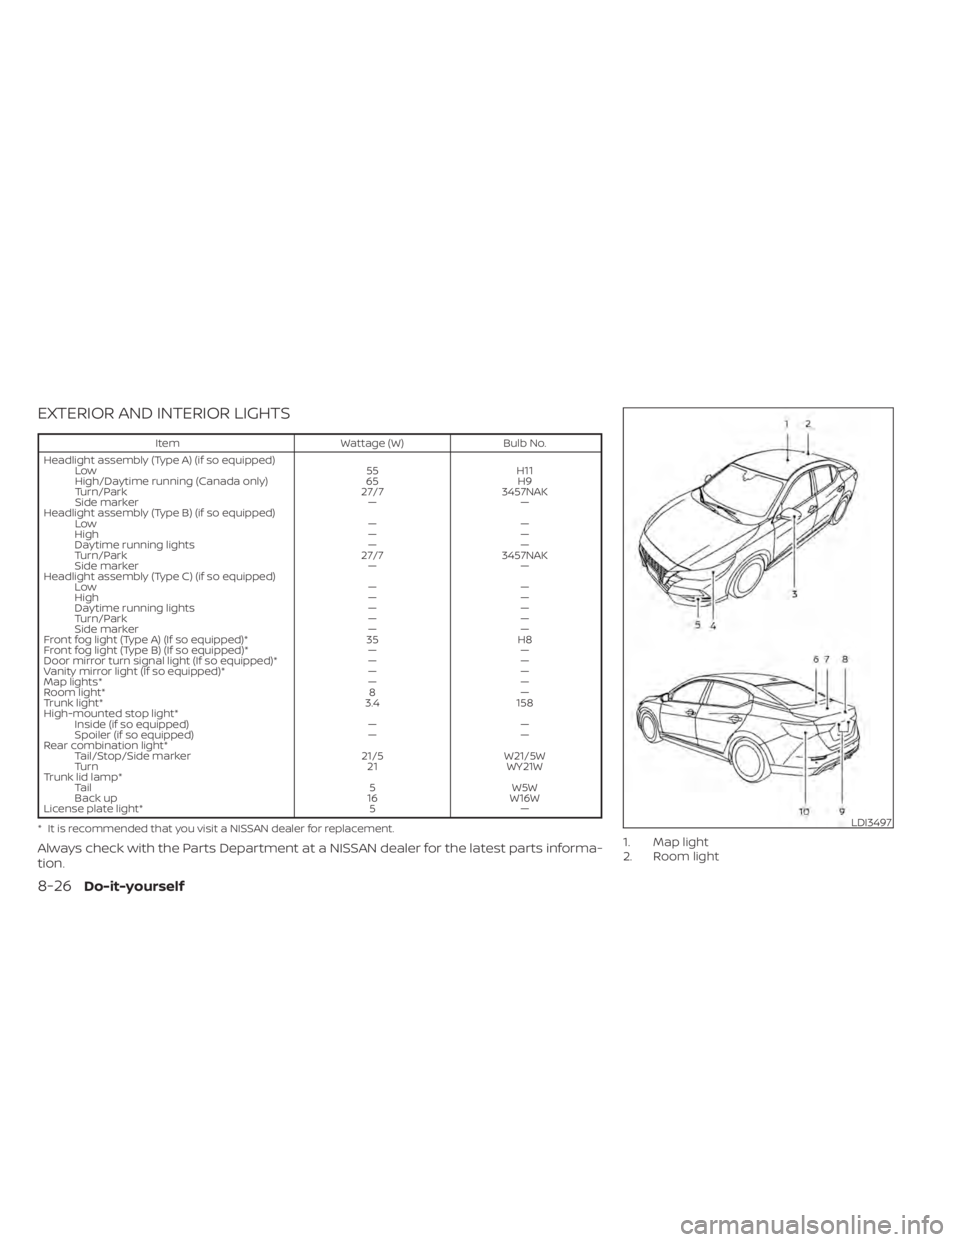
EXTERIOR AND INTERIOR LIGHTS
ItemWattage (W)Bulb No.
Headlight assembly (Type A) (if so equipped) Low 55H11
High/Daytime running (Canada only) 65H9
Turn/Park 27/73457NAK
Side marker ——
Headlight assembly (Type B) (if so equipped) Low ——
High ——
Daytime running lights ——
Turn/Park 27/73457NAK
Side marker ——
Headlight assembly (Type C) (if so equipped) Low ——
High ——
Daytime running lights ——
Turn/Park ——
Side marker ——
Front fog light (Type A) (If so equipped)* 35H8
Front fog light (Type B) (If so equipped)* ——
Door mirror turn signal light (If so equipped)* ——
Vanity mirror light (If so equipped)* ——
Map lights* ——
Room light* 8—
Trunk light* 3.4158
High-mounted stop light* Inside (if so equipped) ——
Spoiler (if so equipped) ——
Rear combination light* Tail/Stop/Side marker 21/5W21/5W
Turn 21WY21W
Trunk lid lamp* Tail 5W5W
Back up 16W16W
License plate light* 5—
* It is recommended that you visit a NISSAN dealer for replacement.
Always check with the Parts Department at a NISSAN dealer for the latest parts informa-
tion.1. Map light
2. Room light
LDI3497
8-26Do-it-yourself
Page 467 of 528
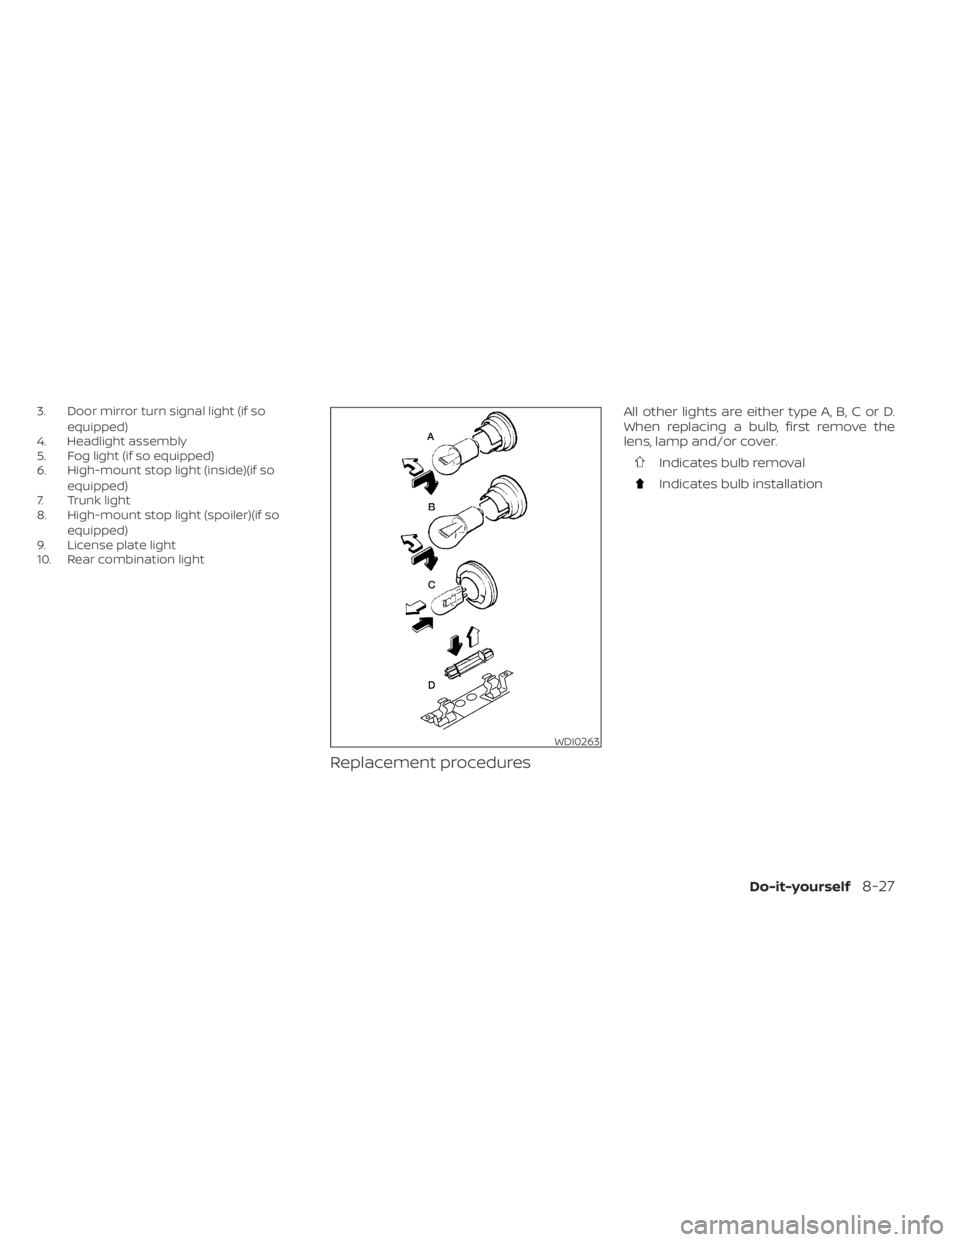
3. Door mirror turn signal light (if soequipped)
4. Headlight assembly
5. Fog light (if so equipped)
6. High-mount stop light (inside)(if so
equipped)
7. Trunk light
8. High-mount stop light (spoiler)(if so
equipped)
9. License plate light
10. Rear combination light
Replacement procedures
All other lights are either type A, B, C or D.
When replacing a bulb, first remove the
lens, lamp and/or cover.
Indicates bulb removal
Indicates bulb installation
WDI0263
Page 484 of 528
Parking brake:Check the parking brake
operation regularly. The vehicle should be
securely held on a fairly steep hill with only
the parking brake applied. If the parking
brake needs adjustment, it is recom-
mended that you visit a NISSAN dealer for
this service.
Seats: Check seat position controls such
as seat adjusters, seatback recliner, etc., to
ensure they operate smoothly and all
latches lock securely in every position.
Check that the head restraints/headrests
move up and down smoothly and the locks
(if so equipped) hold securely in all latched
positions.
Seat belts: Check that all parts of the seat
belt system (for example, buckles, anchors,
adjusters and retractors) operate properly
and smoothly, and are installed securely.
Check the belt webbing for cuts, fraying,
wear or damage.
Steering wheel: Check for changes in the
steering system, such as excessive free
play, hard steering or strange noises.
Warning lights and chimes: Make sure all
warning lights and chimes are operating
properly.
Windshield defroster: Check that the air
comes out of the defroster outlets properly and in sufficient quantity when operating
the heater or air conditioner.
Windshield wiper and washer*:
Check
that the wipers and washer operate prop-
erly and that the wipers do not streak.
Under the hood and vehicle
The maintenance items listed here should
be checked periodically (for example, each
time you check the engine oil or refuel).
Battery*: This vehicle is equipped with a
sealed maintenance free battery. It is rec-
ommended that you visit a NISSAN dealer
for service.
NOTE:
Care should be taken to avoid situations
that can lead to potential battery dis-
charge and potential no-start conditions
such as:
1. Installation or extended use of elec-
tronic accessories that consume bat-
tery power when the engine is not run-
ning (Phone chargers, GPS, DVD
players, etc.).
2. Vehicle is not driven regularly and/or
only driven short distances. In these cases, the battery may need to
be charged to maintain battery health.
Brake and clutch (if so equipped) fluid
level*:
Make sure that the brake and clutch
fluid levels are between the MIN and MAX
lines on the reservoir.
Engine coolant level*: Check the coolant
level when the engine is cold.
Engine drive belt*: Make sure the drive belt
is not frayed, worn, cracked or oily.
Engine oil level*: Check the level af ter
parking the vehicle on a level surface with
the engine off. Wait more than 15 minutes
for the oil to drain back into the oil pan.
Exhaust system: Make sure there are no
loose supports, cracks or holes. If the
sound of the exhaust seems unusual or
there is a smell of exhaust fumes, immedi-
ately have the exhaust system inspected. It
is recommended that you visit a NISSAN
dealer for this service. For additional infor-
mation, refer to “Exhaust gas (carbon mon-
oxide)” in the “Starting and driving” section
of this manual.
9-4Maintenance and schedules
Page 485 of 528
Fluid leaks:Check under the vehicle for
fuel, oil, water or other fluid leaks af ter the
vehicle has been parked for a while. Water
dripping from the air conditioner af ter use
is normal. If you should notice any leaks or if
fuel fumes are evident, check for the cause
and have it corrected immediately.
Radiator and hoses: Check the front of the
radiator and clean off any dirt, insects,
leaves, etc., that may have accumulated.
Make sure the hoses have no cracks, defor-
mation, rot or loose connections.
Underbody: The underbody is frequently
exposed to corrosive substances such as
those used on icy roads or to control dust. It
is very important to remove these sub-
stances from the underbody, otherwise
rust may form on the floor pan, frame, fuel
lines and exhaust system. At the end of
winter, the underbody should be thor-
oughly flushed with plain water, in those
areas where mud and dirt may have accu-
mulated. For additional information, refer
to the “Appearance and care” section of this
manual.
Windshield-washer fluid*: Check that
there is adequate fluid in the reservoir. The following descriptions are provided to
give you a better understanding of the
scheduled maintenance items that should
be regularly checked or replaced. The
maintenance schedule indicates at which
mileage/time intervals each item requires
service.
In addition to scheduled maintenance,
your vehicle requires that some items be
checked during normal day-to-day opera-
tion. For additional information, refer to
“General maintenance” in this section.
Items marked with
“*”are recommended
by NISSAN for reliable vehicle operation.
You are not required to perform mainte-
nance on these items in order to maintain
the warranties which come with your
NISSAN. Other maintenance items and in-
tervals are required.
When applicable, additional information
can be found in the “Do-it-yourself ” section
of this manual.NOTE:
NISSAN does not advocate the use of
non-OEM approved af termarket flush-
ing systems and strongly advises
against performing these services on a
NISSAN product. Many of the af termar-
ket flushing systems use non-OEM ap-
proved chemicals or solvents, the use of
which has not been validated by NISSAN.
For recommended fuel, lubricants, fluids,
grease, and refrigerant, refer to “Recom-
mended fluids/lubricants and capaci-
ties” in the “Technical and consumer in-
formation” section of this manual.
EMISSION CONTROL SYSTEM
MAINTENANCE:
Drive belt*: Check engine drive belt for
wear, fraying or cracking and for proper
tension. Replace any damaged drive belt.
Engine air filter: Replace at specified inter-
vals. When driving for prolonged periods in
dusty conditions, check/replace the filter
more frequently.
EXPLANATION OF SCHEDULED
MAINTENANCE ITEMS
Maintenance and schedules9-5