Page 147 of 528
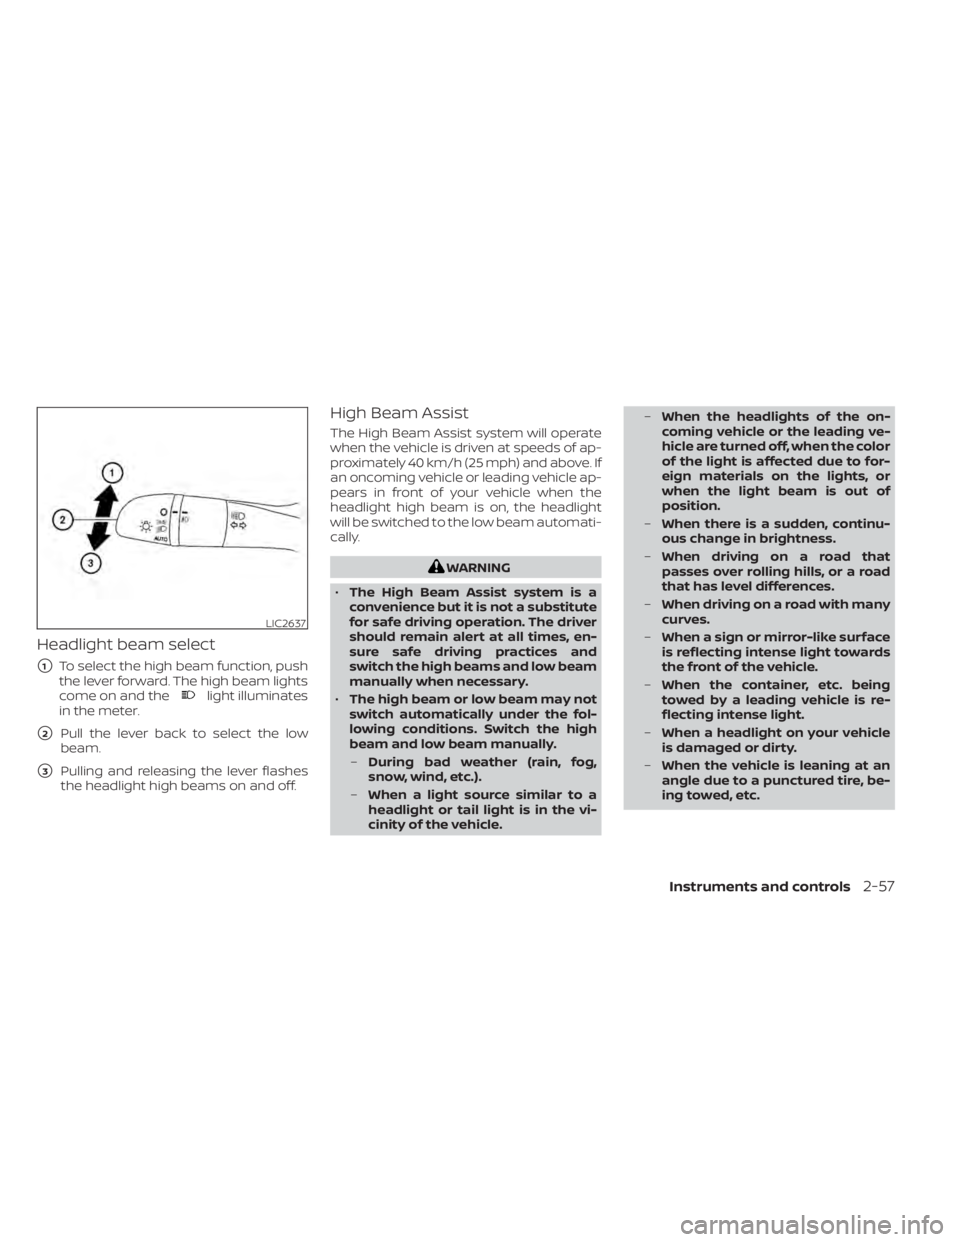
Headlight beam select
�1To select the high beam function, push
the lever forward. The high beam lights
come on and the
light illuminates
in the meter.
�2Pull the lever back to select the low
beam.
�3Pulling and releasing the lever flashes
the headlight high beams on and off.
High Beam Assist
The High Beam Assist system will operate
when the vehicle is driven at speeds of ap-
proximately 40 km/h (25 mph) and above. If
an oncoming vehicle or leading vehicle ap-
pears in front of your vehicle when the
headlight high beam is on, the headlight
will be switched to the low beam automati-
cally.
Page 148 of 528

•The timing of switching the low
beam and high beam may change
under the following situations.
– The brightness of the headlights
of the oncoming vehicle or leading
vehicle.
– The movement and direction of
the oncoming vehicle and the
leading vehicle.
– When only one light on the on-
coming vehicle or the leading ve-
hicle is illuminated.
– When the oncoming vehicle or the
leading vehicle is a two-wheeled
vehicle.
– Road conditions (incline, curve,
the road surface, etc.).
– The number of passengers and
the amount of luggage.
High Beam Assist operation
To activate the High Beam Assist system,
turn the headlight switch to the AUTO po-
sition
O1and push the lever forwardO2
(high beam position). TheHigh Beam
Assist indicator light in the meter will illumi-
nate while the headlights are turned on.
If the High Beam Assist indicator light does
not illuminate in the above condition, it may
indicate that the system is not functioning
properly. Have the system checked, it is
recommended that you visit a NISSAN
dealer for this service. When the vehicle speed lowers to less than
approximately 25 km/h (16 mph), the head-
light uses the low beam.
To turn off the High Beam Assist system,
turn the headlight switch to the
posi-
tion or select the low beam position by
placing the lever in the neutral position.
LIC3696
2-58Instruments and controls
Page 149 of 528

Ambient image sensor maintenance
The ambient image sensorO1for the High
Beam Assist system is located in front of
the inside mirror. To maintain the proper
operation of the high beam assist system
and prevent a system malfunction, be sure
to observe the following:
• Always keep the windshield clean.
• Do not attach a sticker (including trans- parent material) or install an accessory
near the ambient image sensor.
• Do not strike or damage the areas around the ambient image sensor. Do
not touch the sensor lens that is located
on the ambient image sensor. If the ambient image sensor is damaged
due to an accident, it is recommended that
you visit a NISSAN dealer.
Battery saver system (if so
equipped)
If the ignition switch is placed in the OFF
position while the headlight switch is in the
orposition, the headlights will
turn off af ter a period of time.
position for full illumination when driv-
ing at night. (The DRL will turn off.)
If the parking brake is applied before the
engine is started, the DRL do not illuminate.
The DRL illuminate once the parking brake
is released. The DRL will remain on until the
ignition switch is placed in the OFF position.
It is necessary at dusk to turn the headlight
switch on for interior controls and switches
to illuminate, as those remain off while the
switch is in the OFF position.
position for full
illumination, the LED lights switch from LED
DRL to the park function.
LSD3484
Page 150 of 528
If the parking brake is applied before the
engine is started, the LED DRL do not illumi-
nate. The LED DRL illuminate when the
parking brake is released. The LED DRL will
remain on until the ignition switch is placed
in the OFF position.
It is necessary at dusk to turn the headlight
switch on for interior controls and switches
to illuminate, as those remain off while the
switch is in the OFF position.
LIC3176LIC2638
2-60Instruments and controls
Page 151 of 528

Move the lever up or down until the turn
signal begins to flash, but the lever does
not latch, and release the lever. The turn
signal will automatically flash three times.
Choose the appropriate method to signal
a lane change based on road and traffic
conditions.
NOTE:
If the turn signal light bulb malfunctions,
the turn signal indicator will flash at a
higher frequency when the turn signal is
activated.
NOTE:
The 3 flash pass feature may be disabled.
For additional information, refer to “Ve-
hicle information display ” in this section.FOG LIGHT SWITCH (if so
equipped)
To turn the fog lights on, turn the headlight
switch to theposition, then turn the
fog light switch to theposition.
To turn the fog lights on with the headlight
switch in the AUTO position, the headlights
must be on, then turn the fog light switch to
the
position.
To turn the fog lights off, turn the fog light
switch to the OFF position. The headlights must be on and the low
beams selected for the fog lights to oper-
ate. The fog lights automatically turn off
when the high beam headlights are se-
lected.
LIC2639
Page 185 of 528

Locking doors
1. Place the power switch in the LOCKposition.
2. Close all doors.
3. Press the
button on the Intelli-
gent Key.
4. The hazard warning lights flash twice and the horn beeps once.
5. All doors and the rear hatch will be locked.
button on the Intelligent
Key to unlock the driver’s door.
2. The hazard warning lights flash once. 3. Press the
button again within 1
minute to unlock all doors and rear
hatch.
All doors and trunk lid will be locked auto-
matically unless one of the following op-
erations is performed within 1 minute af ter
pressing the
button:
• Opening any doors or trunk lid.
• Pushing the power switch.
The interior light illuminates for a period of
time when a door is unlocked and the
room light switch is in the DOOR position.
The light can be turned off without waiting
by performing one of the following opera-
tions:
• Placing the power switch in the ON posi- tion.
• Locking the doors with the Intelligent Key.
• Switching the room light switch to the OFF position.
Releasing the trunk lid
Press thebutton for longer than 1
second to open the trunk lid. The trunk
release button will not operate when the
ignition switch is placed in the ON position.
Using the panic alarm
If you are near your vehicle and feel threat-
ened, you may activate the panic alarm to
call attention by pressing and holding the
button on the Intelligent Key for lon-
ger than 0.5 seconds.
The panic alarm and headlights will stay on
for a period of time.
The panic alarm stops when:
• It has run for a period of time.
• Any button is pressed on the Intelligent Key.
• The request switch (if so equipped) on the driver or passenger door is pushed and
the Intelligent Key is in range of the door
handle.
Silencing the horn beep feature
If desired, the horn beep feature can be
deactivated using the Intelligent Key.
To deactivate: Press and hold the
andbuttonsfor at least 2 seconds.
The hazard warning lights will flash three
times to confirm that the horn beep fea-
ture has been deactivated.
Pre-driving checks and adjustments3-15
Page 199 of 528
VANITY MIRRORS
To access the vanity mirror, pull the sun
visor down and flip open the mirror cover.
Some vanity mirrors are illuminated and
turn on when the mirror cover is open.
MANUAL ANTI-GLARE REARVIEW
MIRROR (if so equipped)
Use the night positionO1to reduce glare
from the headlights of vehicles behind you
at night.
Use the day position
O2when driving in
daylight hours.
LPD3093WPD0126LPD2418
Type A (if so equipped)
MIRRORS
Pre-driving checks and adjustments3-29
Page 314 of 528

–When rain, snow or dirt adheres to
the windshield in front of the
multi-sensing camera unit.
– When the headlights are not
bright due to dirt on the lens or if
the aiming is not adjusted
properly.
– When strong light enters the cam-
era unit. (For example, the light di-
rectly shines on the front of the
vehicle at sunrise or sunset.)
– When a sudden change in bright-
ness occurs. (For example, when
the vehicle enters or exits a tunnel
or under a bridge.)
– In areas not covered by the navi-
gation system.
– If there are deviations in relation
to the navigation, for example due
to changes in the road routing.
– When overtaking buses or trucks
with speed stickers.
TURNING THE TRAFFIC SIGN
RECOGNITION (TSR) SYSTEM ON
AND OFF
Perform the following steps to enable or
disable the TSR system.
1. Press the
button until “Settings” dis-
plays in the vehicle information display.
Use the
button to select “Driver As-
sistance.” Then press the OK button.
2. Select “Speed Limit Sign” and press the OK button to turn the system on or off.
SYSTEM TEMPORARILY
UNAVAILABLE
If the vehicle is parked in direct sunlight
under high temperature conditions (over
approximately 104°F [40°C]) and then
started, the TSR system may be deacti-
vated automatically. The “Unavailable: High
Camera Temperature” warning message
will appear in the vehicle information dis-
play.
LSD3243
For vehicles with the 7 inch meter display