2022 NISSAN ROGUE SPORT change time
[x] Cancel search: change timePage 333 of 508
will turn the system completely off. When
the ignition switch is placed in the OFF
position, the system is also automatically
turned off.
To use the ICC system again, quickly push
and release the ProPILOT assist switch
(vehicle-to-vehicle distance control
mode) or push and hold it (conventional
cruise control mode) again to turn it on.
WARNING
To avoid accidentally engaging
cruise control, make sure to turn
the ProPILOT assist switch off when
not using the ICC system.WAF0066X
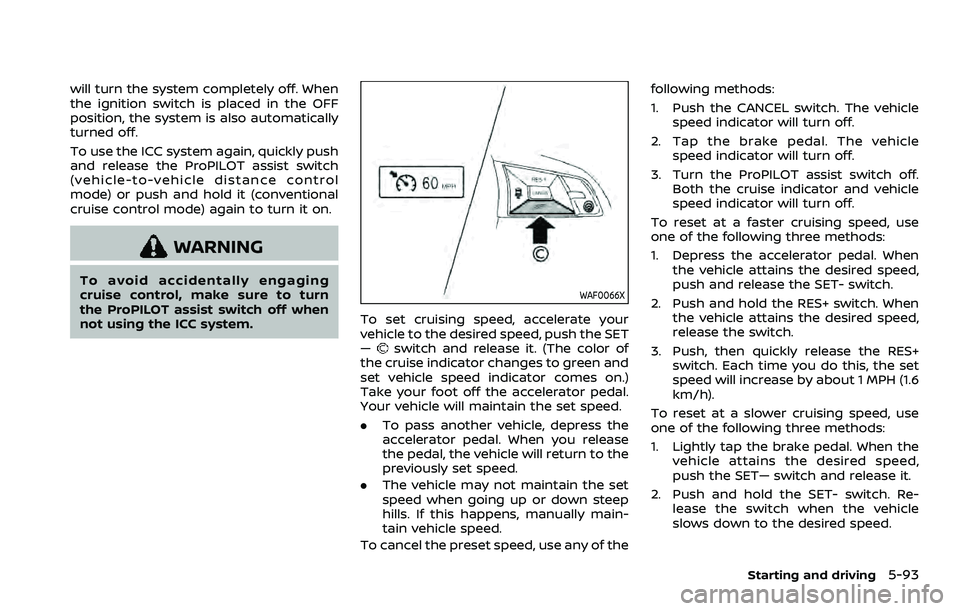
To set cruising speed, accelerate your
vehicle to the desired speed, push the SET
—
switch and release it. (The color of
the cruise indicator changes to green and
set vehicle speed indicator comes on.)
Take your foot off the accelerator pedal.
Your vehicle will maintain the set speed.
. To pass another vehicle, depress the
accelerator pedal. When you release
the pedal, the vehicle will return to the
previously set speed.
. The vehicle may not maintain the set
speed when going up or down steep
hills. If this happens, manually main-
tain vehicle speed.
To cancel the preset speed, use any of the following methods:
1. Push the CANCEL switch. The vehicle
speed indicator will turn off.
2. Tap the brake pedal. The vehicle speed indicator will turn off.
3. Turn the ProPILOT assist switch off. Both the cruise indicator and vehicle
speed indicator will turn off.
To reset at a faster cruising speed, use
one of the following three methods:
1. Depress the accelerator pedal. When the vehicle attains the desired speed,
push and release the SET- switch.
2. Push and hold the RES+ switch. When the vehicle attains the desired speed,
release the switch.
3. Push, then quickly release the RES+ switch. Each time you do this, the set
speed will increase by about 1 MPH (1.6
km/h).
To reset at a slower cruising speed, use
one of the following three methods:
1. Lightly tap the brake pedal. When the vehicle attains the desired speed,
push the SET— switch and release it.
2. Push and hold the SET- switch. Re- lease the switch when the vehicle
slows down to the desired speed.
Starting and driving5-93
Page 334 of 508
5-94Starting and driving
3. Push, then quickly release the SET—switch. Each time you do this, the set
speed will decrease by about 1 MPH
(1.6 km/h).
To resume the preset speed, push and
release the RES+ switch. The vehicle will
resume the last set cruising speed when
the vehicle speed is over 25 MPH (40
km/h).
WARNING
Failure to follow the warnings and
instructions for proper use of the
Intelligent Driver Alertness system
could result in serious injury or
death.
. The I-DA system is only a warning
to inform the driver of a potential
lack of driver attention or drowsi-
ness. It will not steer the vehicle
or prevent loss of control.
. The I-DA system does not detect
and provide an alert of the dri-
ver’s lack of attention or fatigue
in every situation.
. It is the driver’s responsibility to:
— stay alert,
— drive safely,
— keep the vehicle in the travel-
ing lane,
— be in control of the vehicle at all times,
— avoid driving when tired,
— avoid distractions (texting, etc). The I-DA system helps alert the driver if
the system detects a lack of attention or
driving fatigue.
The system monitors driving style and
steering behavior over a period of time,
and it detects changes from the normal
pattern. If the system detects that driver
attention is decreasing over a period of
time, the system uses audible and visual
warnings to suggest that the driver take a
break.
INTELLIGENT DRIVER ALERTNESS
(I-DA) (if so equipped)
Page 342 of 508
5-102Starting and driving
— If there is interference byother radar sources.
— When your vehicle’s position or movement is changed
quickly or significantly (for
example, lane change, turning
vehicle, abrupt steering, sud-
den acceleration or decelera-
tion).
— When your vehicle or the ve- hicle or pedestrian ahead
moves quickly or significantly
such that the system cannot
detect and react in time (for
example, pedestrian moving
quickly toward the vehicle at
close range, vehicle cutting in,
changing lanes, making a
turn, steering abruptly, sud-
den acceleration or decelera-
tion).
— When the vehicle or pedes- trian is offset from the vehi-
cle’s forward path.
— If the speed difference be- tween the two vehicles is
small.
— The pedestrian’s profile is par- tially obscured or unidentifi-
able; for example, due to transporting luggage, push-
ing a stroller, wearing bulky
or very loose-fitting clothing
or accessories, or being in a
unique posture (such as rais-
ing hands).
— There is poor contrast of a person to the background,
such as having clothing color
or pattern which is similar to
the background.
— For approximately 15 seconds after starting the engine
— If the vehicle ahead has a unique or unusual shape, ex-
tremely low or high clearance
heights, or unusual cargo
loading or is narrow (for ex-
ample, a motorcycle).
— When the vehicle or pedes- trian is located near a traffic
sign, a reflective area (for ex-
ample, water on road), or is in
a shadow.
— When multiple pedestrians are grouped together.
— When the view of the pedes- trian is obscured by a vehicle
or other object. — While towing a trailer or other
vehicle.
. The system performance may
degrade in the following condi-
tions:
— The vehicle is driven on a
slippery road.
— The vehicle is driven on a slope.
— Excessively heavy baggage is loaded in the rear seat or the
cargo area of your vehicle.
. The system is designed to auto-
matically check the sensor (radar
and camera)’s functionality, with-
in certain limitations. The system
may not detect some forms of
obstruction of the sensor areas
such as ice, snow or stickers, for
example. In these cases, the sys-
tem may not be able to warn the
driver properly. Be sure that you
check, clean and clear sensor
areas regularly.
. In some road and traffic condi-
tions, the AEB with Pedestrian
Detection system may unexpect-
edly apply partial braking. When
acceleration is necessary, de-
press the accelerator pedal to
Page 347 of 508
ity to operate the equipment.
For Canada
Model: ARS4–B
IC: 4135A-ARS4B
FCC ID: OAYARS4B
This device complies with Part 15 of the
FCC Rules and with Industry Canada
licence-exempt RSS standard(s). Opera-
tion is subject to the following two con-
ditions:
1. This device may not cause harmfulinterference, and
2. This device must accept any interfer- ence received, including interference
that may cause undesired operation.
Le present appareil est conforme aux CNR
d’Industrie Canada applicables aux appa-
reils radio exempts de licence. L’exploita-
tion est autorisee aux deux conditions
suivantes:
1. L’appareil ne doit pas produire de brouillage, et
2. L’utilisateur de l’appareil doit accepter tout brouillage radioelectrique subi,
meme si le brouillage est susceptible
d’en compromettre le fonctionne-
ment. Radio Frequency Radiation Exposure In-
formation:
This equipment complies with FCC radia-
tion exposure limits set forth for an
uncontrolled environment.
This equipment should be installed and
operated with minimum distance of 30
cm between the radiator and your body.
The transmitter must not be co-located
or operating in conjunction with any
other antenna or transmitter.
Cet equipement est conforme aux limites
d’exposition aux rayonnements IC eta-
blies pour un environnement non con-
trole. Cet equipement doit etre installe et
utilise avec un minimum de 30 cm de
distance entre la source de rayonnement
et votre corps.
FCC Notice
Changes or modifications not expressly
approved by the party responsible for
compliance could void the user’s author-
ity to operate the equipment.
WARNING
Failure to follow the warnings and
instructions for proper use of the I-
FCW system could result in serious
injury or death.
.
The I-FCW system helps warn the
driver before a collision but will
not avoid a collision. It is the
driver’s responsibility to stay
alert, drive safely and be in con-
trol of the vehicle at all times.
The I-FCW system can help alert the driver
when there is a sudden braking of a
second vehicle traveling in front of the
vehicle ahead in the same lane.
Starting and driving5-107
INTELLIGENT FORWARD COLLISION
WARNING (I-FCW)
Page 356 of 508
5-116Starting and driving
Cet equipement est conforme aux limites
d’exposition aux rayonnements IC eta-
blies pour un environnement non con-
trole. Cet equipement doit etre installe et
utilise avec un minimum de 30 cm de
distance entre la source de rayonnement
et votre corps.
FCC Notice
Changes or modifications not expressly
approved by the party responsible for
compliance could void the user’s author-
ity to operate the equipment.
WARNING
Failure to follow the warnings and
instructions for proper use of the
RAB system could result in serious
injury or death.
.The RAB system is a supplemen-
tal aid to the driver. It is not a
replacement for proper driving
procedures. Always use the side
and rear mirrors and turn and
look in the direction you will
move before and while backing
up. Never rely solely on the RAB
system. It is the driver’s respon-
sibility to stay alert, drive safely,
and be in control of the vehicle at
all times.
. There is a limitation to the RAB
system capability. The RAB sys-
tem is not effective in all situa-
tions.
The RAB system can assist the driver
when the vehicle is backing up and
approaching objects directly behind the
vehicle.
WAF0077X
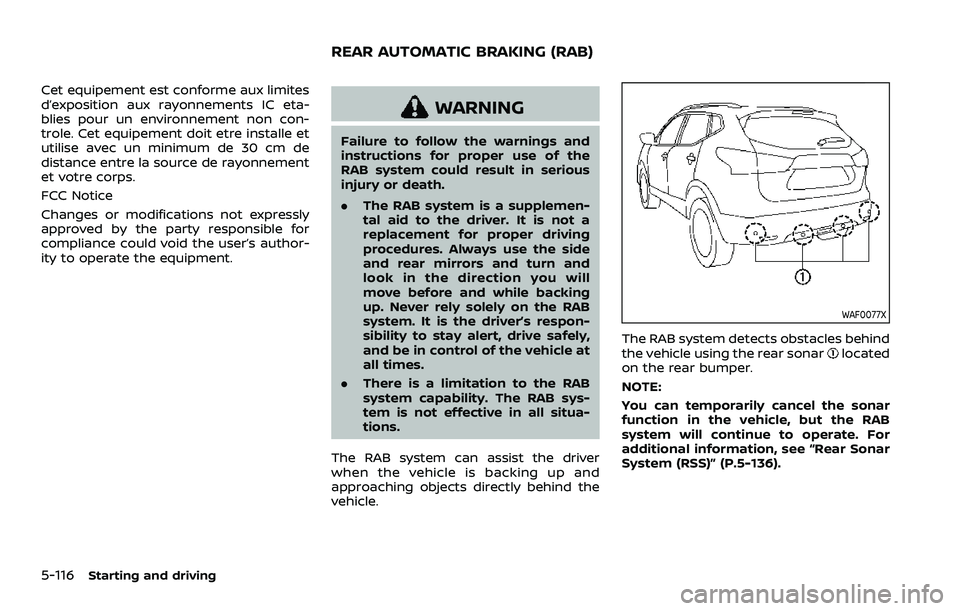
The RAB system detects obstacles behind
the vehicle using the rear sonarlocated
on the rear bumper.
NOTE:
You can temporarily cancel the sonar
function in the vehicle, but the RAB
system will continue to operate. For
additional information, see “Rear Sonar
System (RSS)” (P.5-136).
REAR AUTOMATIC BRAKING (RAB)
Page 362 of 508
5-122Starting and driving
Follow these easy-to-use Fuel Efficient
Driving Tips to help you achieve the most
fuel economy from your vehicle.
1. Use smooth accelerator and brakepedal application.
.Avoid rapid starts and stops..Use smooth, gentle accelerator andbrake application whenever possi-
ble.
.Maintain constant speed whilecommuting and coast whenever
possible.
2. Maintain constant speed.
.Look ahead to try and anticipate and minimize stops.
.Synchronizing your speed with traf-fic lights allows you to reduce your
number of stops.
.Maintaining a steady speed canminimize red light stops and im-
prove fuel efficiency.
3. Use air conditioning (A/C) at higher vehicle speeds.
.Below 40 MPH (64 km/h), it is moreefficient to open windows to cool
the vehicle due to reduced engine
load.
.Above 40 MPH (64 km/h), it is more
efficient to use A/C to cool the
vehicle due to increased aerody-
namic drag.
.Recirculating the cool air in thecabin when the A/C is on reduces
cooling load.
4. Drive at economical speeds and dis- tances.
.Observing the speed limit and notexceeding 60 MPH (97 km/h)
(where legally allowed) can improve
fuel efficiency due to reduced aero-
dynamic drag.
.Maintaining a safe following dis-tance behind other vehicles re-
duces unnecessary braking.
.Safely monitoring traffic to antici- pate changes in speed permits
reduced braking and smooth accel-
eration changes.
.Select a gear range suitable to roadconditions.
5. Use cruise control.
.Using cruise control during highway driving helps maintain a steady
speed.
.Cruise control is particularly effec-tive in providing fuel savings when
driving on flat terrains.
6. Plan for the shortest route.
.Utilize a map or navigation system to determine the best route to save
time. 7. Avoid idling.
.Shutting off your engine when safe
for stops exceeding 30-60 seconds
saves fuel and reduces emissions.
8. Buy an automated pass for toll roads.
.Automated passes permit drivers to use special lanes to maintain cruis-
ing speed through the toll and
avoid stopping and starting.
9. Winter warm up.
.Limit idling time to minimize impact to fuel economy.
.Vehicles typically need no morethan 30 seconds of idling at start-
up to effectively circulate the en-
gine oil before driving.
.Your vehicle will reach its ideal
operating temperature more
quickly while driving versus idling.
10. Keeping your vehicle cool.
.Park your vehicle in a covered parking area or in the shade when-
ever possible.
.When entering a hot vehicle, open- ing the windows will help to reduce
the inside temperature faster, re-
sulting in reduced demand on your
A/C system.
FUEL EFFICIENT DRIVING TIPS
Page 420 of 508
8-8Do-it-yourself
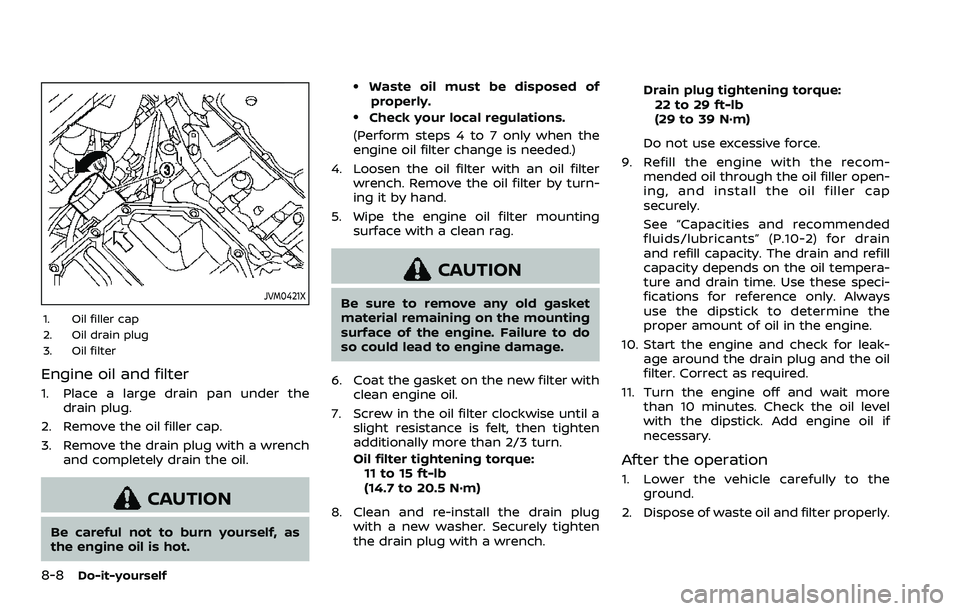
JVM0421X
1. Oil filler cap
2. Oil drain plug
3. Oil filter
Engine oil and filter
1. Place a large drain pan under thedrain plug.
2. Remove the oil filler cap.
3. Remove the drain plug with a wrench and completely drain the oil.
CAUTION
Be careful not to burn yourself, as
the engine oil is hot.
.Waste oil must be disposed ofproperly.
.Check your local regulations.
(Perform steps 4 to 7 only when the
engine oil filter change is needed.)
4. Loosen the oil filter with an oil filter wrench. Remove the oil filter by turn-
ing it by hand.
5. Wipe the engine oil filter mounting surface with a clean rag.
CAUTION
Be sure to remove any old gasket
material remaining on the mounting
surface of the engine. Failure to do
so could lead to engine damage.
6. Coat the gasket on the new filter with clean engine oil.
7. Screw in the oil filter clockwise until a slight resistance is felt, then tighten
additionally more than 2/3 turn.
Oil filter tightening torque:11 to 15 ft-lb
(14.7 to 20.5 N·m)
8. Clean and re-install the drain plug with a new washer. Securely tighten
the drain plug with a wrench. Drain plug tightening torque:
22 to 29 ft-lb
(29 to 39 N·m)
Do not use excessive force.
9. Refill the engine with the recom- mended oil through the oil filler open-
ing, and install the oil filler cap
securely.
See “Capacities and recommended
fluids/lubricants” (P.10-2) for drain
and refill capacity. The drain and refill
capacity depends on the oil tempera-
ture and drain time. Use these speci-
fications for reference only. Always
use the dipstick to determine the
proper amount of oil in the engine.
10. Start the engine and check for leak- age around the drain plug and the oil
filter. Correct as required.
11. Turn the engine off and wait more than 10 minutes. Check the oil level
with the dipstick. Add engine oil if
necessary.
After the operation
1. Lower the vehicle carefully to the
ground.
2. Dispose of waste oil and filter properly.
Page 458 of 508
9-4Maintenance and schedules
Seats:Check seat position controls such
as seat adjusters, seatback recliners, etc.
to ensure they operate smoothly and that
all latches lock securely in every position.
Check that the head restraints move up
and down smoothly and that the locks (if
so equipped) hold securely in all latched
positions.
Steering wheel: Check for changes in the
steering conditions, such as excessive
free play, hard steering or strange noises.
Warning lights and chimes: Make sure
that all warning lights and chimes are
operating properly.
Windshield defroster: Check that the air
comes out of the defroster outlets prop-
erly and in sufficient quantity when oper-
ating the heater or air conditioner.
Windshield wiper and washer*: Check
that the wipers and washers operate
properly and that the wipers do not
streak.
Under the hood and vehicle
The maintenance items listed here should
be checked periodically (for example,
each time you check the engine oil or
refuel).
Battery*: Check the fluid level in each cell.
It should be between the MAX and MIN
lines. Vehicles operated in high tempera- tures or under severe condition require
frequent checks of the battery fluid level.
NOTE:
Care should be taken to avoid situations
that can lead to potential battery dis-
charge and potential no-start condi-
tions such as:
1.
Installation or extended use of elec-
tronic accessories that consume
battery power when the engine is
not running (Phone chargers, GPS,
DVD players, etc.)
2. Vehicle is not driven regularly and/
or only driven short distances.
In these cases, the battery may need to
be charged to maintain battery health.
Brake and clutch fluid level*: Make sure
that the brake and clutch fluid level is
between the MAX and MIN lines on the
reservoir.
Engine coolant level*: Check the coolant
level when the engine is cold.
Engine drive belt*: Make sure that the
drive belt is not frayed, worn, cracked or
oily.
Engine oil level*: Check the level after
parking the vehicle on a level surface and
turning off the engine. Wait more than 10
minutes for the oil to drain back into the
oil pan. Exhaust system:
Make sure there are no
loose supports, cracks or holes. If the
sound of the exhaust seems unusual or
there is a smell of exhaust fumes, im-
mediately have the exhaust system in-
spected. It is recommended you visit a
NISSAN dealer for this service. (See “Pre-
cautions when starting and driving” (P.5-
4) for exhaust gas (carbon monoxide).)
Fluid leaks: Check under the vehicle for
fuel, oil, water or other fluid leaks after the
vehicle has been parked for a while. Water
dripping from the air conditioner after use
is normal. If you should notice any leaks
or if gasoline fumes are evident, check for
the cause and have it corrected immedi-
ately.
Radiator and hoses: Check the front of
the radiator and clean off any dirt, insects,
leaves, etc., that may have accumulated.
Make sure the hoses have no cracks,
deformation, rot or loose connections.
Underbody: The underbody is frequently
exposed to corrosive substances such as
those used on icy roads or to control
dust. It is very important to remove these
substances, otherwise rust will form on
the floor pan, frame, fuel lines and around
the exhaust system. At the end of winter,
the underbody should be thoroughly
flushed with plain water, being careful to
clean those areas where mud and dirt