2022 NISSAN ROGUE SPORT change time
[x] Cancel search: change timePage 122 of 508
2-40Instruments and controls
JVI1566X
TRIP COMPUTER
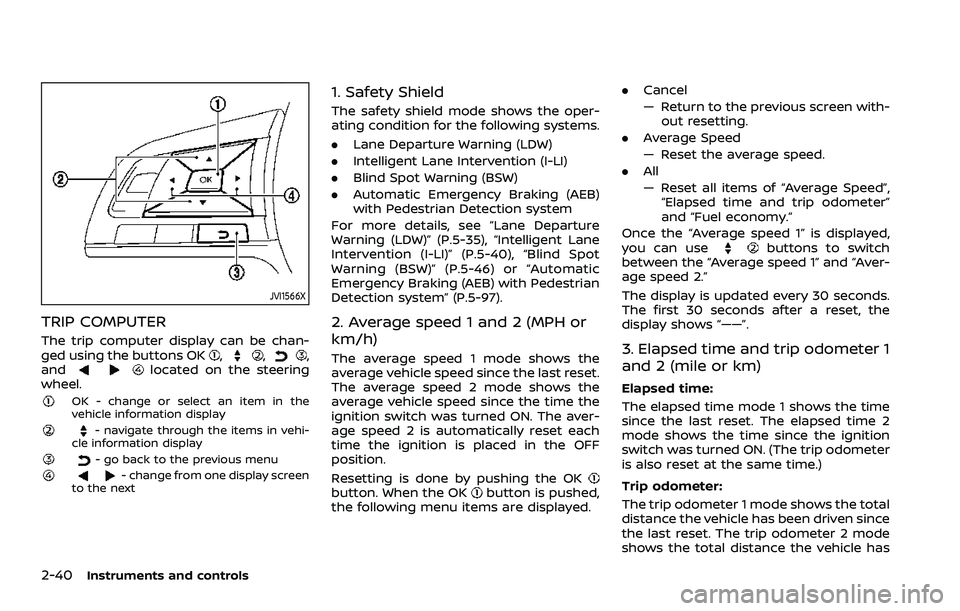
The trip computer display can be chan-
ged using the buttons OK,,,
andlocated on the steering
wheel.
OK - change or select an item in the
vehicle information display
- navigate through the items in vehi-
cle information display
- go back to the previous menu- change from one display screen
to the next
1. Safety Shield
The safety shield mode shows the oper-
ating condition for the following systems.
. Lane Departure Warning (LDW)
. Intelligent Lane Intervention (I-LI)
. Blind Spot Warning (BSW)
. Automatic Emergency Braking (AEB)
with Pedestrian Detection system
For more details, see “Lane Departure
Warning (LDW)” (P.5-35), “Intelligent Lane
Intervention (I-LI)” (P.5-40), “Blind Spot
Warning (BSW)” (P.5-46) or “Automatic
Emergency Braking (AEB) with Pedestrian
Detection system” (P.5-97).
2. Average speed 1 and 2 (MPH or
km/h)
The average speed 1 mode shows the
average vehicle speed since the last reset.
The average speed 2 mode shows the
average vehicle speed since the time the
ignition switch was turned ON. The aver-
age speed 2 is automatically reset each
time the ignition is placed in the OFF
position.
Resetting is done by pushing the OK
button. When the OKbutton is pushed,
the following menu items are displayed. .
Cancel
— Return to the previous screen with-
out resetting.
. Average Speed
— Reset the average speed.
. All
— Reset all items of “Average Speed”,
“Elapsed time and trip odometer”
and “Fuel economy.”
Once the “Average speed 1” is displayed,
you can use
buttons to switch
between the “Average speed 1” and “Aver-
age speed 2.”
The display is updated every 30 seconds.
The first 30 seconds after a reset, the
display shows “——”.
3. Elapsed time and trip odometer 1
and 2 (mile or km)
Elapsed time:
The elapsed time mode 1 shows the time
since the last reset. The elapsed time 2
mode shows the time since the ignition
switch was turned ON. (The trip odometer
is also reset at the same time.)
Trip odometer:
The trip odometer 1 mode shows the total
distance the vehicle has been driven since
the last reset. The trip odometer 2 mode
shows the total distance the vehicle has
Page 137 of 508
JVI1617X
Example
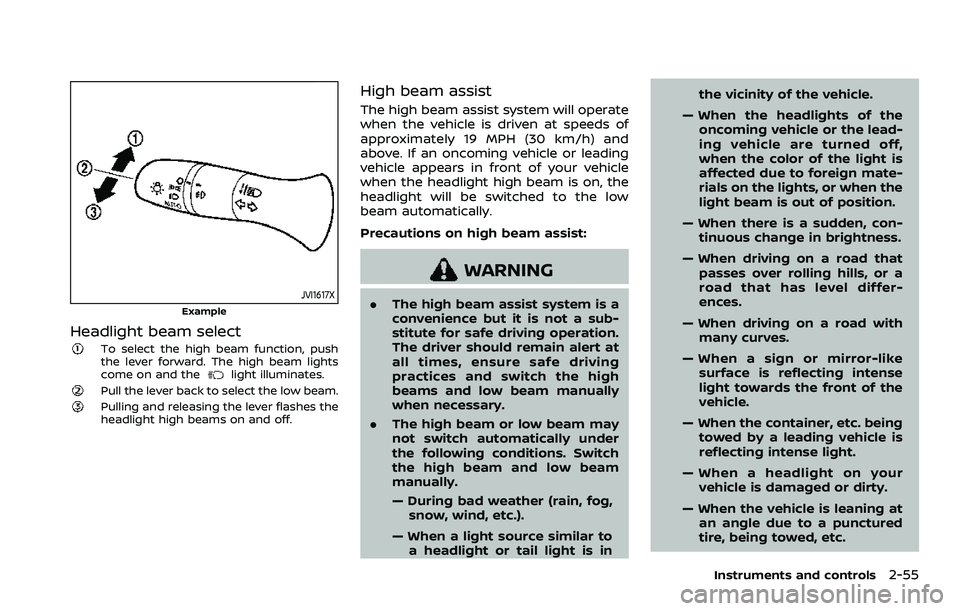
Headlight beam select
To select the high beam function, push
the lever forward. The high beam lights
come on and the
light illuminates.
Pull the lever back to select the low beam.Pulling and releasing the lever flashes the
headlight high beams on and off.
High beam assist
The high beam assist system will operate
when the vehicle is driven at speeds of
approximately 19 MPH (30 km/h) and
above. If an oncoming vehicle or leading
vehicle appears in front of your vehicle
when the headlight high beam is on, the
headlight will be switched to the low
beam automatically.
Precautions on high beam assist:
WARNING
.The high beam assist system is a
convenience but it is not a sub-
stitute for safe driving operation.
The driver should remain alert at
all times, ensure safe driving
practices and switch the high
beams and low beam manually
when necessary.
. The high beam or low beam may
not switch automatically under
the following conditions. Switch
the high beam and low beam
manually.
— During bad weather (rain, fog,
snow, wind, etc.).
— When a light source similar to a headlight or tail light is in the vicinity of the vehicle.
— When the headlights of the oncoming vehicle or the lead-
ing vehicle are turned off,
when the color of the light is
affected due to foreign mate-
rials on the lights, or when the
light beam is out of position.
— When there is a sudden, con- tinuous change in brightness.
— When driving on a road that passes over rolling hills, or a
road that has level differ-
ences.
— When driving on a road with many curves.
— When a sign or mirror-like surface is reflecting intense
light towards the front of the
vehicle.
— When the container, etc. being towed by a leading vehicle is
reflecting intense light.
— When a headlight on your vehicle is damaged or dirty.
— When the vehicle is leaning at an angle due to a punctured
tire, being towed, etc.
Instruments and controls2-55
Page 140 of 508
2-58Instruments and controls
WARNING
When the LED DRL system is active,
tail lights on your vehicle are not on.
It is necessary at dusk to turn on
your headlights. Failure to do so
could cause an accident injuring
yourself and others.
Type B:
The LED portion of the headlights auto-
matically illuminate at 100% intensity
when the engine is started and the
parking brake released. The DRL operate
with the headlight switch in the AUTO
position or
position, the headlight
must be off. When you turn the headlight
switch to the
position for full illumi-
nation, the LED lights switch from LED
DRL to the park function.
If the parking brake is applied before the
engine is started, the LED DRL do not
illuminate. The LED DRL illuminate when
the parking brake is released. The LED
DRL will remain on until the ignition
switch is placed in the OFF position or
the headlight turns on.
JVI1591X
Example
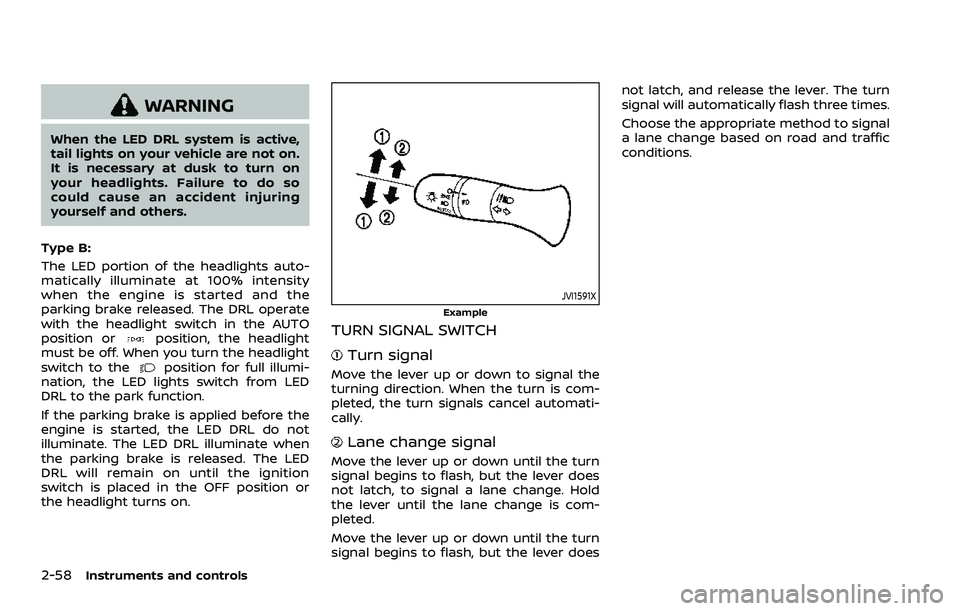
TURN SIGNAL SWITCH
Turn signal
Move the lever up or down to signal the
turning direction. When the turn is com-
pleted, the turn signals cancel automati-
cally.
Lane change signal
Move the lever up or down until the turn
signal begins to flash, but the lever does
not latch, to signal a lane change. Hold
the lever until the lane change is com-
pleted.
Move the lever up or down until the turn
signal begins to flash, but the lever does not latch, and release the lever. The turn
signal will automatically flash three times.
Choose the appropriate method to signal
a lane change based on road and traffic
conditions.
Page 168 of 508
2-86Instruments and controls
PROGRAMMING TROUBLESHOOT-
ING
If the HomeLink® does not quickly learn
the hand-held transmitter information:
.replace the hand-held transmitter
batteries with new batteries.
. position the hand-held transmitter
with its battery area facing away from
the HomeLink® surface.
. press and hold both the HomeLink®
and hand-held transmitter buttons
without interruption.
. position the hand-held transmitter 1-3
in (26-76 mm) away from the
HomeLink® surface. Hold the transmit-
ter in that position for up to 15
seconds. If HomeLink® is not pro-
grammed within that time, try holding
the transmitter in another position -
keeping the indicator light in view at
all times.
If you have any questions or are having
difficulty programming your HomeLink®
buttons, refer to the HomeLink® web site
at: www.homelink.com/nissan or 1-800-
355-3515.
CLEARING THE PROGRAMMED IN-
FORMATION
The following procedure clears the pro-
grammed information from both buttons.
Individual buttons cannot be cleared.
However, individual buttons can be re-
programmed, see “Reprogramming a sin-
gle HomeLink® button” (P.2-86).
To clear all programming
1. Press and hold the two outer HomeLink® buttons until the indicator
light begins to flash in approximately
10 seconds. Do not hold for longer
than 20 seconds.
2. Release both buttons.
HomeLink® is now in the programming
mode and can be programmed at any
time beginning with “Programming
HomeLink®” - Step 1.
REPROGRAMMING A SINGLE
HomeLink® BUTTON
To reprogram a HomeLink® Universal
Transceiver button, complete the follow-
ing.
1. Press and hold the desired HomeLink® button. Do notrelease the button.
2. The indicator light will begin to flash after 20 seconds. Without releasing
the HomeLink® button, proceed with “Programming HomeLink®” - Step 1.
For questions or comments, contact
HomeLink® at: www.homelink.com/
nissan or 1-800-355-3515.
The HomeLink® Universal Transceiver
button has now been reprogrammed.
The new device can be activated by
pushing the HomeLink® button that was
just programmed. This procedure will not
affect any other programmed HomeLink®
buttons.
IF YOUR VEHICLE IS STOLEN
If your vehicle is stolen, you should
change the codes of any non-rolling code
device that has been programmed into
HomeLink®. Consult the Owner’s Manual
of each device or call the manufacturer or
dealer of those devices for additional
information.
When your vehicle is recovered, you will
need to reprogram the HomeLink® Uni-
versal Transceiver with your new trans-
mitter information.
FCC Notice:
For USA:
This device complies with Part 15 of the
FCC Rules. Operation is subject to the
following two conditions: (1) This device
may not cause harmful interference,
and (2) this device must accept any
Page 233 of 508
JVH0664X
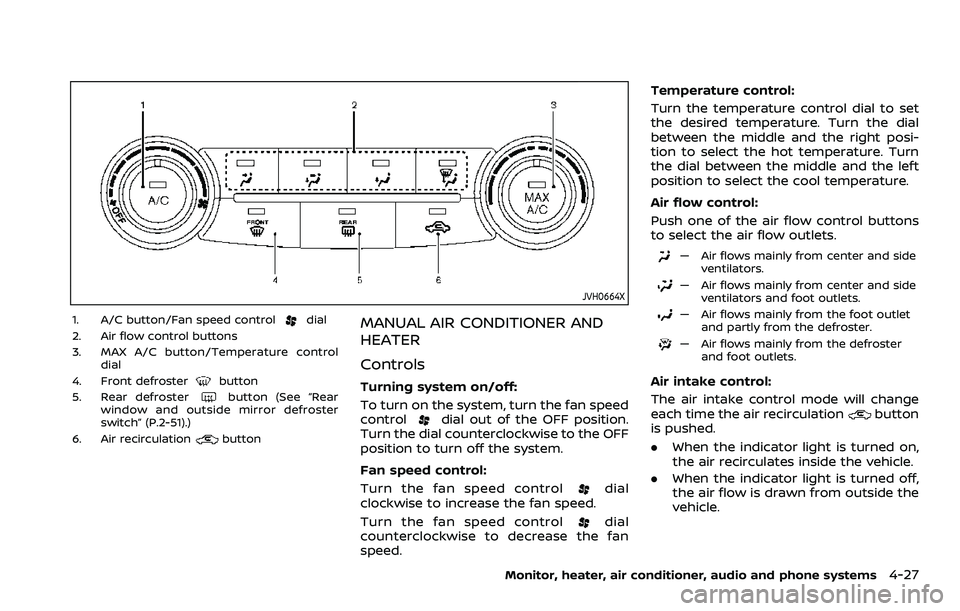
1. A/C button/Fan speed controldial
2. Air flow control buttons
3. MAX A/C button/Temperature control dial
4. Front defroster
button
5. Rear defrosterbutton (See “Rear
window and outside mirror defroster
switch” (P.2-51).)
6. Air recirculation
button
MANUAL AIR CONDITIONER AND
HEATER
Controls
Turning system on/off:
To turn on the system, turn the fan speed
control
dial out of the OFF position.
Turn the dial counterclockwise to the OFF
position to turn off the system.
Fan speed control:
Turn the fan speed control
dial
clockwise to increase the fan speed.
Turn the fan speed control
dial
counterclockwise to decrease the fan
speed. Temperature control:
Turn the temperature control dial to set
the desired temperature. Turn the dial
between the middle and the right posi-
tion to select the hot temperature. Turn
the dial between the middle and the left
position to select the cool temperature.
Air flow control:
Push one of the air flow control buttons
to select the air flow outlets.
— Air flows mainly from center and side
ventilators.
— Air flows mainly from center and sideventilators and foot outlets.
— Air flows mainly from the foot outletand partly from the defroster.
— Air flows mainly from the defrosterand foot outlets.
Air intake control:
The air intake control mode will change
each time the air recirculation
button
is pushed.
. When the indicator light is turned on,
the air recirculates inside the vehicle.
. When the indicator light is turned off,
the air flow is drawn from outside the
vehicle.
Monitor, heater, air conditioner, audio and phone systems4-27
Page 244 of 508
5-4Starting and driving
WARNING
.Do not leave children or adults
who would normally require the
support of others alone in your
vehicle. Pets should not be left
alone either. They could acciden-
tally injure themselves or others
through inadvertent operation of
the vehicle. Also, on hot, sunny
days, temperatures in a closed
vehicle could quickly become
high enough to cause severe or
possibly fatal injuries to people or
animals.
. Properly secure all cargo with
ropes or straps to help prevent it
from sliding or shifting. Do not
place cargo higher than the seat-
backs. In a sudden stop or colli-
sion, unsecured cargo could
cause personal injury.
EXHAUST GAS (carbon monoxide)
WARNING
.Do not breathe exhaust gas; it
contains colorless and odorless
carbon monoxide. Carbon mon- oxide is dangerous. It can cause
unconsciousness or death.
. If you suspect that exhaust fumes
are entering the vehicle, drive
with all windows fully open, and
have the vehicle inspected imme-
diately.
. Do not run the engine in closed
spaces such as a garage.
. Do not park the vehicle with the
engine running for an extended
period of time.
. Keep the liftgate closed while
driving, otherwise exhaust gas
could be drawn into the passen-
ger compartment. If you must
drive with the liftgate open, fol-
low these precautions:
— Open all the windows.
— Turn the air recirculation
mode off and set the fan
speed control to the highest
level to circulate the air.
. If a special body or other equip-
ment is added for recreational or
other usage, follow the manufac-
turer’s recommendation to pre-
vent carbon monoxide entry into
the vehicle. (Some recreational
vehicle appliances such as stoves, refrigerators, heaters, etc. may
also generate carbon monoxide.)
. The exhaust system and body
should be inspected by a quali-
fied mechanic whenever:
— Your vehicle is raised while
being serviced.
— You suspect that exhaust fumes are entering into the
passenger compartment.
— You notice a change in the sound of the exhaust system.
— You have had an accident involving damage to the ex-
haust system, underbody, or
rear of the vehicle.
THREE-WAY CATALYST
The three-way catalyst is an emission
control device installed in the exhaust
system. Exhaust gases in the three-way
catalyst are burned at high temperatures
to help reduce pollutants.
WARNING
. The exhaust gas and the exhaust
system are very hot. Keep people,
animals and flammable materials
PRECAUTIONS WHEN STARTING
AND DRIVING
Page 250 of 508
5-10Starting and driving
WARNING
The following actions can increase
the chance of losing control of the
vehicle if there is a sudden loss of tire
air pressure. Losing control of the
vehicle may cause a collision and
result in personal injury.
.The vehicle generally moves or
pulls in the direction of the flat
tire.
. Do not rapidly apply the brakes.
. Do not rapidly release the accel-
erator pedal.
. Do not rapidly turn the steering
wheel.
1. Remain calm and do not overreact.
2. Maintain a firm grip on the steering wheel with both hands and try to hold
a straight course.
3. When appropriate, slowly release the accelerator pedal to gradually slow
the vehicle.
4. Gradually steer the vehicle to a safe location off the road and away from
traffic if possible. 5. Lightly apply the brake pedal to gra-
dually stop the vehicle.
6. Turn on the hazard warning flashers and either contact a roadside emer-
gency service to change the tire or see
“Changing a flat tire (models with
spare tire)” (P.6-4) of this Owner’s
Manual.
DRINKING ALCOHOL/DRUGS AND
DRIVING
WARNING
Never drive under the influence of
alcohol or drugs. Alcohol in the
bloodstream reduces coordination,
delays reaction time and impairs
judgement. Driving after drinking
alcohol increases the likelihood of
being involved in an accident injuring
yourself and others. Additionally, if
you are injured in an accident, alco-
hol can increase the severity of the
injury.
NISSAN is committed to safe driving.
However, you must choose not to drive
under the influence of alcohol. Every year
thousands of people are injured or killed
in alcohol-related accidents. Although the
local laws vary on what is considered to be legally intoxicated, the fact is that
alcohol affects all people differently and
most people underestimate the effects of
alcohol.
Remember, drinking and driving don’t
mix! And that is true for drugs, too (over-
the-counter, prescription, and illegal
drugs). Don’t drive if your ability to oper-
ate your vehicle is impaired by alcohol,
drugs, or some other physical condition.
DRIVING SAFETY PRECAUTIONS
Your vehicle is designed for both normal
and off-road use. However, avoid driving
in deep water or mud as your vehicle is
mainly designed for leisure use, unlike a
conventional off-road vehicle.
Remember that Two-Wheel Drive (2WD)
models are less capable than All-Wheel
Drive (AWD) models for rough road driving
and extrication when stuck in deep snow,
mud, or the like.
Please observe the following precautions:
WARNING
.
Drive carefully when off the road
and avoid dangerous areas. Every
person who drives or rides in this
vehicle should be seated with
their seat belt fastened. This will
Page 255 of 508
start the engine.
.The cargo room area is not included in
the operating range but the Intelligent
Key may function.
. If the Intelligent Key is placed on the
instrument panel, inside the glove box
or door pocket, the Intelligent Key may
not function.
. If the Intelligent Key is placed near the
door or window outside the vehicle,
the Intelligent Key may function.
PUSH-BUTTON IGNITION SWITCH
OPERATION
CAUTION
.Do not leave the vehicle for ex-
tended periods of time when the
ignition switch is in the ON posi-
tion and the engine is not run-
ning. This can discharge the
battery.
. Use electrical accessories with
the engine running to avoid dis-
charging the vehicle battery. If
you must use accessories while
the engine is not running, do not
use them for extended periods of
time and do not use multiple
electrical accessories at the same time.
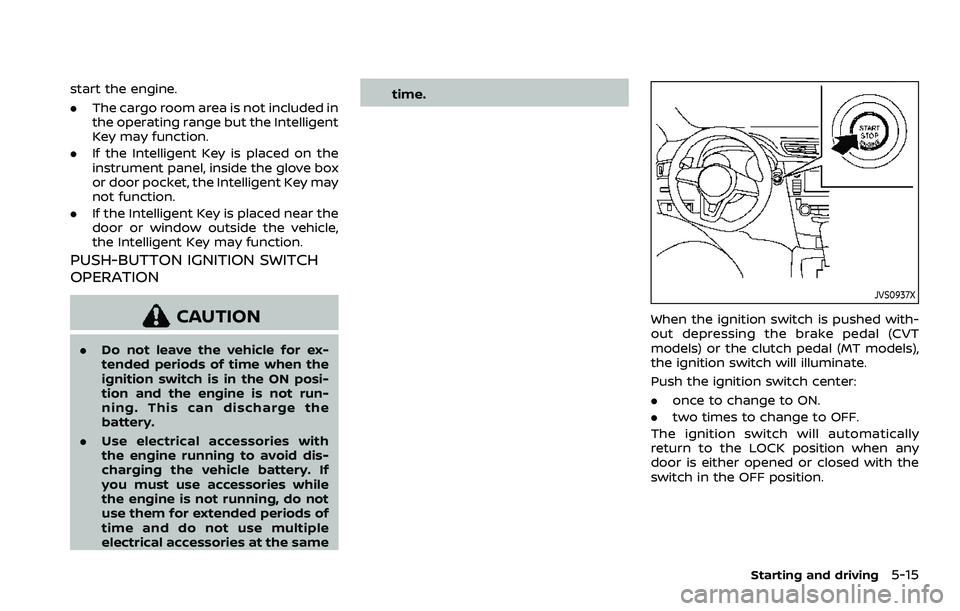
JVS0937X
When the ignition switch is pushed with-
out depressing the brake pedal (CVT
models) or the clutch pedal (MT models),
the ignition switch will illuminate.
Push the ignition switch center:
.
once to change to ON.
. two times to change to OFF.
The ignition switch will automatically
return to the LOCK position when any
door is either opened or closed with the
switch in the OFF position.
Starting and driving5-15