2022 NISSAN NV200 audio
[x] Cancel search: audioPage 9 of 300
Safety-Seats, seat belts and supplemental restraint system
Instruments and controls
Pre-driving checks and adjustments
Monitor, climate, audio, phone and voice recognition systems
Starting and driving
In case of emergency
Appearance and care
Do-it-yourself
Maintenance and schedules
Technical and consumer information
Index
0
1
2
3
4
5
6
7
8
9
10
11
Page 115 of 300
•Do not place the key fob for an ex-
tended period in an area where tem-
peratures exceed 140°F (60°C).
• Do not attach the key fob with a key
holder that contains a magnet.
• Do not place the key fob near equip-
ment that produces a magnetic field,
such as a TV, audio equipment and
personal computers.
If a key fob is lost or stolen, NISSAN rec-
ommends erasing the ID code of that
key fob. This will prevent the key fob
from unauthorized use to unlock the
vehicle. For information regarding the
erasing procedure, it is recommended
that you visit a NISSAN dealer.
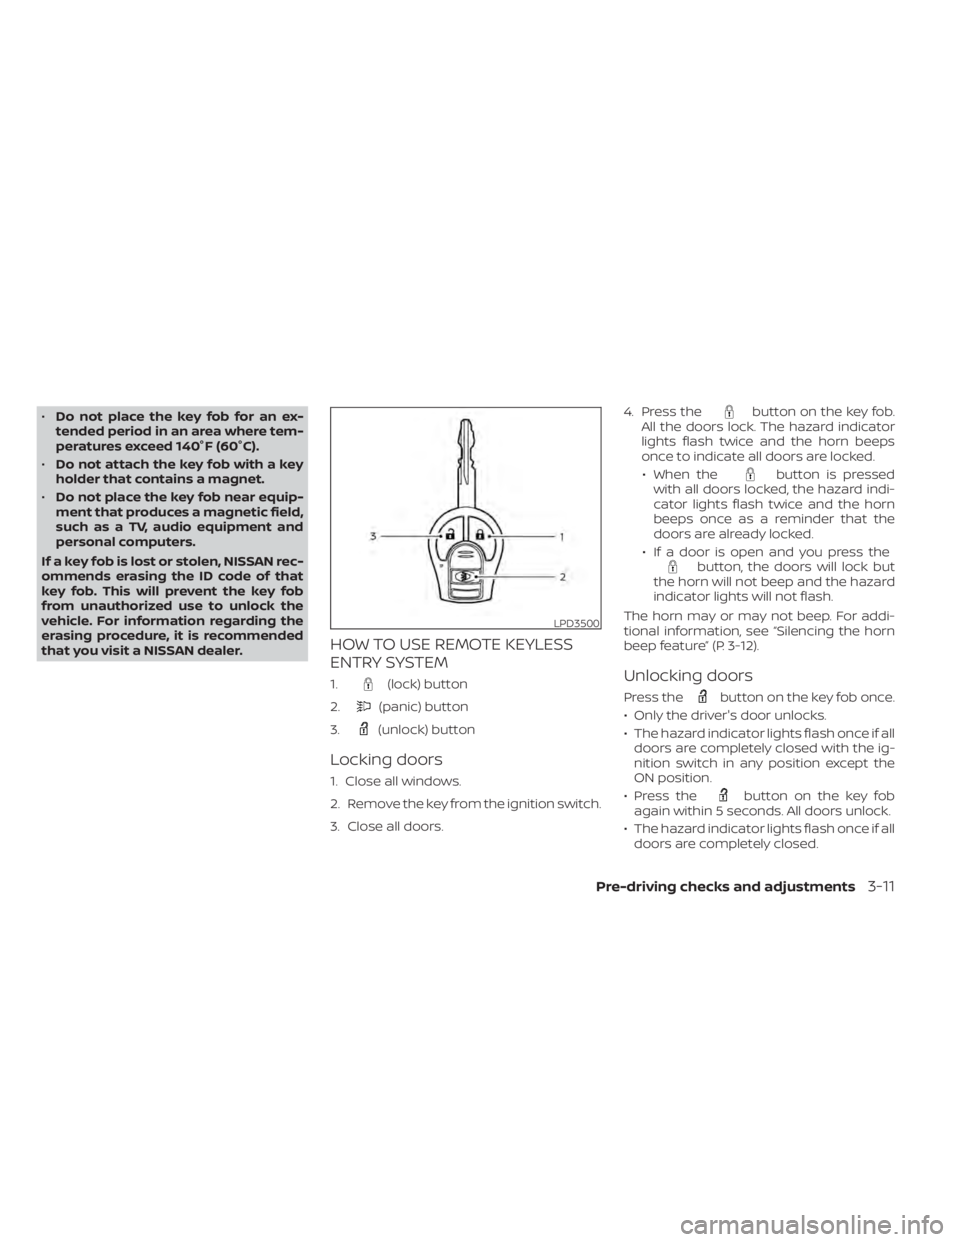
HOW TO USE REMOTE KEYLESS
ENTRY SYSTEM
1.(lock) button
2.
(panic) button
3.
(unlock) button
Locking doors
1. Close all windows.
2. Remove the key from the ignition switch.
3. Close all doors. 4. Press the
button on the key fob.
All the doors lock. The hazard indicator
lights flash twice and the horn beeps
once to indicate all doors are locked.
• When the
button is pressed
with all doors locked, the hazard indi-
cator lights flash twice and the horn
beeps once as a reminder that the
doors are already locked.
• If a door is open and you press the
button, the doors will lock but
the horn will not beep and the hazard
indicator lights will not flash.
The horn may or may not beep. For addi-
tional information, see “Silencing the horn
beep feature” (P. 3-12).
Unlocking doors
Press thebutton on the key fob once.
• Only the driver's door unlocks.
• The hazard indicator lights flash once if all doors are completely closed with the ig-
nition switch in any position except the
ON position.
• Press the
button on the key fob
again within 5 seconds. All doors unlock.
• The hazard indicator lights flash once if all doors are completely closed.
LPD3500
Page 125 of 300
WARNING
• Failure to follow the warnings and in-
structions for proper use of the Rear-
View Monitor system could result in
serious injury or death. •
RearView Monitor is a convenience
feature and is not a substitute for
proper backing. Always turn and look
out the windows and check mirrors
to be sure that it is safe to move be-
fore operating the vehicle. Always
back up slowly. •
The system is designed as an aid to
the driver in showing large station-
ary objects directly behind the ve-
hicle, to help avoid damaging the
vehicle.
Monitor, climate, audio, phone and voice recognition systems4-3
Page 126 of 300
•The distance guide line and the ve-
hicle width line should be used as a
reference only when the vehicle is on
a level paved surface. The distance
viewed on the monitor is for refer-
ence only and may be different than
the actual distance between the ve-
hicle and displayed objects.
CAUTION
Do not scratch the camera lens when
cleaning dirt or snow from the front of
the camera.
The RearView Monitor system automati-
cally shows a rear view of the vehicle when
the shif t lever is shif ted into the R (Reverse)
position. The radio can still be heard while
the RearView Monitor is active. To display the rear view, the RearView Moni-
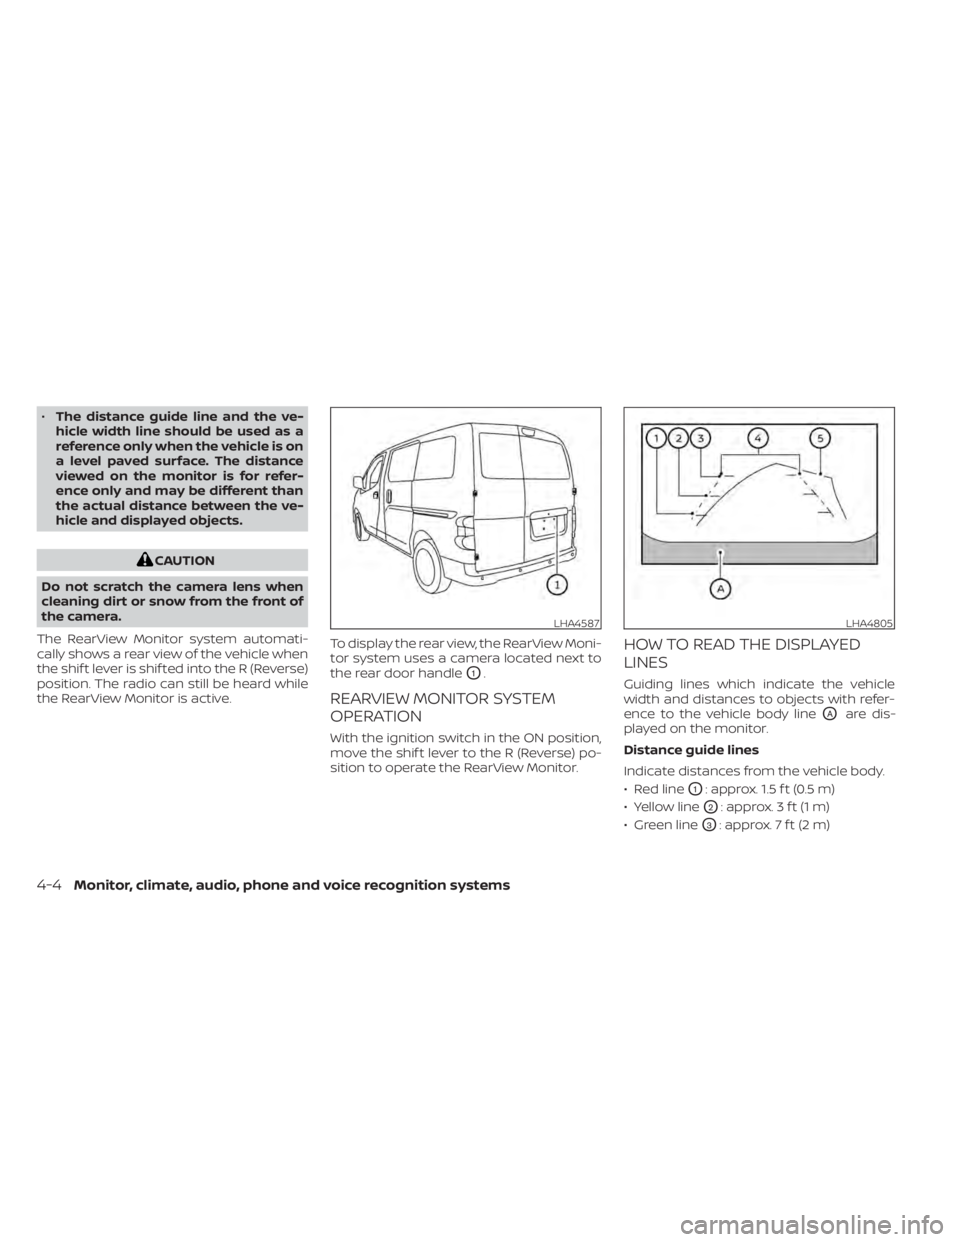
tor system uses a camera located next to
the rear door handle
O1.
REARVIEW MONITOR SYSTEM
OPERATION
With the ignition switch in the ON position,
move the shif t lever to the R (Reverse) po-
sition to operate the RearView Monitor.
HOW TO READ THE DISPLAYED
LINES
Guiding lines which indicate the vehicle
width and distances to objects with refer-
ence to the vehicle body line
OAare dis-
played on the monitor.
Distance guide lines
Indicate distances from the vehicle body.
• Red line
O1: approx. 1.5 f t (0.5 m)
• Yellow line
O2: approx. 3 f t (1 m)
• Green line
O3: approx. 7 f t (2 m)
LHA4587LHA4805
4-4Monitor, climate, audio, phone and voice recognition systems
Page 128 of 300
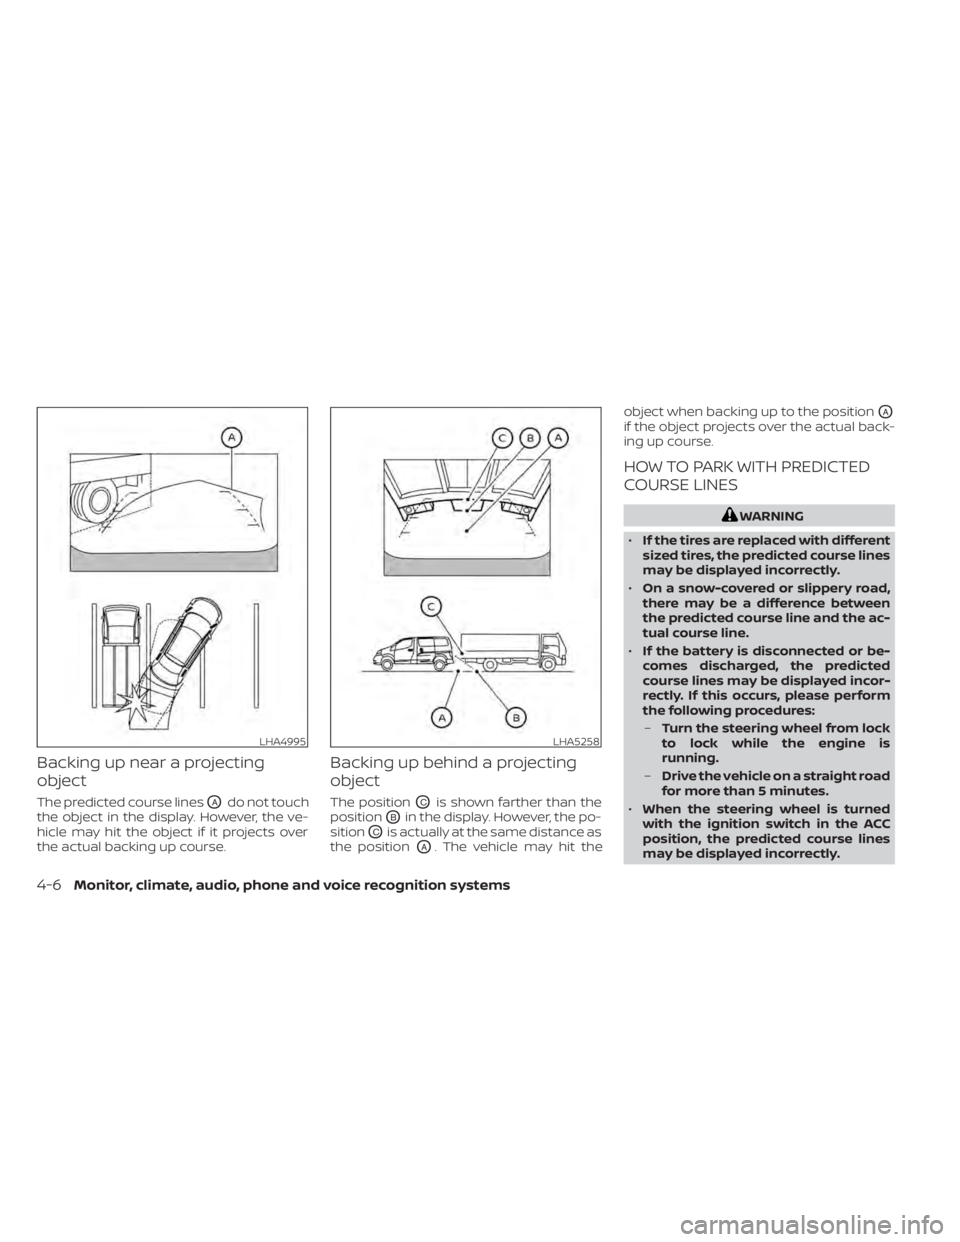
Backing up near a projecting
object
The predicted course linesOAdo not touch
the object in the display. However, the ve-
hicle may hit the object if it projects over
the actual backing up course.
Backing up behind a projecting
object
The positionOCis shown farther than the
position
OBin the display. However, the po-
sition
OCis actually at the same distance as
the position
OA. The vehicle may hit the object when backing up to the position
OA
if the object projects over the actual back-
ing up course.
HOW TO PARK WITH PREDICTED
COURSE LINES
LHA5258
4-6Monitor, climate, audio, phone and voice recognition systems
Page 130 of 300
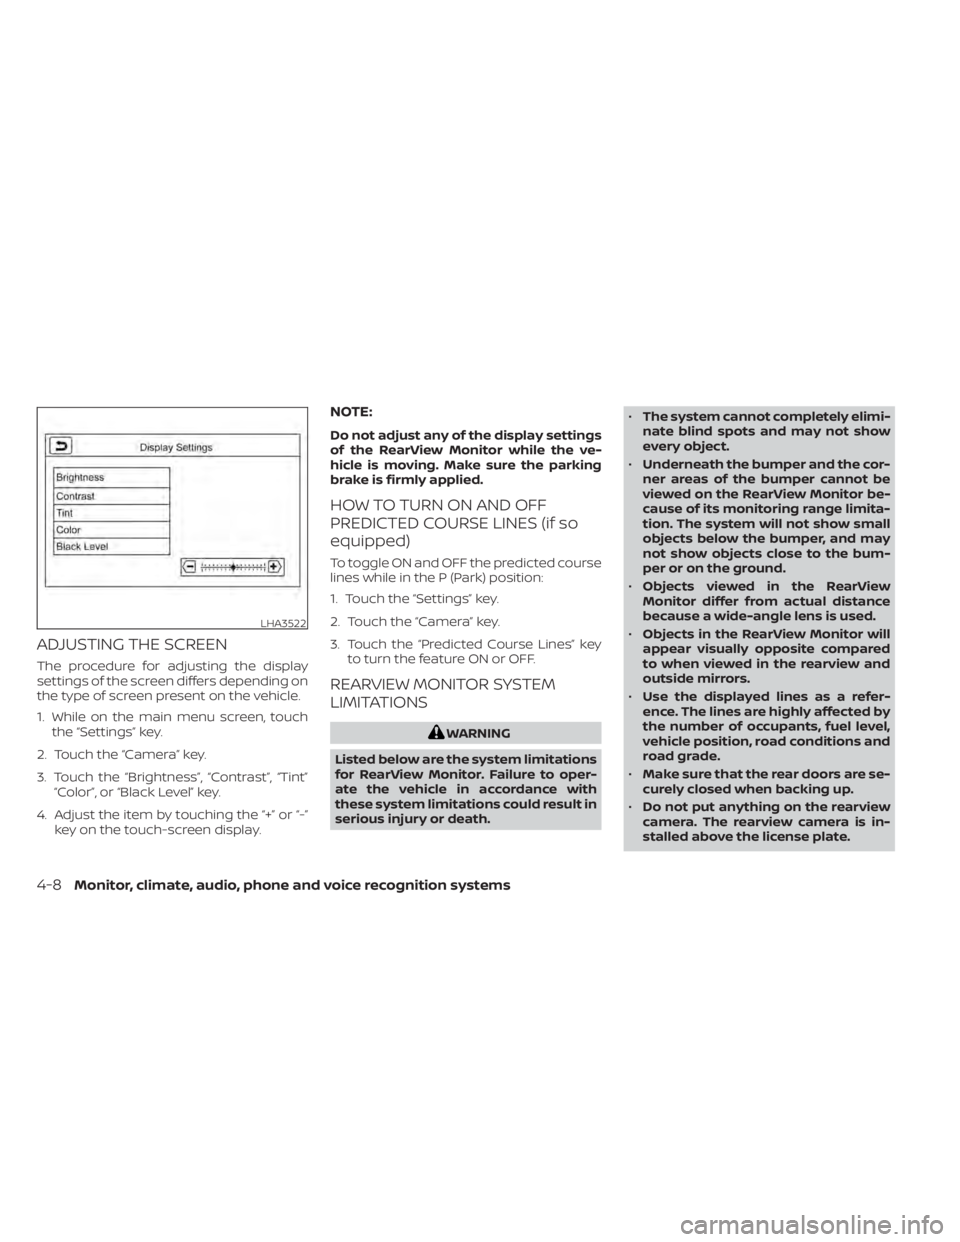
ADJUSTING THE SCREEN
The procedure for adjusting the display
settings of the screen differs depending on
the type of screen present on the vehicle.
1. While on the main menu screen, touchthe “Settings” key.
2. Touch the “Camera” key.
3. Touch the “Brightness”, “Contrast”, “Tint” “Color”, or “Black Level” key.
4. Adjust the item by touching the “+” or “-” key on the touch-screen display.
NOTE:
Do not adjust any of the display settings
of the RearView Monitor while the ve-
hicle is moving. Make sure the parking
brake is firmly applied.
HOW TO TURN ON AND OFF
PREDICTED COURSE LINES (if so
equipped)
To toggle ON and OFF the predicted course
lines while in the P (Park) position:
1. Touch the “Settings” key.
2. Touch the “Camera” key.
3. Touch the “Predicted Course Lines” keyto turn the feature ON or OFF.
REARVIEW MONITOR SYSTEM
LIMITATIONS
4-8Monitor, climate, audio, phone and voice recognition systems
Page 134 of 300
fan speed
control dial to the desired position and
press the
button to turn on the air
conditioner. To turn off the air conditioner,
press the
button again.
The air conditioner cooling function op-
erates only when the engine is running.
Rear window and/or outside
mirror defroster switch (if so
equipped)
For additional information, see “Rear win-
dow and/or outside mirror defroster
switch (if so equipped)” (P. 2-21).
HEATER OPERATION
Heating
This mode is used to direct heated air to
the foot outlets. Some air also flows from
the defrost outlets.
1. Move the air intake lever to the
position for normal heating.
2. Turn the air flow control dial to the
position. 3. Turn the
fan speed control dial to
the desired position.
4. Turn the temperature control dial to the desired position between the middle
and the hot position.
Ventilation
This mode directs outside air to the side
and center vents.
1. Move the air intake lever to the
position.
2. Turn the air flow control dial to the
position.
3. Turn the
fan speed control dial to
the desired position.
4. Turn the temperature control dial to the desired position.
Defrosting or defogging
This mode directs the air to the defrost
outlets to defrost/defog the windows.
1. Move the air intake lever to the
position.
2. Turn the air flow control dial to the
position. 3. Turn the
fan speed control dial to
the desired position.
4. Turn the temperature control dial to the desired position between the middle
and the hot position.
• To quickly remove ice or fog from the win- dows, turn the
fan speed control dial
to the maximum position and the tem-
perature control dial to the full hot
position.
When the
orposition is se-
lected, the air conditioner automatically
turns on (however, the indicator light will
not illuminate). In this position, the air con-
ditioner cannot be turned off. When the air
flow control is turned to any position other
than
or(the air conditioner will
continue operating). and can be turned off
using the air conditioner button. This dehu-
midifies the air, which helps defog the
windshield.
Bi-level heating
This mode directs cooler air from the side
and center vents and warmer air from the
floor outlets. When the temperature con-
trol dial is moved to the full hot or full cool
position, the air between the vents and the
floor outlets is the same temperature.
4-12Monitor, climate, audio, phone and voice recognition systems
Page 135 of 300
position.
2. Turn the air flow control dial to the
position.
3. Turn the
fan speed control dial to
the desired position.
4. Turn the temperature control dial to the desired position.
Heating and defogging
This mode heats the interior and defogs
the windshield.
1. Move the air intake lever to the
position.
2. Turn the air flow control dial to the
position.
3. Turn the
fan speed control dial to
the desired position.
4. Turn the temperature control dial to the desired position between the middle
and the hot position.
When the
orposition is se-
lected, the air conditioner automatically
turns on (however, the indicator light will
not illuminate). In this position, the air con-
ditioner cannot be turned off. When the air
flow control is turned to any position other than
or(the air conditioner will
continue operating) and can be turned off
using the air conditioner button. This dehu-
midifies the air, which helps defog the
windshield.
Operating tips
Clear snow and ice from the wiper blades
and air inlet in front of the windshield.
This improves heater operation.
AIR CONDITIONER OPERATION
Start the engine, turn thefan speed
control dial to the desired position, and
press the
button to activate the air
conditioner. When the air conditioner is on,
cooling and dehumidif ying functions are
added to the heater operation.
The air conditioner cooling function op-
erates only when the engine is running.
Cooling
This mode is used to cool and dehumidif y
the air.
1. Move the air intake lever to the
position.
2. Turn the air flow control dial to the
position. 3. Turn the
fan speed control dial to
the desired position.
4. Press the
button. The indicator
light comes on.
5. Turn the temperature control dial to the desired position.
• For quick cooling when the outside tem- perature is high, move the air intake lever
to the
position. Be sure to return to
theposition for normal cooling.
Dehumidified heating
This mode is used to heat and dehumidif y
the air.
1. Move the air intake lever to the
position.
2. Turn the air flow control dial to the
position.
3. Turn the
fan speed control dial to
the desired position.
4. Press the
button. The indicator
light comes on.
5. Turn the temperature control dial to the desired position.
Monitor, climate, audio, phone and voice recognition systems4-13