2022 NISSAN KICKS ignition
[x] Cancel search: ignitionPage 286 of 500

(Af ter step 3 is performed, when the ig-
nition switch is pushed without de-
pressing the brake pedal, the ignition
switch position will change to ON.)
4. Push the ignition switch while depress- ing the brake pedal within 10 seconds
af ter the chime sounds. The engine will
start.
NOTE:
• When the ignition switch is pushed tothe ON position or the engine is started
by the above procedure, the Intelligent
Key battery discharge indicator ap-
pears in the vehicle information dis-
play (if so equipped) even when the In-
telligent Key is inside the vehicle. This
is not a malfunction. To turn off the In-
telligent Key battery discharge indica-
tor, touch the ignition switch with the
Intelligent Key again.
• If the Intelligent Key battery discharge indicator appears, replace the battery
as soon as possible. For additional in-
formation, refer to “Battery replace-
ment” in the “Do-it-yourself ” section of
this manual.
NISSAN ANTI-THEFT SYSTEM
(NATS) (if so equipped)
The NISSAN Anti-Thef t System (NATS) will
not allow the engine to start without the
use of the registered NATS key.
If the engine does not start by using the
registered NATS key, it may be due to inter-
ference caused by:
• Another NATS key.
• An automated toll road device.
• An automated payment device.
• Other devices that transmit similar sig-nals.
Start the engine using the following proce-
dure:
1. Remove any items that may be causing the interference away from the NATS key.
2. Leave the ignition switch in the ON posi- tion for approximately 5 seconds.
3. Place the ignition switch in the OFF or LOCK position, and wait approximately
10 seconds.
4. Repeat steps 2 and 3.
5. Start the engine.
6. Repeat the steps above until all possible interferences are eliminated. If this procedure allows the engine to start,
NISSAN recommends placing the regis-
tered NATS key separate from other de-
vices to avoid interference.
NISSAN VEHICLE IMMOBILIZER
SYSTEM
The NISSAN Vehicle Immobilizer System
will not allow the engine to start without
the use of the registered key.
If the engine fails to start using a registered
key (for example, when interference is
caused by another registered key, an auto-
mated toll road device or automatic pay-
ment device on the key ring), restart the
engine using the following procedures:
1. Leave the ignition switch in the ON posi-
tion for approximately 5 seconds.
2. Turn the ignition switch to the OFF or LOCK position, and wait approximately
10 seconds.
3. Repeat steps 1 and 2.
4. Restart the engine while holding the de- vice (which may have caused the inter-
ference) separate from the registered
key.
5-14Starting and driving
Page 287 of 500

If the no start condition re-occurs, NISSAN
recommends placing the registered key on
a separate key ring to avoid interference
from other devices.• Make sure the area around the vehicle is
clear.
• Check fluid levels such as engine oil, cool- ant, brake fluid, and windshield-washer
fluid as frequently as possible, or at least
whenever you refuel.
• Check that all windows and lights are clean.
• Visually inspect tires for their appearance and condition. Also check tires for proper
inflation.
• Lock all doors.
• Position seat and adjust headrests/head restraints.
• Adjust inside and outside mirrors.
• Fasten seat belts and ask all passengers to do likewise.
• Check the operation of warning lights when the ignition switch is pushed to the
ON position. For additional information,
refer to “Warning lights, indicator lights
and audible reminders” in the “Instru-
ments and controls” section of this
manual. 1. Apply the parking brake.
2. Move the shif t lever to P (Park) or N (Neu-
tral). P (Park) is recommended.
The shif t lever cannot be moved out of
P (Park) and into any of the other gear
positions if the ignition switch is
placed in the OFF position.
The starter is designed not to operate
if the shif t lever is in any of the driving
positions.
3. Push the ignition switch to the ON posi- tion. Depress the brake pedal and push
the ignition switch to start the engine.
To start the engine immediately, push
and release the ignition switch while de-
pressing the brake pedal with the igni-
tion switch in any position.
• If the engine is very hard to start in extremely cold weather or when re-
starting, depress the accelerator
pedal a little (approximately 1/3 to the
floor) and while holding, crank the en-
gine. Release the accelerator pedal
when the engine starts.
BEFORE STARTING THE ENGINE STARTING THE ENGINE
Starting and driving5-15
Page 288 of 500
• If the engine is very hard to start be-cause it is flooded, depress the accel-
erator pedal all the way to the floor
and hold it. Push the ignition switch to
the ON position to start cranking the
engine. Af ter 5 or 6 seconds, stop
cranking by pushing the ignition
switch to LOCK. Af ter cranking the en-
gine, release the accelerator pedal.
Crank the engine with your foot off the
accelerator pedal by depressing the
brake pedal and pushing the ignition
switch to start the engine. If the engine
starts, but fails to run, repeat the
above procedure.
Page 289 of 500
CONTINUOUSLY VARIABLE
TRANSMISSION (CVT)CAUTION
• Except in an emergency, do not shif t
to the N (Neutral) position while driv-
ing. Coasting with the transmission
in the N (Neutral) position may cause
serious damage to the transmission.
• To avoid possible damage to your ve-
hicle, when stopping the vehicle on
an uphill grade, do not hold the ve-
hicle by depressing the accelerator
pedal. The foot brake should be used
for this purpose.
The CVT in your vehicle is electronically
controlled to produce maximum power
and smooth operation.
The recommended operating procedures
for this transmission are shown on the fol-
lowing pages. Follow these procedures for
maximum vehicle performance and driv-
ing enjoyment.
NOTE:
Engine power may be automatically re-
duced to protect the CVT if the engine
speed increases quickly when driving on
slippery roads or while being tested on
some dynamometers.
Starting the vehicle
1. Af ter starting the engine, fully depress the foot brake pedal before moving the
shif t lever out of the P (Park) position.
This Continuously Variable Transmis-
sion is designed so that the foot brake
pedal must be depressed before shif t-
ing from P (Park) to any driving posi-
tion while the ignition switch is in the
ON position.
The shif t lever cannot be moved out of
the P (Park) position and into any of
the other positions if the ignition
switch is placed in the LOCK or OFF
position.
2. Keep the foot brake pedal depressed and move the shif t lever to a driving
position.
3. Release the parking brake and foot brake pedal, and then gradually start the
vehicle in motion.
DRIVING THE VEHICLE
Starting and driving5-17
Page 292 of 500
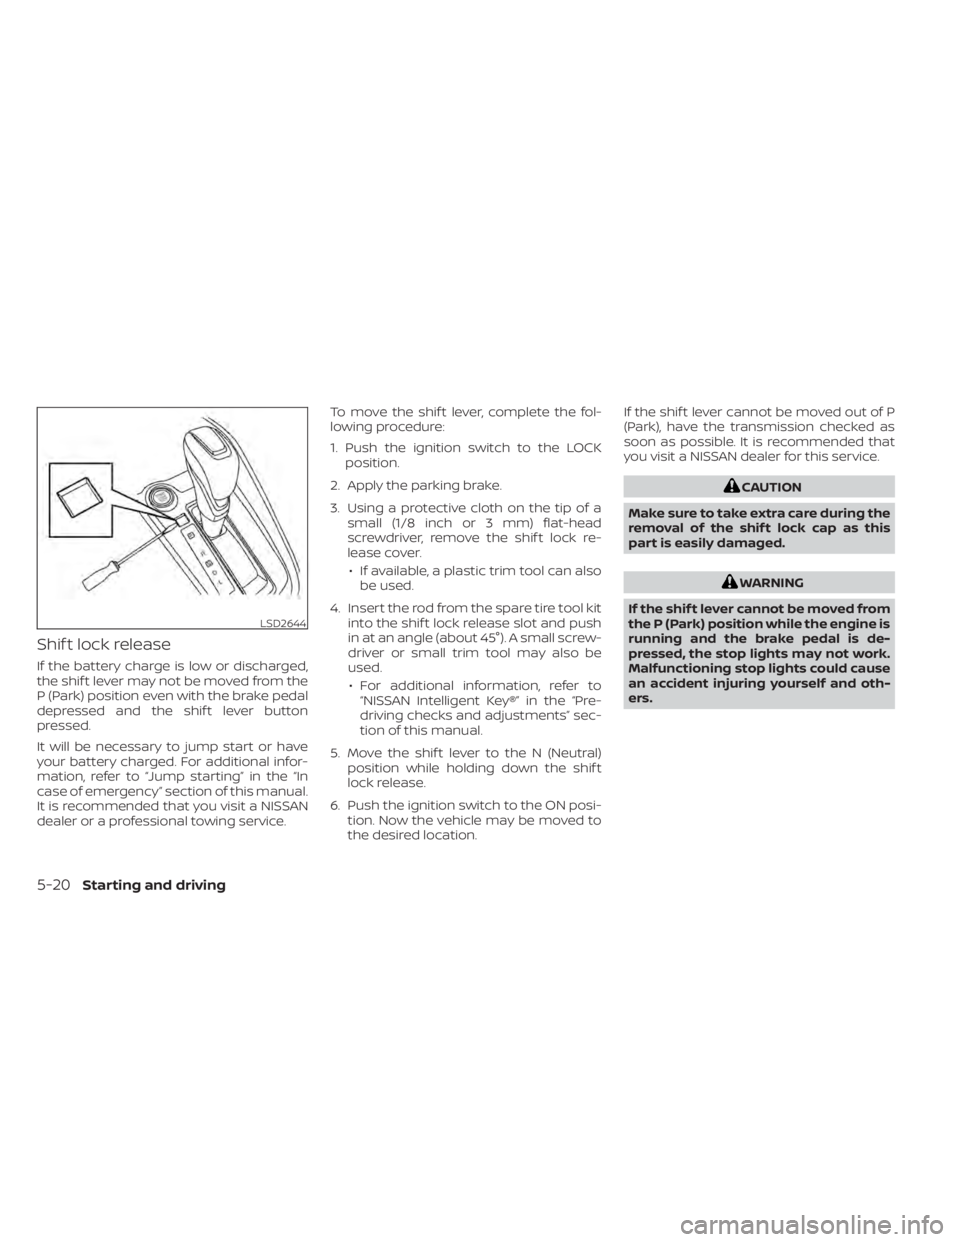
Shif t lock release
If the battery charge is low or discharged,
the shif t lever may not be moved from the
P (Park) position even with the brake pedal
depressed and the shif t lever button
pressed.
It will be necessary to jump start or have
your battery charged. For additional infor-
mation, refer to “Jump starting” in the “In
case of emergency” section of this manual.
It is recommended that you visit a NISSAN
dealer or a professional towing service.To move the shif t lever, complete the fol-
lowing procedure:
1. Push the ignition switch to the LOCK
position.
2. Apply the parking brake.
3. Using a protective cloth on the tip of a small (1/8 inch or 3 mm) flat-head
screwdriver, remove the shif t lock re-
lease cover.
• If available, a plastic trim tool can also be used.
4. Insert the rod from the spare tire tool kit into the shif t lock release slot and push
in at an angle (about 45°). A small screw-
driver or small trim tool may also be
used.
• For additional information, refer to “NISSAN Intelligent Key®” in the “Pre-
driving checks and adjustments” sec-
tion of this manual.
5. Move the shif t lever to the N (Neutral) position while holding down the shif t
lock release.
6. Push the ignition switch to the ON posi- tion. Now the vehicle may be moved to
the desired location. If the shif t lever cannot be moved out of P
(Park), have the transmission checked as
soon as possible. It is recommended that
you visit a NISSAN dealer for this service.
WARNING
If the shif t lever cannot be moved from
the P (Park) position while the engine is
running and the brake pedal is de-
pressed, the stop lights may not work.
Malfunctioning stop lights could cause
an accident injuring yourself and oth-
ers.
5-20Starting and driving
Page 294 of 500
OFF position:
For normal driving and fuel economy, use
the OFF position.
ON position:
For driving up or down long slopes where
engine braking is necessary, or for powerful
acceleration, use the ON position. The
transmission will automatically select a dif-
ferent gear ratio, allowing the engine to
provide high output.
Remember not to drive at high speeds for
extended periods of time with the over-
drive OFF mode in the ON position. This
reduces fuel economy.
Accelerator downshif t
— in D (Drive) position —
For passing or hill climbing, depress the
accelerator pedal to the floor. This shif ts
the transmission down into a lower gear,
depending on the vehicle speed.
High fluid temperature protection
mode
This transmission has a high fluid tem-
perature protection mode. If the fluid tem-
perature becomes too high (for example,
when climbing steep grades in high tem-peratures with heavy loads, such as when
towing a trailer), engine power and, under
some conditions, vehicle speed will be de-
creased automatically to reduce the
chance of transmission damage. Vehicle
speed can be controlled with the accelera-
tor pedal, but the engine and vehicle speed
may be limited.
Fail-safe
If the vehicle is driven under extreme
conditions, such as excessive wheel
spinning and subsequent hard braking,
the fail-safe system may be activated.
The Malfunction Indicator Light (MIL)
may come on to indicate the fail-safe
mode is activated. For additional infor-
mation, refer to “Malfunction Indicator
Light (MIL)” in the “Instruments and con-
trols” section of this manual. This will oc-
cur even if all electrical circuits are func-
tioning properly. In this case, place the
ignition switch in the OFF position and
wait for 10 seconds. Then push the
switch back to the ON position. The ve-
hicle should return to its normal operat-
ing condition. If it does not return to its
normal operating condition, have the
transmission checked and repaired, if
necessary. It is recommended that you
visit a NISSAN dealer for this service.
WARNING
When the high fluid temperature pro-
tection mode or fail-safe operation oc-
curs, vehicle speed may be gradually
reduced. The reduced speed may be
lower than other traffic, which could in-
crease the chance of a collision. Be es-
pecially careful when driving. If neces-
sary, pull to the side of the road at a safe
place and allow the transmission to re-
turn to normal operation, or have it re-
paired if necessary.
5-22Starting and driving
Page 305 of 500

1. Side BSW/RCTA Indicator Light
2. BSW Indicator or BSW Indicator Light
BSW SYSTEM OPERATION
The BSW system operates above approxi-
mately 20 mph (32 km/h).
If the radar sensors detect a vehicle in the
detection zone, the side BSW/RCTA indica-
tor light (1) illuminates. If the turn signal is
then activated, the system chimes (twice)
and the side BSW/RCTA indicator light
flashes. The side BSW/RCTA indicator light
continues to flash until the detected ve-
hicle leaves the detection zone.
The side BSW/RCTA indicator light illumi-
nates for a few seconds when the ignition
switch is placed in the ON position.
The brightness of the side BSW/RCTA indi-
cator light is adjusted automatically de-
pending on the brightness of the ambient
light.
If a vehicle comes into the detection zone
af ter the driver activates the turn signal,
then only the side BSW/RCTA indicator light
flashes and no chime sounds. For addi-
tional information, refer to “BSW driving
situations” in this section.
Starting and driving5-33
Page 364 of 500
WARNING
Failure to follow the warnings and in-
structions for proper use of the I-DA
system could result in serious injury or
death.
• The I–DA system is only a warning to
inform the driver of a potential lack
of driver attention or drowsiness. It
will not steer the vehicle or prevent
loss of control.
• The I–DA system does not detect and
provide an alert of the driver’s lack of
attention or fatigue in every
situation.
• It is the driver’s responsibility to:
• stay alert,
• drive safely,
• keep the vehicle in the traveling
lane,
• be in control of the vehicle at all
times,
• avoid driving when tired,
• avoid distractions (texting, etc). The I–DA system helps alert the driver if the
system detects a lack of attention or driv-
ing fatigue.
The system monitors driving style and
steering behavior over a period of time,
and it detects changes from the normal
pattern. If the system detects that driver
attention is decreasing over a period of
time, the system uses audible and visual
warnings to suggest that the driver take a
break.
INTELLIGENT DRIVER ALERTNESS
SYSTEM OPERATION
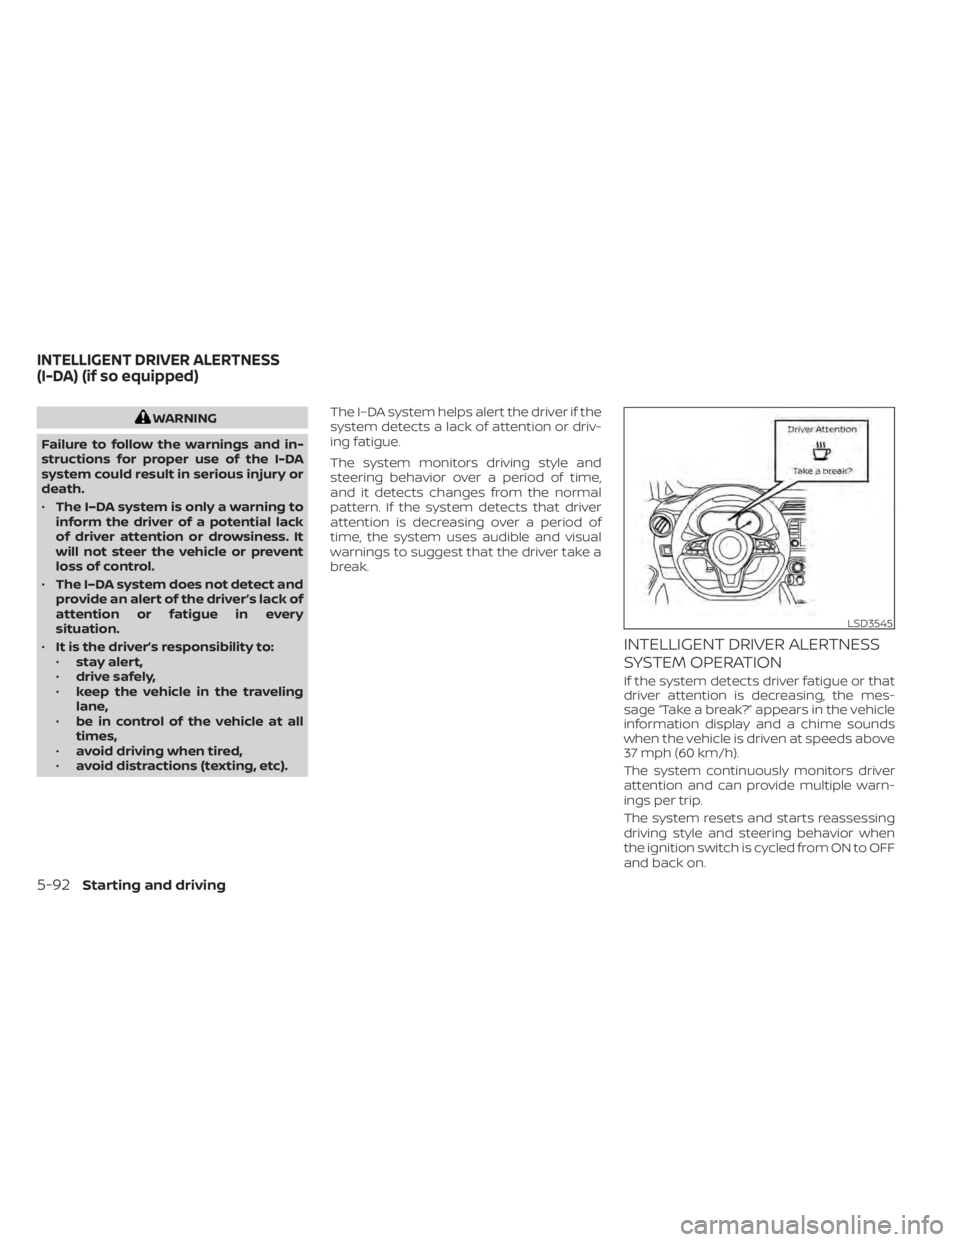
If the system detects driver fatigue or that
driver attention is decreasing, the mes-
sage “Take a break?” appears in the vehicle
information display and a chime sounds
when the vehicle is driven at speeds above
37 mph (60 km/h).
The system continuously monitors driver
attention and can provide multiple warn-
ings per trip.
The system resets and starts reassessing
driving style and steering behavior when
the ignition switch is cycled from ON to OFF
and back on.
LSD3545
INTELLIGENT DRIVER ALERTNESS
(I-DA) (if so equipped)