2022 NISSAN KICKS brake
[x] Cancel search: brakePage 178 of 500

• The second 10 minutes will start immedi-ately when the Remote Engine Start
function is performed again. For example,
if the engine has been running for 5 min-
utes, and 10 minutes are added, the en-
gine will run for a total of 15 minutes.
• Extending engine run time will bring you to the two Remote Engine Start limit.
A maximum of two Remote Engine Starts,
or a single Remote Engine Start with an
extension, are allowed between ignition
cycles. The ignition switch must be cycled
to the ON position and then back to the
OFF position before the Remote Engine
Start procedure can be used again.
CANCELING A REMOTE ENGINE
START
To cancel a Remote Engine Start, perform
one of the following:
• Aim the Intelligent Key at the vehicle and press
until the parking lights turn off.
• Turn on the hazard warning flashers.
• Cycle the ignition switch on and then off.
• The extended engine run time has ex- pired.
• The first 10 minute timer has expired.
• Opening the engine hood.
• Shif ting the vehicle out of P (Park). • The alarm sounds due to illegal entry into
the vehicle.
• Pushing the ignition switch without the Intelligent Key in the vehicle.
• Not pressing the brake pedal while press- ing the ignition switch with the Intelligent
Key in the vehicle.
CONDITIONS THE REMOTE ENGINE
START WILL NOT WORK
The Remote Engine Start will not operate if
any of the following conditions are present:
• The ignition switch is placed in the ONposition.
• The hood is not securely closed.
• The hazard indicator lights are on.
• The engine is still running. The engine must be completely stopped. Wait at
least 6 seconds if the engine goes from
running to off. This is not applicable when
extending engine run time.
• The
button is not pressed and held
for at least 2 seconds.
• The
button is not pressed and held
within 5 seconds of pressing the lock but-
ton.
• The brake is pressed.
• The doors are not closed and locked. • The lif tgate is open.
• The I–Key System Error warning shows in
the vehicle information display (if so
equipped).
• The alarm sounds due to illegal entry into the vehicle.
• Two Remote Engine Starts, or a single Remote Engine Start with an extension,
have already been used.
• The vehicle is not in P (Park).
• There is a detected registered key already inside of the vehicle.
• The Remote Engine Start function has been switched to the OFF position in “Ve-
hicle Settings” of the vehicle information
display (if so equipped). For additional in-
formation, refer to “Vehicle information
display” in the “Instruments and controls”
section of this manual.
The Remote Engine Start may display a
warning or indicator in the vehicle informa-
tion display (if so equipped). For additional
information, refer to “Vehicle information
display” in the “Instruments and controls”
section of this manual.
3-20Pre-driving checks and adjustments
Page 202 of 500

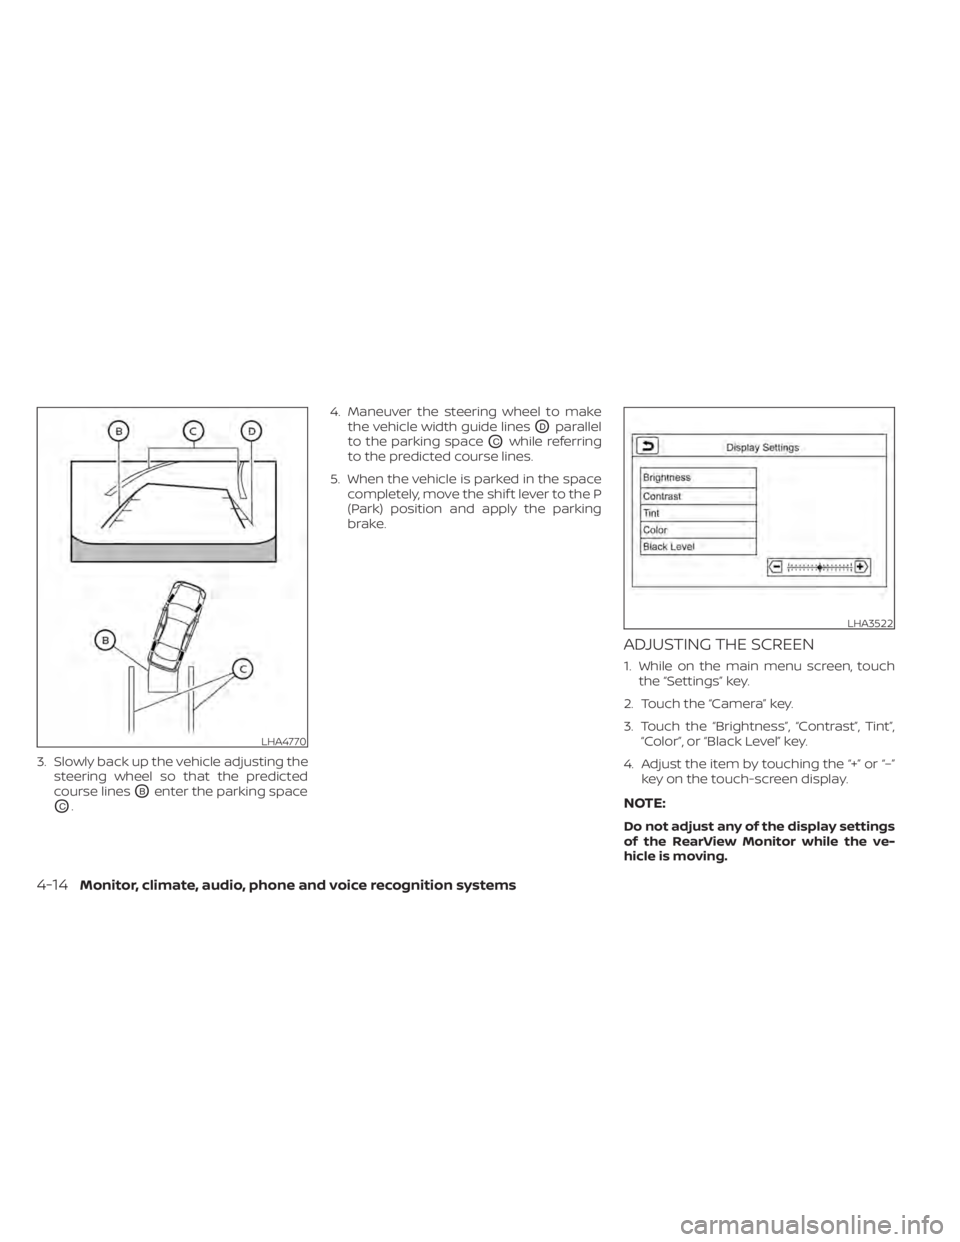
3. Slowly back up the vehicle adjusting thesteering wheel so that the predicted
course lines
OBenter the parking space
OC. 4. Maneuver the steering wheel to make
the vehicle width guide lines
ODparallel
to the parking space
OCwhile referring
to the predicted course lines.
5. When the vehicle is parked in the space completely, move the shif t lever to the P
(Park) position and apply the parking
brake.
ADJUSTING THE SCREEN
1. While on the main menu screen, touchthe “Settings” key.
2. Touch the “Camera” key.
3. Touch the “Brightness”, “Contrast”, Tint”, “Color”, or “Black Level” key.
4. Adjust the item by touching the “+” or “–” key on the touch-screen display.
NOTE:
Do not adjust any of the display settings
of the RearView Monitor while the ve-
hicle is moving.
LHA3522
4-14Monitor, climate, audio, phone and voice recognition systems
Page 212 of 500

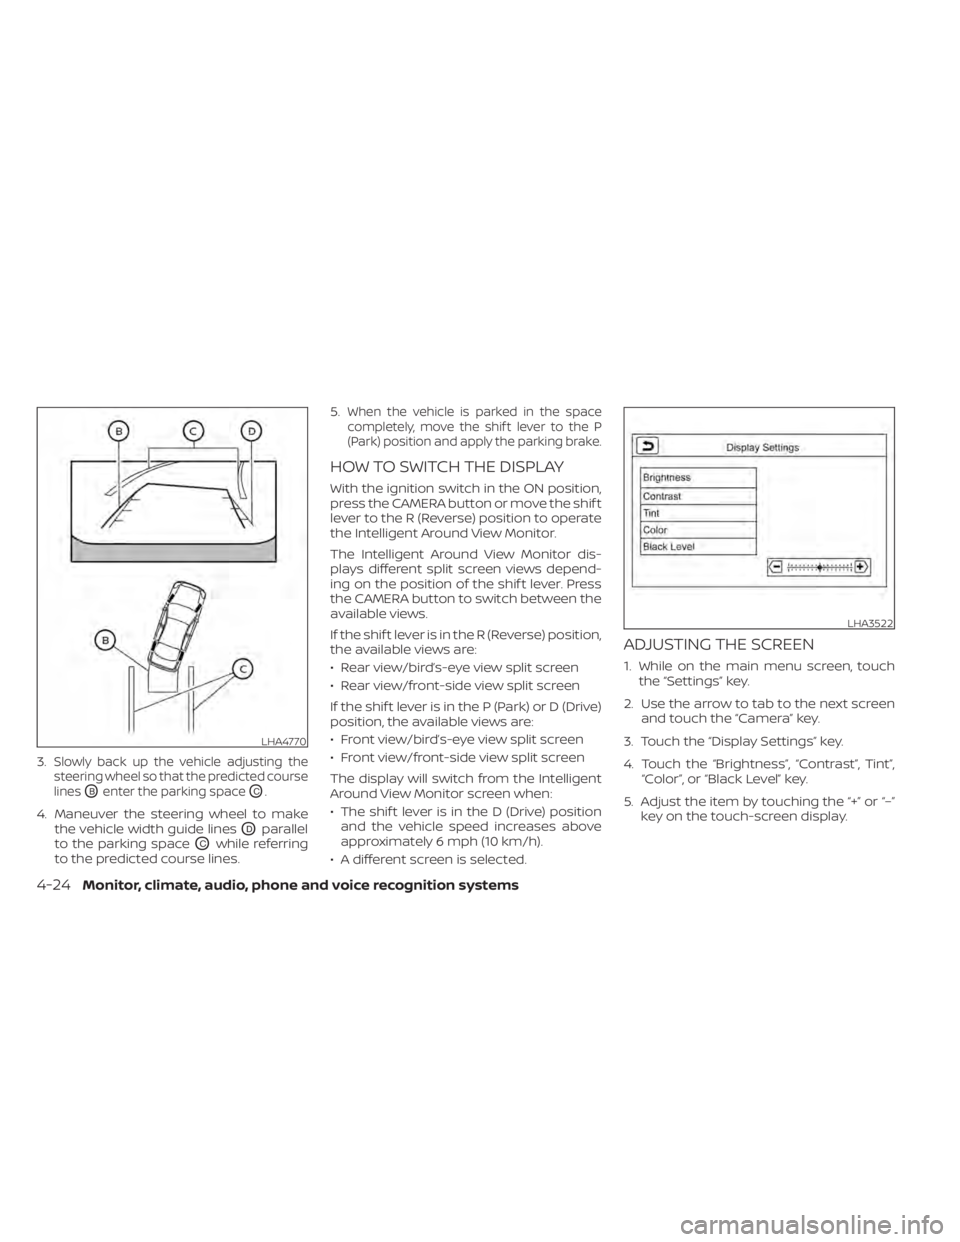
3.Slowly back up the vehicle adjusting the
steering wheel so that the predicted course
lines
OBenter the parking spaceOC.
4. Maneuver the steering wheel to make the vehicle width guide lines
ODparallel
to the parking space
OCwhile referring
to the predicted course lines. 5.
When the vehicle is parked in the space
completely, move the shif t lever to the P
(Park) position and apply the parking brake.
HOW TO SWITCH THE DISPLAY
With the ignition switch in the ON position,
press the CAMERA button or move the shif t
lever to the R (Reverse) position to operate
the Intelligent Around View Monitor.
The Intelligent Around View Monitor dis-
plays different split screen views depend-
ing on the position of the shif t lever. Press
the CAMERA button to switch between the
available views.
If the shif t lever is in the R (Reverse) position,
the available views are:
• Rear view/bird’s-eye view split screen
• Rear view/front-side view split screen
If the shif t lever is in the P (Park) or D (Drive)
position, the available views are:
• Front view/bird’s-eye view split screen
• Front view/front-side view split screen
The display will switch from the Intelligent
Around View Monitor screen when:
• The shif t lever is in the D (Drive) position and the vehicle speed increases above
approximately 6 mph (10 km/h).
• A different screen is selected.
ADJUSTING THE SCREEN
1. While on the main menu screen, touch the “Settings” key.
2. Use the arrow to tab to the next screen and touch the “Camera” key.
3. Touch the “Display Settings” key.
4. Touch the “Brightness”, “Contrast”, Tint”, “Color”, or “Black Level” key.
5. Adjust the item by touching the “+” or “–” key on the touch-screen display.
LHA4770
LHA3522
4-24Monitor, climate, audio, phone and voice recognition systems
Page 213 of 500

NOTE:
Do not adjust any of the display settings
of the RearView Monitor while the ve-
hicle is moving. Make sure the parking
brake is firmly applied.
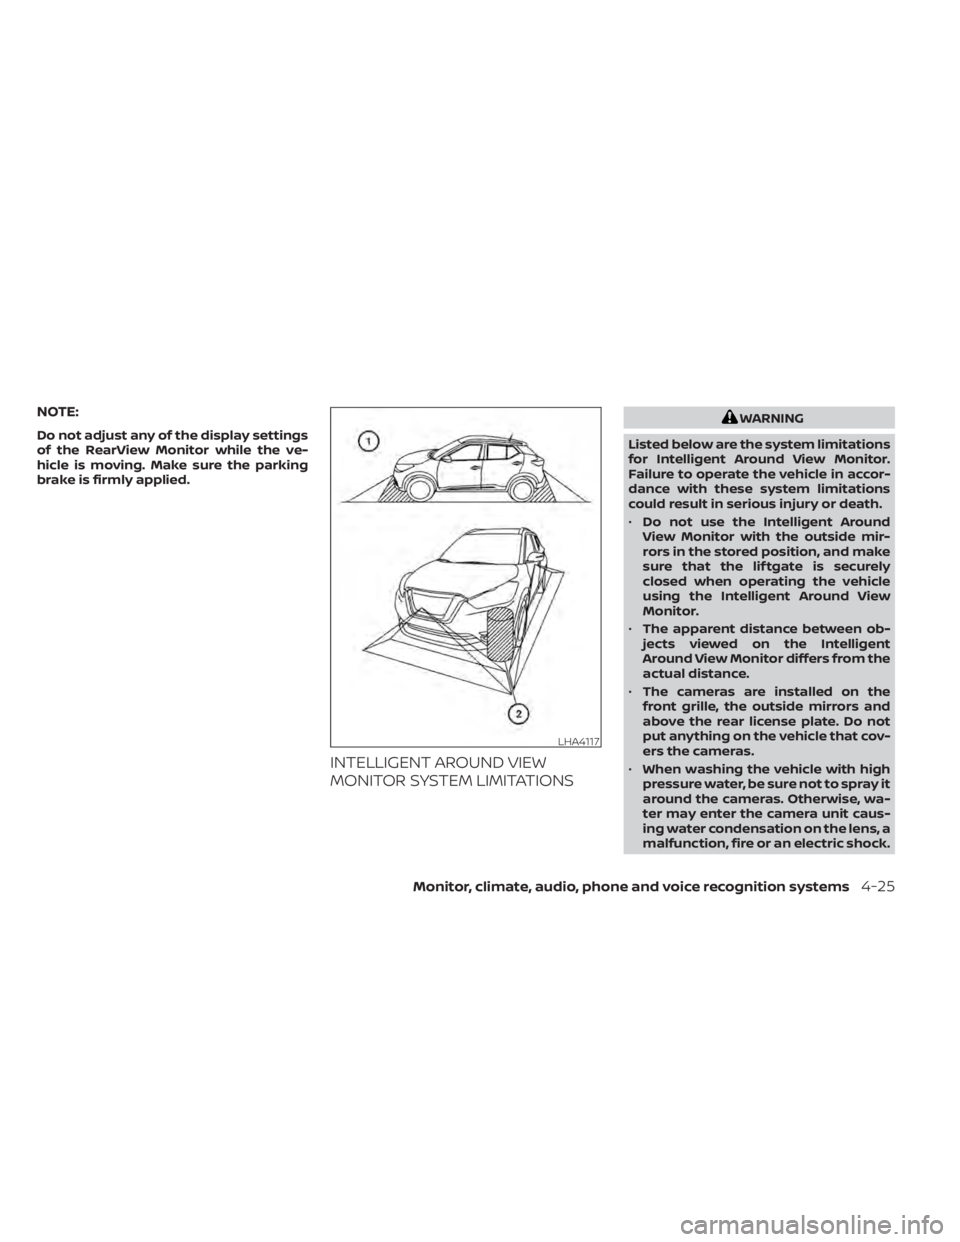
INTELLIGENT AROUND VIEW
MONITOR SYSTEM LIMITATIONS
Page 274 of 500

Rear Automatic Braking (RAB) (if so equipped) . . 5-54RAB system operation .......................5-54
Turning the RAB system on/off ..............5-56
RAB system limitations ......................5-57
System malfunction ......................... 5-59
System maintenance .......................5-59
Automatic Emergency Braking (AEB)
(if so equipped) ................................. 5-60
AEB system operation ....................... 5-61
Turning the AEB system on/off ..............5-63
AEB system limitations ......................5-65
System temporarily unavailable .............5-66
System malfunction ......................... 5-67
System maintenance .......................5-68
Automatic Emergency Braking (AEB) with
Pedestrian Detection (if so equipped) ...........5-69
AEB with Pedestrian Detection system
operation ................................... 5-70
Turning the AEB with Pedestrian
Detection system on/off ....................5-72
AEB with Pedestrian Detection system
limitations ..................................5-74
System temporarily unavailable .............5-76
System malfunction ......................... 5-78
System maintenance .......................5-78Intelligent Forward Collision Warning (I-FCW) . . . 5-80
I-FCW system operation .....................5-82
Turning the I-FCW system on/off ............5-82
I-FCW system limitations ....................5-84
System temporarily unavailable .............5-88
System malfunction ......................... 5-90
System maintenance .......................5-90
Intelligent Driver Alertness (I-DA)
(if so equipped) ................................. 5-92
Intelligent Driver Alertness system
operation ................................... 5-92
How to enable/disable the Intelligent
Driver Alertness (I-DA) system ...............5-93
Intelligent Driver Alertness (I-DA)
system limitations .......................... 5-94
Break-in schedule .............................. 5-94
Fuel efficient driving tips ........................5-95
Increasing fuel economy .......................5-96
Parking/parking on hills ........................5-96
P
ower steering ................................. 5-97
Brake system .................................. 5-98
Brake precautions ........................... 5-98
Anti-lock Braking System (ABS) ..............5-99
Brake Assist ................................ 5-100
Page 275 of 500

Vehicle Dynamic Control (VDC) system........5-100
Brake force distribution ....................5-102
Chassis Control (if so equipped) ...............5-103
Intelligent Trace Control (I-TC) ..............5-103
Intelligent Engine Brake (I-EB) ...............5-103
Active Ride Control (ARC) ...................5-104
Hill start assist system ........................5-104
Rear Sonar System (RSS) (if so equipped) ......5-105
System operation .......................... 5-106
How to enable/disable the sonar
system ..................................... 5-108
Sonar limitations ........................... 5-109System temporarily unavailable
............5-110
System maintenance ......................5-110
Cold weather driving ........................... 5-111
Freeing a frozen door lock ...................5-111
Antifreeze ................................... 5-111
Battery...................................... 5-111
Draining of coolant water ...................5-111
Tire equipment .............................. 5-111
Special winter equipment ..................5-112
Driving on snow or ice ......................5-112
Parking brake .............................. 5-112
Engine block heater (if so equipped) ........5-112
Page 280 of 500

FCC Notice:
For USA:
This device complies with Part 15 of the
FCC Rules. Operation is subject to the fol-
lowing two conditions: (1) This device
may not cause harmful interference, and
(2) this device must accept any interfer-
ence received, including interference
that may cause undesired operation.
NOTE:
Changes or modifications not ex-
pressly approved by the party re-
sponsible for compliance could void
the user's authority to operate the
equipment.
For Canada:
This device complies with Industry
Canada licence-exempt RSS standard(s).
Operation is subject to the following two
conditions: (1) this device may not cause
interference, and (2) this device must ac-
cept any interference, including interfer-
ence that may cause undesired opera-
tion of the device.
TPMS with Easy-Fill Tire Alert
When adding air to an under-inflated tire,
the TPMS with Easy-Fill Tire Alert provides
visual and audible signals outside the ve-
hicle to help you inflate the tires to the rec-
ommended COLD tire pressure.
Vehicle set-up
1. Park the vehicle in a safe and level place.
2. Apply the parking brake and place theshif t lever in the P (Park) position.
3. Place the ignition switch in the ON posi- tion. Do not start the engine.
Operation
1. Add air to the tire.
2. Af ter a few seconds, the hazard indica- tors will start flashing.
3. When the designated pressure is reached, the horn beeps once and the
hazard indicators stop flashing.
4. Perform the above steps for each tire. • If the tire is over-inflated more thanapproximately 4 psi (30 kPa), the horn
beeps and the hazard indicators flash
three times. To correct the pressure,
push the core of the valve stem on the
tire briefly to release pressure. When the pressure reaches the designated
pressure, the horn beeps once.
• If the hazard indicator does not flash within approximately 15 seconds af ter
starting to inflate the tire, it indicates
that the Easy-Fill Tire Alert is not oper-
ating.
• The TPMS will not activate the Easy-Fill Tire Alert under the following condi-
tions:– If there is interference from an exter- nal device or transmitter.
– The air pressure from the inflation device is not sufficient to inflate the
tire.
– There is a malfunction in the TPMS.
– There is a malfunction in the horn or hazard indicators.
– The identification code of the tire pressure sensor is not registered to
the system.
– The battery of the tire pressure sen- sor is low.
• If the Easy-Fill Tire Alert does not oper- ate due to TPMS interference, move
the vehicle about 3 f t (1 m) backward
or forward and try again.
If the Easy-Fill Tire Alert is not working, use a
tire pressure gauge.
5-8Starting and driving
Page 286 of 500

(Af ter step 3 is performed, when the ig-
nition switch is pushed without de-
pressing the brake pedal, the ignition
switch position will change to ON.)
4. Push the ignition switch while depress- ing the brake pedal within 10 seconds
af ter the chime sounds. The engine will
start.
NOTE:
• When the ignition switch is pushed tothe ON position or the engine is started
by the above procedure, the Intelligent
Key battery discharge indicator ap-
pears in the vehicle information dis-
play (if so equipped) even when the In-
telligent Key is inside the vehicle. This
is not a malfunction. To turn off the In-
telligent Key battery discharge indica-
tor, touch the ignition switch with the
Intelligent Key again.
• If the Intelligent Key battery discharge indicator appears, replace the battery
as soon as possible. For additional in-
formation, refer to “Battery replace-
ment” in the “Do-it-yourself ” section of
this manual.
NISSAN ANTI-THEFT SYSTEM
(NATS) (if so equipped)
The NISSAN Anti-Thef t System (NATS) will
not allow the engine to start without the
use of the registered NATS key.
If the engine does not start by using the
registered NATS key, it may be due to inter-
ference caused by:
• Another NATS key.
• An automated toll road device.
• An automated payment device.
• Other devices that transmit similar sig-nals.
Start the engine using the following proce-
dure:
1. Remove any items that may be causing the interference away from the NATS key.
2. Leave the ignition switch in the ON posi- tion for approximately 5 seconds.
3. Place the ignition switch in the OFF or LOCK position, and wait approximately
10 seconds.
4. Repeat steps 2 and 3.
5. Start the engine.
6. Repeat the steps above until all possible interferences are eliminated. If this procedure allows the engine to start,
NISSAN recommends placing the regis-
tered NATS key separate from other de-
vices to avoid interference.
NISSAN VEHICLE IMMOBILIZER
SYSTEM
The NISSAN Vehicle Immobilizer System
will not allow the engine to start without
the use of the registered key.
If the engine fails to start using a registered
key (for example, when interference is
caused by another registered key, an auto-
mated toll road device or automatic pay-
ment device on the key ring), restart the
engine using the following procedures:
1. Leave the ignition switch in the ON posi-
tion for approximately 5 seconds.
2. Turn the ignition switch to the OFF or LOCK position, and wait approximately
10 seconds.
3. Repeat steps 1 and 2.
4. Restart the engine while holding the de- vice (which may have caused the inter-
ference) separate from the registered
key.
5-14Starting and driving