2022 NISSAN ARMADA seat adjustment
[x] Cancel search: seat adjustmentPage 70 of 604
1-52Safety — seats, seat belts and supplemental restraint system
LRS0453
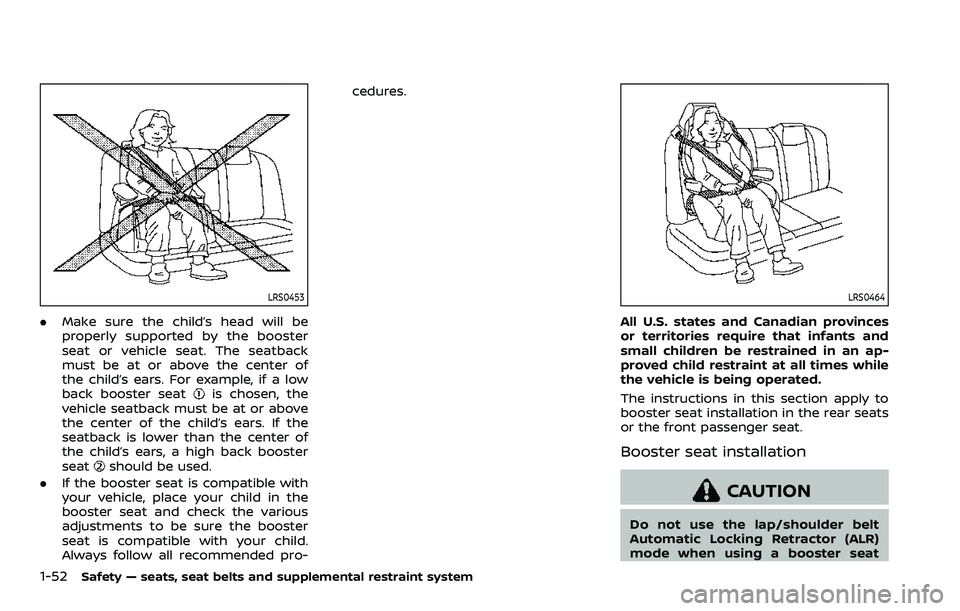
.Make sure the child’s head will be
properly supported by the booster
seat or vehicle seat. The seatback
must be at or above the center of
the child’s ears. For example, if a low
back booster seat
is chosen, the
vehicle seatback must be at or above
the center of the child’s ears. If the
seatback is lower than the center of
the child’s ears, a high back booster
seat
should be used.
. If the booster seat is compatible with
your vehicle, place your child in the
booster seat and check the various
adjustments to be sure the booster
seat is compatible with your child.
Always follow all recommended pro- cedures.
LRS0464
All U.S. states and Canadian provinces
or territories require that infants and
small children be restrained in an ap-
proved child restraint at all times while
the vehicle is being operated.
The instructions in this section apply to
booster seat installation in the rear seats
or the front passenger seat.
Booster seat installation
CAUTION
Do not use the lap/shoulder belt
Automatic Locking Retractor (ALR)
mode when using a booster seat
Page 71 of 604
with the seat belts.
Refer to all Warnings and Cautions in the
“Child safety”, “Child restraints” and “Boos-
ter seats” sections earlier in this section
before installing a child restraint.
Follow these steps to install a booster
seat in the rear seat or in the front
passenger seat:
SSS0640
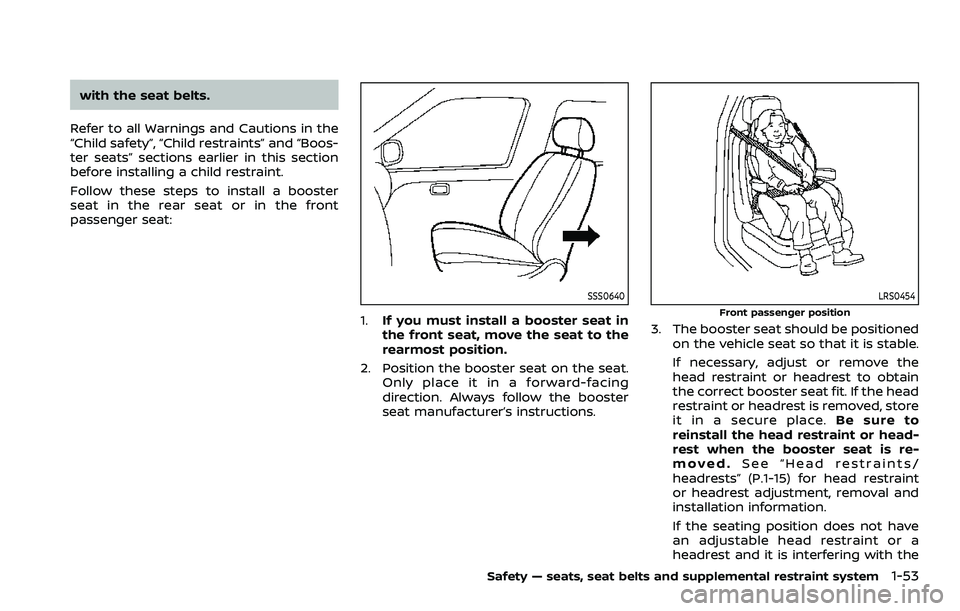
1. If you must install a booster seat in
the front seat, move the seat to the
rearmost position.
2. Position the booster seat on the seat. Only place it in a forward-facing
direction. Always follow the booster
seat manufacturer’s instructions.
LRS0454
Front passenger position
3. The booster seat should be positioned
on the vehicle seat so that it is stable.
If necessary, adjust or remove the
head restraint or headrest to obtain
the correct booster seat fit. If the head
restraint or headrest is removed, store
it in a secure place. Be sure to
reinstall the head restraint or head-
rest when the booster seat is re-
moved. See “Head restraints/
headrests” (P.1-15) for head restraint
or headrest adjustment, removal and
installation information.
If the seating position does not have
an adjustable head restraint or a
headrest and it is interfering with the
Safety — seats, seat belts and supplemental restraint system1-53
Page 189 of 604
3 Pre-driving checks and adjustments
Keys ........................................................................\
................................. 3-2Intelligent Key ........................................................................\
... 3-2
Valet hand-off ........................................................................\
... 3-4
Doors ........................................................................\
.............................. 3-4 Locking with mechanical key ...................................... 3-4
Opening and closing windows with the
mechanical key ........................................................................\
3-5
Locking with inside lock knob ..................................... 3-5
Locking with power door lock switch ................... 3-5
Automatic door locks ......................................................... 3-6
Child safety rear door lock ........................................... 3-6
Intelligent Key system .............................................................. 3-7 Intelligent Key operating range ................................. 3-9
Door locks/unlocks precaution .................................. 3-9
Intelligent Key operation .............................................. 3-10
Battery saver system ....................................................... 3-12
Warning signals .................................................................... 3-12
Troubleshooting guide ................................................... 3-13
Remote keyless entry system ......................................... 3-15 How to use remote keyless entry system ...... 3-16
Remote engine start (if so equipped) ....................... 3-19 Remote engine start operating range ............... 3-19
Remote starting the engine ....................................... 3-19
Extending engine run time ......................................... 3-20 Canceling a remote engine start ........................ 3-20
Conditions the remote engine start will
not work ........................................................................\
.......... 3-20
Hood ........................................................................\
............................ 3-21
Liftgate ........................................................................\
...................... 3-22 Operating manual liftgate ......................................... 3-22
Operating power liftgate (if so equipped) ...... 3-22
Auto closure ........................................................................\
3-25
Liftgate release lever ..................................................... 3-26
Fuel-filler door ........................................................................\
..... 3-26
Opening the fuel-filler door ...................................... 3-26
Fuel-filler cap ....................................................................... 3-26
Tilt/telescopic steering ........................................................ 3-29
Electric operation ............................................................. 3-29
Sun visors ........................................................................\
................ 3-29
Mirrors ........................................................................\
........................ 3-30
Inside mirror ........................................................................\
. 3-30
Outside mirrors .................................................................. 3-38
Vanity mirror ........................................................................\
3-40
Memory seat (if so equipped) ......................................... 3-40
Entry/exit function .......................................................... 3-40
Memory storage ................................................................ 3-41
Setting memory function ........................................... 3-42
System operation ............................................................. 3-42
Page 192 of 604
3-4Pre-driving checks and adjustments
CAUTION
Always carry the mechanical key
installed in the Intelligent Key.
VALET HAND-OFF
When you have to leave a key with a valet,
give them the Intelligent Key itself and
keep the mechanical key with you to
protect your belongings.
To prevent the glove box from being
opened during valet hand-off, follow the
procedures below.
1. Remove the mechanical key from theIntelligent Key.
2. Lock the glove box with the mechan- ical key.
3. Hand the Intelligent Key to the valet, keeping the mechanical key in your
pocket or bag for insertion into the
Intelligent Key when you retrieve your
vehicle.
See “Storage” (P.2-69).
WARNING
. Always have the doors locked
while driving. Along with the use
of seat belts, this provides great-
er safety in the event of an
accident by helping to prevent
persons from being thrown from
the vehicle. This also helps keep
children and others from unin-
tentionally opening the doors,
and will help keep out intruders.
. Before opening any door, always
look for and avoid oncoming
traffic.
. To help avoid risk of injury or
death through unintended opera-
tion of the vehicle and or its
systems, including entrapment
in windows or inadvertent door
lock activation, do not leave chil-
dren, people who require the
assistance of others or pets un-
attended in your vehicle. Addi-
tionally, the temperature inside a
closed vehicle on a warm day can
quickly become high enough to
cause a significant risk of injury
or death to people and pets.
SPA2457B
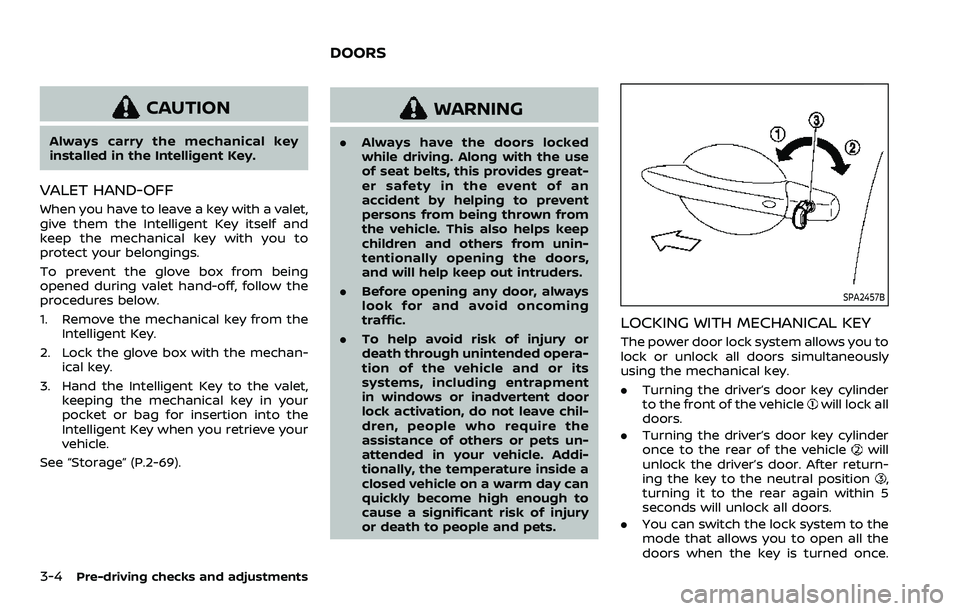
LOCKING WITH MECHANICAL KEY
The power door lock system allows you to
lock or unlock all doors simultaneously
using the mechanical key.
.Turning the driver’s door key cylinder
to the front of the vehicle
will lock all
doors.
. Turning the driver’s door key cylinder
once to the rear of the vehicle
will
unlock the driver’s door. After return-
ing the key to the neutral position
,
turning it to the rear again within 5
seconds will unlock all doors.
. You can switch the lock system to the
mode that allows you to open all the
doors when the key is turned once.
DOORS
Page 201 of 604
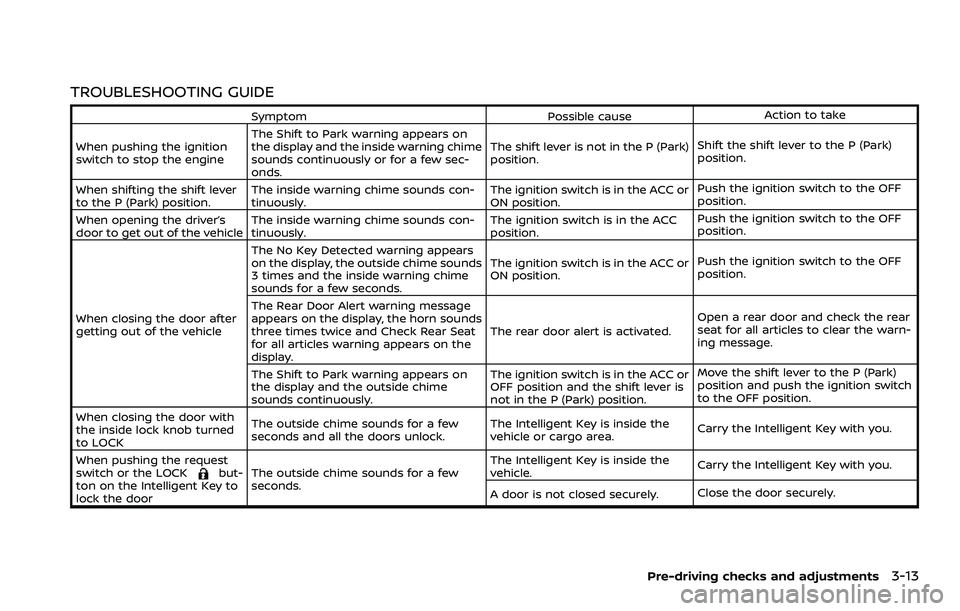
TROUBLESHOOTING GUIDE
SymptomPossible causeAction to take
When pushing the ignition
switch to stop the engine The Shift to Park warning appears on
the display and the inside warning chime
sounds continuously or for a few sec-
onds. The shift lever is not in the P (Park)
position.
Shift the shift lever to the P (Park)
position.
When shifting the shift lever
to the P (Park) position. The inside warning chime sounds con-
tinuously. The ignition switch is in the ACC or
ON position.Push the ignition switch to the OFF
position.
When opening the driver’s
door to get out of the vehicle The inside warning chime sounds con-
tinuously. The ignition switch is in the ACC
position.Push the ignition switch to the OFF
position.
When closing the door after
getting out of the vehicle The No Key Detected warning appears
on the display, the outside chime sounds
3 times and the inside warning chime
sounds for a few seconds.
The ignition switch is in the ACC or
ON position.
Push the ignition switch to the OFF
position.
The Rear Door Alert warning message
appears on the display, the horn sounds
three times twice and Check Rear Seat
for all articles warning appears on the
display. The rear door alert is activated.
Open a rear door and check the rear
seat for all articles to clear the warn-
ing message.
The Shift to Park warning appears on
the display and the outside chime
sounds continuously. The ignition switch is in the ACC or
OFF position and the shift lever is
not in the P (Park) position.Move the shift lever to the P (Park)
position and push the ignition switch
to the OFF position.
When closing the door with
the inside lock knob turned
to LOCK The outside chime sounds for a few
seconds and all the doors unlock.
The Intelligent Key is inside the
vehicle or cargo area.
Carry the Intelligent Key with you.
When pushing the request
switch or the LOCK
but-
ton on the Intelligent Key to
lock the door The outside chime sounds for a few
seconds. The Intelligent Key is inside the
vehicle.
Carry the Intelligent Key with you.
A door is not closed securely. Close the door securely.
Pre-driving checks and adjustments3-13
Page 217 of 604

WARNING
.Do not adjust the steering wheel
while driving. You could lose con-
trol of your vehicle and cause an
accident.
. Do not adjust the steering wheel
any closer to you than is neces-
sary for proper steering opera-
tion and comfort. The driver’s air
bag inflates with great force. If
you are unrestrained, leaning for-
ward, sitting sideways or out of
position in any way, you are at
greater risk of injury or death in a
crash. You may also receive ser-
ious or fatal injuries from the air
bag if you are up against it when
it inflates. Always sit back against
the seatback and as far away as
practical from the steering wheel.
Always use the seat belts.
SPA2754
ELECTRIC OPERATION
Tilt or telescopic operation
Move the leverto adjust the steering
wheel up or down, forward or rearward to
the desired position.
Entry/Exit function operation (if so
equipped):
The memory seat system will make the
steering wheel move up automatically
when the driver’s door is opened with
the ignition switch in the LOCK position.
This lets the driver get into and out of the
seat more easily.
For more information, see “Memory seat”
(P.3-40).
SIC3451
Pre-driving checks and adjustments3-29
TILT/TELESCOPIC STEERING SUN VISORS
Page 219 of 604

SPA2450-A
Automatic anti-glare type (if so
equipped)
The inside mirror is designed so that it
automatically changes reflection accord-
ing to the intensity of the headlights of
the following vehicle.
The anti-glare system will be automati-
cally turned on when the ignition switch is
placed in the ON position.
When the anti-glare system is turned on,
the indicator light
will illuminate and
excessive glare from the headlights of the
vehicle behind you will be reduced.
Push the “*” switch
to make the inside
rearview mirror operate normally. The indicator light will turn off. Push the “I”
switch
to turn the system on.
Do not allow any object to cover the
sensors
or apply glass cleaner on
them. Doing so will reduce the sensitiv-
ity of the sensor, resulting in improper
operation.
For the HomeLink® Universal Transceiver
operation, see “HomeLink® Universal
Transceiver (Type A)” (P.2-83).
Intelligent Rear View Mirror (if so
equipped)
WARNING
Failure to follow the warnings and
instructions for proper use of the
Intelligent Rear View Mirror could
result in serious injury or death.
. The Intelligent Rear View Mirror is
a convenience feature but it is not
a substitute for proper vehicle
operation. The system has areas
where objects cannot be viewed.
Check the blind spot of the In-
telligent Rear View Mirror before
vehicle operation. The driver is
always responsible for safe driv-
ing. .
Do not disassemble or modify the
Intelligent Rear View Mirror, the
camera unit or wirings. If you do,
it may result in accidents or fire.
In case you notice smoke or smell
coming from the Intelligent Rear
View Mirror, stop using the sys-
tem immediately. It is recom-
mended that you see a NISSAN
dealer for servicing.
. Do not operate the Intelligent
Rear View Mirror while driving.
Doing so can be a distraction
and it could lose control of your
vehicle and cause an accident or
serious injury.
. Do not gaze into the Intelligent
Rear View Mirror display during
driving. It may cause a distraction
and it could lose control of your
vehicle and cause an accident or
serious injury.
. Do not put a cigarette or flames
to the Intelligent Rear View Mir-
ror, the camera unit or wirings. It
may cause a fire.
. Be sure to adjust the Intelligent
Rear View Mirror before driving.
Switch the system to the conven-
tional rearview mirror mode and
be properly seated on the driver’s
Pre-driving checks and adjustments3-31
Page 220 of 604

3-32Pre-driving checks and adjustments
seat. Then adjust the mirror so as
to see the rear window properly.
Driving without adjusting the mir-
ror may cause difficulty in watch-
ing the display at Intelligent Rear
View Mirror mode (camera view
mode) due to the reflection from
the surface of the mirror.
. If the Intelligent Rear View Mirror
malfunctions, immediately switch
the system to the conventional
rearview mirror mode.
. When strong light (for example,
sunlight or high beams from fol-
lowing vehicles) enters the cam-
era, a light beam or a glaring light
may appear on the monitor
screen of the Intelligent Rear
View Mirror. In that case, switch
the system to the conventional
rearview mirror mode appropri-
ately.
. If dirt, rain or snow accumulates
on the exterior glass surface cov-
ering the camera, the Intelligent
Rear View Mirror may not display
objects clearly. Use of the rear
window wiper/washer may im-
prove visibility, but if not, switch
the Intelligent Rear View Mirror to
the conventional rearview mirror
mode until a time the glass cov- ering the camera can be cleaned.
WAD0190X
MENU buttonLeft buttonRight buttonMode select leverHomeLink® buttons (1-3)
Components:
Intelligent Rear View Mirror provides a
clear rearview from a camera located on
the rear of the vehicle. Intelligent Rear
View Mirror has two modes: conventional
rearview mirror mode and Intelligent Rear
View Mirror mode (camera view mode).
You can switch these two modes by the
mode select lever
.
When the Intelligent Rear View Mirror
mode is selected, the indicator
is