2022 NISSAN ARMADA lock
[x] Cancel search: lockPage 276 of 604

4-46Monitor, heater, air conditioner, audio, phone and voice recognition systems
.3.5mm Stereo Headphone Output
. Front Panel Capacitive Touch Controls
. Infrared Wireless Headphones
. Full-Function Slimline Remote Control
. Monitor Screen Sharing
WAE0712X
GETTING STARTED
Turning the monitor on or off
1. Press thebuttonon the top of
the monitor or the remote control to
turn the monitor on or off. When in
use, the front panel controls will
illuminate.
2. After the monitor has been turned on and is displaying a picture, the up/
down viewing angle can be adjusted
to optimize the picture quality. Press
the push-button latch
located on
the top of the monitor to pivot the
screen.
Power up tips
1. After the ignition switch is placed in the ON position, there is a 12 second
delay before the monitor
(power)
button is operable.
2. On some vehicles after the ignition is turned off, the system will continue to
work for 10 minutes, or until the
driver’s door is opened.
3. Remember to turn the monitor off and pivot the screen to the locked
(latched) position when not in use.
Audio options
Wireless headphones
Each monitor includes a built-in dual
channel infrared transmitter for use with
wireless headphones. The wireless head-
phones must be used within a line of
sight from the transmitter as infrared
signals, like visible light, travel only in a
straight line.
How to use the wireless headphones
When placing the headphones on your
head, make sure to observe the left and
right orientation. The headphones must
be oriented correctly (facing forward) to
receive the audio signal. Press the
(power) button on the headphones, then
select channel “A” to listen to monitor A,
or channel “B” to listen to monitor B.
Page 280 of 604
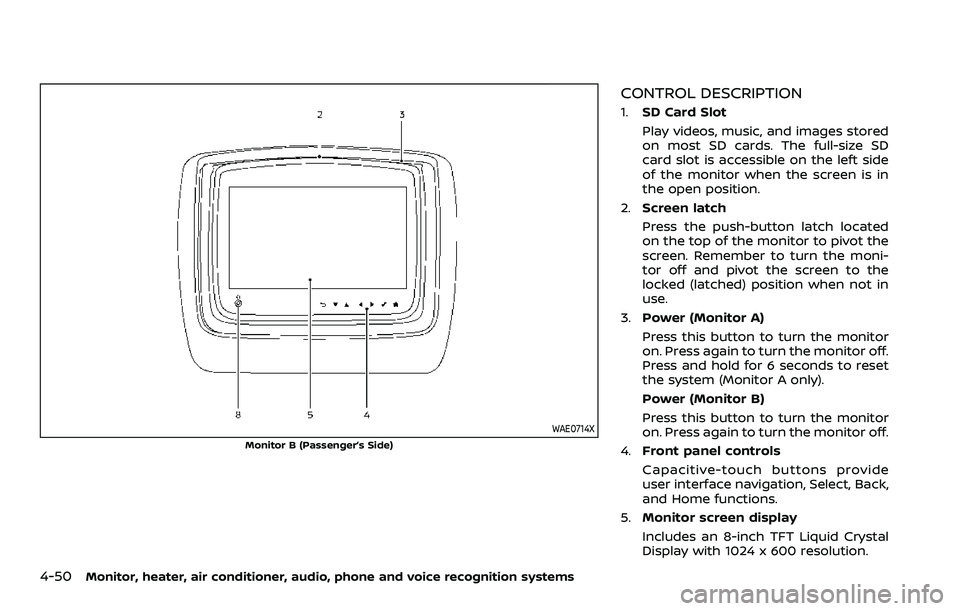
4-50Monitor, heater, air conditioner, audio, phone and voice recognition systems
WAE0714X
Monitor B (Passenger’s Side)
CONTROL DESCRIPTION
1.SD Card Slot
Play videos, music, and images stored
on most SD cards. The full-size SD
card slot is accessible on the left side
of the monitor when the screen is in
the open position.
2. Screen latch
Press the push-button latch located
on the top of the monitor to pivot the
screen. Remember to turn the moni-
tor off and pivot the screen to the
locked (latched) position when not in
use.
3. Power (Monitor A)
Press this button to turn the monitor
on. Press again to turn the monitor off.
Press and hold for 6 seconds to reset
the system (Monitor A only).
Power (Monitor B)
Press this button to turn the monitor
on. Press again to turn the monitor off.
4. Front panel controls
Capacitive-touch buttons provide
user interface navigation, Select, Back,
and Home functions.
5. Monitor screen display
Includes an 8-inch TFT Liquid Crystal
Display with 1024 x 600 resolution.
Page 281 of 604
6.HDMI port
Connect an external audio/video
source using a full-size HDMI connec-
tor. Supports MHL 2.0 playback and
charging.
7. USB 2.0 port
Play videos, music, and images stored
on most USB devices. Provides up to 2
amps of output to charge most mo-
bile devices.
8. Headphone output jack
Connect wired headphones using a
1/8 in (3.5 mm) stereo connector.
CAUTION
.Do not use any harsh solvents or
chemicals when cleaning the
monitor.
. Do not use any abrasive cleaners
that may scratch the screen. Use
only a lightly dampened lint free
cloth to wipe the screen if it is
dirty.
. The LCD display screen is not
touchscreen. Do not put pressure
or add suction cups on the
screen. .
Caution children to avoid touch-
ing or scratching the screen, as it
may become dirty or damaged.
. Place the monitor in the fully
closed position when not in use.
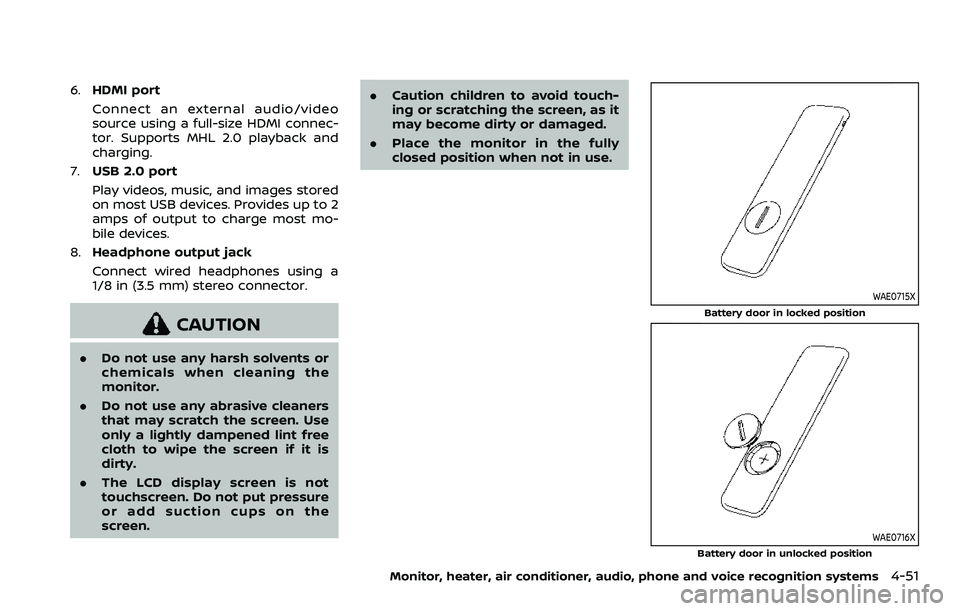
WAE0715X
Battery door in locked position
WAE0716X
Battery door in unlocked position
Monitor, heater, air conditioner, audio, phone and voice recognition systems4-51
Page 282 of 604
4-52Monitor, heater, air conditioner, audio, phone and voice recognition systems
REMOTE CONTROL OPERATION
Before use
Before attempting to operate your re-
mote control, turn the remote control
face down and remove the battery in-
sulator by pulling the clear plastic tab
away from the remote control.
Replacing the battery
1. Turn the remote control face down.Use a coin to turn the battery cover
counter-clockwise and remove it.
2. Replace the battery with a CR2032 or equivalent. Make sure that proper
polarity is observed. The positive (+)
side of the battery should face up-
wards.
3. Place the cover back into position and turn it clockwise until it locks into
place.
The remote control will only operate this
device. It is not a universal remote control
and will not control other equipment.
WARNING
Keep the battery out of the reach of
children. In case the battery is acci-
dentally swallowed, immediately
consult a doctor. Also, when dispos-
ing of used batteries, please comply with governmental regulations or
environmental public institution
rules that apply in your country/
area.
CAUTION
.
Always ensure that the battery is
inserted in the correct direction
as shown in the battery compart-
ment.
. When the battery fails to function,
replace it immediately.
. Remove the battery if the remote
control is not used for a month or
longer.
. Storage in extreme cold can
weaken the battery. Keep the
remote control stored in a cool,
dry place.
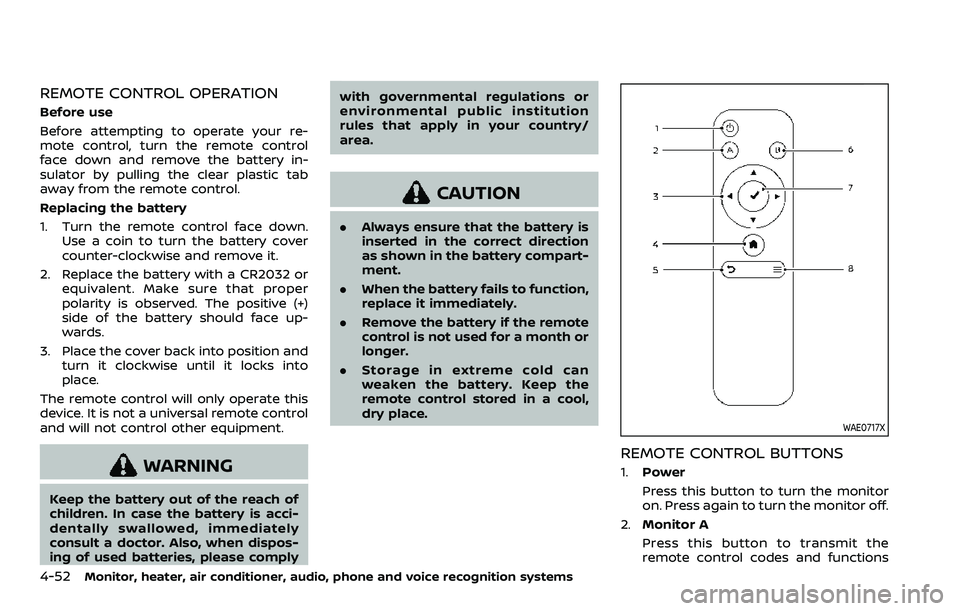
WAE0717X
REMOTE CONTROL BUTTONS
1.Power
Press this button to turn the monitor
on. Press again to turn the monitor off.
2. Monitor A
Press this button to transmit the
remote control codes and functions
Page 306 of 604

4-76Monitor, heater, air conditioner, audio, phone and voice recognition systems
TROUBLESHOOTING
SymptomRemedy
Monitor does not power on Verify the vehicle is in the ON or ACC position.
Verify the battery is installed correctly in the remote control.
Verify the in-line fuse protection is good. Refer to the RSI system installation instructions for vehicle-
specific fuse location.
Monitor front panel controls flash red For further diagnosis, it is recommended that you visit a NISSAN dealer.
System frozen - will not respond Soft reset the system by pressing and holding the power button on the top of the driver side monitor
for 5 seconds.
Hard reset the system by turning the ignition off, then back on.
No picture Check that the signal source is connected.
Check the menu source setting. Match your monitor mode with the source correctly.
No sound or distorted sound Make sure that the external media device is connected properly, and all cables are securely inserted
into the appropriate jacks.
Verify that the batteries in the headphones are fresh.
If you are using the wireless headphones, make sure you turn on the power and select the correct
monitor (A or B).
Verify the volume is turned up on headphones and the system.
Verify nothing is blocking the path between the monitor IR sensor and headphones.
When placing the headphones on your head, make sure to observe the Left and Right orientation. The
headphones must be oriented correctly (facing forward) to receive the audio signal.
Monitor feels warm When the monitor is in use for a long period of time, the surface will be warm. This is normal.
Cannot connect mobile device to the
internal RSI Wi-Fi network Check to make sure Wi-Fi is enabled on the mobile device.
Check to make sure RSI is set to Access Point mode.
Check to make sure the correct password is used. For additional information, see “Using Wi-Fi” (P.4-70).
Cannot connect RSI system to an external
Wi-Fi network Check to make sure RSI is set to Client Mode. Check to make sure the correct password is used. For
additional information, see “Using Wi-Fi” (P.4-70).
Cannot establish a Bluetooth
®connection Check to make sure Bluetooth®is enabled on the RSI system. For additional information, see
“Bluetooth® streaming” (P.4-74).
Page 315 of 604
Rear Automatic Braking (RAB) .................................... 5-116RAB system operation ................................................ 5-118
Turning the RAB system ON/OFF ...................... 5-119
RAB system limitations .............................................. 5-119
System malfunction ...................................................... 5-121
System maintenance ................................................... 5-122
Break-in schedule ................................................................. 5-122
Fuel efficient driving tips ................................................. 5-123
Increasing fuel economy ................................................. 5-124
NISSAN all-mode 4WD® (if so equipped) ............. 5-124 NISSAN all-mode 4WD® system ........................... 5-125
4WD shift switch .............................................................. 5-129
4WD shift indicator ........................................................ 5-130
4WD warning light ......................................................... 5-130
Hill Start Assist system ...................................................... 5-132
Parking/parking on hills ................................................... 5-133
TOW mode ........................................................................\
.......... 5-134
SNOW mode ........................................................................\
....... 5-135
Front and rear sonar system (if
so equipped) ........................................................................\
...... 5-136 System operation ........................................................... 5-137
Sonar function settings ............................................. 5-137
Turning on and off the sonar function ......... 5-139 Sonar limitations ........................................................... 5-140
System temporarily unavailable ....................... 5-141
System maintenance ................................................ 5-141
Power steering ........................................................................\
5-141
Brake system ........................................................................\
... 5-142 Braking precautions ................................................... 5-142
Parking brake break-in ............................................ 5-142
Brake assist ........................................................................\
....... 5-143
Brake assist ....................................................................... 5-143
Anti-lock Braking System (ABS) ........................ 5-143
Vehicle Dynamic Control (VDC) system .............. 5-144
Vehicle Dynamic Control (VDC)
OFF switch ........................................................................\
. 5-146
Cold weather driving ......................................................... 5-146
Freeing a frozen door lock ................................... 5-146
Antifreeze ........................................................................\
.... 5-146
Battery ........................................................................\
........... 5-146
Draining of coolant water ..................................... 5-146
Tire equipment ............................................................... 5-147
Special winter equipment ..................................... 5-147
Driving on snow or ice ............................................. 5-147
Engine block heater (if so equipped) ........... 5-148
Page 325 of 604

WARNING
Do not operate the push-button
ignition switch while driving the ve-
hicle except in an emergency. (The
engine will stop when the ignition
switch is pushed 3 consecutive times
or the ignition switch is pushed and
held for more than 2 seconds.) If the
engine stops while the vehicle is
being driven, this could lead to a
crash and serious injury.
Before operating the push-button igni-
tion switch, be sure to move the shift
lever to the P (Park) position.
SSD0436
OPERATING RANGE FOR ENGINE
START FUNCTION
The operating range for starting the
engine inside the vehicleis shown in
the illustration.
. If the Intelligent Key is on the instru-
ment panel, cargo area, inside the
glove box or door pocket, or the
corner of interior compartment, it
may not be possible to start the
engine.
. If the Intelligent Key is near the door or
door glass outside the vehicle, it may
be possible to start the engine.
SSD1021
When the ignition switch is pushed with-
out depressing the brake pedal, the igni-
tion switch position will change as
follows:
.Push center once to change to ACC.
. Push center two times to change to
ON.
. Push center three times to change to
OFF. (No position illuminates.)
. Push center four times to return to
ACC.
. Open or close any door to return to
LOCK during the OFF position.
The ignition lock is designed so that the
ignition switch position cannot be
switched to LOCK until the shift lever is
Starting and driving5-13
PUSH-BUTTON IGNITION SWITCH
Page 326 of 604
5-14Starting and driving
moved to the P (Park) position.
When the ignition switch cannot be
pushed toward the LOCK position, pro-
ceed as follows:
1. Move the shift lever into the P (Park)position.
2. Push the ignition switch to the OFF position. The ignition switch position
indicator will not illuminate.
3. Open the door. The ignition switch will change to the LOCK position.
The shift lever can be moved from the P
(Park) position if the ignition switch is in
the ON position and the brake pedal is
depressed.
If the battery of the vehicle is dis-
charged, the push-button ignition
switch cannot be turned from the LOCK
position.
Some indicators and warnings for opera-
tion are displayed on the vehicle informa-
tion display between the speedometer
and tachometer. (See “Vehicle informa-
tion display” (P.2-20).)PUSH-BUTTON IGNITION SWITCH
POSITIONS
LOCK (Normal parking position)
The ignition switch can only be locked in
this position.
The ignition switch will be unlocked when
it is pushed to the ACC position while
carrying the Intelligent Key.
ACC (Accessories)
This position activates electrical acces-
sories such as the radio, when the engine
is not running.
ACC has a battery saver feature that will
turn the ignition switch to the OFF posi-
tion after a period of time under the
following conditions:
. all doors are closed.
. shift lever is in P (Park).
. turn signal/hazard indicator lights are
not flashing.
The battery saver feature will be can-
celled if any of the following occur:
. any door is opened.
. shift lever is moved out of P (Park).
. ignition switch changes position.
ON (Normal operating position)
This position turns on the ignition system
and electrical accessories.
ON has a battery saver feature that will
turn the ignition switch to the OFF posi-
tion, if the vehicle is not running, after
some time under the following condi-
tions:
. all doors are closed.
. shift lever is in P (Park).
. turn signal/hazard indicator lights are
not flashing.
The battery saver feature will be can-
celled if any of the following occur:
. any door is opened.
. shift lever is moved out of P (Park).
. ignition switch changes position.
OFF
The engine can be turned off in the
position.
The ignition lock is designed so that the
ignition switch cannot be switched to the
LOCK position until the shift lever is
moved to the P (Park) position.