Page 3 of 559
2
or
Electronic parking
brake warning
light (yellow) (if so
equipped)3
orBrake warning light (red)
orElectronic parking
brake warning light
(yellow) (if so equipped)
WARNING L")
Brake warning
light (red)2
or
Electronic parking
brake warning
light (yellow) (if so
equipped)3
orBrake warning light (red)
orElectronic parking
brake warning light
(yellow) (if so equipped)
WARNING LIGHTS
orBrake warning
light (red)
This light functions for both the parking
brake and the foot brake systems.
Parking brake indicator (if so equipped)
When the ignition switch is placed in the ON
position, the light comes on when the park-
ing brake is applied.
Low brake fluid warning light
When the ignition switch is placed in the ON
position, the light warns of a low brake fluid
level. If the light comes on while the engine is
running with the parking brake not applied,
stop the vehicle and perform the following:
1. Check the brake fluid level. Add brake
fluid as necessary. For additional infor-
mation, refer to “Brake fluid” in the “Do-
it-yourself ” section of this manual.2. If the brake fluid level is correct, have
the warning system checked. It is rec-
ommended that you visit a NISSAN
dealer for this service.
Page 4 of 559
Electronic parking
brake warning
light (yellow) (if so
equipped)
The electronic parking brake system warn-
ing light functions for the electronic park-
ing brake system. If the warning light illumi-
nates, it may indicate the electronic
parking brake system is not functioning
properly. Have the system checked. It is
recommended that you visit a NISSAN
dealer for this service.
For additional information, refer to
Page 5 of 559
CALIFORNIA PROPOSITION 65 WARNING
WARNING
Operating, servicing and maintaining a passenger
vehicle or off-highway motor vehicle can expose you to
chemicals including engine exhaust, carbon monoxide,
phthalates, and lead, which are known to the State of
California to cause cancer and birth defects or other
reproductive harm. To minimize exposure, avoid
breathing exhaust, do not idle the engine except as
necessary, service your vehicle in a well-ventilated area
and wear gloves or wash your hands frequently when
servicing your vehicle. For more information go to
www.P65Warnings.ca.gov/passenger-vehicle.
Page 6 of 559
 of driving pleasure.
Please read through this manual befor")
This manual was prepared to help you un-
derstand the operation and maintenance
of your vehicle so that you may enjoy many
miles (kilometers) of driving pleasure.
Please read through this manual before
operating your vehicle.
A separate Warranty Information Book-
let explains details about the warranties
covering your vehicle. The “Maintenance
and schedules” section of this manual
explains details about maintaining and
servicing your vehicle. Additionally, a
separate Customer Care/Lemon Law
Booklet (U.S. only) will explain how to re-
solve any concerns you may have with
your vehicle, and clarif y your rights un-
der your state’s lemon law.
When you require any service or have any
questions, a NISSAN dealer will be glad to
assist you with the extensive resources
available to them.
In addition to factory-installed options,
your vehicle may also be equipped with
additional accessories installed prior to de-
livery. It is recommended that you visit a
NISSAN dealer for details concerning the
particular accessories with which your ve-
hicle is equipped. It is important that you
familiarize yourself with all disclosures,warnings, cautions and instructions con-
cerning proper use of such accessories
prior to operating the vehicle and/or ac-
cessory. It is recommended that you visit a
NISSAN dealer for details concerning the
particular accessories with which your ve-
hicle is equipped.
Before driving your vehicle, please read this
Owner’s Manual carefully. This will ensure
familiarity with controls and maintenance
requirements assisting you in the safe op-
eration of your vehicle.
Page 39 of 559

∙ Be sure the seat belt tongue is se-curely fastened to the proper buckle.
∙ Do not wear the seat belt inside out or twisted. Doing so may reduce its
effectiveness.
∙ Do not allow more than one person to use the same seat belt.
∙ Never carry more people in the vehicle than there are seat belts.
∙ If the seat belt warning light glows continuously while the ignition is
turned ON with all doors closed and all
seat belts fastened, it may indicate a
malfunction in the system. Have the
system checked. It is recommended
that you visit a NISSAN dealer for this
service.
∙ No changes should be made to the seat belt system. For example, do not
modif y the seat belt, add material, or
install devices that may change the
seat belt routing or tension. Doing so
may affect the operation of the seat
belt system. Modif ying or tampering
with the seat belt system may result
in serious personal injury. ∙ Once seat belt pretensioner(s) have
activated, they cannot be reused and
must be replaced together with the
retractor. It is recommended that you
visit a NISSAN dealer for this service.
∙ All seat belt assemblies, including re- tractors and attaching hardware,
should be inspected af ter any colli-
sion. It is recommended that you visit
a NISSAN dealer for this service.
NISSAN recommends that all seat belt
assemblies in use during a collision be
replaced unless the collision was mi-
nor and the belts show no damage
and continue to operate properly.
Seat belt assemblies not in use during
a collision should also be inspected
and replaced if either damage or im-
proper operation is noted.
∙ All child restraints and attaching hardware should be inspected af ter
any collision. Always follow the re-
straint manufacturer’s inspection in-
structions and replacement recom-
mendations. The child restraints
should be replaced if they are
damaged.
SEAT BELT WARNING LIGHT AND
CHIME
The driver and front passenger seat is
equipped with an enhanced seat belt re-
minder function. If your vehicle is equipped
with an enhanced seat belt reminder func-
tion, a visual and audible alert will operate if
a driver or front passenger seat belt is un-
buckled at speeds of approximately 9 mph
(15 km/h) or more under the following con-
ditions:
∙ If the driver seat belt is not fastened.
Page 62 of 559
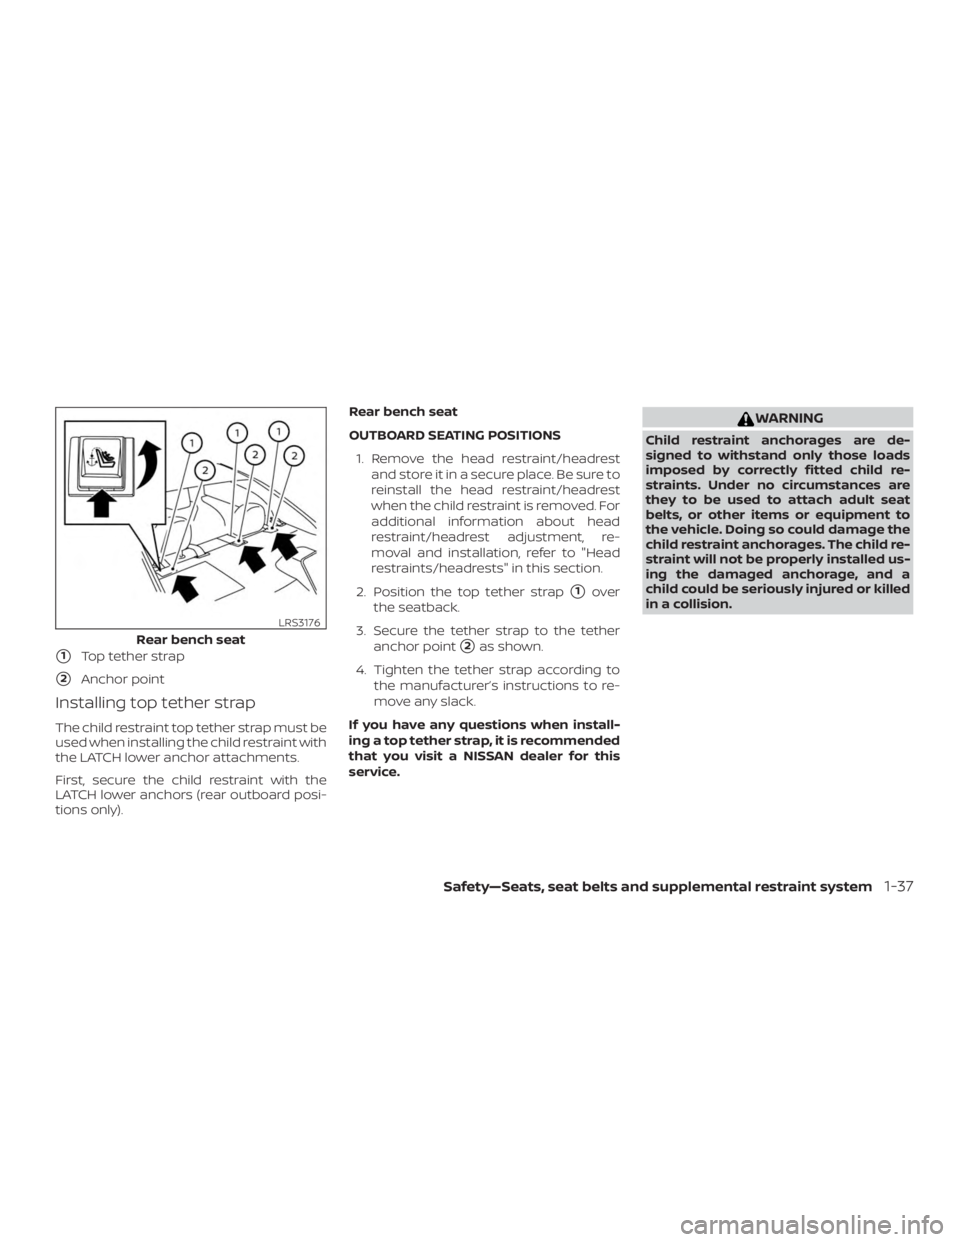
�1Top tether strap
�2Anchor point
Installing top tether strap
The child restraint top tether strap must be
used when installing the child restraint with
the LATCH lower anchor attachments.
First, secure the child restraint with the
LATCH lower anchors (rear outboard posi-
tions only).Rear bench seat
OUTBOARD SEATING POSITIONS
1. Remove the head restraint/headrest and store it in a secure place. Be sure to
reinstall the head restraint/headrest
when the child restraint is removed. For
additional information about head
restraint/headrest adjustment, re-
moval and installation, refer to "Head
restraints/headrests" in this section.
2. Position the top tether strap
�1over
the seatback.
3. Secure the tether strap to the tether anchor point
�2as shown.
4. Tighten the tether strap according to the manufacturer’s instructions to re-
move any slack.
If you have any questions when install-
ing a top tether strap, it is recommended
that you visit a NISSAN dealer for this
service.
Page 67 of 559

�1Top tether strap
�2Anchor point
Installing top tether strap
The child restraint top tether strap must be
used when installing the child restraint with
seat belts.
First, secure the child restraint with the seat
belt.Rear bench seat
OUTBOARD SEATING POSITIONS
1. Remove the head restraint/headrest and store it in a secure place. Be sure to
reinstall the head restraint/headrest
when the child restraint is removed. For
additional information about head
restraint/headrest adjustment, re-
moval and installation, refer to "Head
restraints/headrests" in this section.
2. Position the top tether strap
�1over
the seatback.
3. Secure the tether strap to the tether anchor point
�2as shown.
4. Tighten the tether strap according to the manufacturer’s instructions to re-
move any slack.
CENTER SEATING POSITION 1. Position the top tether strap
�1over the
seatback.
2. Secure the tether strap to the tether anchor point
�2as shown.
3. Tighten the tether strap according to the manufacturer’s instructions to re-
move any slack. If you have any questions when install-
ing a top tether strap, it is recommended
that you visit a NISSAN dealer for this
service.
Page 86 of 559

∙ A child restraint or other object pressingagainst the rear of the seatback.
∙ A rear passenger pushing or pulling on the back of the front passenger seat.
∙ Forcing the front seat or seatback against an object on the seat or floor
behind it.
∙ An object placed under the front pas- senger seat.
∙ An object placed between the seat cushion and center console.
If the vehicle is moving, please come to a
stop when it is safe to do so. Check and
correct any of the above conditions. Re-
start the vehicle and wait 1 minute.
NOTE:
A system check will be performed during
which the front passenger air bag status
light will remain lit for about 7 seconds
initially.
If the light is still OFF af ter this, the small
adult, child or child restraint should be re-
positioned in the rear seat and the vehicle
should be checked as soon as possible. It is
recommended that you visit a NISSAN
dealer for this service. 3. If the light is OFF with no front passen-
ger and no objects on the front pas-
senger seat, the vehicle should be
checked. It is recommended that you
visit a NISSAN dealer as soon as pos-
sible.
Other supplemental front-impact air
bag precautions
 (if so
equipped)
The electronic parking brake system warn-
ing light functions for the electronic park-
ing brake system. If the warning light illumi-
n")