2022 LINCOLN CORSAIR Ac drain
[x] Cancel search: Ac drainPage 225 of 676
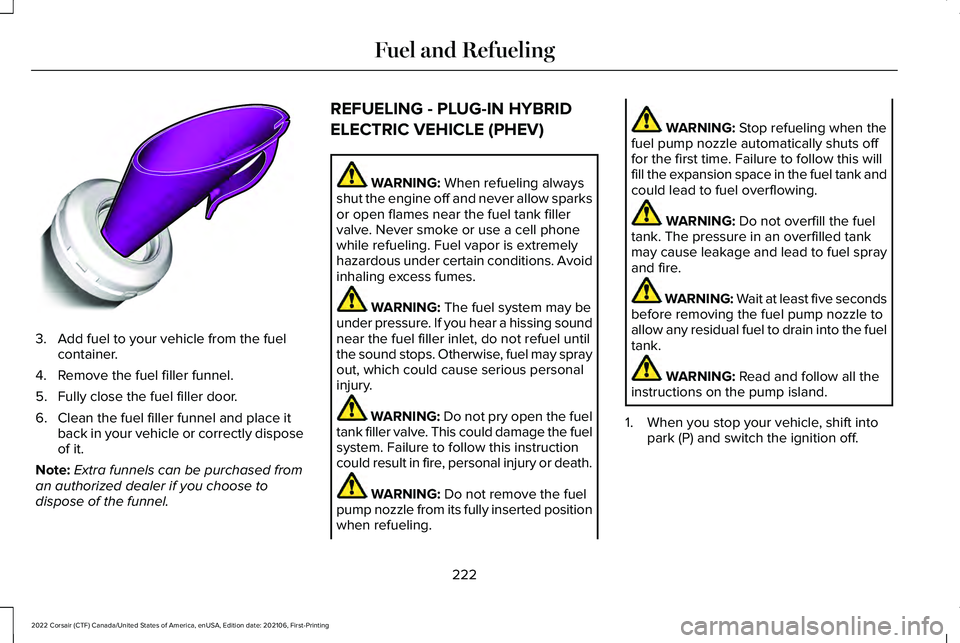
3. Add fuel to your vehicle from the fuel
container.
4. Remove the fuel filler funnel.
5. Fully close the fuel filler door.
6. Clean the fuel filler funnel and place it back in your vehicle or correctly dispose
of it.
Note: Extra funnels can be purchased from
an authorized dealer if you choose to
dispose of the funnel. REFUELING - PLUG-IN HYBRID
ELECTRIC VEHICLE (PHEV) WARNING: When refueling always
shut the engine off and never allow sparks
or open flames near the fuel tank filler
valve. Never smoke or use a cell phone
while refueling. Fuel vapor is extremely
hazardous under certain conditions. Avoid
inhaling excess fumes. WARNING:
The fuel system may be
under pressure. If you hear a hissing sound
near the fuel filler inlet, do not refuel until
the sound stops. Otherwise, fuel may spray
out, which could cause serious personal
injury. WARNING:
Do not pry open the fuel
tank filler valve. This could damage the fuel
system. Failure to follow this instruction
could result in fire, personal injury or death. WARNING:
Do not remove the fuel
pump nozzle from its fully inserted position
when refueling. WARNING:
Stop refueling when the
fuel pump nozzle automatically shuts off
for the first time. Failure to follow this will
fill the expansion space in the fuel tank and
could lead to fuel overflowing. WARNING:
Do not overfill the fuel
tank. The pressure in an overfilled tank
may cause leakage and lead to fuel spray
and fire. WARNING: Wait at least five seconds
before removing the fuel pump nozzle to
allow any residual fuel to drain into the fuel
tank. WARNING:
Read and follow all the
instructions on the pump island.
1. When you stop your vehicle, shift into park (P) and switch the ignition off.
222
2022 Corsair (CTF) Canada/United States of America, enUSA, Edition date: 202106, First-Printing Fuel and RefuelingE157452
Page 230 of 676
Refueling Your Vehicle
WARNING: When refueling always
shut the engine off and never allow sparks
or open flames near the fuel tank filler
valve. Never smoke or use a cell phone
while refueling. Fuel vapor is extremely
hazardous under certain conditions. Avoid
inhaling excess fumes. WARNING:
The fuel system may be
under pressure. If you hear a hissing sound
near the fuel filler inlet, do not refuel until
the sound stops. Otherwise, fuel may spray
out, which could cause serious personal
injury. WARNING:
Do not pry open the fuel
tank filler valve. This could damage the fuel
system. Failure to follow this instruction
could result in fire, personal injury or death. WARNING:
Do not remove the fuel
pump nozzle from its fully inserted position
when refueling. WARNING:
Stop refueling when the
fuel pump nozzle automatically shuts off
for the first time. Failure to follow this will
fill the expansion space in the fuel tank and
could lead to fuel overflowing. WARNING:
Do not overfill the fuel
tank. The pressure in an overfilled tank
may cause leakage and lead to fuel spray
and fire. WARNING: Wait at least five seconds
before removing the fuel pump nozzle to
allow any residual fuel to drain into the fuel
tank.
1. Fully open the fuel filler door.
2. Select the correct fuel pump nozzle for your vehicle. 3.
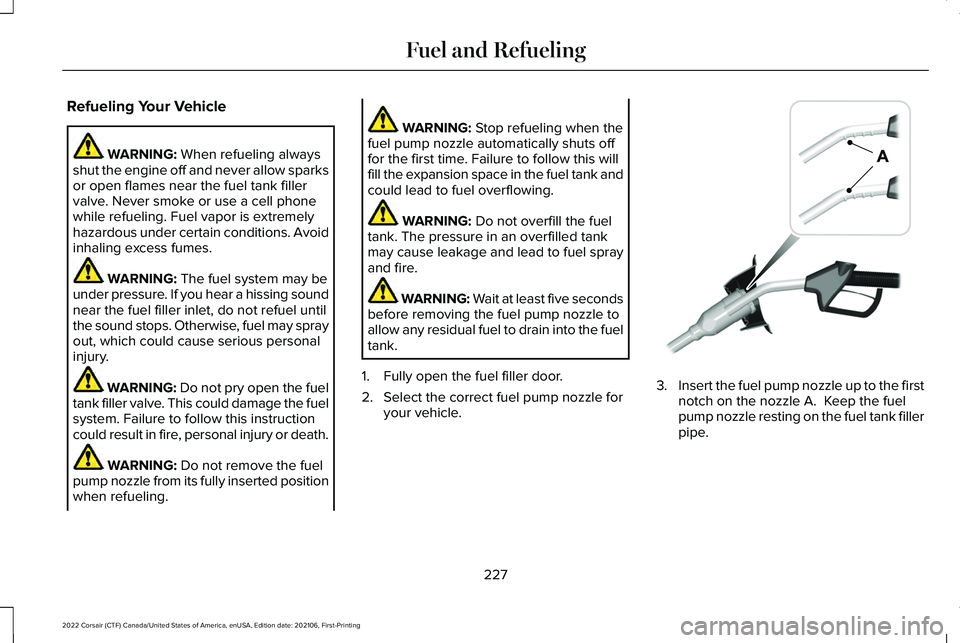
Insert the fuel pump nozzle up to the first
notch on the nozzle A. Keep the fuel
pump nozzle resting on the fuel tank filler
pipe.
227
2022 Corsair (CTF) Canada/United States of America, enUSA, Edition date: 202106, First-Printing Fuel and RefuelingE139202
Page 399 of 676

Engine oil filler cap: See Engine Oil Check (page 396).
D
Engine oil dipstick:
See Engine Oil Dipstick (page 396).
E
Brake fluid reservoir:
See Brake Fluid Check (page 405).
F
Power distribution box:
See Under Hood Overview (page 393).
G
Air filter assembly:
See Changing the Engine Air Filter (page 397).
H
ENGINE OIL DIPSTICK Minimum.
A
Nominal.
B
Maximum.
C ENGINE OIL CHECK
1. Make sure that your vehicle is on level
ground.
2. Check the oil level before starting the engine, or switch the engine off after
warm up and wait 10 minutes for the oil
to drain into the oil pan.
3. Remove the dipstick and wipe it with a clean, lint-free cloth.
4. Reinstall the dipstick and make sure it is
fully seated.
5. Remove the dipstick again to check the oil level. Note:
If the oil level is between the
maximum and minimum marks, the oil level
is acceptable. Do not add oil.
6. If the oil level is at the minimum mark, immediately add oil.
7. Reinstall the dipstick. Make sure it is fully
seated.
Note: The oil consumption of new engines
reaches its normal level after approximately
3,000 mi (5,000 km)
.
Adding Engine Oil WARNING:
Do not add engine oil
when the engine is hot. Failure to follow
this instruction could result in personal
injury.
396
2022 Corsair (CTF) Canada/United States of America, enUSA, Edition date: 202106, First-Printing MaintenanceE250320
Page 404 of 676
Note:
Automotive fluids are not
interchangeable. Take care not to put
engine coolant in the windshield washer fluid
reservoir or windshield washer fluid in the
engine coolant reservoir.
Note: Do not use stop leak pellets, cooling
system sealants, or non-specified additives
as they can cause damage to the engine
cooling or heating systems. Resulting
component damage may not be covered by
the vehicle Warranty.
It is very important to use prediluted coolant
approved to the correct specification in order
to avoid plugging the small passageways in
the engine cooling system. See Capacities
and Specifications (page 461). Do not mix
different colors or types of coolant in your
vehicle. Mixing of engine coolants or using
an incorrect coolant may harm the engine or
cooling system components and may not be
covered by the vehicle Warranty. Note:
If prediluted coolant is not available,
use the approved concentrated coolant
diluting it to 50/50 with distilled water.
See
Capacities and Specifications (page 461).
Using water that has not been deionised
may contribute to deposit formation,
corrosion and plugging of the small cooling
system passageways.
Note: Coolants marketed for all makes and
models may not be approved to our
specifications and may cause damage to
the cooling system. Resulting component
damage may not be covered by the vehicle
Warranty.
If the coolant level is at or below the
minimum mark, add prediluted coolant
immediately.
To top up the coolant level do the following:
1. Unscrew the cap slowly. Any pressure escapes as you unscrew the cap.
2. Add prediluted coolant approved to the correct specification. See Capacities and
Specifications
(page 461).
3. Add enough prediluted coolant to reach
the correct level. 4. Replace the coolant reservoir cap. Turn
the cap clockwise until it contacts the
hard stop.
5. Check the coolant level in the coolant reservoir the next few times you drive
your vehicle. If necessary, add enough
prediluted engine coolant to bring the
coolant level to the correct level.
If you have to add more than
1.1 qt (1 L) of
engine coolant per month, have your vehicle
checked as soon as possible. Operating an
engine with a low level of coolant can result
in engine overheating and possible engine
damage.
In case of emergency, you can add a large
amount of water without engine coolant in
order to reach a vehicle service location. In
this instance, qualified personnel:
1. Must drain the cooling system.
2. Chemically clean the coolant system.
3. Refill with engine coolant as soon as possible.
Water alone, without engine coolant, can
cause engine damage from corrosion,
overheating or freezing.
401
2022 Corsair (CTF) Canada/United States of America, enUSA, Edition date: 202106, First-Printing Maintenance
Page 411 of 676
Battery Management System (If Equipped)
The system monitors battery conditions and
takes actions to extend battery life. If
excessive battery drain is detected, the
system temporarily disables some electrical
systems to protect the battery.
Systems included are:
• Heated rear window.
• Heated seats.
• Climate control.
• Heated steering wheel.
• Audio unit.
• Navigation system.
A message may appear in the information
display to alert you that battery protection
actions are active. This message is only for
notification that an action is taking place, and
not intended to indicate an electrical problem
or that the battery requires replacement. After battery replacement, or in some cases
after charging the battery with an external
charger, the battery management system
requires eight hours of vehicle sleep time to
relearn the battery state of charge. During
this time, your vehicle must remain fully
locked with the ignition switched off.
Note:
Prior to relearning the battery state of
charge, the battery management system
may temporarily disable some electrical
systems.
Electrical Accessory Installation
To make sure the battery management
system works correctly, do not connect an
electrical device ground connection directly
to the battery negative post. This can cause
inaccurate measurements of the battery
condition and potential incorrect system
operation.
Note: If you add electrical accessories or
components to the vehicle, it may adversely
affect battery performance and durability.
This may also affect the performance of
other electrical systems in the vehicle. Remove and Reinstall the Battery
Install a battery approved for use by our
specifications.
See Capacities and
Specifications (page 461).
To disconnect or remove the battery, do the
following:
1. Apply the parking brake and switch the ignition off.
2. Switch all electrical equipment off, for example lights and radio.
3. Wait a minimum of two minutes before disconnecting the battery.
Note: The engine management system has
a power hold function and remains powered
for a period of time after you switch the
ignition off. This is to allow the system to
store diagnostic and adaptive tables.
Disconnecting the battery without waiting
can cause damage not covered by the
vehicle warranty.
4. Disconnect the negative battery cable terminal.
5. Disconnect the positive battery cable terminal.
408
2022 Corsair (CTF) Canada/United States of America, enUSA, Edition date: 202106, First-Printing Maintenance
Page 418 of 676
Exterior Chrome Parts
•
Apply a high quality-cleaning product to
bumpers and other chrome parts. Follow
the manufacturer’ s instructions. We
recommend Motorcraft Custom Bright
Metal Cleaner.
• Do not apply the cleaning product to hot
surfaces. Do not leave the cleaning
product on chrome surfaces longer than
the time recommended.
• Using non-recommended cleaners can
result in severe and permanent cosmetic
damage.
Note: Never use abrasive materials, for
example steel wool or plastic pads as they
can scratch the chrome surface.
Note: Do not use chrome cleaner, metal
cleaner or polish on wheels or wheel covers.
Exterior Plastic Parts
For routine cleaning we recommend
Motorcraft Detail Wash. If tar or grease spots
are present, we recommend Motorcraft Bug
and Tar Remover. Stripes or Graphics (If Equipped)
Hand washing your vehicle is preferred
however, pressure washing may be used
under the following conditions:
• Do not use water pressure higher than
2,000 psi (14,000 kPa)
.
• Do not use water hotter than 179°F (82°C).
• Use a spray with a 40 degree wide spray
angle pattern.
• Keep the nozzle at a
12 in (305 mm)
distance and 90 degree angle to your
vehicle's surface.
Note: Holding the pressure washer nozzle
at an angle to the vehicle's surface may
damage graphics and cause the edges to
peel away from the vehicle's surface.
Underbody
Regularly clean the underside of your vehicle
using water. Keep body and door drain holes
free of debris or foreign material. Under Hood
For removing black rubber marks from under
the hood we recommend Motorcraft Wheel
and Tire Cleaner or Motorcraft Bug and Tar
Remover.
WAXING
Regular waxing is necessary to protect your
car's paint from the elements. We
recommend that you wash and wax the
painted surface once or twice a year.
When washing and waxing, park your vehicle
in a shaded area out of direct sunlight.
Always wash your vehicle before applying
wax.
•
Use a quality wax that does not contain
abrasives.
• Follow the manufacturer’ s instructions to
apply and remove the wax.
• Apply a small amount of wax in a
back-and-forth motion, not in circles.
415
2022 Corsair (CTF) Canada/United States of America, enUSA, Edition date: 202106, First-Printing Vehicle Care
Page 428 of 676

Note:
Do not drive the vehicle above 50 mph
(80 km/h).
Note: Do not drive further than
120 mi
(200 km). Drive only to the closest authorized
Ford dealer or tire repair shop to have your
tire inspected.
• Drive carefully and avoid abrupt steering
maneuvers.
• Periodically monitor tire inflation pressure
in the affected tire; if the tire is losing
pressure, have the vehicle towed.
• Read the information in the Tips for Use
of the Kit section to make sure safe
operation of the kit and your vehicle.
Tips for Use of the Kit
To ensure safe operation of the kit:
• Read all instructions and cautions fully.
• Before operating the kit, make sure your
vehicle is safely off the road and away
from moving traffic. Turn on the hazard
lights.
• Always set the parking brake to ensure
the vehicle doesn't move unexpectedly. •
Do not remove any foreign objects, such
as nails or screws, from the tire.
• When using the kit, leave the engine
running (only if the vehicle is outdoors or
in a well-ventilated area) so the
compressor does not drain the vehicle's
battery.
• Do not allow the compressor to operate
continuously for more than 15 minutes.
This will help prevent the compressor
from overheating.
• Never leave the kit unattended during
operation.
• Sealant compound contains latex. Those
with latex sensitivities should use
appropriate precautions to avoid an
allergic reaction.
• Keep the kit away from children.
• Only use the kit when the ambient
temperature is between -22°F (-30°C) and
158°F (70°C)
. •
Only use the sealing compound before
the use-by date. The use-by date is on a
label on the sealant canister and can be
seen through the rectangular viewing
window on the bottom of the compressor.
Check the use-by date regularly and
replace the canister when the sealant
expires.
• Do not store the kit unsecured inside the
passenger compartment of the vehicle
as it may cause injury during a sudden
stop or crash. Always store the kit in its
original location.
• After sealant use, the tire pressure
monitoring system sensor and valve stem
on the wheel must be replaced by an
authorized Ford dealer.
• Operating the kit could cause an
electrical disturbance in radio, CD, and
DVD player operation. * When inflation only is required for
a tire or other objects, the selector
must be in the Air position.
425
2022 Corsair (CTF) Canada/United States of America, enUSA, Edition date: 202106, First-Printing Wheels and TiresE175978
Page 430 of 676
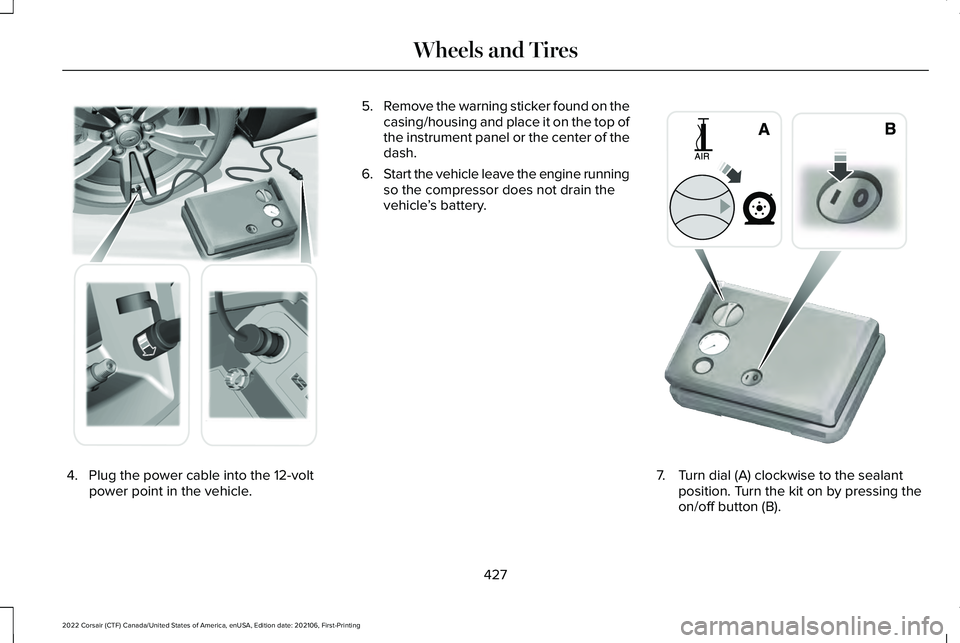
4. Plug the power cable into the 12-volt
power point in the vehicle. 5.
Remove the warning sticker found on the
casing/housing and place it on the top of
the instrument panel or the center of the
dash.
6. Start the vehicle leave the engine running
so the compressor does not drain the
vehicle ’s battery. 7. Turn dial (A) clockwise to the sealant
position. Turn the kit on by pressing the
on/off button (B).
427
2022 Corsair (CTF) Canada/United States of America, enUSA, Edition date: 202106, First-Printing Wheels and Tires E175979 E175981