2022 LINCOLN CORSAIR instrument panel
[x] Cancel search: instrument panelPage 420 of 676
Note:
Do not use razor blades or other
sharp objects to clean or remove decals from
the inside of the heated rear window. The
vehicle warranty does not cover damage
caused to the heated rear window grid lines.
CLEANING THE INTERIOR WARNING: Do not use cleaning
solvents, bleach or dye on the vehicle's
seatbelts, as these actions may weaken
the belt webbing. WARNING:
On vehicles equipped
with seat-mounted airbags, do not use
chemical solvents or strong detergents.
Such products could contaminate the side
airbag system and affect performance of
the side airbag in a crash.
Note: Follow the same procedure for
cleaning leather seats when cleaning leather
interior.
See Cleaning Leather Seats (page
418). Note:
Do not use household cleaning
products or glass cleaners, which can stain
and discolor the fabric and affect the flame
retardant abilities of the seat materials.
For fabric, carpets, cloth seats, safety belts
and seats equipped with side airbags:
• Remove dust and loose dirt with a
vacuum cleaner.
• Remove light stains and soil with
Motorcraft® Professional Strength Carpet
& Upholstery Cleaner.
For grease or tar stains:
• Spot clean the area with Motorcraft® Spot
and Stain Remover. In Canada, use
Motorcraft® Multi-Purpose Cleaner.
• If a ring forms on the fabric after spot
cleaning, clean the entire area
immediately, but do not oversaturate or
the ring will set. CLEANING THE INSTRUMENT
PANEL AND INSTRUMENT
CLUSTER LENS WARNING:
Do not use chemical
solvents or strong detergents when
cleaning the steering wheel or instrument
panel to avoid contamination of the airbag
system.
Note: Follow the same procedure as
cleaning leather seats for cleaning leather
instrument panels and leather interior trim
surfaces. See Cleaning Leather Seats
(page
418).
Clean the instrument panel and cluster lens
with a clean, damp and soft cloth, then use
a clean, dry and soft cloth to dry these areas.
417
2022 Corsair (CTF) Canada/United States of America, enUSA, Edition date: 202106, First-Printing Vehicle Care
Page 421 of 676
•
Avoid cleaners or polishes that increase
the gloss of the upper portion of the
instrument panel. The dull finish in this
area helps protect you from undesirable
windshield reflection.
• Do not use any household cleaning
products or glass cleaners as these may
damage the finish of the instrument
panel, interior trim and cluster lens.
• Wash or wipe your hands clean if you
have been in contact with certain
products such as insect repellent and
suntan lotion to avoid possible damage
to the interior painted surfaces.
• Do not allow air fresheners and hand
sanitizers to spill onto interior surfaces.
If a spill occurs, wipe off immediately.
Your warranty may not cover these
damages.
If a staining liquid like coffee or juice has
been spilled on the instrument panel or on
interior trim surfaces:
1. Wipe up spilled liquid using a clean, soft
cloth as quickly as possible. 2. Use Motorcraft Premium Leather and
Vinyl Cleaner or a commercially available
leather cleaning product for automotive
interiors. Test any cleaner or stain
remover on an inconspicuous area.
3. Alternatively, wipe the surface with a clean, soft cloth and a mild soap and
water solution. Dry the area with a clean,
soft cloth.
4. If necessary, apply more soap and water
solution or cleaning product to a clean,
soft cloth and press it onto the soiled
area. Allow this to set at room
temperature for 30 minutes.
5. Remove the soaked cloth, then with a clean, damp cloth, use a rubbing motion
for 60 seconds on the soiled area.
6. Dry the area with a clean, soft cloth.
CLEANING LEATHER SEATS
Note: Follow the same procedure as
cleaning leather seats for cleaning leather
instrument panels and leather interior trim
surfaces. For routine cleaning, wipe the surface with
a soft, damp cloth and a mild soap and water
solution. Dry the area with a clean, soft cloth.
Note:
Test any cleaner or stain remover on
an inconspicuous area.
You should:
• Remove dust and loose dirt with a
vacuum cleaner.
• Clean and treat spills and stains as soon
as possible.
Do not use the following products as these
may damage the leather:
• Oil and petroleum or silicone-based
leather conditioners.
• Household cleaners.
• Alcohol solutions.
• Solvents or cleaners intended specifically
for rubber, vinyl and plastics.
418
2022 Corsair (CTF) Canada/United States of America, enUSA, Edition date: 202106, First-Printing Vehicle Care
Page 430 of 676
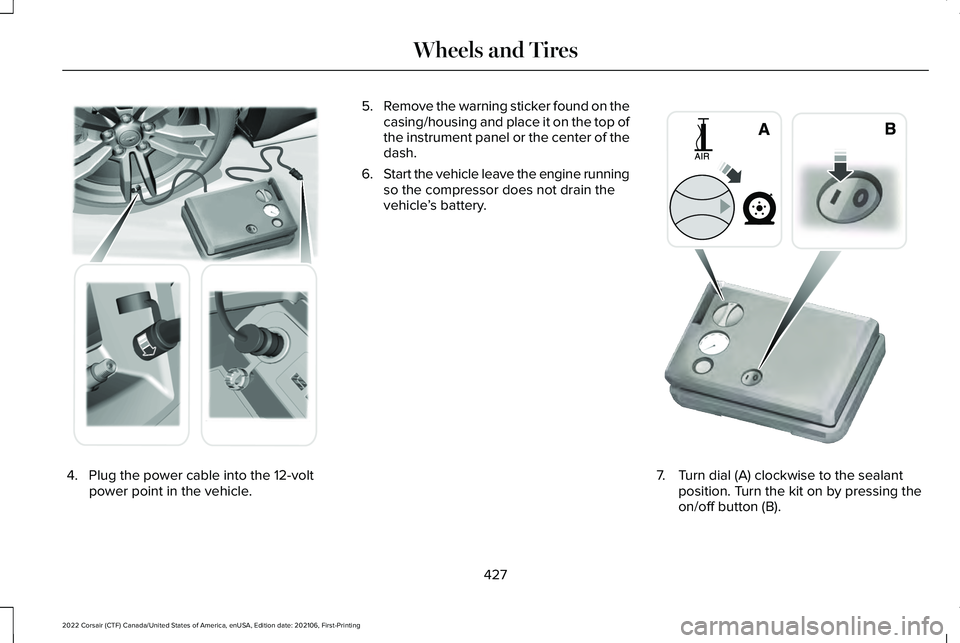
4. Plug the power cable into the 12-volt
power point in the vehicle. 5.
Remove the warning sticker found on the
casing/housing and place it on the top of
the instrument panel or the center of the
dash.
6. Start the vehicle leave the engine running
so the compressor does not drain the
vehicle ’s battery. 7. Turn dial (A) clockwise to the sealant
position. Turn the kit on by pressing the
on/off button (B).
427
2022 Corsair (CTF) Canada/United States of America, enUSA, Edition date: 202106, First-Printing Wheels and Tires E175979 E175981
Page 493 of 676
VEHICLE IDENTIFICATION NUMBER
LOCATING THE VEHICLE
IDENTIFICATION NUMBER
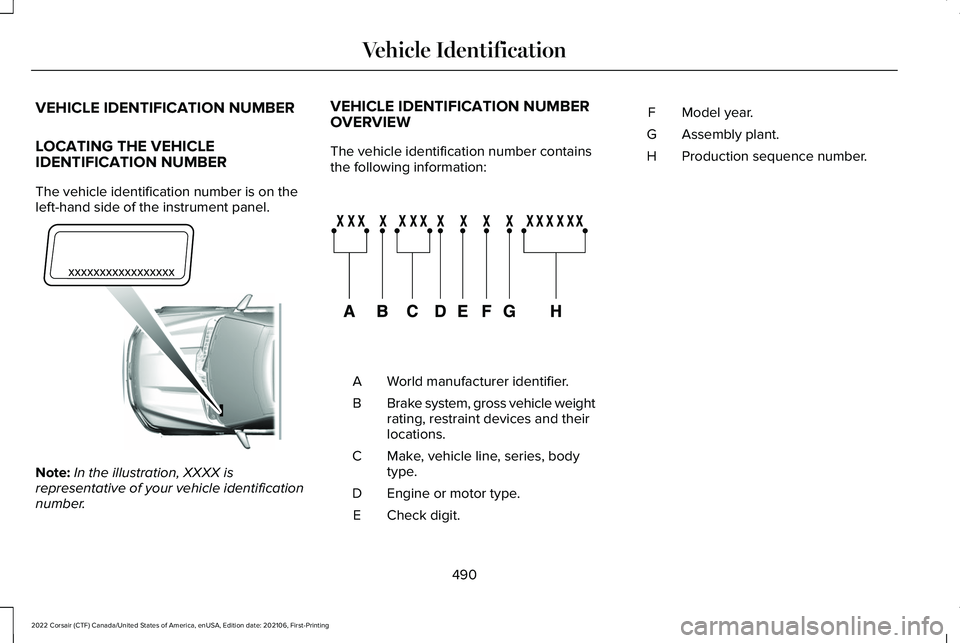
The vehicle identification number is on the
left-hand side of the instrument panel.
Note:
In the illustration, XXXX is
representative of your vehicle identification
number. VEHICLE IDENTIFICATION NUMBER
OVERVIEW
The vehicle identification number contains
the following information:
World manufacturer identifier.
A
Brake system, gross vehicle weight
rating, restraint devices and their
locations.
B
Make, vehicle line, series, body
type.
C
Engine or motor type.
D
Check digit.
E Model year.
F
Assembly plant.
G
Production sequence number.
H
490
2022 Corsair (CTF) Canada/United States of America, enUSA, Edition date: 202106, First-Printing Vehicle IdentificationE311767 E142477
Page 509 of 676
Locating the USB Ports
The USB ports may be in the following
locations:
•
Inside the media bin.
• Inside the center console.
• On the lower instrument panel.
Note: The number and type of USB ports
may vary depending on your vehicle.
Note: Not all USB ports in your vehicle have
data transfer capabilities. See Auxiliary
Power Points (page 198).
506
2022 Corsair (CTF) Canada/United States of America, enUSA, Edition date: 202106, First-Printing Audio System
Page 536 of 676
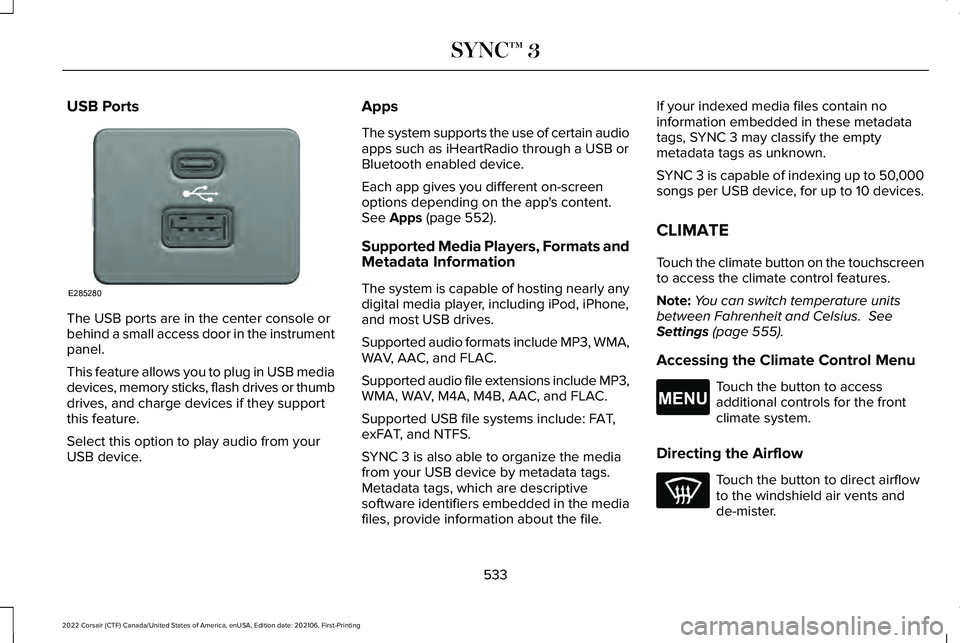
USB Ports
The USB ports are in the center console or
behind a small access door in the instrument
panel.
This feature allows you to plug in USB media
devices, memory sticks, flash drives or thumb
drives, and charge devices if they support
this feature.
Select this option to play audio from your
USB device. Apps
The system supports the use of certain audio
apps such as iHeartRadio through a USB or
Bluetooth enabled device.
Each app gives you different on-screen
options depending on the app's content.
See Apps (page 552).
Supported Media Players, Formats and
Metadata Information
The system is capable of hosting nearly any
digital media player, including iPod, iPhone,
and most USB drives.
Supported audio formats include MP3, WMA,
WAV, AAC, and FLAC.
Supported audio file extensions include MP3,
WMA, WAV, M4A, M4B, AAC, and FLAC.
Supported USB file systems include: FAT,
exFAT, and NTFS.
SYNC 3 is also able to organize the media
from your USB device by metadata tags.
Metadata tags, which are descriptive
software identifiers embedded in the media
files, provide information about the file. If your indexed media files contain no
information embedded in these metadata
tags, SYNC 3 may classify the empty
metadata tags as unknown.
SYNC 3 is capable of indexing up to 50,000
songs per USB device, for up to 10 devices.
CLIMATE
Touch the climate button on the touchscreen
to access the climate control features.
Note:
You can switch temperature units
between Fahrenheit and Celsius.
See
Settings (page 555).
Accessing the Climate Control Menu Touch the button to access
additional controls for the front
climate system.
Directing the Airflow Touch the button to direct airflow
to the windshield air vents and
de-mister.
533
2022 Corsair (CTF) Canada/United States of America, enUSA, Edition date: 202106, First-Printing SYNC™ 3E285280 E265038
Page 537 of 676
Touch the button to direct airflow
to the instrument panel air vents.
Touch the button to direct airflow
to the footwell air vents.
You can direct air through any combination
of these air vents.
Setting the Blower Motor Speed Touch up or down to increase or
decrease the volume of air that
circulates in your vehicle.
Setting the Temperature
Touch up or down on the left-hand
temperature control to set the left-hand
temperature.
Note: This control also adjusts the right-hand
side temperature when you switch off dual
zone mode.
Touch up or down on the right-hand
temperature control to set the right-hand
temperature. Switching Auto Mode On and Off Touch the button to switch on
automatic operation, then set the
temperature.
The system adjusts the blower motor speed,
air distribution, air conditioning operation,
and outside or recirculated air to reach and
maintain the temperature you have set.
Switching the Air Conditioning On and
Off A pop-up appears on the screen
to display the air conditioning
options.
MAX A/C: Touch the button to activate and
maximize cooling. The driver and passenger
temperatures are set to LO, recirculated air
flows through the instrument panel vents, air
conditioning automatically turns on and the
fan automatically adjusts to the highest
speed.
A/C: Touch to switch the air conditioning on
or off. Use A/C with recirculated air to
improve cooling performance and efficiency. Note:
In certain conditions, such as
maximum defrost, the air conditioning
compressor may continue to operate even
though you switch off the air conditioning.
Switching the Climate Control On and
Off Touch the button.
Switching the Climate Controlled Seats
On and Off Touch the button to cycle through
the various climate controlled seat
settings.
Switching Dual Zone Mode On and Off Touch the button to switch on
temperature control for the
right-hand side of the vehicle.
534
2022 Corsair (CTF) Canada/United States of America, enUSA, Edition date: 202106, First-Printing SYNC™ 3E244097 E265282 E265280
Page 538 of 676
Switching the Heated Exterior Mirrors
On and Off
Touch the button.
Switching the Heated Windshield On
and Off Touch the button to clear the
windshield of thin ice and fog. The
heated windshield turns off after a
short period of time.
Switching the Heated Rear Window On
and Off Touch the button to clear the rear
window of thin ice and fog.
Switching the Heated Seats On and Off Touch the button to cycle through
the various heat settings. Switching the Heated Steering Wheel
On and Off Touch the button.
Switching Maximum Air Conditioning
On and Off Touch the button for maximum
cooling.
Recirculated air flows through the instrument
panel air vents, air conditioning turns on and
the blower motor adjusts to the highest
speed.
Switching Maximum Defrost On and
Off Touch the button for maximum
defrosting.
Air flows through the windshield air vents,
and the blower motor adjusts to the highest
speed.
You can also use this setting to defog and
clear the windshield of a thin covering of ice. Note:
To prevent window fogging, you
cannot select recirculated air when
maximum defrost is on.
Note: The heated rear window also turns on
when you select maximum defrost.
Note: Depending on your region, air
conditioning turns on.
Switching Recirculated Air On and Off Touch the button to switch
between outside air and
recirculated air.
The air currently in the passenger
compartment recirculates. This may reduce
the time needed to cool the interior, when
used with A/C, and reduce unwanted odors
from entering your vehicle.
Note: Recirculated air may turn off, or
prevent you from switching on, in all air flow
modes except MAX A/C to reduce the risk
of fogging. Recirculation may also turn on
and off in various air distribution control
combinations during hot weather to improve
cooling efficiency.
535
2022 Corsair (CTF) Canada/United States of America, enUSA, Edition date: 202106, First-Printing SYNC™ 3E266189 E184884