2022 LINCOLN CORSAIR charging
[x] Cancel search: chargingPage 255 of 676
Charge Port
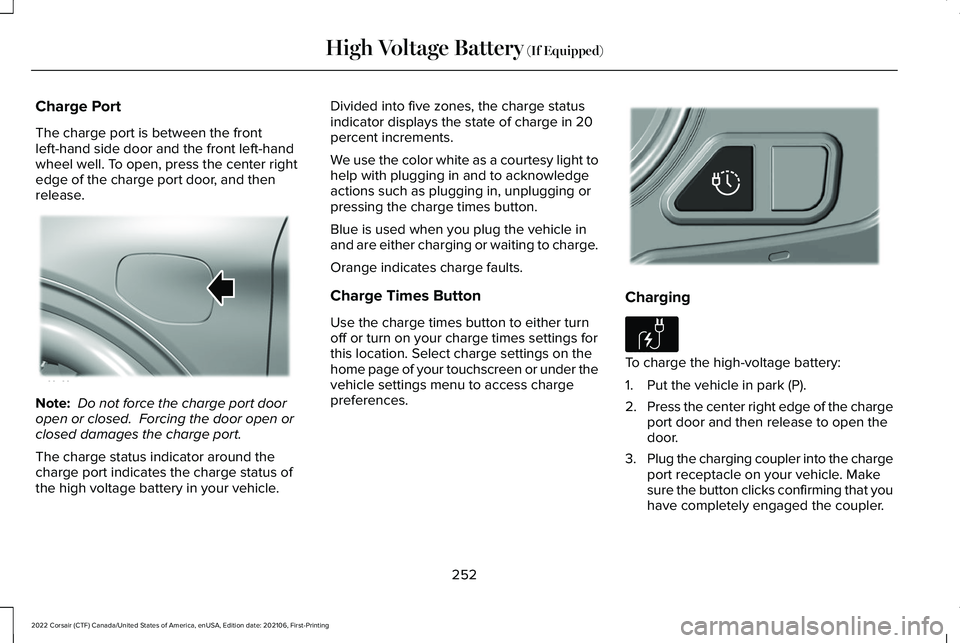
The charge port is between the front
left-hand side door and the front left-hand
wheel well. To open, press the center right
edge of the charge port door, and then
release.
Note:
Do not force the charge port door
open or closed. Forcing the door open or
closed damages the charge port.
The charge status indicator around the
charge port indicates the charge status of
the high voltage battery in your vehicle. Divided into five zones, the charge status
indicator displays the state of charge in 20
percent increments.
We use the color white as a courtesy light to
help with plugging in and to acknowledge
actions such as plugging in, unplugging or
pressing the charge times button.
Blue is used when you plug the vehicle in
and are either charging or waiting to charge.
Orange indicates charge faults.
Charge Times Button
Use the charge times button to either turn
off or turn on your charge times settings for
this location. Select charge settings on the
home page of your touchscreen or under the
vehicle settings menu to access charge
preferences.
Charging
To charge the high-voltage battery:
1. Put the vehicle in park (P).
2.
Press the center right edge of the charge
port door and then release to open the
door.
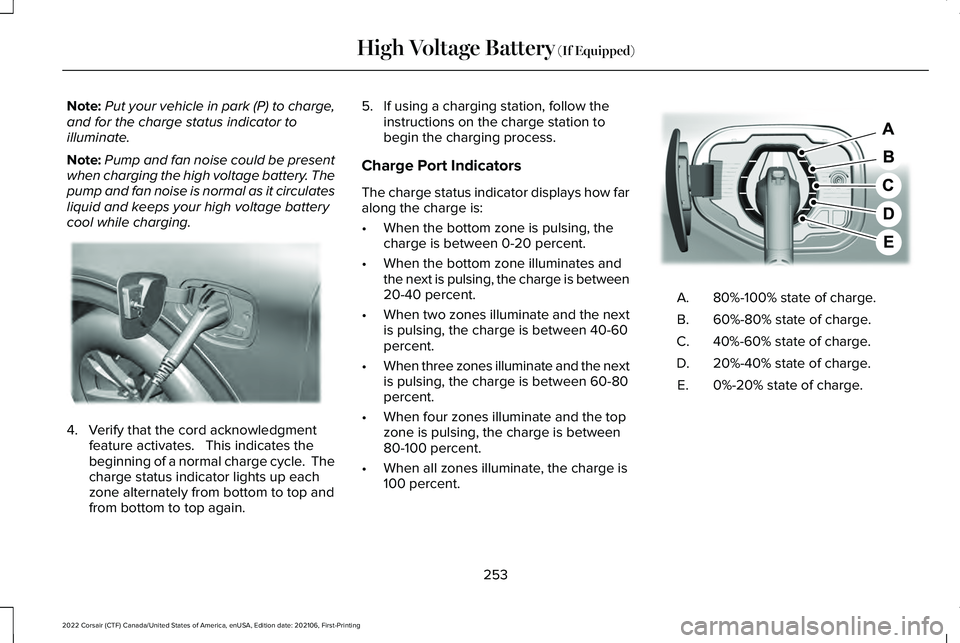
3. Plug the charging coupler into the charge
port receptacle on your vehicle. Make
sure the button clicks confirming that you
have completely engaged the coupler.
252
2022 Corsair (CTF) Canada/United States of America, enUSA, Edition date: 202106, First-Printing High Voltage Battery (If Equipped)E295258 E301111 E306676
Page 256 of 676
Note:
Put your vehicle in park (P) to charge,
and for the charge status indicator to
illuminate.
Note: Pump and fan noise could be present
when charging the high voltage battery. The
pump and fan noise is normal as it circulates
liquid and keeps your high voltage battery
cool while charging. 4. Verify that the cord acknowledgment
feature activates. This indicates the
beginning of a normal charge cycle. The
charge status indicator lights up each
zone alternately from bottom to top and
from bottom to top again. 5. If using a charging station, follow the
instructions on the charge station to
begin the charging process.
Charge Port Indicators
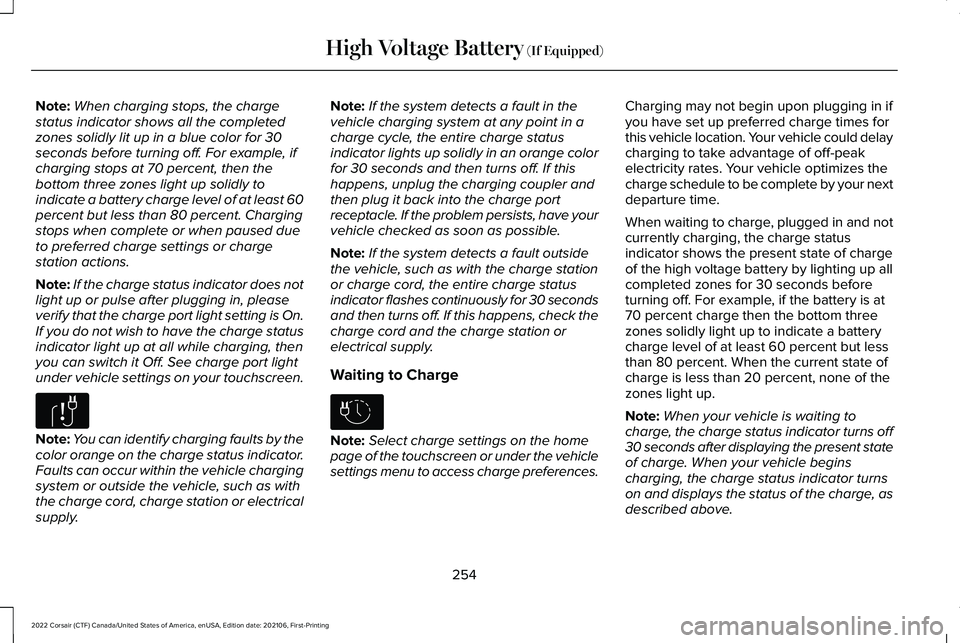
The charge status indicator displays how far
along the charge is:
• When the bottom zone is pulsing, the
charge is between 0-20 percent.
• When the bottom zone illuminates and
the next is pulsing, the charge is between
20-40 percent.
• When two zones illuminate and the next
is pulsing, the charge is between 40-60
percent.
• When three zones illuminate and the next
is pulsing, the charge is between 60-80
percent.
• When four zones illuminate and the top
zone is pulsing, the charge is between
80-100 percent.
• When all zones illuminate, the charge is
100 percent. 80%-100% state of charge.
A.
60%-80% state of charge.
B.
40%-60% state of charge.
C.
20%-40% state of charge.
D.
0%-20% state of charge.
E.
253
2022 Corsair (CTF) Canada/United States of America, enUSA, Edition date: 202106, First-Printing High Voltage Battery (If Equipped)E295257 E301197
Page 257 of 676
Note:
When charging stops, the charge
status indicator shows all the completed
zones solidly lit up in a blue color for 30
seconds before turning off. For example, if
charging stops at 70 percent, then the
bottom three zones light up solidly to
indicate a battery charge level of at least 60
percent but less than 80 percent. Charging
stops when complete or when paused due
to preferred charge settings or charge
station actions.
Note: If the charge status indicator does not
light up or pulse after plugging in, please
verify that the charge port light setting is On.
If you do not wish to have the charge status
indicator light up at all while charging, then
you can switch it Off. See charge port light
under vehicle settings on your touchscreen. Note:
You can identify charging faults by the
color orange on the charge status indicator.
Faults can occur within the vehicle charging
system or outside the vehicle, such as with
the charge cord, charge station or electrical
supply. Note:
If the system detects a fault in the
vehicle charging system at any point in a
charge cycle, the entire charge status
indicator lights up solidly in an orange color
for 30 seconds and then turns off. If this
happens, unplug the charging coupler and
then plug it back into the charge port
receptacle. If the problem persists, have your
vehicle checked as soon as possible.
Note: If the system detects a fault outside
the vehicle, such as with the charge station
or charge cord, the entire charge status
indicator flashes continuously for 30 seconds
and then turns off. If this happens, check the
charge cord and the charge station or
electrical supply.
Waiting to Charge Note:
Select charge settings on the home
page of the touchscreen or under the vehicle
settings menu to access charge preferences. Charging may not begin upon plugging in if
you have set up preferred charge times for
this vehicle location. Your vehicle could delay
charging to take advantage of off-peak
electricity rates. Your vehicle optimizes the
charge schedule to be complete by your next
departure time.
When waiting to charge, plugged in and not
currently charging, the charge status
indicator shows the present state of charge
of the high voltage battery by lighting up all
completed zones for 30 seconds before
turning off. For example, if the battery is at
70 percent charge then the bottom three
zones solidly light up to indicate a battery
charge level of at least 60 percent but less
than 80 percent. When the current state of
charge is less than 20 percent, none of the
zones light up.
Note:
When your vehicle is waiting to
charge, the charge status indicator turns off
30 seconds after displaying the present state
of charge. When your vehicle begins
charging, the charge status indicator turns
on and displays the status of the charge, as
described above.
254
2022 Corsair (CTF) Canada/United States of America, enUSA, Edition date: 202106, First-Printing High Voltage Battery (If Equipped)E306677 E306678
Page 258 of 676
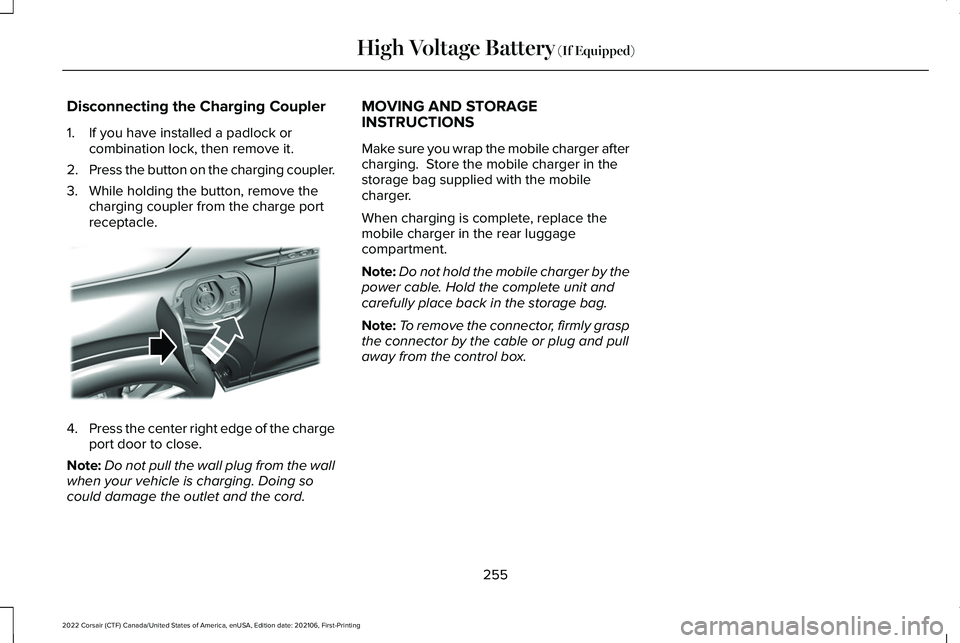
Disconnecting the Charging Coupler
1. If you have installed a padlock or
combination lock, then remove it.
2. Press the button on the charging coupler.
3. While holding the button, remove the charging coupler from the charge port
receptacle. 4.
Press the center right edge of the charge
port door to close.
Note: Do not pull the wall plug from the wall
when your vehicle is charging. Doing so
could damage the outlet and the cord. MOVING AND STORAGE
INSTRUCTIONS
Make sure you wrap the mobile charger after
charging. Store the mobile charger in the
storage bag supplied with the mobile
charger.
When charging is complete, replace the
mobile charger in the rear luggage
compartment.
Note:
Do not hold the mobile charger by the
power cable. Hold the complete unit and
carefully place back in the storage bag.
Note: To remove the connector, firmly grasp
the connector by the cable or plug and pull
away from the control box.
255
2022 Corsair (CTF) Canada/United States of America, enUSA, Edition date: 202106, First-Printing High Voltage Battery (If Equipped)E295444
Page 391 of 676
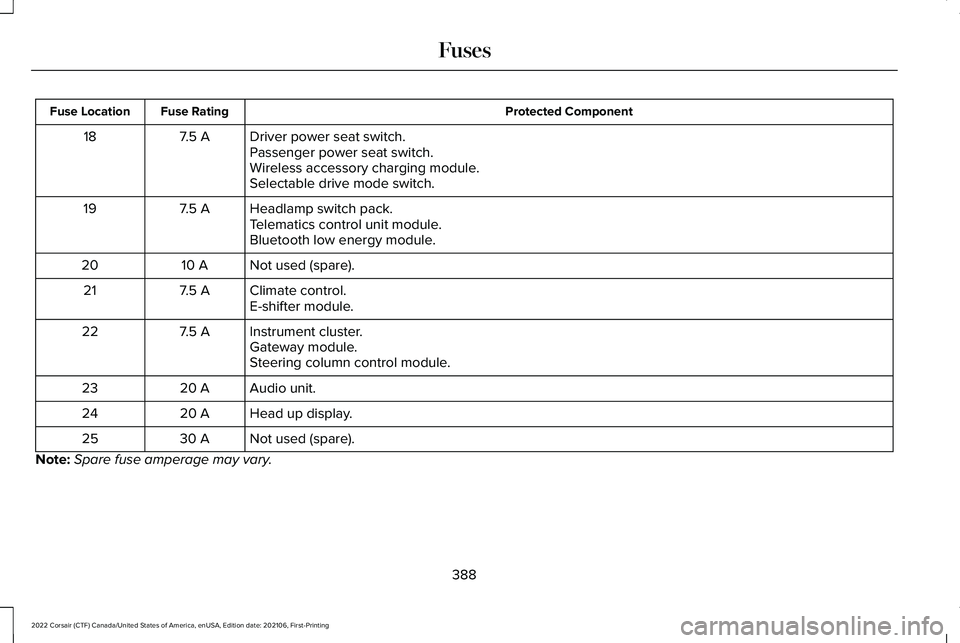
Protected Component
Fuse Rating
Fuse Location
Driver power seat switch.
7.5 A
18
Passenger power seat switch.
Wireless accessory charging module.
Selectable drive mode switch.
Headlamp switch pack.
7.5 A
19
Telematics control unit module.
Bluetooth low energy module.
Not used (spare).
10 A
20
Climate control.
7.5 A
21
E-shifter module.
Instrument cluster.
7.5 A
22
Gateway module.
Steering column control module.
Audio unit.
20 A
23
Head up display.
20 A
24
Not used (spare).
30 A
25
Note: Spare fuse amperage may vary.
388
2022 Corsair (CTF) Canada/United States of America, enUSA, Edition date: 202106, First-Printing Fuses
Page 411 of 676
Battery Management System (If Equipped)
The system monitors battery conditions and
takes actions to extend battery life. If
excessive battery drain is detected, the
system temporarily disables some electrical
systems to protect the battery.
Systems included are:
• Heated rear window.
• Heated seats.
• Climate control.
• Heated steering wheel.
• Audio unit.
• Navigation system.
A message may appear in the information
display to alert you that battery protection
actions are active. This message is only for
notification that an action is taking place, and
not intended to indicate an electrical problem
or that the battery requires replacement. After battery replacement, or in some cases
after charging the battery with an external
charger, the battery management system
requires eight hours of vehicle sleep time to
relearn the battery state of charge. During
this time, your vehicle must remain fully
locked with the ignition switched off.
Note:
Prior to relearning the battery state of
charge, the battery management system
may temporarily disable some electrical
systems.
Electrical Accessory Installation
To make sure the battery management
system works correctly, do not connect an
electrical device ground connection directly
to the battery negative post. This can cause
inaccurate measurements of the battery
condition and potential incorrect system
operation.
Note: If you add electrical accessories or
components to the vehicle, it may adversely
affect battery performance and durability.
This may also affect the performance of
other electrical systems in the vehicle. Remove and Reinstall the Battery
Install a battery approved for use by our
specifications.
See Capacities and
Specifications (page 461).
To disconnect or remove the battery, do the
following:
1. Apply the parking brake and switch the ignition off.
2. Switch all electrical equipment off, for example lights and radio.
3. Wait a minimum of two minutes before disconnecting the battery.
Note: The engine management system has
a power hold function and remains powered
for a period of time after you switch the
ignition off. This is to allow the system to
store diagnostic and adaptive tables.
Disconnecting the battery without waiting
can cause damage not covered by the
vehicle warranty.
4. Disconnect the negative battery cable terminal.
5. Disconnect the positive battery cable terminal.
408
2022 Corsair (CTF) Canada/United States of America, enUSA, Edition date: 202106, First-Printing Maintenance
Page 423 of 676

Body
•
Wash your vehicle thoroughly to remove
dirt, grease, oil, tar or mud from exterior
surfaces, rear-wheel housing and the
underside of front fenders.
• Periodically wash your vehicle if it is
stored in exposed locations.
• Touch-up exposed or primed metal to
prevent rust.
• Cover chrome and stainless steel parts
with a thick coat of auto wax to prevent
discoloration. Re-wax as necessary when
you wash your vehicle.
• Lubricate all hood, door and luggage
compartment hinges and latches with a
light grade oil.
• Cover interior trim to prevent fading.
• Keep all rubber parts free from oil and
solvents. Engine
•
Change the engine oil and filter prior to
storage because used engine oil contains
contaminates which may cause engine
damage.
• Start the engine every 15 days for a
minimum of 15 minutes. Run at fast idle
with the climate controls set to defrost
until the engine reaches normal
operating temperature.
• With your foot on the brake, shift through
all the gears while the engine is running.
• We recommend that you change the
engine oil before you use your vehicle
again.
Fuel system
• Fill the fuel tank with high-quality fuel
until the first automatic shutoff of the fuel
pump nozzle. Cooling system
•
Protect against freezing temperatures.
• When removing your vehicle from
storage, check coolant fluid level.
Confirm that there are no cooling system
leaks and that fluid is at the
recommended level.
Disconnecting Your 12 Volt Battery
• Check and recharge as necessary. Keep
connections clean.
• If storing your vehicle for more than 30
days without recharging the battery, we
recommend that you disconnect the
battery cables to maintain battery charge
for quick starting.
Note: It is necessary to reset memory
features if you disconnect the battery cables.
420
2022 Corsair (CTF) Canada/United States of America, enUSA, Edition date: 202106, First-Printing Vehicle Care
Page 549 of 676

The navigation system map data may contain
inaccurate or incomplete information due to
the passage of time, changing
circumstances, sources used and the nature
of collecting comprehensive geographic
data, any of which may lead to incorrect
results. Inaccurate speed limit information,
turn restrictions and other road attributes
may affect the determined route and
associated guidance
Annual navigation map updates are available
for purchase through your dealership.
Depending on your purchase agreement,
you might be eligible for free Map update.
You can choose to download the Map data
update onto a USB, order a USB, or use Wi-Fi
to deliver automatic updates. To update your
Map data over Wi-Fi, your vehicle must be
connected to a Wi-Fi access point. Map Data
files are large, so it is highly recommended
to perform the update when free Wi-Fi is
available otherwise high data rates may
apply. For USB updates, free map update
eligibility, and other details, contact dealers
at 1-866-462-8837 in the United States and
Canada or 01-800-557-5539 in Mexico or
visit our local website for more information.
ELECTRIC VEHICLE INFORMATION
Power Flow The Power Flow information for
your plug-in hybrid vehicle is
available through the Home screen
or under Apps.
Vehicle Operational States
Power will flow to or from the front and rear
wheels depending on operational state and
drive conditions.
• Idling: The vehicle is running and in park
(P). The engine and, or the high voltage
battery are on.
• Electric Driving: The vehicle is running
and in drive (D) or neutral (N). The high
voltage battery provides power to the
wheels.
• Hybrid Driving: The vehicle is running
and in drive (D) or neutral (N). The engine
and the high voltage battery provide
power to the wheels. •
Engine Driving: The vehicle is running
and in drive (D) or neutral (N). The engine
provides power to the wheels.
• Regenerative Braking: The vehicle is
running in drive gear (D) and is slowing
down. The regenerative braking system
captures power and sends it back to the
high voltage battery.
• Charging: The vehicle is plugged in and
the high voltage battery is being charged.
Engine On Due To
The following conditions help to explain why
the engine is on, and what you can do to
allow all electric operation.
• Drive Power: The engine is on due to
accelerator pedal pressure or speed
control activation. Reduce pressure on
the accelerator pedal or switch off the
speed control to return to full electric
mode.
• High Speed: The engine is on because
the vehicle speed exceeds the level for
full electric operation. Reduce the speed
to return to electric operation.
546
2022 Corsair (CTF) Canada/United States of America, enUSA, Edition date: 202106, First-Printing SYNC™ 3E304437