2022 LINCOLN CORSAIR tow
[x] Cancel search: towPage 428 of 676

Note:
Do not drive the vehicle above 50 mph
(80 km/h).
Note: Do not drive further than
120 mi
(200 km). Drive only to the closest authorized
Ford dealer or tire repair shop to have your
tire inspected.
• Drive carefully and avoid abrupt steering
maneuvers.
• Periodically monitor tire inflation pressure
in the affected tire; if the tire is losing
pressure, have the vehicle towed.
• Read the information in the Tips for Use
of the Kit section to make sure safe
operation of the kit and your vehicle.
Tips for Use of the Kit
To ensure safe operation of the kit:
• Read all instructions and cautions fully.
• Before operating the kit, make sure your
vehicle is safely off the road and away
from moving traffic. Turn on the hazard
lights.
• Always set the parking brake to ensure
the vehicle doesn't move unexpectedly. •
Do not remove any foreign objects, such
as nails or screws, from the tire.
• When using the kit, leave the engine
running (only if the vehicle is outdoors or
in a well-ventilated area) so the
compressor does not drain the vehicle's
battery.
• Do not allow the compressor to operate
continuously for more than 15 minutes.
This will help prevent the compressor
from overheating.
• Never leave the kit unattended during
operation.
• Sealant compound contains latex. Those
with latex sensitivities should use
appropriate precautions to avoid an
allergic reaction.
• Keep the kit away from children.
• Only use the kit when the ambient
temperature is between -22°F (-30°C) and
158°F (70°C)
. •
Only use the sealing compound before
the use-by date. The use-by date is on a
label on the sealant canister and can be
seen through the rectangular viewing
window on the bottom of the compressor.
Check the use-by date regularly and
replace the canister when the sealant
expires.
• Do not store the kit unsecured inside the
passenger compartment of the vehicle
as it may cause injury during a sudden
stop or crash. Always store the kit in its
original location.
• After sealant use, the tire pressure
monitoring system sensor and valve stem
on the wheel must be replaced by an
authorized Ford dealer.
• Operating the kit could cause an
electrical disturbance in radio, CD, and
DVD player operation. * When inflation only is required for
a tire or other objects, the selector
must be in the Air position.
425
2022 Corsair (CTF) Canada/United States of America, enUSA, Edition date: 202106, First-Printing Wheels and TiresE175978
Page 431 of 676
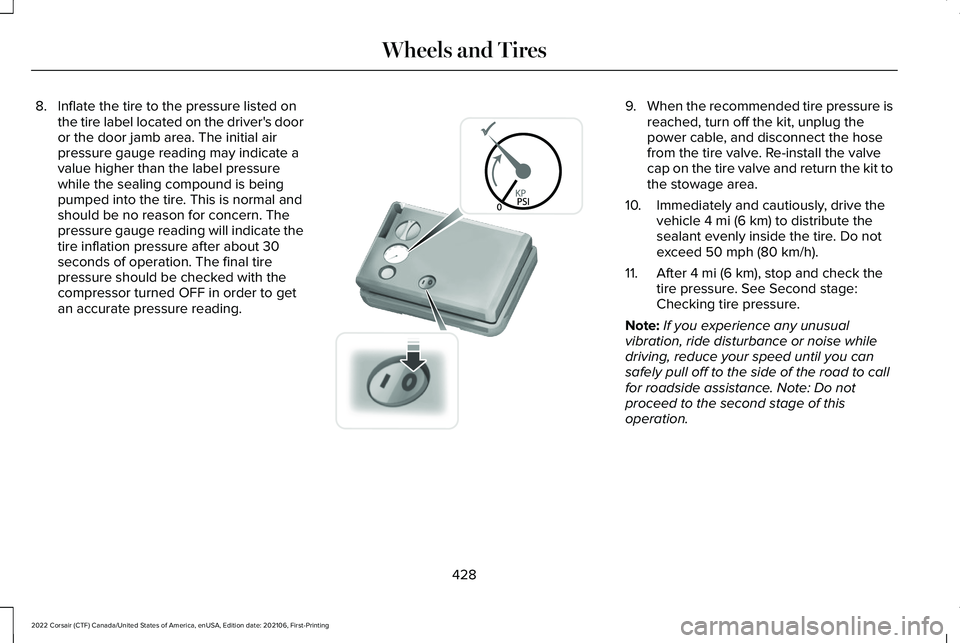
8. Inflate the tire to the pressure listed on
the tire label located on the driver's door
or the door jamb area. The initial air
pressure gauge reading may indicate a
value higher than the label pressure
while the sealing compound is being
pumped into the tire. This is normal and
should be no reason for concern. The
pressure gauge reading will indicate the
tire inflation pressure after about 30
seconds of operation. The final tire
pressure should be checked with the
compressor turned OFF in order to get
an accurate pressure reading. 9.
When the recommended tire pressure is
reached, turn off the kit, unplug the
power cable, and disconnect the hose
from the tire valve. Re-install the valve
cap on the tire valve and return the kit to
the stowage area.
10. Immediately and cautiously, drive the vehicle 4 mi (6 km) to distribute the
sealant evenly inside the tire. Do not
exceed
50 mph (80 km/h).
11. After
4 mi (6 km), stop and check the
tire pressure. See Second stage:
Checking tire pressure.
Note: If you experience any unusual
vibration, ride disturbance or noise while
driving, reduce your speed until you can
safely pull off to the side of the road to call
for roadside assistance. Note: Do not
proceed to the second stage of this
operation.
428
2022 Corsair (CTF) Canada/United States of America, enUSA, Edition date: 202106, First-Printing Wheels and TiresE175982
Page 432 of 676
Second Stage: Checking Tire Pressure
WARNING: If the tire does not inflate
to the recommended tire pressure within
15 minutes, stop and call roadside
assistance. WARNING:
The power plug may get
hot after use and should be handled
carefully when unplugging.
Check the air pressure of your tires as
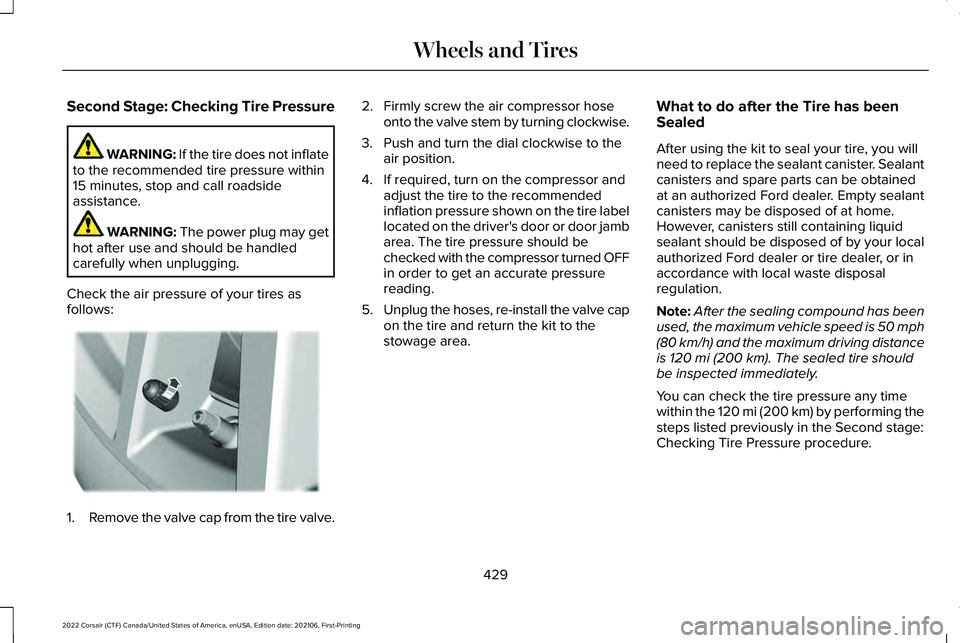
follows: 1.
Remove the valve cap from the tire valve. 2. Firmly screw the air compressor hose
onto the valve stem by turning clockwise.
3. Push and turn the dial clockwise to the air position.
4. If required, turn on the compressor and adjust the tire to the recommended
inflation pressure shown on the tire label
located on the driver's door or door jamb
area. The tire pressure should be
checked with the compressor turned OFF
in order to get an accurate pressure
reading.
5. Unplug the hoses, re-install the valve cap
on the tire and return the kit to the
stowage area. What to do after the Tire has been
Sealed
After using the kit to seal your tire, you will
need to replace the sealant canister. Sealant
canisters and spare parts can be obtained
at an authorized Ford dealer. Empty sealant
canisters may be disposed of at home.
However, canisters still containing liquid
sealant should be disposed of by your local
authorized Ford dealer or tire dealer, or in
accordance with local waste disposal
regulation.
Note:
After the sealing compound has been
used, the maximum vehicle speed is 50 mph
(80 km/h) and the maximum driving distance
is
120 mi (200 km). The sealed tire should
be inspected immediately.
You can check the tire pressure any time
within the
120 mi (200 km) by performing the
steps listed previously in the Second stage:
Checking Tire Pressure procedure.
429
2022 Corsair (CTF) Canada/United States of America, enUSA, Edition date: 202106, First-Printing Wheels and TiresE175983
Page 434 of 676
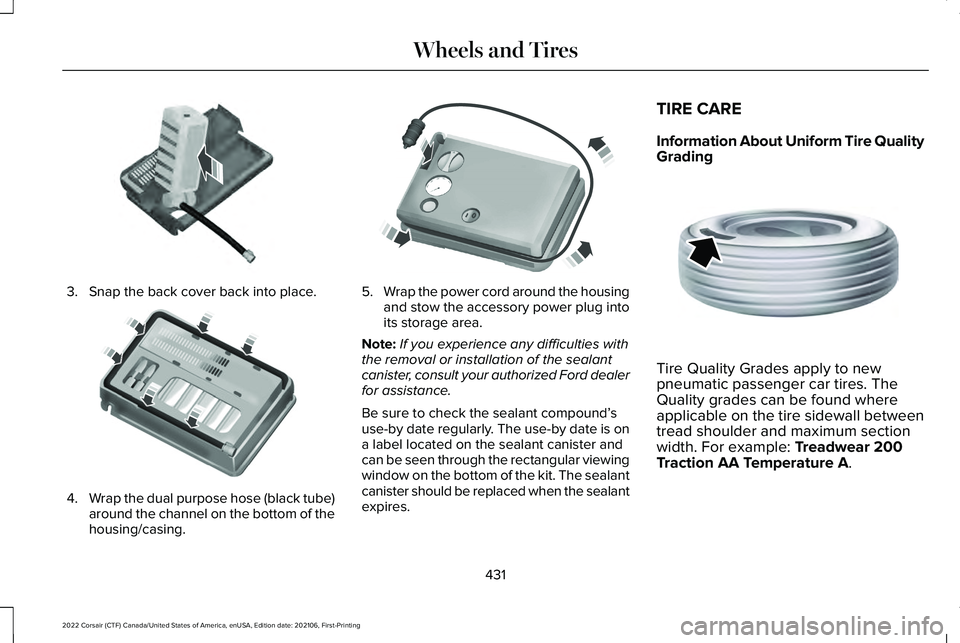
3. Snap the back cover back into place.
4.
Wrap the dual purpose hose (black tube)
around the channel on the bottom of the
housing/casing. 5.
Wrap the power cord around the housing
and stow the accessory power plug into
its storage area.
Note: If you experience any difficulties with
the removal or installation of the sealant
canister, consult your authorized Ford dealer
for assistance.
Be sure to check the sealant compound’ s
use-by date regularly. The use-by date is on
a label located on the sealant canister and
can be seen through the rectangular viewing
window on the bottom of the kit. The sealant
canister should be replaced when the sealant
expires. TIRE CARE
Information About Uniform Tire Quality
Grading
Tire Quality Grades apply to new
pneumatic passenger car tires. The
Quality grades can be found where
applicable on the tire sidewall between
tread shoulder and maximum section
width. For example: Treadwear 200
Traction AA Temperature A.
431
2022 Corsair (CTF) Canada/United States of America, enUSA, Edition date: 202106, First-Printing Wheels and TiresE175988 E175989 E175990 E142542
Page 447 of 676

Highway Hazards
No matter how carefully you drive, there
is always the possibility that you may
eventually have a flat tire on the
highway. Drive slowly to the closest safe
area out of traffic. This may further
damage the flat tire, but your safety is
more important.
If you feel a sudden vibration or ride
disturbance while driving, or you suspect
your tire or vehicle has been damaged,
immediately reduce your speed. Drive
with caution until you can safely pull off
the road. Stop and inspect the tires for
damage. If a tire is under-inflated or
damaged, deflate it, remove wheel and
replace it with your spare tire and wheel.
If you cannot detect a cause, have the
vehicle towed to the nearest repair
facility or tire dealer to have the vehicle
inspected.
Tire and Wheel Alignment
A bad jolt from hitting a curb or pothole
can cause the front end of your vehicle
to become misaligned or cause damage
to your tires. If your vehicle seems to
pull to one side when you are driving,
the wheels may be out of alignment.
Have an authorized dealer check the
wheel alignment periodically.
Wheel misalignment in the front or the
rear can cause uneven and rapid
treadwear of your tires and should be
corrected by an authorized dealer.
Front-wheel drive vehicles and those
with an independent rear suspension (if
equipped) may require alignment of all
four wheels.
The tires should also be balanced
periodically. An unbalanced tire and
wheel assembly may result in irregular
tire wear.Tire Rotation
Note:
If your tires show uneven wear,
ask an authorized dealer to check for
and correct any wheel misalignment,
tire imbalance or mechanical problem
involved before tire rotation.
Note: Your vehicle may be equipped
with a dissimilar spare wheel and tire
assembly. A dissimilar spare wheel and
tire assembly is defined as a spare
wheel and tire assembly that is different
in brand, size or appearance from the
road tires and wheels. If you have a
dissimilar spare wheel and tire
assembly, it is intended for temporary
use only and should not be used in a
tire rotation.
Note: After having your tires rotated,
inflation pressure must be checked and
adjusted to the vehicle requirements.
444
2022 Corsair (CTF) Canada/United States of America, enUSA, Edition date: 202106, First-Printing Wheels and Tires
Page 455 of 676
Note:
Only use tire sealants in roadside
emergencies as they may cause damage to
the tire pressure monitoring system sensor.
Note: The tire pressure monitoring system
indicator light illuminates when the spare
tire is in use. To restore the full function of
the monitoring system, all road wheels
equipped with tire pressure monitoring
sensors must be mounted on the vehicle.
If you get a flat tire when driving, do not
apply the brake heavily. Instead, gradually
decrease your speed. Hold the steering
wheel firmly and slowly move to a safe place
on the side of the road.
Have a flat serviced by an authorized dealer
in order to prevent damage to the tire
pressure monitoring system sensors. See
Tire Pressure Monitoring System (page 446).
Replace the spare tire with a road tire as
soon as possible. During repairing or
replacing of the flat tire, have the authorized
dealer inspect the tire pressure monitoring
system sensor for damage. Dissimilar Spare Wheel and Tire
Assembly Information WARNING:
Failure to follow these
guidelines could result in an increased risk
of loss of vehicle control, injury or death.
If you have a dissimilar spare wheel and tire,
then it is intended for temporary use only.
This means that if you need to use it, you
should replace it as soon as possible with a
road wheel and tire assembly that is the
same size and type as the road tires and
wheels that we provided with the vehicle. If
the dissimilar spare tire or wheel is damaged,
replace it instead of repairing it.
A dissimilar spare wheel and tire assembly
is defined as a spare wheel and tire assembly
that is different in brand, size or appearance
from the road tires and wheels and can be
one of three types:
1.
T-type mini-spare: This spare tire begins
with the letter T for tire size and may have
Temporary Use Only molded in the sidewall. 2.
Full-size dissimilar spare with label on
wheel: This spare tire has a label on the
wheel that states: THIS WHEEL AND TIRE
ASSEMBLY FOR TEMPORARY USE ONLY.
When driving with one of the dissimilar spare
tires listed above, do not:
• Exceed
50 mph (80 km/h).
• Load the vehicle beyond maximum
vehicle load rating listed on the Safety
Compliance Label.
• Tow a trailer.
• Use snow chains on the end of the
vehicle with the dissimilar spare tire.
• Use more than one dissimilar spare tire
at a time.
• Use commercial car washing equipment.
• Try to repair the dissimilar spare tire.
Use of one of the dissimilar spare tires listed
above at any one wheel location can lead to
impairment of the following:
• Handling, stability and braking
performance.
• Comfort and noise.
• Ground clearance and parking at curbs.
452
2022 Corsair (CTF) Canada/United States of America, enUSA, Edition date: 202106, First-Printing Wheels and Tires
Page 456 of 676

•
Winter weather driving capability.
• Wet weather driving capability.
• All-wheel driving capability
3. Full-size dissimilar spare without label
on wheel
When driving with the full-size dissimilar
spare wheel and tire assembly, do not:
• Exceed
70 mph (113 km/h).
• Use more than one dissimilar spare
wheel and tire assembly at a time.
• Use commercial car washing equipment.
• Use snow chains on the end of the
vehicle with the dissimilar spare wheel
and tire assembly.
The usage of a full-size dissimilar spare
wheel and tire assembly can lead to
impairment of the following:
• Handling, stability and braking
performance.
• Comfort and noise.
• Ground clearance and parking at curbs.
• Winter weather driving capability. •
Wet weather driving capability.
• All-wheel driving capability
When driving with the full-size dissimilar
spare wheel and tire assembly additional
caution should be given to:
• Towing a trailer.
• Driving vehicles equipped with a camper
body.
• Driving vehicles with a load on the cargo
rack.
Drive cautiously when using a full-size
dissimilar spare wheel and tire assembly and
seek service as soon as possible.
Tire Change Procedure WARNING:
Never place anything
between the vehicle jack and the ground. WARNING:
Never place anything
between the vehicle jack and your vehicle. WARNING:
To help prevent your
vehicle from moving when changing a
wheel, shift the transmission into park (P),
set the parking brake and use an
appropriate block or wheel chock to
secure the wheel diagonally opposite to
the wheel being changed. For example,
when changing the front left wheel, place
an appropriate block or wheel chock on
the right rear wheel. WARNING:
It is recommended that
the wheels of the vehicle be chocked, and
that no person should remain in a vehicle
that is being jacked. WARNING:
Always use the jack
provided as original equipment with your
vehicle. If using a jack other than the one
provided, make sure the jack capacity is
adequate for the vehicle weight, including
any vehicle cargo or modifications. If you
are unsure if the jack capacity is adequate,
contact the authorized dealer.
453
2022 Corsair (CTF) Canada/United States of America, enUSA, Edition date: 202106, First-Printing Wheels and Tires
Page 459 of 676
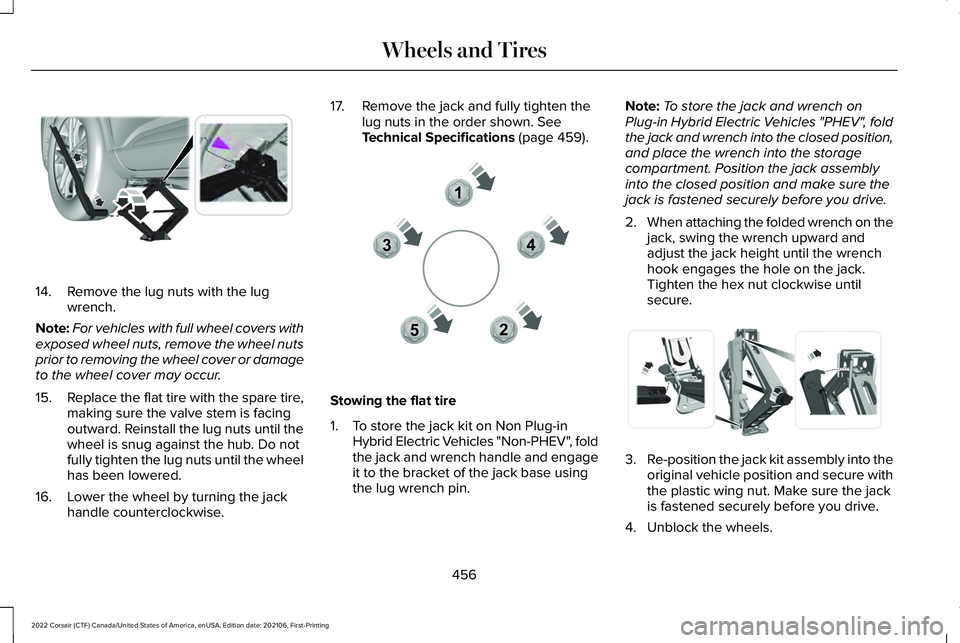
14. Remove the lug nuts with the lug
wrench.
Note: For vehicles with full wheel covers with
exposed wheel nuts, remove the wheel nuts
prior to removing the wheel cover or damage
to the wheel cover may occur.
15. Replace the flat tire with the spare tire,
making sure the valve stem is facing
outward. Reinstall the lug nuts until the
wheel is snug against the hub. Do not
fully tighten the lug nuts until the wheel
has been lowered.
16. Lower the wheel by turning the jack handle counterclockwise. 17. Remove the jack and fully tighten the
lug nuts in the order shown. See
Technical Specifications (page 459). Stowing the flat tire
1. To store the jack kit on Non Plug-in
Hybrid Electric Vehicles "Non-PHEV", fold
the jack and wrench handle and engage
it to the bracket of the jack base using
the lug wrench pin. Note:
To store the jack and wrench on
Plug-in Hybrid Electric Vehicles "PHEV", fold
the jack and wrench into the closed position,
and place the wrench into the storage
compartment. Position the jack assembly
into the closed position and make sure the
jack is fastened securely before you drive.
2. When attaching the folded wrench on the
jack, swing the wrench upward and
adjust the jack height until the wrench
hook engages the hole on the jack.
Tighten the hex nut clockwise until
secure. 3.
Re-position the jack kit assembly into the
original vehicle position and secure with
the plastic wing nut. Make sure the jack
is fastened securely before you drive.
4. Unblock the wheels.
456
2022 Corsair (CTF) Canada/United States of America, enUSA, Edition date: 202106, First-Printing Wheels and TiresE294119 12
3
4
5E306781 E294121