2022 LEXUS RX350 ESP
[x] Cancel search: ESPPage 234 of 508

2324-5. Using the driving support systems
*:If equipped
Meter control switches
Turning the Blind Spot Monitor on/off.
Outside rear view mirror indicators
When a vehicle is detected in a blind spot
of the outside rear view mirrors or
approaching rapidly from behind into a
blind spot, the outside rear view mirror
indicator on the detected side will illumi-
nate. If the turn signal lever is operated
toward the detected side, the outside rear
view mirror indicator flashes.
BSM indicator
Illuminates when the Blind Spot Monitor is
enabled
■Outside rear view mirror indicator visi-
bility
In strong sunlight, the outside rear view mir-
ror indicator may be difficult to see.
■When “Blind Spot Monitor Unavailable”
is shown on the multi-information dis-
play
Ice, snow, mud, etc., may be attached to the
rear bumper around the sensors. ( P.232)
The system should return to normal opera-
tion after removing the ice, snow, mud, etc.
from the rear bumper. Additionally, the sen-
sors may not operate normally when driving
in extremely hot or cold environments.
■Customization
Some functions can be customized.
( P.449)
BSM (Blind Spot Monitor)*
The Blind Spot Monitor is a system
that uses rear side radar sensors
installed on the in ner side of the
rear bumper on the left and right
side to assist the driver in confirm-
ing safety when changing lanes.
WARNING
■Cautions regarding the use of the sys-
tem
The driver is solely responsible for safe
driving. Always drive safely, taking care
to observe your surroundings.
The Blind Spot Monitor is a supplemen-
tary function which alerts the driver that a
vehicle is in a blind spot of the outside
rear view mirrors or is approaching rap-
idly from behind into a blind spot. Do not
overly rely on the Blind Spot Monitor. As
the function cannot judge if it is safe to
change lanes, over reliance could lead to
an accident resulting in death or serious
injury.
As the system may not function correctly
under certain conditions, the driver’s own
visual confirmation of safety is necessary.
System components
A
WARNING
■To ensure the system can operate
properly
Blind Spot Monitor sensors are installed
behind the left and right sides of the rear
bumper respectively. Observe the fol-
lowing to ensure the Blind Spot Monitor
can operate correctly.
B
C
Page 241 of 508

2394-5. Using the driving support systems
4
Driving
Center Display (vehicles with a Pan-
oramic view monitor)
A graphic will be displayed on the Center
Display.
Use the meter control switches to
enable/disable the Lexus parking
assist-sensor. ( P.80)
1 Press or to select .
2 Press or to select “PKSA”
and then press .
3 Press or to select and
then press .
When the intuitive parking assist func-
tion is disabled, the intuitive parking
assist OFF indicator ( P.70) illumi-
nates. To re-enable the system, select on
the multi-information display, select
and turn it on. If the system is dis-
abled, it will remain off even if the
engine switch is turned to IGNITION
ON mode after the engine switch has
been turned off.
Turning intuitive parking assist
on/off
WARNING
■Cautions regarding the use of the sys-
tem
There is a limit to the degree of recogni-
tion accuracy and control performance
that this system can provide, do not
overly rely on this system. The driver is
always responsible for paying attention
to the vehicle’ surroundings and driving
safely.
■To ensure the system can operate
properly
Observe the following precautions.
Failing to do so may result in the vehicle
being unable to be dr iven safely and pos-
sibly cause an accident.
●Do not damage the sensors, and
always keep them clean.
●Do not attach a sticker or install an
electronic compon ent, such as a
backlit license plate (especially fluo-
rescent type), fog lights, fender pole or
wireless antenna near a radar sensor.
●Do not subject the surrounding area of
the sensor to a strong impact. If sub-
jected to an impact, have the vehicle
inspected by your Lexus dealer. If the
front or rear bumper needs to be
emoved/installed or replaced, contact
your Lexus dealer.
●Do not modify, disassemble or paint
the sensors.
●Do not attach a license plate cover.
●Keep your tires properly inflated.
Page 243 of 508

2414-5. Using the driving support systems
4
Driving
●Wires, fences, ropes, etc.
●Cotton, snow and other materials that
absorb sound waves
●Sharply-angled objects
●Low objects
●Tall objects with upper sections project-
ing outwards in the direction of your vehi-
cle
People may not be detected if they are
wearing certain types of clothing.
■Situations in which the system may not
operate properly
Certain vehicle conditions and the sur-
rounding environment may affect the ability
of a sensor to correctly detect objects. Par-
ticular instances where this may occur are
listed below.
●There is dirt, snow or ice on a sensor.
(Cleaning the sensors will resolve this
problem.)
●A sensor is frozen. (Thawing the area will
resolve this problem.)
In especially cold weather, if a sensor is
frozen the sensor display may be dis-
played abnormally, or objects, such as a
wall, may not be detected.
●When a sensor or the area around a sen-
sor is extremely hot or cold.
●On an extremely bumpy road, on an
incline, on gravel, or on grass.
●When vehicle horns, vehicle detectors,
motorcycle engines, air brakes of large
vehicles, the clearance sonar of other
vehicles or other devices which produce
ultrasonic waves are near the vehicle
●A sensor is coated with a sheet of spray
or heavy rain.
●If objects draw too close to the sensor.
●When a pedestrian is wearing clothing that does not reflect ultrasonic waves (ex.
skirts with gathers or frills).
●When objects that are not perpendicular
to the ground, not perpendicular to the
vehicle traveling direction, uneven, or
waving are in the detection range.
●Strong wind is blowing
●When driving in inclement weather such
as fog, snow or a sandstorm
●When an object that
cannot be detected
is between the vehicle and a detected
object
●If an object such as a vehicle, motorcycle,
bicycle or pedestrian cuts in front of the
vehicle or runs out from the side of the
vehicle
●If the orientation of a sensor has been
changed due to a collision or other
impact
●When equipment that may obstruct a
sensor is installed, such as a towing eye-
let, bumper protector (an additional trim
strip, etc.), bicycle carrier, or snow plow
●If the front of the vehicle is raised or low-
ered due to the carried load
●If the vehicle cannot be driven in a stable
manner, such as when the vehicle has
been in an accident or is malfunctioning
●When a tire chains, compact spare tire or
an emergency tire punc ture repair kit is
used
■Situations in which the system may
operate even if there is no possibility of a
collision
In some situations, such as the following, the
system may operate even though there is no
possibility of a collision.
●When driving on a narrow road
●When driving toward a banner, flag,
Page 247 of 508
2454-5. Using the driving support systems
4
Driving
*:If equipped
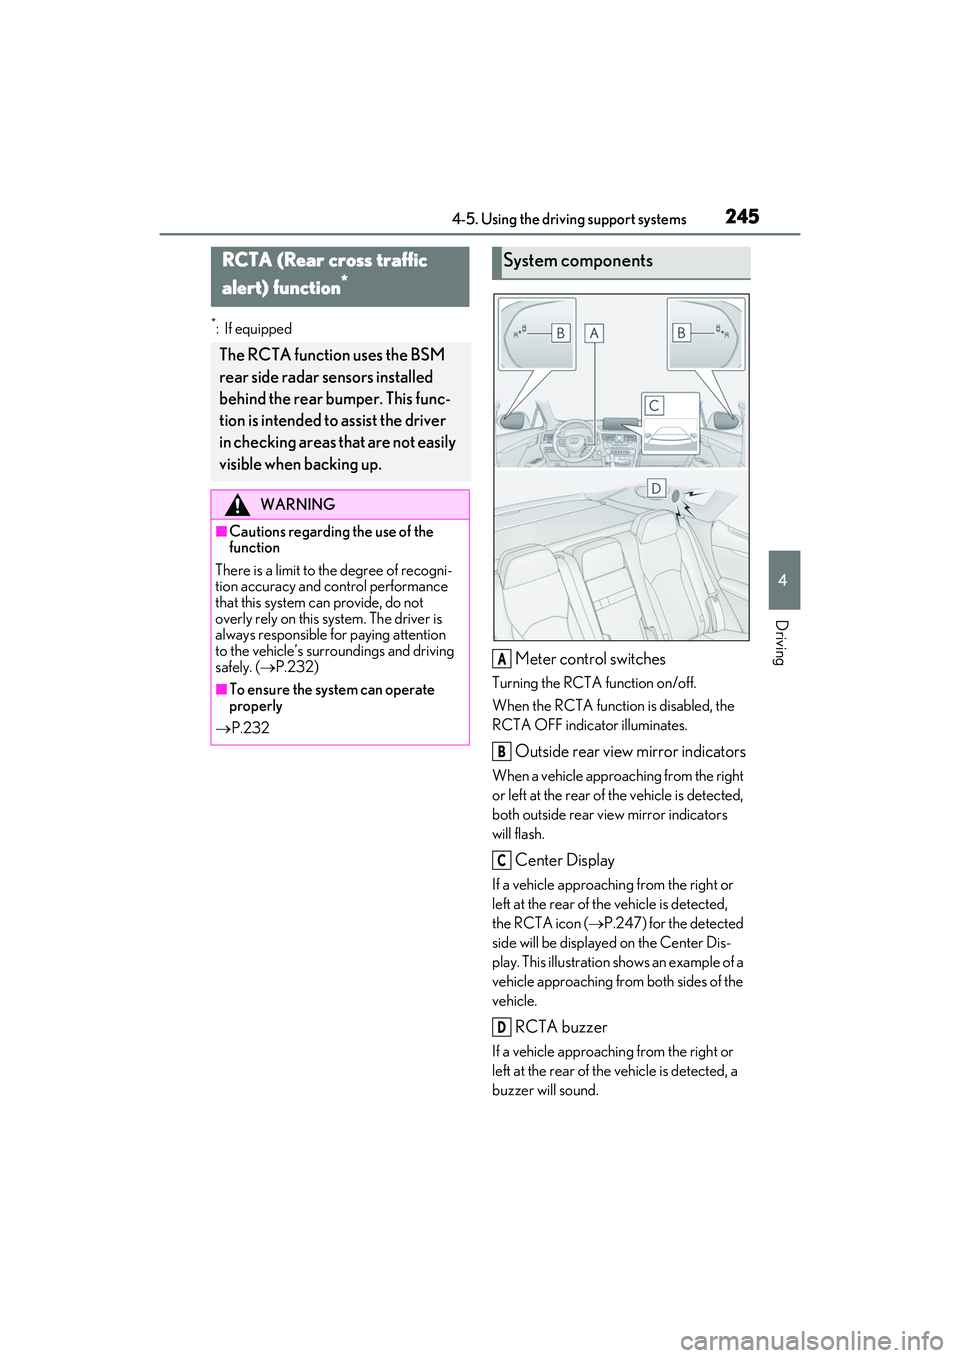
Meter control switches
Turning the RCTA function on/off.
When the RCTA function is disabled, the
RCTA OFF indicator illuminates.
Outside rear view mirror indicators
When a vehicle approaching from the right
or left at the rear of the vehicle is detected,
both outside rear view mirror indicators
will flash.
Center Display
If a vehicle approaching from the right or
left at the rear of the vehicle is detected,
the RCTA icon ( P.247) for the detected
side will be displaye d on the Center Dis-
play. This illustration shows an example of a
vehicle approaching from both sides of the
vehicle.
RCTA buzzer
If a vehicle approaching from the right or
left at the rear of the vehicle is detected, a
buzzer will sound.
RCTA (Rear cross traffic
alert) function
*
The RCTA function uses the BSM
rear side radar sensors installed
behind the rear bumper. This func-
tion is intended to assist the driver
in checking areas that are not easily
visible when backing up.
WARNING
■Cautions regarding the use of the
function
There is a limit to the degree of recogni-
tion accuracy and control performance
that this system can provide, do not
overly rely on this system. The driver is
always responsible for paying attention
to the vehicle’s surro undings and driving
safely. ( P.232)
■To ensure the system can operate
properly
P.232
System components
A
B
C
D
Page 253 of 508
2514-5. Using the driving support systems
4
Driving
*:If equipped
■Parking Support Brake function
(static objects) (if equipped)
Ultrasonic sensors are used to detect
static objects, such as a wall, in the
detection area when driving at a low
speed or backing up. ( P.257)
■Parking Support Brake function
(rear-crossing vehicles) (if
equipped)
Rear radar sensors are used to detect
approaching vehicles in the detection
area behind the vehicle when backing
up. ( P.260)
PKSB (Parking Support
Brake)
*
The Parking Support Brake system
consists of the following functions
that operate when driving at a low
speed or backing up, such as when
parking. When the system deter-
mines that the possibility of a colli-
sion with a detected object is high, a
warning operates to urge the driver
to take evasive action. If the system
determines that the possibility of a
collision with a detected object is
extremely high, the brakes are
automatically applie d to help avoid
the collision or help reduce the
impact of the collision.
PKSB (Parking Support Brake)
system
WARNING
■Cautions regarding the use of the sys-
tem
Do not overly rely on the system, as
doing so may lead to an accident.
●The driver is solely responsible for safe
driving. Always drive carefully, taking
care to observe your surroundings.
The Parking Support Brake system is
designed to provide support to lessen
the severity of collisions. However, it
may not operate in some situations.
●The Parking Support Brake system is
not designed to stop the vehicle com-
pletely. Additionally, even if the system
has stopped the vehicl e, it is necessary
to depress the brake pedal immedi-
ately as brake control will be canceled
after approximately 2 seconds.
●It is extremely dangerous to check the
system operations by intentionally
driving the vehicle into the direction of
a wall, etc. Never attempt such actions.
■When to disable the Parking Support
Brake
In the following situations, disable the
Parking Support Brake as the system
may operate even though there is no
possibility of a collision.
●When inspecting the vehicle using a
chassis roller, chassis dynamo or free
roller
●When loading the vehicle onto a boat,
truck or other transport vessel
●If the suspension has been modified or
tires of a size othe r than specified are
installed
●If the front of the vehicle is raised or
lowered due to the carried load
●When equipment that may obstruct a
sensor is installed, such as a towing
eyelet, bumper protector (an addi-
tional trim strip, etc.), bicycle carrier, or
snow plow
Page 264 of 508
2624-5. Using the driving support systems
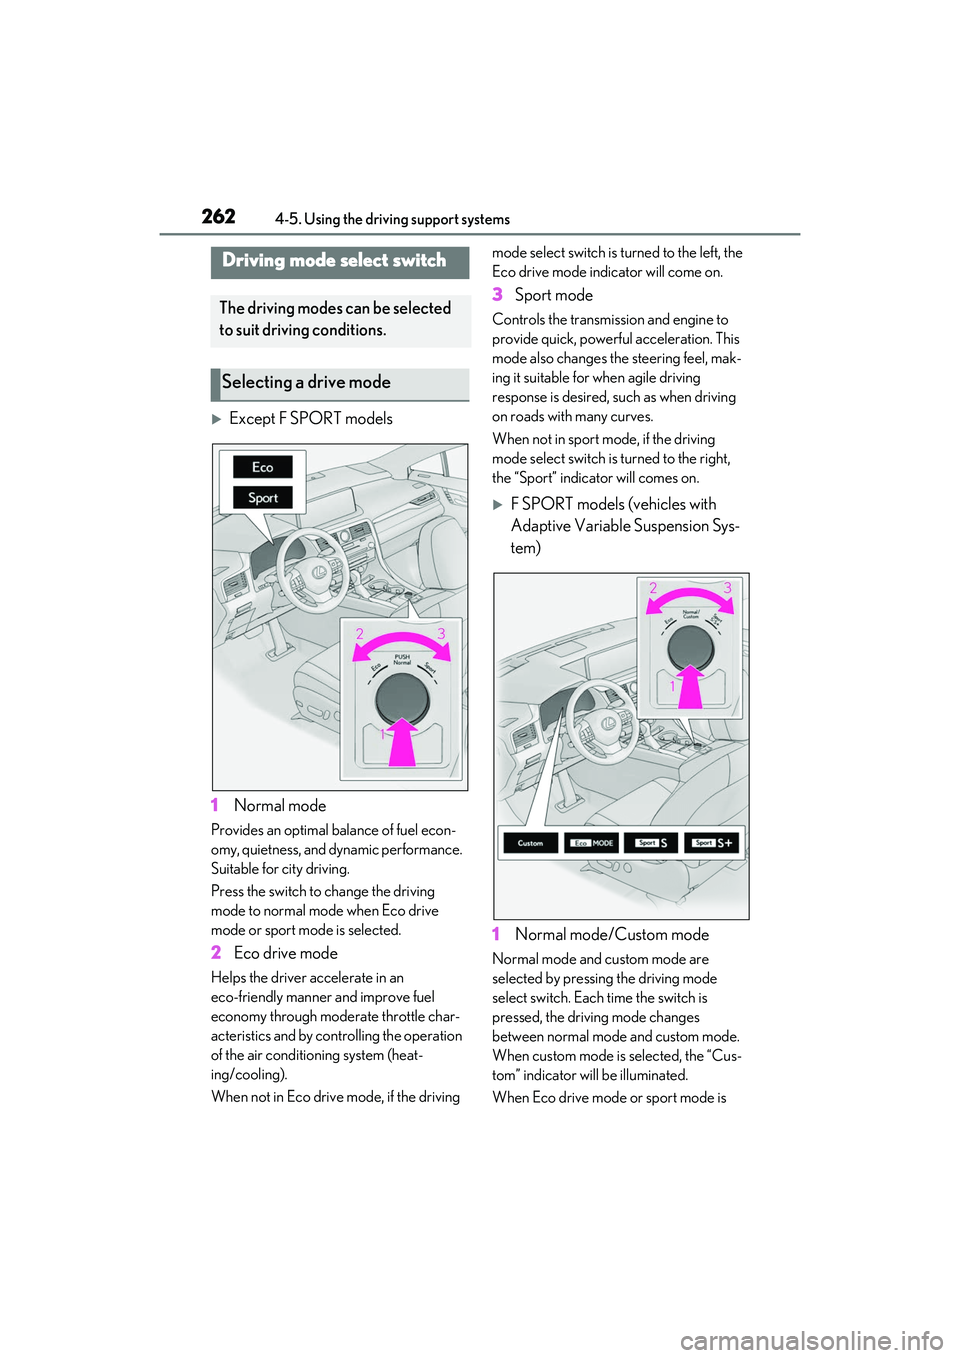
Except F SPORT models
1 Normal mode
Provides an optimal balance of fuel econ-
omy, quietness, and dynamic performance.
Suitable for city driving.
Press the switch to change the driving
mode to normal mode when Eco drive
mode or sport mode is selected.
2 Eco drive mode
Helps the driver accelerate in an
eco-friendly manner and improve fuel
economy through modera te throttle char-
acteristics and by controlling the operation
of the air conditioning system (heat-
ing/cooling).
When not in Eco drive mode, if the driving mode select switch is turned to the left, the
Eco drive mode indicator will come on.
3
Sport mode
Controls the transmission and engine to
provide quick, powerful acceleration. This
mode also changes the steering feel, mak-
ing it suitable for when agile driving
response is desired, such as when driving
on roads with many curves.
When not in sport mode, if the driving
mode select switch is turned to the right,
the “Sport” indicator will comes on.
F SPORT models (vehicles with
Adaptive Variable Suspension Sys-
tem)
1 Normal mode/Custom mode
Normal mode and custom mode are
selected by pressing the driving mode
select switch. Each time the switch is
pressed, the driving mode changes
between normal mode and custom mode.
When custom mode is selected, the “Cus-
tom” indicator will be illuminated.
When Eco drive mode or sport mode is
Driving mode select switch
The driving modes can be selected
to suit driving conditions.
Selecting a drive mode
Page 265 of 508
2634-5. Using the driving support systems
4
Driving
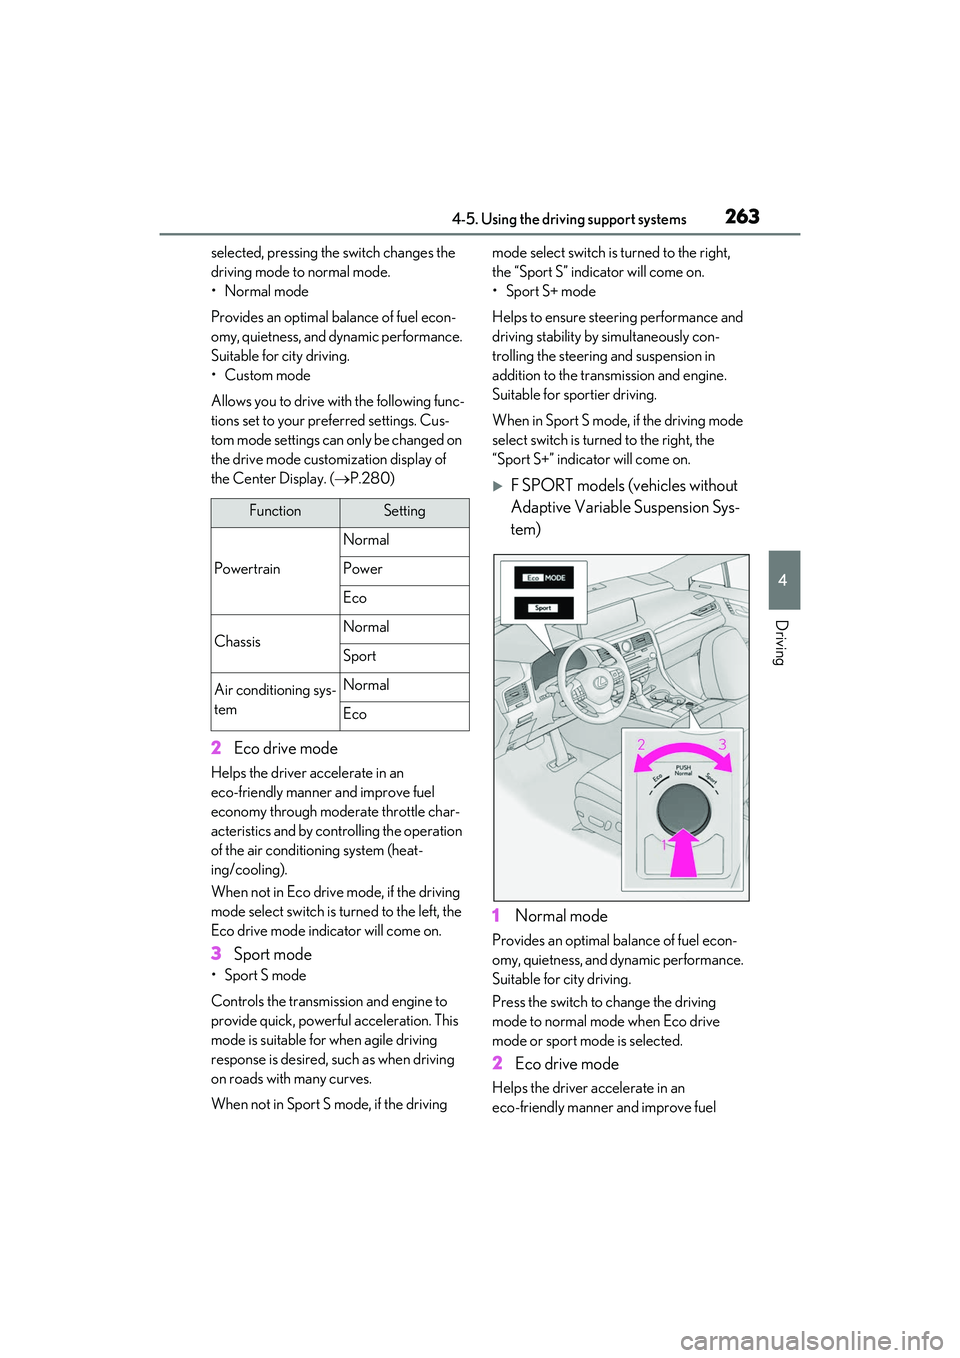
selected, pressing the switch changes the
driving mode to normal mode.
•Normal mode
Provides an optimal balance of fuel econ-
omy, quietness, and dynamic performance.
Suitable for city driving.
•Custom mode
Allows you to drive with the following func-
tions set to your preferred settings. Cus-
tom mode settings can only be changed on
the drive mode custom ization display of
the Center Display. ( P.280)
2Eco drive mode
Helps the driver accelerate in an
eco-friendly manner and improve fuel
economy through modera te throttle char-
acteristics and by controlling the operation
of the air conditioning system (heat-
ing/cooling).
When not in Eco drive mode, if the driving
mode select switch is turned to the left, the
Eco drive mode indicator will come on.
3 Sport mode
• Sport S mode
Controls the transmission and engine to
provide quick, powerful acceleration. This
mode is suitable for when agile driving
response is desired, such as when driving
on roads with many curves.
When not in Sport S mode, if the driving mode select switch is
turned to the right,
the “Sport S” indicator will come on.
• Sport S+ mode
Helps to ensure stee ring performance and
driving stability by simultaneously con-
trolling the steering and suspension in
addition to the transmission and engine.
Suitable for sportier driving.
When in Sport S mode, if the driving mode
select switch is turned to the right, the
“Sport S+” indicator will come on.
F SPORT models (vehicles without
Adaptive Variable Suspension Sys-
tem)
1 Normal mode
Provides an optimal balance of fuel econ-
omy, quietness, and dynamic performance.
Suitable for city driving.
Press the switch to change the driving
mode to normal mo de when Eco drive
mode or sport mode is selected.
2 Eco drive mode
Helps the driver accelerate in an
eco-friendly manner and improve fuel
FunctionSetting
Powertrain
Normal
Power
Eco
ChassisNormal
Sport
Air conditioning sys-
temNormal
Eco
Page 266 of 508
2644-5. Using the driving support systems
economy through moderate throttle char-
acteristics and by controlling the operation
of the air conditioning system (heat-
ing/cooling).
When not in Eco drive mode, if the driving
mode select switch is turned to the left, the
Eco drive mode indicator will come on.
3 Sport mode
Controls the transmission and engine to
provide quick, powerful acceleration. This
mode also changes the steering feel, mak-
ing it suitable for when agile driving
response is desired, such as when driving
on roads with many curves.
When not in sport mode, if the driving
mode select switch is turned to the right,
the “Sport” indicator will comes on.
■Operation of the air conditioning sys-
tem in Eco drive mode
Eco drive mode contro ls the heating/cool-
ing operations and fan speed of the air con-
ditioning system to enhance fuel efficiency.
To improve air condit ioning performance,
adjust the fan speed or turn off Eco drive
mode.
■Automatic deactivation of sport mode
and custom mode
If the engine switch is turned off after driv-
ing in sport mode or custom mode, the
drive mode will be changed to normal
mode.
■Driving mode pop-up display (12.3-inch
display only)
When the driving mode is changed, the
selected driving mode will be temporarily
displayed on the side display. (P.280)
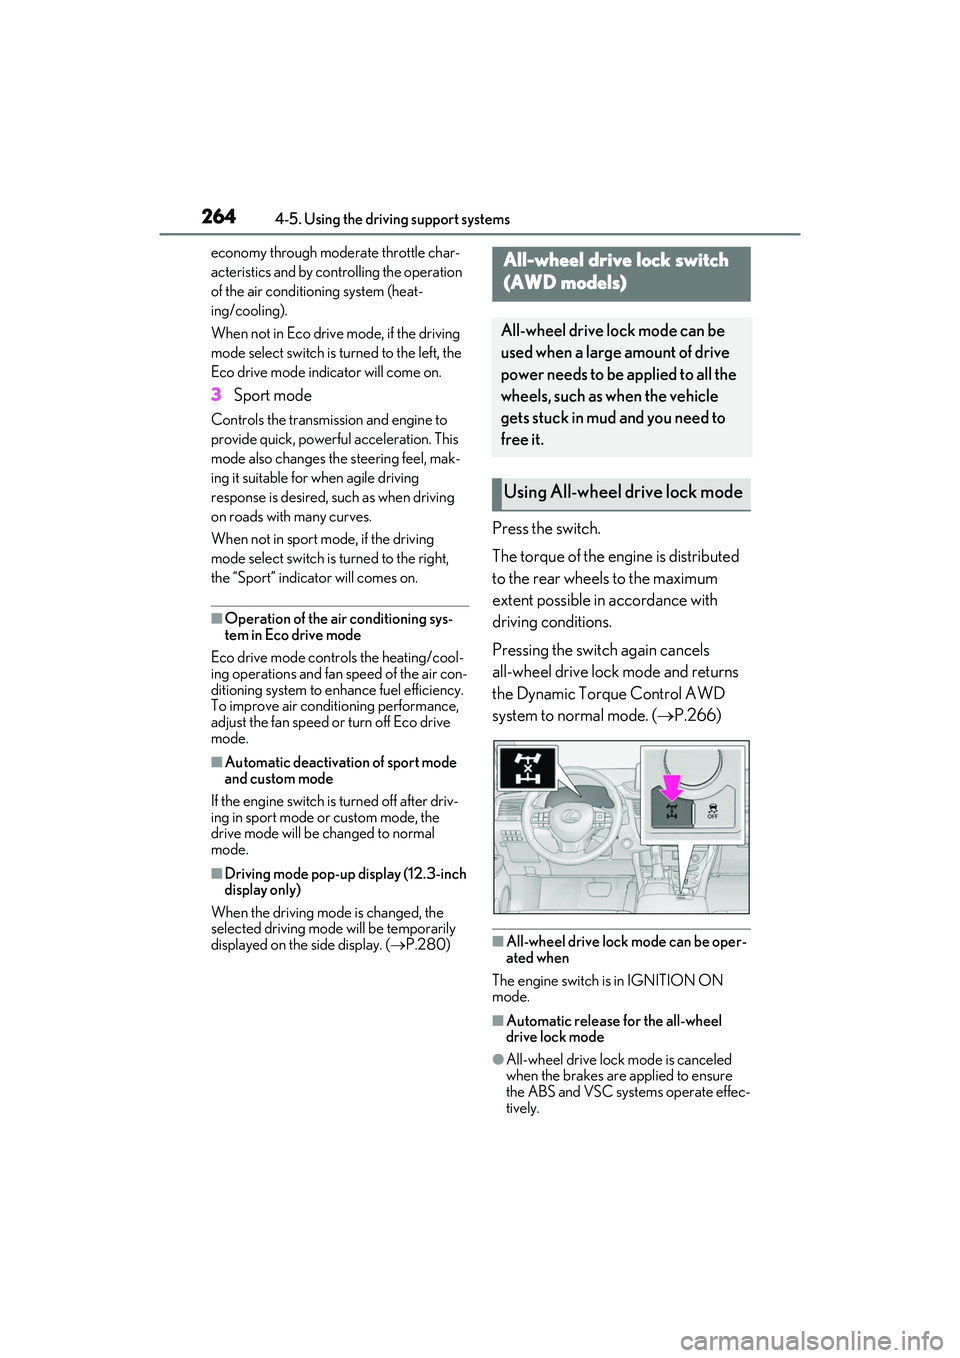
Press the switch.
The torque of the engine is distributed
to the rear wheels to the maximum
extent possible in accordance with
driving conditions.
Pressing the switch again cancels
all-wheel drive lock mode and returns
the Dynamic Torque Control AWD
system to normal mode. ( P.266)
■All-wheel drive lock mode can be oper-
ated when
The engine switch is in IGNITION ON
mode.
■Automatic release for the all-wheel
drive lock mode
●All-wheel drive lock mode is canceled
when the brakes are applied to ensure
the ABS and VSC systems operate effec-
tively.
All-wheel drive lock switch
(AWD models)
All-wheel drive lock mode can be
used when a large amount of drive
power needs to be applied to all the
wheels, such as when the vehicle
gets stuck in mud and you need to
free it.
Using All-wheel drive lock mode