Page 57 of 70

The sunroof and sunshade operation is controlled by a multi-directional switch/lever A . The ignition needs to be in the ON position to operate the sunroof/sunshade .
To slide the sunshade and sunroof:
Auto Open – Push the lever A backward to the second detent position and release .
Auto Close – Push the lever A forward to the second detent position and release .
To slide the sunshade only:
Auto Open – Push the lever A backward to the first detent position and release .
Auto Close – Push the lever A forward to the first detent position and release .
Slide the sunroof (with sunshade open):
Auto Open – Push the lever A backward to the first detent position and release .
Auto Close – Push the lever A forward to the first detent position and release to close sunroof glass only . Push the lever A forward to the second detent position and release to close sunroof glass and sunshade .
To tilt the sunroof:
Raise: Push and release lever A upward
Lower: Push and release lever A upward
Auto-close sunroof and sunshade:
Slide the lever forward to the farthest position .
OTHER KEY FEATURES
Your vehicle’s sunroof controls may differ from that in the illustration .
See section 4 in the Owner’s Manual for more information .
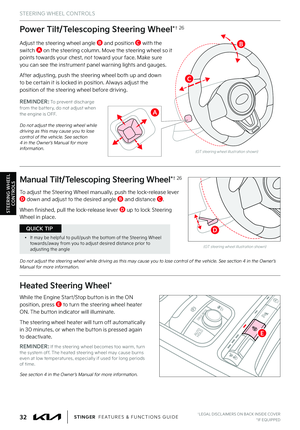
Sunroof Operation*
Refer to the inside front cover for more information on QR codes .www .youtube .com/KiaFeatureVideos
Sunroof Operation Video
QR CODE
ALWAYS CHECK THE OWNER ’S MANUAL FOR COMPLETE OPER ATING INFORMATION AND SAFET Y WARNINGS . *IF EQUIPPED55
A
OTHER KEY
FEATURES
•To stop the sunroof/sunshade at any position, press or pull the sunroof control lever in any direction
QUICK TIP
REMINDERS:
•
Sunshade must remain OPEN while sunroof is open
•
If the ignition is turned off with the Sunroof not fully closed, the Instrument Cluster LCD will display a warning message and a chime will sound for a few seconds
•
Do not adjust the sunroof or sunshade while driving . This could result in loss of control of the vehicle
(But ton located within overhead lamp console)
Page 58 of 70

Fuel Door Release Button
Press the Fuel Door Release button C to open the fuel door .
See section 4 in the Owner’s Manual fo")
(But ton located on driver ’s panel, left of the steering wheel)
Fuel Door Release Button
Press the Fuel Door Release button C to open the fuel door .
See section 4 in the Owner’s Manual for more information .
See section 4 in the Owner’s Manual for more information .
(Located on Driver side kick panel)(Located inside of Hood’s center)
See section 4 in the Owner’s Manual for more information .
OTHER KEY FEATURES
†LEGAL DISCL AIMERS ON BACK INSIDE COVER*IF EQUIPPED56STINGER FEATURES & FUNCTIONS GUIDE
Use the sunvisor to shield direct light through the front or side windows .
Slide the sunvisor out and adjust as needed .
Sunvisor† 25
Opening the Hood:
1 .
Pull the hood release lever A to unlatch the hood
2 .
In the front of the vehicle, lift the hood slightly . Push the secondary latch B inside of the hood’s center and lift the hood
Closing the Hood:
Lower the hood about halfway and then press down to securely lock in place .
Hood Release Lever and Latch
REMINDERS:
•
Sunvisor may not shield all direct light
•
Sunvisor may impair visibilit y if not adjusted properly
•
Be aware of seating position when adjusting or swinging sunvisor around to or from the front or side windows
•
Do not operate the vehicle if the sunvisor is impairing your visibility
OTHER KEY
FEATURES
A
B
C
Page 59 of 70
OTHER KEY FEATURES
Fuel Cap / Malfunction Indicator (Check Engine Light)
Tighten for ONE CLICK to prevent malfunction indicator from illuminating .
See section 4 in the Owner’s Manual for more information .
Refer to the inside front cover for more information on QR codes .www .youtube .com/KiaFeatureVideos
One-Click Fuel Cap Video
QR CODE
ALWAYS CHECK THE OWNER ’S MANUAL FOR COMPLETE OPER ATING INFORMATION AND SAFET Y WARNINGS . *IF EQUIPPED57
REMINDERS:
•
The Fuel Filler Door Release but ton is located on the lower par t of the driver ’s door sill
•
It is normal to hear one click when tightening and for the Fuel Cap to click back when released
OTHER KEY
FEATURES
•Place the Fuel Cap on the inside of the Fuel Filler Lid when fueling
QUICK TIP
Page 60 of 70

Seat Belts† 2,20
To properly fasten your safety belts:
Insert the belt tongue plate A into the buckle until it clicks
Position the lap portion of the belt across your lap as LOW ON THE HIPS as possible C . Adjust the belt to a SNUG FIT by pulling up on the shoulder portion B
Seat Belt Retractor Locks
Retractor locks allow lap/shoulder safety belts to remain unlocked during normal vehicle operation for freedom of movement and increased comfort .
During a STRONG STOP, SUDDEN TURN OR CERTAIN COLLISIONS, seat belt retractors will automatically lock the belts to help reduce the risk of injury .
For more detailed information regarding your vehicle’s safety belts, please refer to to section 3 in the Owner’s Manual and the separate brochure titled “Understanding Your Safety Belt & Supplemental Restraint System . ”
SAFET Y FEATURES
SAFETYFEATURES†LEGAL DISCL AIMERS ON BACK INSIDE COVER*IF EQUIPPED58STINGER FEATURES & FUNCTIONS GUIDE
A
B
C
REMINDER: For maximum protection, always wear your seatbelt
•The seat belt warning chime operates for the driver ’s seat only
QUICK TIP
Page 61 of 70
 / Passenger Airbag Off Indicator† 2 ,")
See section 3 in the Owner’s Manual for more information .
RADIO
MEDIA SEEKTRACK MAP
N AVSETUPMAPPASSENGERPASSENGER
AIR BAGOFF
Occupant Detection System (ODS) / Passenger Airbag Off Indicator† 2 ,17
ODS is designed to detect the presence and position of the front passenger and is designed to adjust or turn off airbag deployment accordingly .
Depending on the situation and type of accident, the system may:
•Deploy airbag (Adult)
•Not deploy the airbag (Unoccupied)
If the system determines that the airbag should not be deployed, the “PASSENGER AIRBAG OFF” light will illuminate A .
SAFET Y FEATURES
SAFETYFEATURES
Child-Protector Rear Door Lock
Located on the rear edge of the rear passenger doors, move the Child-Protector Rear Door Lock located on the rear edge of the rear passenger doors to the lock position to disable the inner door handles from opening the rear doors .
ALWAYS CHECK THE OWNER ’S MANUAL FOR COMPLETE OPER ATING INFORMATION AND SAFET Y WARNINGS . †LEGAL DISCL AIMERS ON BACK INSIDE COVER*IF EQUIPPED59
A
REMINDER: Child-Protector Rear Door Lock is located on rear passenger door jamb .
See section 4 in the Owner’s Manual for more information .
Page 62 of 70
 . If necessar y, adjust, correct, clean or replac")
MAINTENANCE
STINGER SMARTSTREAM G2.5L TURBO-GDI
‡ If equipped .A . See the Owner ’s Manual for complete maintenance schedule .B . (next page) . If necessar y, adjust, correct, clean or replaceC . Kia recommends that you use unleaded gasoline which has an octane rating of RON (Research Octane Number) 95/AKI (Anti Knock Index) 91 or higher . For owners who do not use good qualit y gasolines including fuel additives regularly, and have problems star ting or the engine does not run smoothly, one bot tle of additives should be added to the fuel tank at ever y 8,000 miles . Additives are available from an authorized Kia dealer . Do not mix with other additives .
D . Check the engine oil level and leaks when stopping for fuel or before star ting a long trip . As it is normal for engine oil to be consumed during driving, the engine oil level should be checked on regular basis . The engine oil change inter val for normal operating conditions is based on the use of the recommended engine specification . If the recommended engine oil specification is not used, then replace the engine oil according to the maintenance schedule under severe operating conditions .
*IF EQUIPPED60STINGER FEATURES & FUNCTIONS GUIDE
(up to ����,������ miles)AMAINTENANCE INTERVALS (MILES)
MAINTENANCE ITEMS��,����������,����������,����������,������
Add fuel additiveCPPPP
Rotate tiresPPPP
Engine oil and filter (Full Synthetic)DRRRR
�#attery conditionIIII
�#rake lines, hoses and connectionsIIII
�#rake discs and padsIIII
Vacuum hosesIIII
Steering gear rack, linkage �� bootsIIII
Suspension ball �KointsIIII
Air conditioner compressor��refrigerantIIII
Exhaust systemIIII
Air cleaner filter (engine)IIRI
Climate control air filterIRIR
�#rake fluidIIII
Drive shafts and bootsII
Propeller shaftII
Air intake hoseII
Fuel tank air filter�
Page 63 of 70

MAINTENANCE
NORMAL MAINTENANCE SCHEDULE
P=Perform
R=Replace
I=InspectB
See your Owner’s Manual for more details and complete maintenance information, including severe maintenance schedule . Warranty may be voided if maintenance schedule is not followed .
ALWAYS CHECK THE OWNER ’S MANUAL FOR COMPLETE OPER ATING INFORMATION AND SAFET Y WARNINGS . *IF EQUIPPED61
•Place the Fuel Cap on the inside of the Fuel Filler Lid when fueling
QUICK TIPE . Fuel filter & fuel tank air filter are considered to be maintenance free but periodic inspection is recommended for this maintenance schedule depending on fuel qualit y . If there are some impor tant safet y mat ters like fuel flow restriction, surging, loss of power, hard star ting problems, etc ., replace the fuel filter immediately regardless of maintenance schedule and consult an authorized Kia dealer for details .F . Front/rear differential oil should be changed any time they have been submerged in water . When replacing differential oil with LSD, use only specified LSD oil .G . Inspect for excessive tappet noise and/or engine vibration and adjust if necessary .H . Inspect alternator, water pump and air conditioner drive belt and if necessar y, repair or replace .Inspect drive belt tensioner, idler and alternator pulley and if necessar y correct or replace .
MAINTENANCE INTERVALS (MILES)
40,00048,00056,00064,00072,00080,000
PPPPPP
PPPPPP
RRRRRR
IIIIII
IIIIII
IIIIII
IIIIII
IIIIII
IIIIII
IIIIII
IIIIII
IRIIRI
IRIRIR
IRIIII
III
III
III
III
III
III
II
III
II
RR
II
R
I
IIIII
Page 64 of 70
 . If necessar y, adjust, correct, clean or replaceC . Kia")
62STINGER FEATURES & FUNCTIONS GUIDE
‡ If equipped .A . See the Owner ’s Manual for complete maintenance schedule .B . (next page) . If necessar y, adjust, correct, clean or replaceC . Kia recommends that you use unleaded gasoline which has an octane rating of RON (Research Octane Number) 95/AKI (Anti Knock Index) 91 or higher . For owners who do not use good qualit y gasolines including fuel additives regularly, and have problems star ting or the engine does not run smoothly, one bot tle of additives should be added to the fuel tank at ever y 8,000 miles . Additives are available from an authorized Kia dealer . Do not mix with other additives .
D . Check the engine oil level and leaks when stopping for fuel or before star ting a long trip . As it is normal for engine oil to be consumed during driving, the engine oil level should be checked on regular basis . The engine oil change inter val for normal operating conditions is based on the use of the recommended engine specification . If the recommended engine oil specification is not used, then replace the engine oil according to the maintenance schedule under severe operating conditions .
STINGER 3.3L TURBO-GDI
MAINTENANCE
(up to 60,000 miles)AMAINTENANCE INTERVALS (MILES)
MAINTENANCE ITEMS6,00012,00018,00024,000
Add fuel additiveCPPPP
Rotate tiresPPPP
Engine oil and filter (Full Synthetic)DRRRR
Battery conditionIIII
Brake lines, hoses and connectionsIIII
Brake discs and padsIIII
Vacuum hosesIIII
Steering gear rack, linkage & bootsIIII
Suspension ball jointsIIII
Air conditioner compressor/refrigerantIIII
Exhaust systemIIII
Climate control air filterIRIR
Brake fluidIIII
Air cleaner filterIR
Drive shafts and bootsII
Propeller shaftII
Intercooler, in/out hose, air intake hoseII
Fuel tank air filter�


Tighten for ONE CLICK to prevent malfunction indicator from illuminating .
See section 4 in the Owner’s Manual for more info")