Page 39 of 630
Safety features of your vehicle
22
3
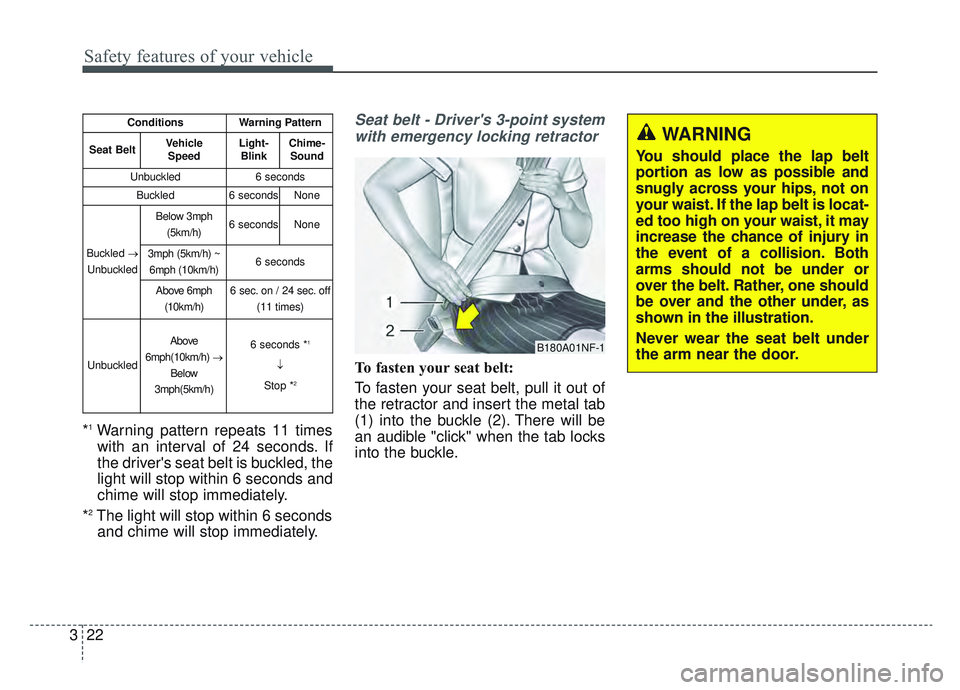
*1Warning pattern repeats 11 times
with an interval of 24 seconds. If
the driver's seat belt is buckled, the
light will stop within 6 seconds and
chime will stop immediately.
*
2The light will stop within 6 seconds and chime will stop immediately.
Seat belt - Driver's 3-point system
with emergency locking retractor
To fasten your seat belt:
To fasten your seat belt, pull it out of
the retractor and insert the metal tab
(1) into the buckle (2). There will be
an audible "click" when the tab locks
into the buckle.
ConditionsWarning Pattern
Seat BeltVehicle
SpeedLight-BlinkChime-Sound
Unbuckled6 seconds
Buckled6 secondsNone
Buckled →
Unbuckled
Below 3mph (5km/h)6 secondsNone
3mph (5km/h) ~6mph (10km/h)6 seconds
Above 6mph (10km/h)6 sec. on / 24 sec. off (11 times)
Unbuckled
Above
6mph(10km/h) →
Below
3mph(5km/h)6 seconds *1
↓
Stop *
2
B180A01NF-1
WARNING
You should place the lap belt
portion as low as possible and
snugly across your hips, not on
your waist. If the lap belt is locat-
ed too high on your waist, it may
increase the chance of injury in
the event of a collision. Both
arms should not be under or
over the belt. Rather, one should
be over and the other under, as
shown in the illustration.
Never wear the seat belt under
the arm near the door.
Page 60 of 630
343
Safety features of your vehicle
To install a child restraint system on
the rear seats, do the following:
1.Place the child restraint system ona rear seat and route the lap/ shoul-
der belt around or through the child
restraint, following the restraint
manufacturer’s instructions.
Be sure the seat belt webbing is
not twisted.
2. Fasten the lap/shoulder belt latchinto the buckle. Listen for the dis-
tinct "click" sound.
Position the release button so that
it is easy to access in case of an
emergency. 3. Pull the shoulder portion of the
seat belt all the way out. When the
shoulder portion of the seat belt is
fully extended, it will shift the
retractor to the "Automatic
Locking" (child restraint) mode.
OEN036101ODM036071
Page 61 of 630
Safety features of your vehicle
44
3
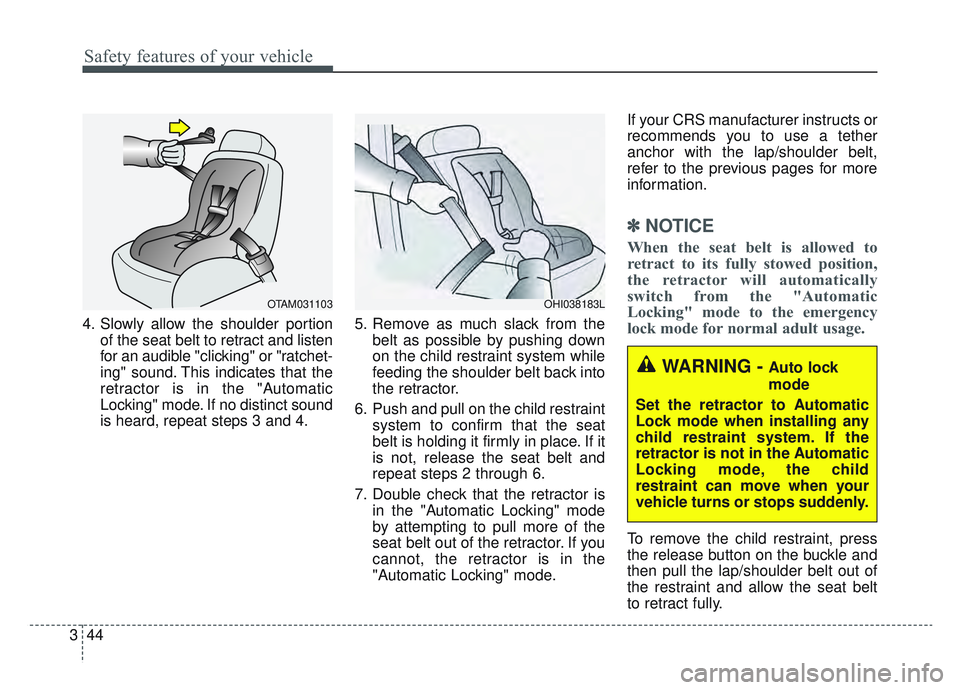
4. Slowly allow the shoulder portion
of the seat belt to retract and listen
for an audible "clicking" or "ratchet-
ing" sound. This indicates that the
retractor is in the "Automatic
Locking" mode. If no distinct sound
is heard, repeat steps 3 and 4. 5. Remove as much slack from the
belt as possible by pushing down
on the child restraint system while
feeding the shoulder belt back into
the retractor.
6. Push and pull on the child restraint system to confirm that the seat
belt is holding it firmly in place. If it
is not, release the seat belt and
repeat steps 2 through 6.
7. Double check that the retractor is in the "Automatic Locking" mode
by attempting to pull more of the
seat belt out of the retractor. If you
cannot, the retractor is in the
"Automatic Locking" mode. If your CRS manufacturer instructs or
recommends you to use a tether
anchor with the lap/shoulder belt,
refer to the previous pages for more
information.
✽ ✽
NOTICE
When the seat belt is allowed to
retract to its fully stowed position,
the retractor will automatically
switch from the "Automatic
Locking" mode to the emergency
lock mode for normal adult usage.
To remove the child restraint, press
the release button on the buckle and
then pull the lap/shoulder belt out of
the restraint and allow the seat belt
to retract fully.
OTAM031103
WARNING - Auto lock
mode
Set the retractor to Automatic
Lock mode when installing any
child restraint system. If the
retractor is not in the Automatic
Locking mode, the child
restraint can move when your
vehicle turns or stops suddenly.
OHI038183L
Page 96 of 630
47
Features of your vehicle
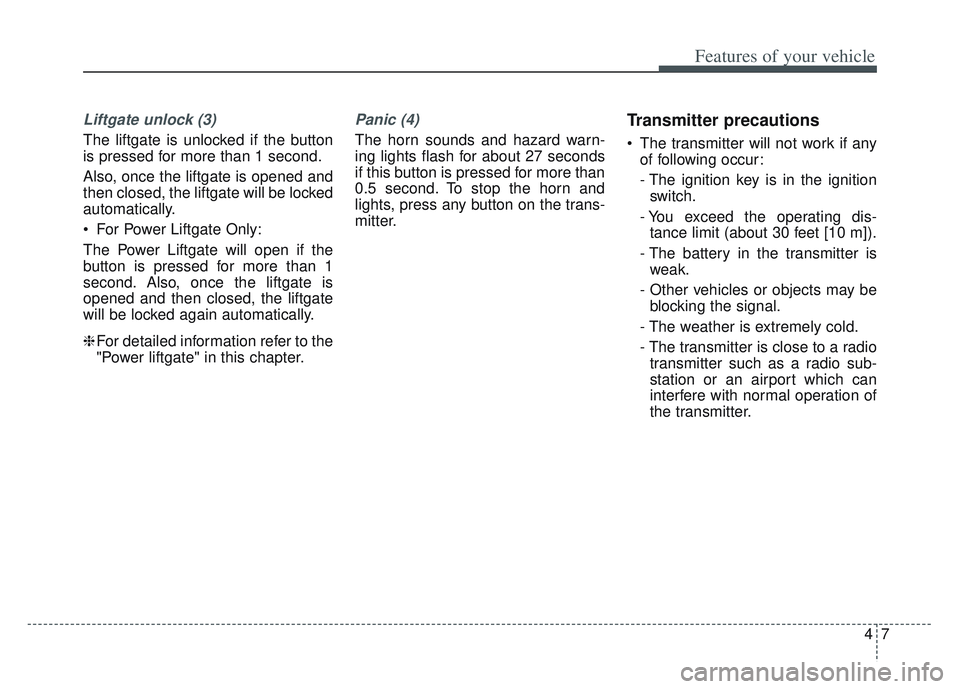
Liftgate unlock (3)
The liftgate is unlocked if the button
is pressed for more than 1 second.
Also, once the liftgate is opened and
then closed, the liftgate will be locked
automatically.
For Power Liftgate Only:
The Power Liftgate will open if the
button is pressed for more than 1
second. Also, once the liftgate is
opened and then closed, the liftgate
will be locked again automatically.
❈For detailed information refer to the
"Power liftgate" in this chapter.
Panic (4)
The horn sounds and hazard warn-
ing lights flash for about 27 seconds
if this button is pressed for more than
0.5 second. To stop the horn and
lights, press any button on the trans-
mitter.
Transmitter precautions
The transmitter will not work if any
of following occur:
- The ignition key is in the ignitionswitch.
- You exceed the operating dis- tance limit (about 30 feet [10 m]).
- The battery in the transmitter is weak.
- Other vehicles or objects may be blocking the signal.
- The weather is extremely cold.
- The transmitter is close to a radio transmitter such as a radio sub-
station or an airport which can
interfere with normal operation of
the transmitter.
Page 102 of 630
413
Features of your vehicle
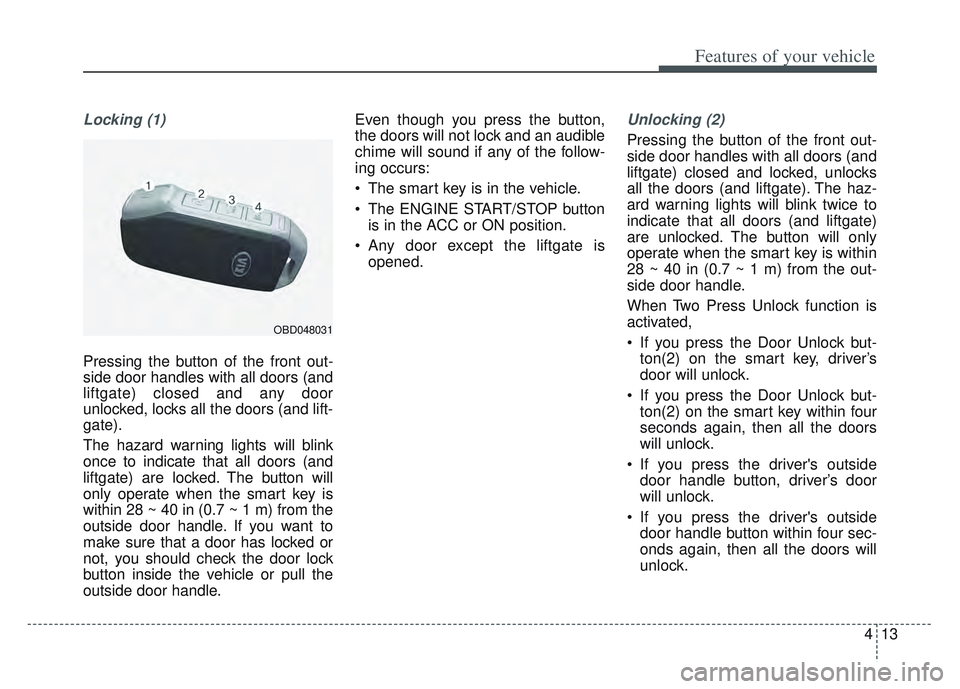
Locking (1)
Pressing the button of the front out-
side door handles with all doors (and
liftgate) closed and any door
unlocked, locks all the doors (and lift-
gate).
The hazard warning lights will blink
once to indicate that all doors (and
liftgate) are locked. The button will
only operate when the smart key is
within 28 ~ 40 in (0.7 ~ 1 m) from the
outside door handle. If you want to
make sure that a door has locked or
not, you should check the door lock
button inside the vehicle or pull the
outside door handle. Even though you press the button,
the doors will not lock and an audible
chime will sound if any of the follow-
ing occurs:
The smart key is in the vehicle.
The ENGINE START/STOP button
is in the ACC or ON position.
Any door except the liftgate is opened.
Unlocking (2)
Pressing the button of the front out-
side door handles with all doors (and
liftgate) closed and locked, unlocks
all the doors (and liftgate). The haz-
ard warning lights will blink twice to
indicate that all doors (and liftgate)
are unlocked. The button will only
operate when the smart key is within
28 ~ 40 in (0.7 ~ 1 m) from the out-
side door handle.
When Two Press Unlock function is
activated,
If you press the Door Unlock but-ton(2) on the smart key, driver’s
door will unlock.
If you press the Door Unlock but- ton(2) on the smart key within four
seconds again, then all the doors
will unlock.
If you press the driver's outside door handle button, driver’s door
will unlock.
If you press the driver's outside door handle button within four sec-
onds again, then all the doors will
unlock.
OBD048031
Page 103 of 630
Features of your vehicle
14
4
✽ ✽
NOTICE
You can active or deactivate the Two
Press Unlock function from the User
Settings mode in the LCD display.
Refer to “User Settings” in this
chapter.
Liftgate unlocking (3)
If you are within 28 ~ 40 in (0.7 ~ 1 m)
from the outside liftgate handle, with
your smart key in possession, the lift-
gate will unlock and open when you
press the liftgate handle switch.
The hazard warning lights will blink
twice to indicate that the liftgate is
unlocked.
Also, once the liftgate is opened and
then closed, the liftgate will lock
automatically.
Panic (4)
1. Press the panic button (4) for more than 1 second.
2. The horn sounds and hazard warning light flash for about 27
seconds.
✽ ✽NOTICE
To stop the horn and lights, press
any button on the smart key.
Engine start
You can start the engine without insert-
ing the key. For detailed information
refer to the “ENGINE START/STOP
button” in chapter 5.
Page 104 of 630
415
Features of your vehicle
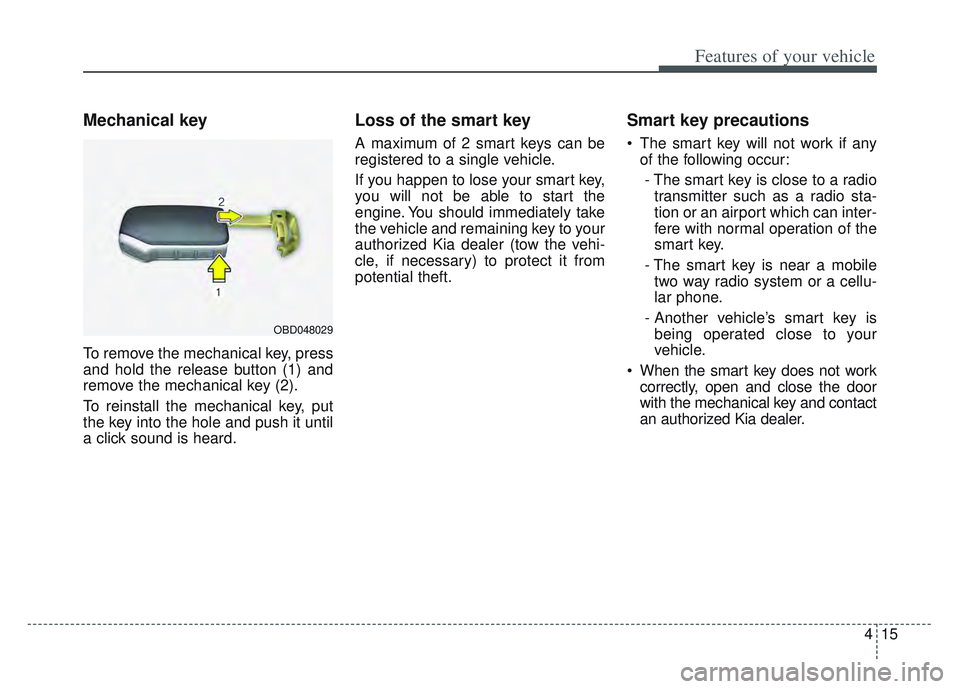
Mechanical key
To remove the mechanical key, press
and hold the release button (1) and
remove the mechanical key (2).
To reinstall the mechanical key, put
the key into the hole and push it until
a click sound is heard.
Loss of the smart key
A maximum of 2 smart keys can be
registered to a single vehicle.
If you happen to lose your smart key,
you will not be able to start the
engine. You should immediately take
the vehicle and remaining key to your
authorized Kia dealer (tow the vehi-
cle, if necessary) to protect it from
potential theft.
Smart key precautions
The smart key will not work if anyof the following occur:
- The smart key is close to a radio transmitter such as a radio sta-
tion or an airport which can inter-
fere with normal operation of the
smart key.
- The smart key is near a mobile two way radio system or a cellu-
lar phone.
- Another vehicle’s smart key is being operated close to your
vehicle.
When the smart key does not work correctly, open and close the door
with the mechanical key and contact
an authorized Kia dealer.
OBD048029
Page 109 of 630
Features of your vehicle
20
4
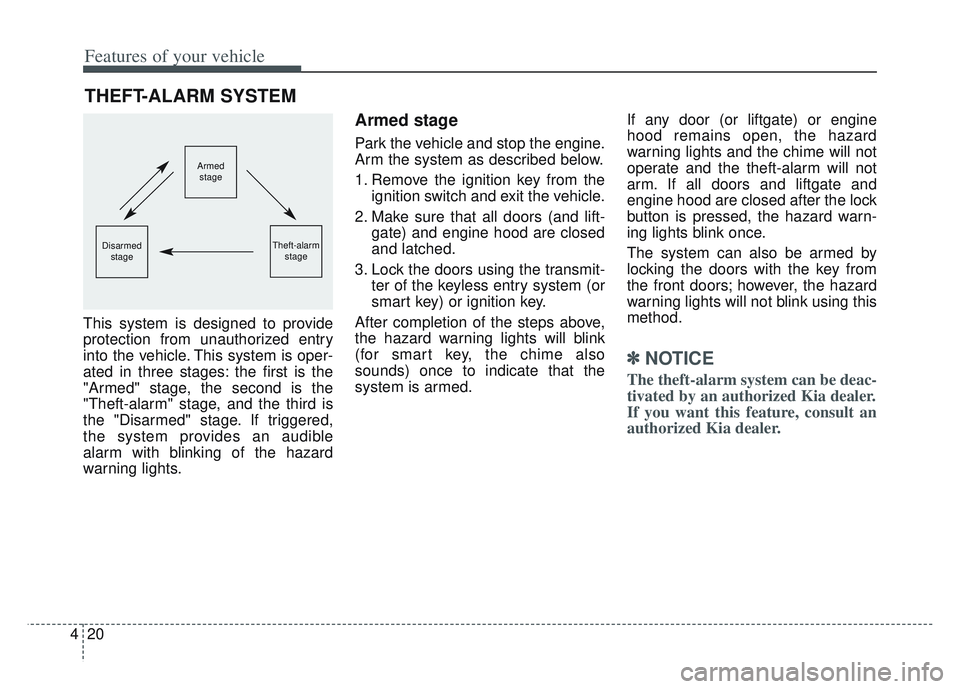
This system is designed to provide
protection from unauthorized entry
into the vehicle. This system is oper-
ated in three stages: the first is the
"Armed" stage, the second is the
"Theft-alarm" stage, and the third is
the "Disarmed" stage. If triggered,
the system provides an audible
alarm with blinking of the hazard
warning lights.
Armed stage
Park the vehicle and stop the engine.
Arm the system as described below.
1. Remove the ignition key from the
ignition switch and exit the vehicle.
2. Make sure that all doors (and lift- gate) and engine hood are closed
and latched.
3. Lock the doors using the transmit- ter of the keyless entry system (or
smart key) or ignition key.
After completion of the steps above,
the hazard warning lights will blink
(for smart key, the chime also
sounds) once to indicate that the
system is armed. If any door (or liftgate) or engine
hood remains open, the hazard
warning lights and the chime will not
operate and the theft-alarm will not
arm. If all doors and liftgate and
engine hood are closed after the lock
button is pressed, the hazard warn-
ing lights blink once.
The system can also be armed by
locking the doors with the key from
the front doors; however, the hazard
warning lights will not blink using this
method.
✽ ✽
NOTICE
The theft-alarm system can be deac-
tivated by an authorized Kia dealer.
If you want this feature, consult an
authorized Kia dealer.
THEFT-ALARM SYSTEM
Armed
stage
Theft-alarm stageDisarmedstage