Page 399 of 630
Driving your vehicle
114
5
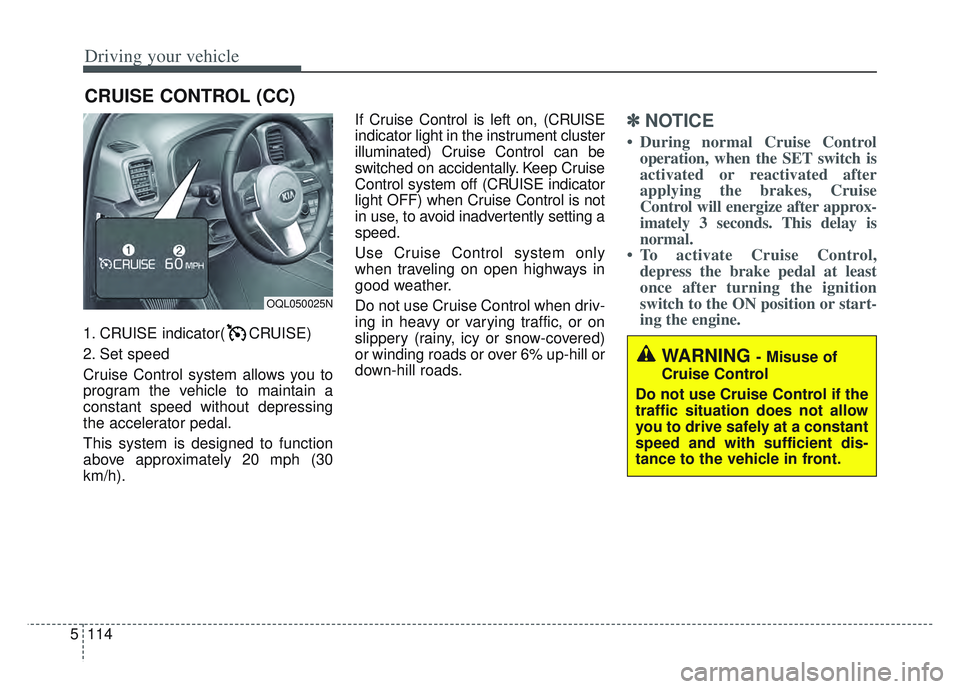
1. CRUISE indicator( CRUISE)
2. Set speed
Cruise Control system allows you to
program the vehicle to maintain a
constant speed without depressing
the accelerator pedal.
This system is designed to function
above approximately 20 mph (30
km/h). If Cruise Control is left on, (CRUISE
indicator light in the instrument cluster
illuminated) Cruise Control can be
switched on accidentally. Keep Cruise
Control system off (CRUISE indicator
light OFF) when Cruise Control is not
in use, to avoid inadvertently setting a
speed.
Use Cruise Control system only
when traveling on open highways in
good weather.
Do not use Cruise Control when driv-
ing in heavy or varying traffic, or on
slippery (rainy, icy or snow-covered)
or winding roads or over 6% up-hill or
down-hill roads.
✽ ✽
NOTICE
• During normal Cruise Control
operation, when the SET switch is
activated or reactivated after
applying the brakes, Cruise
Control will energize after approx-
imately 3 seconds. This delay is
normal.
• To activate Cruise Control, depress the brake pedal at least
once after turning the ignition
switch to the ON position or start-
ing the engine.
CRUISE CONTROL (CC)
WARNING - Misuse of
Cruise Control
Do not use Cruise Control if the
traffic situation does not allow
you to drive safely at a constant
speed and with sufficient dis-
tance to the vehicle in front.
OQL050025N
Page 400 of 630
5115
Driving your vehicle
To set Cruise Control speed:
1. Press the CRUISE button on thesteering wheel to turn the system
on. The CRUISE indicator light in
the instrument cluster will illumi-
nate.
2. Accelerate to the desired speed, which must be more than 20 mph
(30 km/h). 3. Move the lever down (to SET-),
and release it at the desired
speed. The SET indicator light in
the instrument cluster will illumi-
nate. Release the accelerator at
the same time. The desired speed
will automatically be maintained.
On a steep grade, the vehicle mayslow down or speed up slightly whilegoing uphill or downhill.
To increase Cruise Control set
speed:
Follow either of these procedures:
Move the lever up (to RES+) and hold it. Your vehicle will accelerate.
Release the lever at the speed you
want.
Move the lever up (to RES+) and release it immediately. The cruising
speed will increase by 1.0 mph (2
km/h ) each time the lever is operat-
ed in this manner.
OQLE058143
OQL058230L
OQL058231L
Page 402 of 630
5117
Driving your vehicle
Each of these actions will cancelCruise Control operation (the SETindicator light in the instrument clus-ter will go off), but it will not turn thesystem off. If you wish to resumeCruise Control operation, move thelever up (to RES+). You will return toyour previously preset speed.To resume cruising speed at
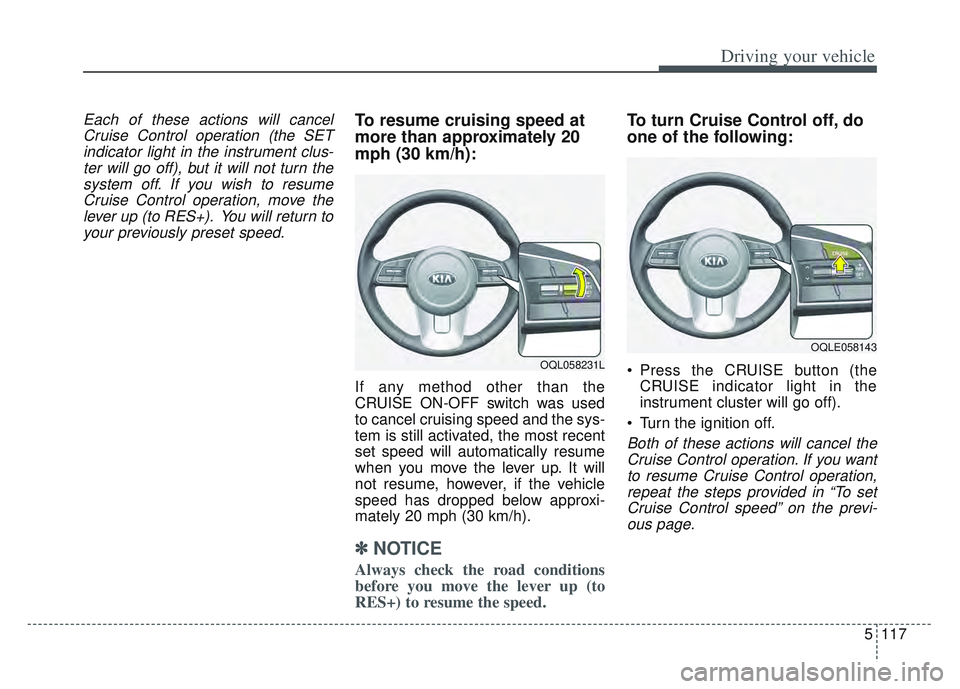
more than approximately 20
mph (30 km/h):
If any method other than the
CRUISE ON-OFF switch was used
to cancel cruising speed and the sys-
tem is still activated, the most recent
set speed will automatically resume
when you move the lever up. It will
not resume, however, if the vehicle
speed has dropped below approxi-
mately 20 mph (30 km/h).
✽ ✽ NOTICE
Always check the road conditions
before you move the lever up (to
RES+) to resume the speed.
To turn Cruise Control off, do
one of the following:
Press the CRUISE button (the
CRUISE indicator light in the
instrument cluster will go off).
Turn the ignition off.
Both of these actions will cancel the Cruise Control operation. If you wantto resume Cruise Control operation,repeat the steps provided in “To setCruise Control speed” on the previ-ous page.
OQL058231L
OQLE058143
Page 403 of 630
Driving your vehicle
118
5
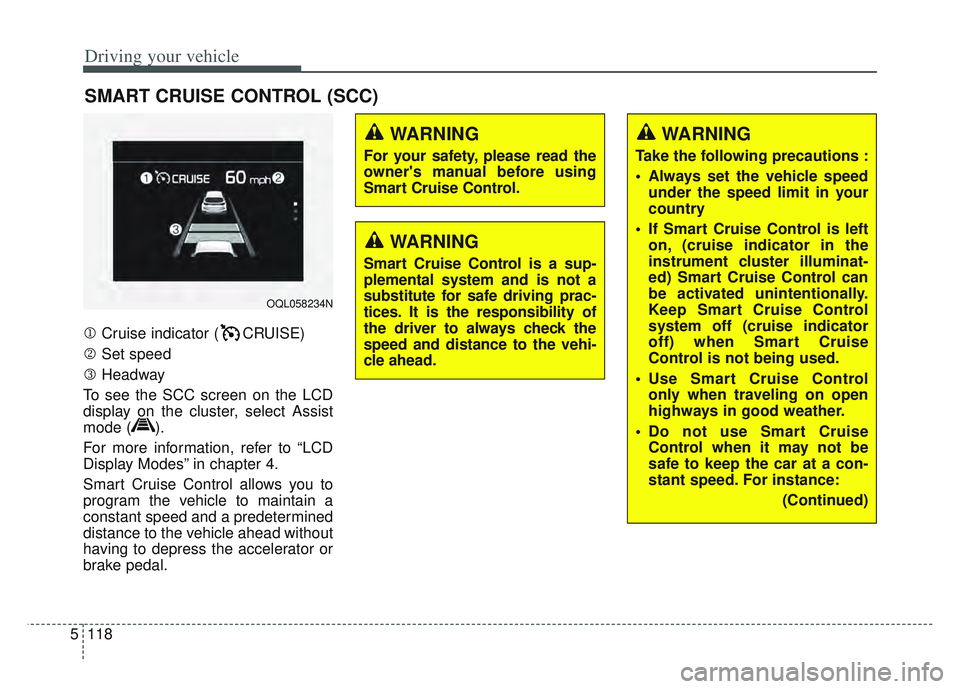
Cruise indicator ( CRUISE)
Set speed
Headway
To see the SCC screen on the LCD
display on the cluster, select Assist
mode ( ).
For more information, refer to “LCD
Display Modes” in chapter 4.
Smart Cruise Control allows you to
program the vehicle to maintain a
constant speed and a predetermined
distance to the vehicle ahead without
having to depress the accelerator or
brake pedal.
SMART CRUISE CONTROL (SCC)
WARNING
For your safety, please read the
owner's manual before using
Smart Cruise Control.
WARNING
Smart Cruise Control is a sup-
plemental system and is not a
substitute for safe driving prac-
tices. It is the responsibility of
the driver to always check the
speed and distance to the vehi-
cle ahead.
OQL058234N
WARNING
Take the following precautions :
Always set the vehicle speed under the speed limit in your
country
If Smart Cruise Control is left on, (cruise indicator in the
instrument cluster illuminat-
ed) Smart Cruise Control can
be activated unintentionally.
Keep Smart Cruise Control
system off (cruise indicator
off) when Smart Cruise
Control is not being used.
Use Smart Cruise Control only when traveling on open
highways in good weather.
Do not use Smart Cruise Control when it may not be
safe to keep the car at a con-
stant speed. For instance:
(Continued)
Page 405 of 630
Driving your vehicle
120
5
Smart Cruise Control switch
CANCEL : Cancels Cruise Control
operation.
CRUISE : Turns Cruise Control sys- tem on or off.
RES + : Resumes or increases
Cruise Control speed.
SET - : Sets or decreases Cruise Control speed.
: Headway
Smart Cruise Control speed
To set Smart Cruise Control Speed :
1. Press the CRUISE button, to turn the system on. The CRUISE indi-
cator in the instrument cluster will
illuminate.
2. Accelerate to the desired speed. Smart Cruise Control speed can
be set as follows: (177 km/h) : when there is no
vehicle in front
km/h) : when there is a vehicle in
front 3. Move the lever down (to SET-),
and release it at the desired
speed. The set speed and
Headway on the LCD screen will
illuminate.
4. Release the accelerator pedal. The desired speed will automati-
cally be maintained.
OQLE058143
OQL058230L
Page 467 of 630
What to do in an emergency
86
TIRE PRESSURE MONITORING SYSTEM (TPMS)
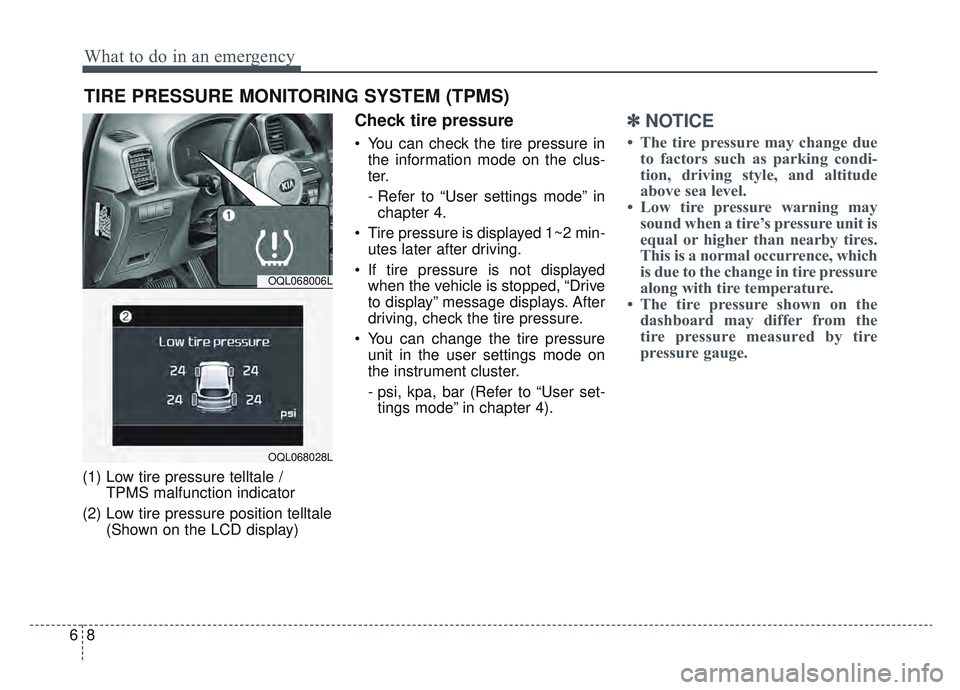
(1) Low tire pressure telltale / TPMS malfunction indicator
(2) Low tire pressure position telltale (Shown on the LCD display)
Check tire pressure
You can check the tire pressure inthe information mode on the clus-
ter.
- Refer to “User settings mode” inchapter 4.
Tire pressure is displayed 1~2 min- utes later after driving.
If tire pressure is not displayed when the vehicle is stopped, “Drive
to display” message displays. After
driving, check the tire pressure.
You can change the tire pressure unit in the user settings mode on
the instrument cluster.
- psi, kpa, bar (Refer to “User set-tings mode” in chapter 4).
✽ ✽ NOTICE
• The tire pressure may change due
to factors such as parking condi-
tion, driving style, and altitude
above sea level.
• Low tire pressure warning may sound when a tire’s pressure unit is
equal or higher than nearby tires.
This is a normal occurrence, which
is due to the change in tire pressure
along with tire temperature.
• The tire pressure shown on the dashboard may differ from the
tire pressure measured by tire
pressure gauge.
OQL068006L
OQL068028L
Page 560 of 630
Maintenance
64
7
If you do not have a spare, use a
fuse of the same rating from a circuityou may not need for operating thevehicle, such as the power outletfuse.
If the head lamp, turn signal lamp,
stop signal lamp, fog lamp, DRL, tail
lamp, HMSL do not work and the
fuses are not blown, check the fuse
panel in the engine compartment. If a
fuse is blown, it must be replaced.
✽ ✽ NOTICE
If the headlamp, fog lamp, turn sig-
nal lamp, or tail lamp malfunction
even without any problem to the
lamps, have the vehicle checked by
an authorized Kia dealer for assis-
tance.
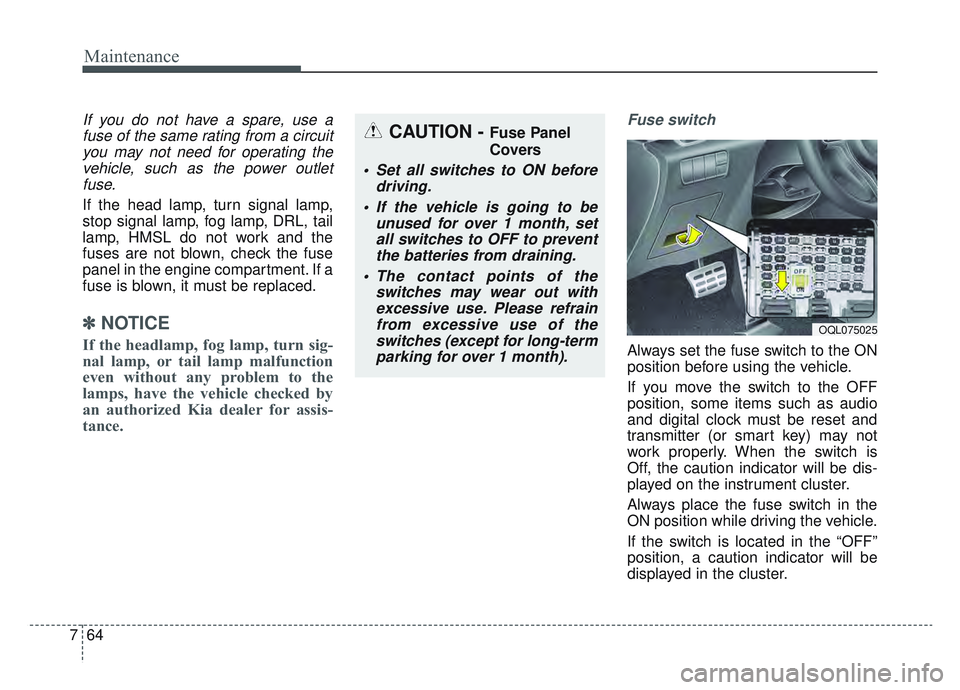
Fuse switch
Always set the fuse switch to the ON
position before using the vehicle.
If you move the switch to the OFF
position, some items such as audio
and digital clock must be reset and
transmitter (or smart key) may not
work properly. When the switch is
Off, the caution indicator will be dis-
played on the instrument cluster.
Always place the fuse switch in the
ON position while driving the vehicle.
If the switch is located in the “OFF”
position, a caution indicator will be
displayed in the cluster.
CAUTION - Fuse Panel
Covers
Set all switches to ON before
driving.
If the vehicle is going to be unused for over 1 month, setall switches to OFF to preventthe batteries from draining.
The contact points of the switches may wear out withexcessive use. Please refrainfrom excessive use of theswitches (except for long-termparking for over 1 month).
OQL075025
Page 564 of 630
Maintenance
68
7
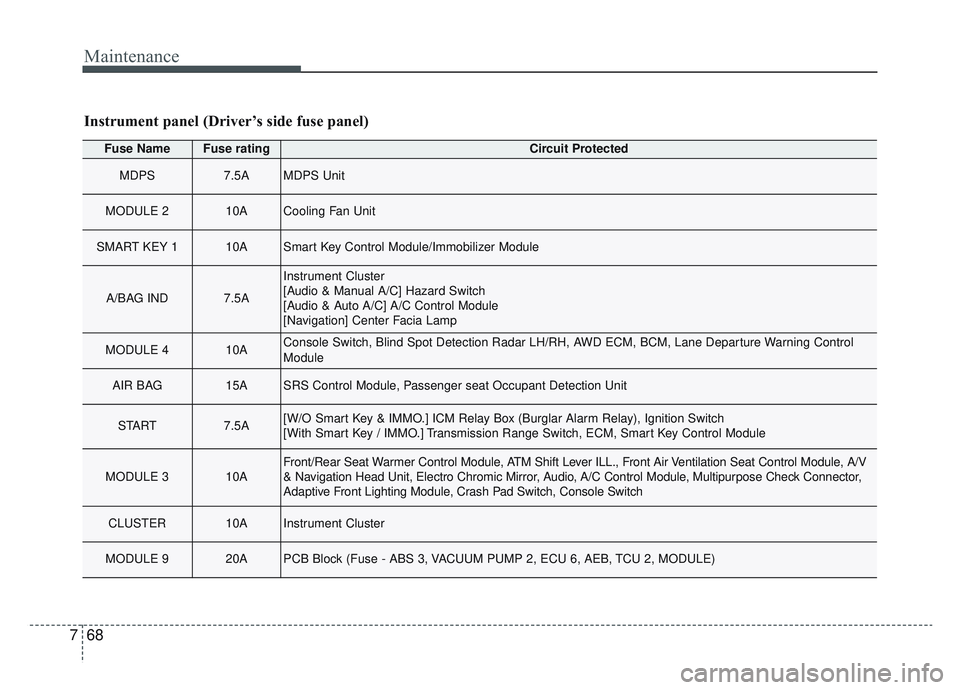
Fuse NameFuse ratingCircuit Protected
MDPS7.5AMDPS Unit
MODULE 210ACooling Fan Unit
SMART KEY 110ASmart Key Control Module/Immobilizer Module
A/BAG IND7.5A
Instrument Cluster
[Audio & Manual A/C] Hazard Switch
[Audio & Auto A/C] A/C Control Module
[Navigation] Center Facia Lamp
MODULE 410AConsole Switch, Blind Spot Detection Radar LH/RH, AWD ECM, BCM, Lane Departure Warning Control
Module
AIR BAG15ASRS Control Module, Passenger seat Occupant Detection Unit
START7.5A[W/O Smart Key & IMMO.] ICM Relay Box (Burglar Alarm Relay), Ignition Switch
[With Smart Key / IMMO.] Transmission Range Switch, ECM, Smart Key Control Module
MODULE 310AFront/Rear Seat Warmer Control Module, ATM Shift Lever ILL., Front Air Ventilation Seat Control Module, A/V
& Navigation Head Unit, Electro Chromic Mirror, Audio, A/C Control Module, Multipurpose Check Connector,
Adaptive Front Lighting Module, Crash Pad Switch, Console Switch
CLUSTER10AInstrument Cluster
MODULE 920APCB Block (Fuse - ABS 3, VACUUM PUMP 2, ECU 6, AEB, TCU 2, MODULE)
Instrument panel (Driver’s side fuse panel)