Page 115 of 528

Features of your vehicle
36
4
If the power window is not operated
correctly, the automatic power win-
dow system must be reset as follows:
1. Place the ignition switch or
ENGINE START/STOP button to
the ON position.
2. Close the window and continue pulling up on the driver’s power
window switch for at least 1 sec-
ond after the window is complete-
ly closed.
Automatic reversal (if equipped)
If the upward movement of the win-
dow is blocked by an object or part of
the body, the window will detect the
resistance and will stop upward
movement. The window will then
lower approximately 11.8 in. (30 cm)
to allow the object to be cleared.
If the window detects the resistance
while the power window switch is
pulled up continuously, the window
will stop upward movement then
lower approximately 1 in. (2.5 cm). And if the power window switch is
pulled up continuously again within 5
seconds after the window is lowered
by the automatic window reversal
feature, the automatic window rever-
sal will not operate.
The automatic reverse feature for the
driver’s window is only active when
the “auto up” feature is used by fully
pulling up the switch. The automatic
reverse feature will not operate if the
window is raised using the halfway
position on the power window switch.
WARNING
Always check for obstructions
before raising any window to
avoid injuries or vehicle dam-
age. If an object less than 0.16
in. (4 mm) in diameter is caught
between the window glass and
the upper window channel, the
automatic reverse window may
not detect the resistance and
will not stop and reverse direc-
tion.
OUN026013
SC PE USA 4.QXP 9/9/2021 6:03 PM Page 36
Page 116 of 528

437
Features of your vehicle
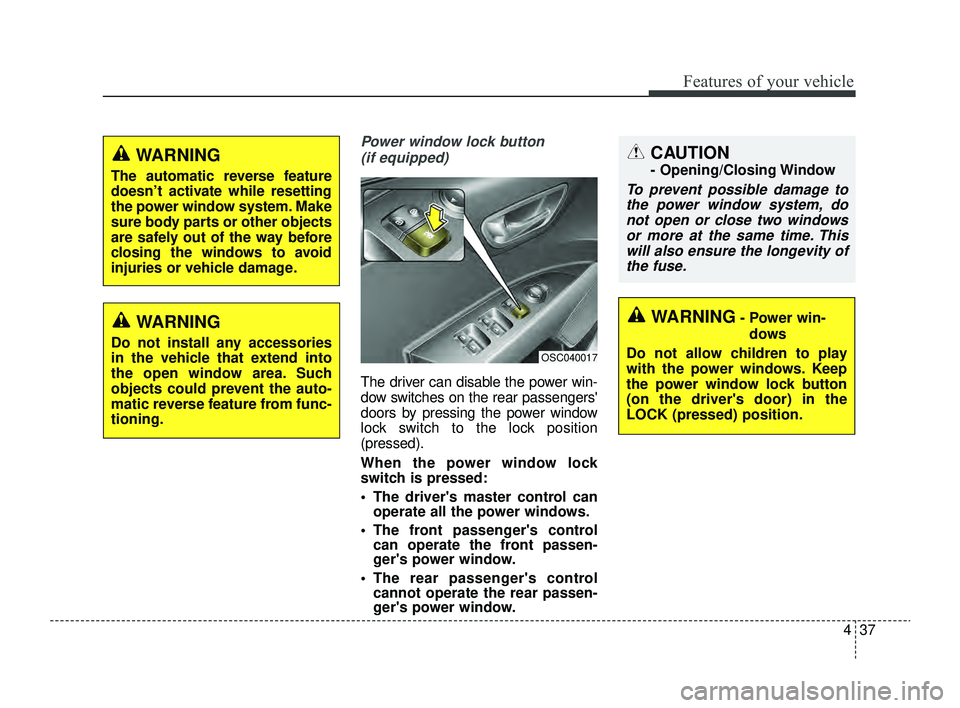
Power window lock button (if equipped)
The driver can disable the power win-
dow switches on the rear passengers'
doors by pressing the power window
lock switch to the lock position
(pressed).
When the power window lock
switch is pressed:
The driver's master control can operate all the power windows.
The front passenger's control can operate the front passen-
ger's power window.
The rear passenger's control cannot operate the rear passen-
ger's power window.
CAUTION
- Opening/Closing Window
To prevent possible damage to
the power window system, donot open or close two windowsor more at the same time. Thiswill also ensure the longevity ofthe fuse.
OSC040017
WARNING- Power win-
dows
Do not allow children to play
with the power windows. Keep
the power window lock button
(on the driver's door) in the
LOCK (pressed) position.
WARNING
The automatic reverse feature
doesn’t activate while resetting
the power window system. Make
sure body parts or other objects
are safely out of the way before
closing the windows to avoid
injuries or vehicle damage.
WARNING
Do not install any accessories
in the vehicle that extend into
the open window area. Such
objects could prevent the auto-
matic reverse feature from func-
tioning.
SC PE USA 4.QXP 9/9/2021 6:03 PM Page 37
Page 119 of 528

Features of your vehicle
40
4
Closing the hood
1. Before closing the hood, check the
following:
All filler caps in the engine com- partment must be correctly
installed.
Gloves, rags or any other com- bustible material must be
removed from the engine com-
partment.
2. Return the support rod to its clip to prevent it from rattling.
3. Lower the hood until it is about 12 inches(30 cm) above the closed
position and let it drop. Make sure
that it locks into place.
4. Check that the hood has engaged properly. If the hood can be raised
slightly, it is not properly engaged.
Open it again and close it with a lit-
tle more force.
Hood open warning
(if equipped)
The warning message will appear on
the LCD display when hood is open.
The warning chime will operate when
the vehicle is being driven at or
above 2 mph (3 km/h) with the hood
open.
WARNING- Fire risk
Do not leave gloves, rags or any
other combustible material in the
engine compartment. Doing so
may cause a heat-induced fire.
OST040547L
SC PE USA 4.QXP 9/9/2021 6:03 PM Page 40
Page 121 of 528

Features of your vehicle
42
4
Opening the fuel filler door
The fuel filler door must be opened
from inside the vehicle by pulling up
the fuel filler door opener.
If the fuel filler door does not open
because ice has formed around it,
tap lightly or push on the lid to break
the ice and release the lid. Do not pry
on the lid. If necessary, spray around
the lid with an approved de-icer fluid
(do not use radiator anti-freeze) or
move the vehicle to a warm place
and allow the ice to melt. 1. Stop the engine.
2. To open the fuel filler door, pull the
fuel filler door opener up.
3. Pull open the fuel filler door (1) out to fully open.
4. To remove the cap turn the fuel filler cap (2) counterclockwise.
5. Refuel as needed.
FUEL FILLER DOOR
OSC040505
OYB046026
WARNING
Before refueling, be sure to
check what type of fuel is used
for your vehicle.
If you put diesel fuel into a
gasoline-powered vehicle or
gasoline into a diesel-powered
vehicle, it may affect the fuel
system and cause serious dam-
age to the vehicle.
SC PE USA 4.QXP 9/9/2021 6:03 PM Page 42
Page 122 of 528

443
Features of your vehicle
Closing the fuel filler door
1. To install the cap, turn it clockwiseuntil it “clicks” one time. This indi-
cates that the cap is securely tight-
ened.
2. Close the fuel filler door and push it lightly and make sure that it is
securely closed.
✽ ✽
NOTICE
When refueling on unlevel ground,
the fuel gauge may not point to the F
position.
It is not a malfunction. If you move
your vehicle to level ground, the fuel
gauge will move to the full position.
✽ ✽
NOTICE
Tighten the cap until it clicks one
time,otherwise the check engine
warning indicator light will illumi-
nate.
Always check that the fuel cap is
installed securely to prevent fuel
spillage in the event of an accident.
WARNING - Fire/
explosion risk
Read and follow all warnings
posted at the gas station facili-
ty. Failure to follow all warnings
will result in severe personal
injury, severe burns or death
due to fire or explosion.
WARNING - Static electricity
Before touching the fuel noz- zle, you should eliminate
potentially dangerous static
electricity discharge by touch-
ing another metal part of the
vehicle, a safe distance away
from the fuel filler neck, noz-
zle, or other gas source.
Do not get back into a vehicle once you have begun refuel-
ing since you can generate
static electricity by touching,
rubbing or sliding against any
item or fabric (polyester, satin,
nylon, etc.) capable of produc-
ing static electricity. Static
electricity discharge can
ignite fuel vapors resulting in
rapid burning. If you must re-
enter the vehicle, you should
once again eliminate poten-
tially dangerous static elec-
tricity discharge by touching a
metal part of the vehicle, away
from the fuel filler neck, noz-
zle or other gasoline source.
WARNING - Refueling
Always remove the fuel cap
carefully and slowly. If the cap
is venting fuel or if you hear a
hissing sound, wait until the
condition stops before com-
pletely removing the cap.
If pressurized fuel sprays out, it
can cover your clothes or skin
and subject you to the risk of
fire and burns.
SC PE USA 4.QXP 9/9/2021 6:03 PM Page 43
Page 126 of 528
447
Features of your vehicle
Horn
To sound the horn, press the horn
symbols on your steering wheel.
Check the horn regularly to be sure it
operates properly.
✽ ✽
NOTICE
To sound the horn, press the area
indicated by the horn symbol on
your steering wheel (see illustra-
tion). The horn will operate only
when this area is pressed.
OSC041046N
SC PE USA 4.QXP 9/9/2021 6:03 PM Page 47
Page 129 of 528

Features of your vehicle
50
4
Remote control
Electric type
The electric remote control mirror
switch allows you to adjust the posi-
tion of the left and right outside
rearview mirrors. To adjust the posi-
tion of either mirror, the ignition
switch or ENGINE START/STOP but-
ton should be in the ACC or ON posi-
tion.
To adjust the position of either mirror,
press the R or L button (1) to select
the right side mirror or the left side
mirror, then press a corresponding
point (▲) on the mirror adjustment
control to position the selected mirror
up, down, left or right. After adjustment, press the R or L
button again to prevent any inadver-
tent adjustment.
Folding the outside rearview mirror
Manual type
To fold the outside review mirror,
grasp the housing of the mirror and
then fold it toward the rear of the
vehicle.
OSC040518
CAUTION - Outside mirror
The mirrors stop moving when
they reach the maximumadjusting angles, but themotor continues to operatewhile the switch is pressed.Do not press the switch longerthan necessary as the motormay be damaged.
Do not attempt to adjust the outside rearview mirror byhand. Doing so may damagethe parts.
When the mirror control, press exactly “ � �
”(2) marking area.
Otherwise, the mirror will move to unintended directionor malfunction.
OYB046034
SC PE USA 4.QXP 9/9/2021 6:03 PM Page 50
Page 131 of 528
Features of your vehicle
52
4
Instrument Cluster Control
Adjusting Instrument Cluster
Illumination
The instrument panel illumination
intensity can be adjusted by pressing
the control switch with the headlight
switch in any position when the igni-
tion switch or ENGINE
START/STOP button is in the ON
position. If you hold the illumination control
button (“+” or “-”), the brightness
will be changed continuously.
If the brightness reaches the maxi- mum or minimum level, an alarm
will sound.
LCD Display Control
The LCD Display modes can be
changed by using the control buttons
on the steering wheel.
OSC041047N
OJA040571L
OSC047127N
■ Type A
■ Type B
OSC041049N
OSC041048N
■ Type A
■ Type B
SC PE USA 4.QXP 9/9/2021 6:04 PM Page 52