2022 KIA RIO battery replacement
[x] Cancel search: battery replacementPage 80 of 528
Features of your vehicle
Keys . . . . . . . . . . . . . . . . . . . . . . . . . . . . . . . . . . . . \
. . 4-4
• Record your key number . . . . . . . . . . . . . . . . . . . . . . . 4-4
• Key operations . . . . . . . . . . . . . . . . . . . . . . . . . . . . . . . . 4-4
• Remote keyless entry system operations . . . . . . . . . . . 4-5
• Transmitter precautions . . . . . . . . . . . . . . . . . . . . . . . . 4-7
• Battery replacement . . . . . . . . . . . . . . . . . . . . . . . . . . . 4-8
• Immobilizer system . . . . . . . . . . . . . . . . . . . . . . . . . . . . 4-9
Smart key . . . . . . . . . . . . . . . . . . . . . . . . . . . . . . . . 4-11
• Smart key functions. . . . . . . . . . . . . . . . . . . . . . . . . . . 4-11
• Smart key precautions . . . . . . . . . . . . . . . . . . . . . . . . 4-13
• Smart key immobilizer system . . . . . . . . . . . . . . . . . . 4-14
Theft-alarm system . . . . . . . . . . . . . . . . . . . . . . . . 4-15
• Armed stage . . . . . . . . . . . . . . . . . . . . . . . . . . . . . . . . . 4-15
• Theft-alarm stage . . . . . . . . . . . . . . . . . . . . . . . . . . . . 4-16
• Disarmed stage. . . . . . . . . . . . . . . . . . . . . . . . . . . . . . . 4-17
Door locks . . . . . . . . . . . . . . . . . . . . . . . . . . . . . . . . 4-18
• Operating door locks from outside the vehicle . . . . 4-18
• Operating door locks from inside the vehicle . . . . . . 4-19
• Impact sensing door unlock system . . . . . . . . . . . . . . 4-21
• Auto door lock/unlock feature . . . . . . . . . . . . . . . . . . 4-21
• Speed sensing door lock system . . . . . . . . . . . . . . . . 4-21
• Child-protector rear door lock. . . . . . . . . . . . . . . . . . 4-22
• Rear Occupant Alert (ROA) system . . . . . . . . . . . . . 4-22
Trunk (For 4 door) . . . . . . . . . . . . . . . . . . . . . . . . . 4-24
• Opening the trunk . . . . . . . . . . . . . . . . . . . . . . . . . . . . 4-24
• Closing the trunk . . . . . . . . . . . . . . . . . . . . . . . . . . . . . 4-24
• Emergency trunk safety release . . . . . . . . . . . . . . . . . 4-25
Smart Trunk Release (4 door). . . . . . . . . . . . . . . . 4-26
Liftgate (For 5 door) . . . . . . . . . . . . . . . . . . . . . . . 4-30
• Opening the liftgate . . . . . . . . . . . . . . . . . . . . . . . . . . . 4-30
• Closing the liftgate. . . . . . . . . . . . . . . . . . . . . . . . . . . . 4-30
• Emergency liftgate safety release. . . . . . . . . . . . . . . . 4-31
Windows . . . . . . . . . . . . . . . . . . . . . . . . . . . . . . . . . 4-33
• Power windows . . . . . . . . . . . . . . . . . . . . . . . . . . . . . . 4-34
Hood. . . . . . . . . . . . . . . . . . . . . . . . . . . . . . . . . . . . \
. 4-39
• Opening the hood . . . . . . . . . . . . . . . . . . . . . . . . . . . . 4-39
• Closing the hood . . . . . . . . . . . . . . . . . . . . . . . . . . . . . 4-40
• Hood open warning . . . . . . . . . . . . . . . . . . . . . . . . . . . 4-40
Fuel filler door . . . . . . . . . . . . . . . . . . . . . . . . . . . . 4-42
• Opening the fuel filler door . . . . . . . . . . . . . . . . . . . . 4-42
• Closing the fuel filler door . . . . . . . . . . . . . . . . . . . . . 4-43
Steering wheel . . . . . . . . . . . . . . . . . . . . . . . . . . . . . 4-45
• Electric Power Steering (EPS) . . . . . . . . . . . . . . . . . . 4-45
• Tilt steering . . . . . . . . . . . . . . . . . . . . . . . . . . . . . . . . . 4-46
• Horn . . . . . . . . . . . . . . . . . . . . . . . . . . . . . . . . . . . . \
. . . 4-47
Mirrors . . . . . . . . . . . . . . . . . . . . . . . . . . . . . . . . . . 4-48\
• Inside rearview mirror . . . . . . . . . . . . . . . . . . . . . . . . 4-48
• Outside rearview mirror. . . . . . . . . . . . . . . . . . . . . . . 4-49
4
SC PE USA 4.QXP 9/9/2021 6:01 PM Page 1
Page 87 of 528
Features of your vehicle
84
This device complies with Part 15
of the FCC rules.
Operation is subject to the following
two conditions:
1. This device may not cause harm-ful interference, and
2. This device must accept any inter- ference received, including inter-
ference that may cause undesired
operation.
✽ ✽NOTICE
Changes or modifications not
expressly approved by the party
responsible for compliance could void
the user’s authority to operate the
equipment. If the keyless entry sys-
tem is inoperative due to changes or
modifications not expressly approved
by the party responsible for compli-
ance, it will not be covered by your
manufacturer’s vehicle warranty.
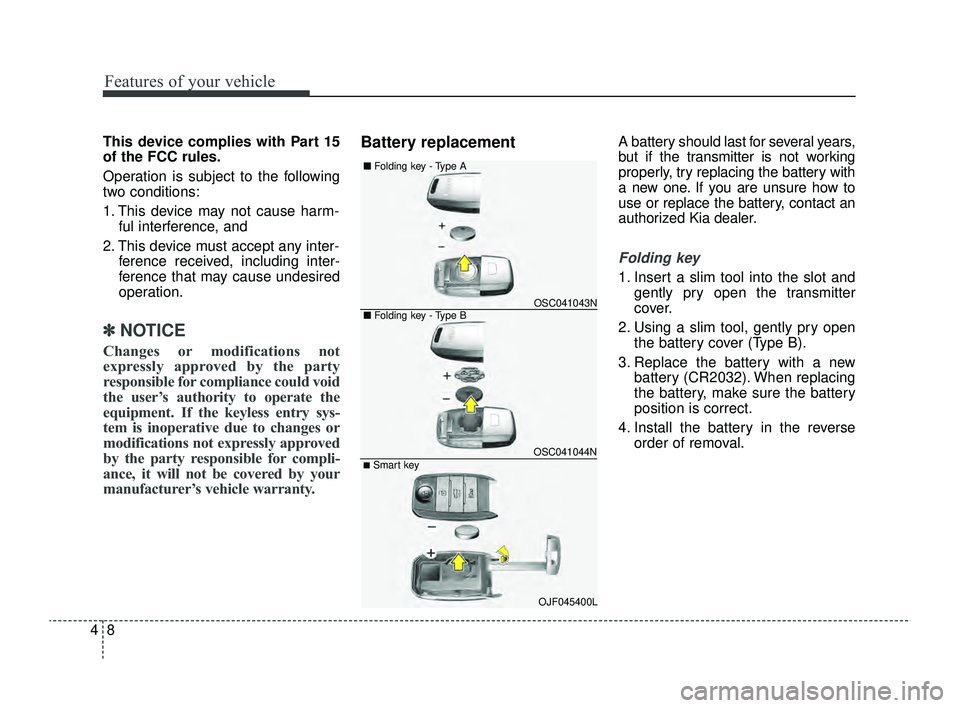
Battery replacementA battery should last for several years,
but if the transmitter is not working
properly, try replacing the battery with
a new one. If you are unsure how to
use or replace the battery, contact an
authorized Kia dealer.
Folding key
1. Insert a slim tool into the slot and
gently pry open the transmitter
cover.
2. Using a slim tool, gently pry open the battery cover (Type B).
3. Replace the battery with a new battery (CR2032). When replacing
the battery, make sure the battery
position is correct.
4. Install the battery in the reverse order of removal.
■Folding key - Type B
■
Folding key - Type AOSC041043N
OSC041044N■Smart key
OJF045400L
SC PE USA 4.QXP 9/9/2021 6:01 PM Page 8
Page 388 of 528
Maintenance
Engine compartment . . . . . . . . . . . . . . . . . . . . . . . . 7-4
Maintenance services . . . . . . . . . . . . . . . . . . . . . . . . 7-5
• Owner’s responsibility . . . . . . . . . . . . . . . . . . . . . . . . . 7-5
• Owner maintenance precautions . . . . . . . . . . . . . . . . 7-6
Owner maintenance . . . . . . . . . . . . . . . . . . . . . . . . . 7-7
• Owner maintenance schedule . . . . . . . . . . . . . . . . . . . 7-7
Scheduled maintenance service. . . . . . . . . . . . . . . . 7-9
• Scheduled maintenance service precaution . . . . . . . . 7-9
Explanation of scheduled maintenance items . . . 7-15
Checking fluid levels . . . . . . . . . . . . . . . . . . . . . . . 7-20
Engine oil. . . . . . . . . . . . . . . . . . . . . . . . . . . . . . . . . 7-21
• Checking the engine oil level . . . . . . . . . . . . . . . . . . . 7-21
• Changing the engine oil and filter . . . . . . . . . . . . . . . 7-22
Engine coolant . . . . . . . . . . . . . . . . . . . . . . . . . . . . 7-24
• Checking the coolant level . . . . . . . . . . . . . . . . . . . . . 7-24
• Changing the coolant . . . . . . . . . . . . . . . . . . . . . . . . . 7-26
Brake fluid . . . . . . . . . . . . . . . . . . . . . . . . . . . . . . . 7-27
• Checking the brake fluid level . . . . . . . . . . . . . . . . . . 7-27
Washer fluid . . . . . . . . . . . . . . . . . . . . . . . . . . . . . . 7-29
• Checking the washer fluid level . . . . . . . . . . . . . . . . 7-29
Parking brake . . . . . . . . . . . . . . . . . . . . . . . . . . . . . 7-30
• Checking the parking brake. . . . . . . . . . . . . . . . . . . . 7-30
Air cleaner. . . . . . . . . . . . . . . . . . . . . . . . . . . . . . . . 7-31
• Filter replacement . . . . . . . . . . . . . . . . . . . . . . . . . . . 7-31
Climate control air filter . . . . . . . . . . . . . . . . . . . . 7-33
• Filter inspection . . . . . . . . . . . . . . . . . . . . . . . . . . . . . . 7-33
Wiper blades . . . . . . . . . . . . . . . . . . . . . . . . . . . . . . 7-35
• Blade inspection . . . . . . . . . . . . . . . . . . . . . . . . . . . . . . 7-35
• Blade replacement . . . . . . . . . . . . . . . . . . . . . . . . . . . 7-35
Battery . . . . . . . . . . . . . . . . . . . . . . . . . . . . . . . . . . . 7-\
39
• For best battery service . . . . . . . . . . . . . . . . . . . . . . . 7-39
• Recharging the battery . . . . . . . . . . . . . . . . . . . . . . . . 7-40
• Reset items . . . . . . . . . . . . . . . . . . . . . . . . . . . . . . . . . . 7-41\
Tires and wheels . . . . . . . . . . . . . . . . . . . . . . . . . . . 7-42
• Tire care . . . . . . . . . . . . . . . . . . . . . . . . . . . . . . . . . . . 7-\
42
• Recommended cold tire inflation pressures . . . . . . 7-42
• Tire pressure . . . . . . . . . . . . . . . . . . . . . . . . . . . . . . . . 7-43
• Checking tire inflation pressure. . . . . . . . . . . . . . . . . 7-43
• Tire rotation . . . . . . . . . . . . . . . . . . . . . . . . . . . . . . . . 7-44
• Wheel alignment and tire balance . . . . . . . . . . . . . . 7-45
• Tire replacement . . . . . . . . . . . . . . . . . . . . . . . . . . . . . 7-46
• Wheel replacement . . . . . . . . . . . . . . . . . . . . . . . . . . . 7-47
• Tire traction . . . . . . . . . . . . . . . . . . . . . . . . . . . . . . . . . 7-47
• Tire maintenance . . . . . . . . . . . . . . . . . . . . . . . . . . . . 7-47
• Tire sidewall labeling . . . . . . . . . . . . . . . . . . . . . . . . . 7-47
• All season tires . . . . . . . . . . . . . . . . . . . . . . . . . . . . . . 7-54
• Summer tires . . . . . . . . . . . . . . . . . . . . . . . . . . . . . . . . 7-54
• Snow tires . . . . . . . . . . . . . . . . . . . . . . . . . . . . . . . . . . . 7-\
54
• Tire chains . . . . . . . . . . . . . . . . . . . . . . . . . . . . . . . . . . 7-55\
7
SC PE USA 7.qxp 9/9/2021 6:26 PM Page 1
Page 428 of 528
741
Maintenance
When recharging the battery,
observe the following precautions:
The battery must be removed fromthe vehicle and placed in an area
with good ventilation.
Do not allow cigarettes, sparks, or flame near the battery.
Watch the battery during charging, and stop or reduce the charging
rate if the battery cells begin
gassing (boiling) violently or if the
temperature of the electrolyte of
any cell exceeds 120°F (49°C).
Wear eye protection when check- ing the battery during charging.
Disconnect the battery charger in the following order.
1. Turn off the battery charger main switch.
2. Unhook the negative clamp from the negative battery terminal.
3. Unhook the positive clamp from the positive battery terminal. Before performing maintenance or
recharging the battery, turn off all
accessories and stop the engine.
The negative battery cable must be removed first and installed last
when the battery is disconnected.Reset items
The following items should be reset
after the battery has been dis-
charged or the battery has been dis-
connected.
Auto up/down window
Sunroof
Trip computer
Climate control system
CAUTION - AGM battery
Absorbent Glass Mat (AGM) batteries are maintenance freeand have the AGM batteryserviced by a professionalworkshop. Kia recommends tovisit an authorized Kia dealer.
For charging your AGM battery,use only fully automatic batterychargers that are speciallydeveloped for AGM batteries.
When replacing the AGM bat- tery, use parts for replacementfrom a professional workshop.Kia recommends to visit anauthorized Kia dealer.
Do not open or remove the cap on top of the battery. This maycause leaks of internal elec-trolyte that could result insevere injury.
SC PE USA 7.qxp 9/9/2021 6:27 PM Page 41
Page 444 of 528
757
Maintenance
FUSES
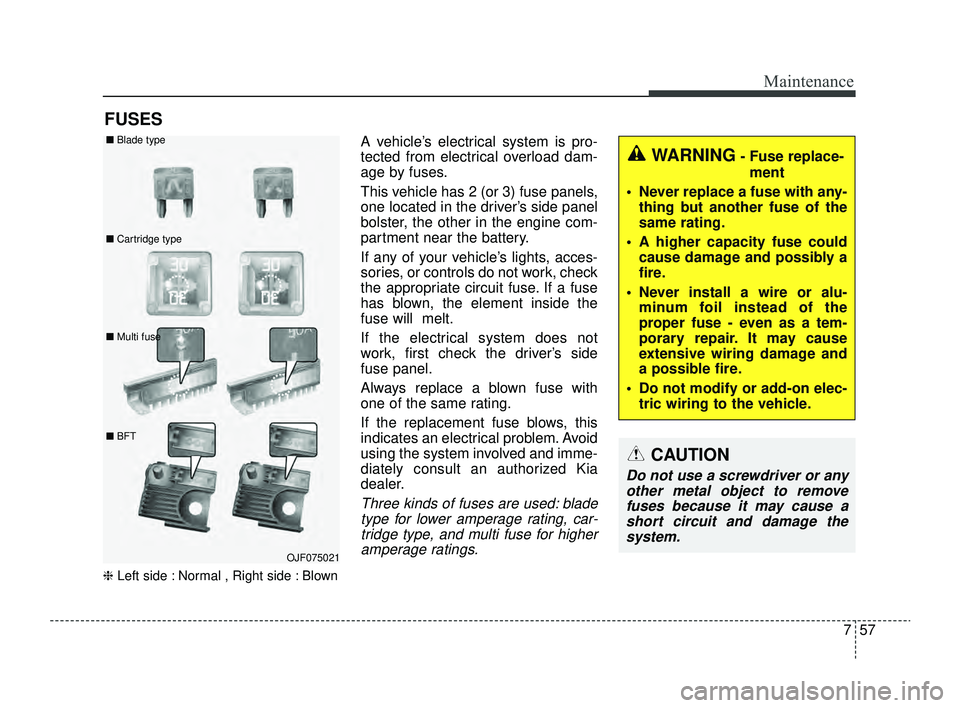
❈Left side : Normal , Right side : Blown
A vehicle’s electrical system is pro-
tected from electrical overload dam-
age by fuses.
This vehicle has 2 (or 3) fuse panels,
one located in the driver’s side panel
bolster, the other in the engine com-
partment near the battery.
If any of your vehicle’s lights, acces-
sories, or controls do not work, check
the appropriate circuit fuse. If a fuse
has blown, the element inside the
fuse will melt.
If the electrical system does not
work, first check the driver’s side
fuse panel.
Always replace a blown fuse with
one of the same rating.
If the replacement fuse blows, this
indicates an electrical problem. Avoid
using the system involved and imme-
diately consult an authorized Kia
dealer.
Three kinds of fuses are used: blade
type for lower amperage rating, car-tridge type, and multi fuse for higheramperage ratings.
WARNING- Fuse replace-
ment
Never replace a fuse with any- thing but another fuse of the
same rating.
A higher capacity fuse could cause damage and possibly a
fire.
Never install a wire or alu- minum foil instead of the
proper fuse - even as a tem-
porary repair. It may cause
extensive wiring damage and
a possible fire.
Do not modify or add-on elec- tric wiring to the vehicle.
CAUTION
Do not use a screwdriver or anyother metal object to removefuses because it may cause ashort circuit and damage thesystem.
OJF075021
■
Blade type
■ Cartridge type
■ Multi fuse
■ BFT
SC PE USA 7.qxp 9/9/2021 6:27 PM Page 57
Page 445 of 528

Maintenance
58
7
✽ ✽
NOTICE
• When replacing fuse, turn the
ignition “OFF” and turn off
switches of all electrical devices
then remove battery (-) terminal.
• The actual fuse/relay panel label may differ from equipped items.
WARNING- Electrical Fire
Always ensure replacements
fuses and relays are securely
fastened when installed. Failure
to do so can result in a vehicle
fire.
CAUTION
When replacing a blown fuse or relay, make sure the newfuse or relay fits tightly intothe clips. Failure to tightlyinstall the fuse or relay maycause damage to the wiringand electric systems.
Do not remove fuses, relays and terminals fastened withbolts or nuts. The fuses, relaysand terminals may not be fas-tened correctly which maycause vehicle damage.
CAUTION
Do not input any other objects except fuses or relays intofuse/relay terminals such as ascrewdriver or wiring. It maycause contact failure and sys-tem malfunction.
Do not plug in screwdrivers or aftermarket wiring into the ter-minal originally designed forfuse and relays only. The elec-trical system and wiring of thevehicle interior may be dam-aged or burned due to contactfailure.
If you directly connect the wire on the taillight or replacethe bulb which is over the reg-ulated capacity to install trail-ers etc., the inner junctionblock can get burned.
SC PE USA 7.qxp 9/9/2021 6:27 PM Page 58
Page 447 of 528
Maintenance
60
7
✽ ✽
NOTICE
• Set all switches to ON before driv-
ing.
• If the vehicle is going to be unused for over 1 month, set all switches
to OFF to prevent the batteries
from draining.
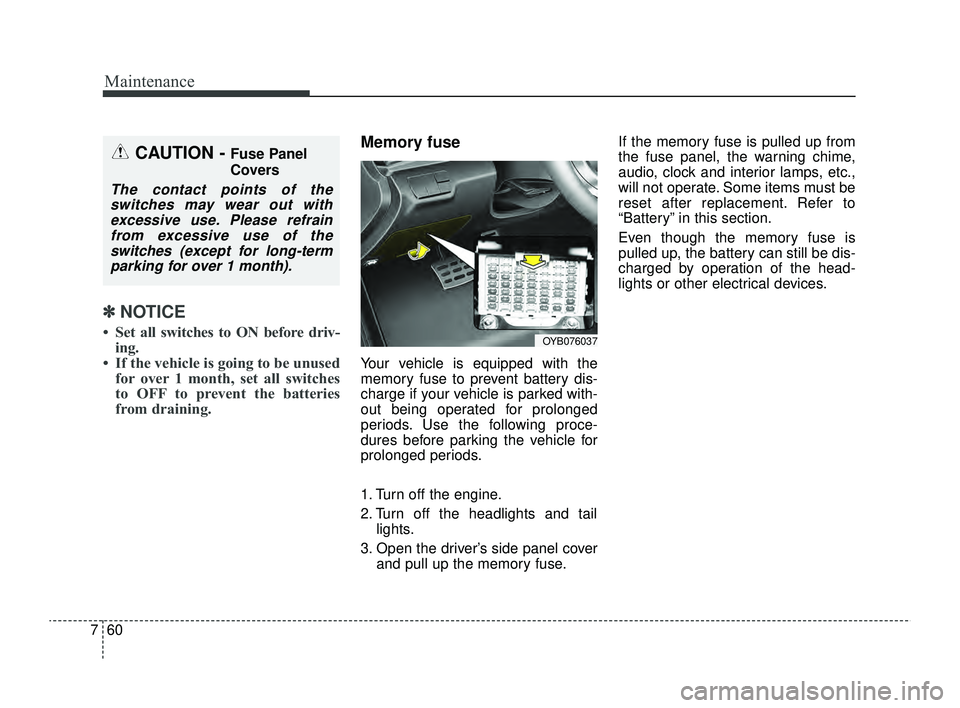
Memory fuse
Your vehicle is equipped with the
memory fuse to prevent battery dis-
charge if your vehicle is parked with-
out being operated for prolonged
periods. Use the following proce-
dures before parking the vehicle for
prolonged periods.
1. Turn off the engine.
2. Turn off the headlights and tail
lights.
3. Open the driver’s side panel cover and pull up the memory fuse. If the memory fuse is pulled up from
the fuse panel, the warning chime,
audio, clock and interior lamps, etc.,
will not operate. Some items must be
reset after replacement. Refer to
“Battery” in this section.
Even though the memory fuse is
pulled up, the battery can still be dis-
charged by operation of the head-
lights or other electrical devices.
CAUTION - Fuse Panel
Covers
The contact points of the
switches may wear out withexcessive use. Please refrainfrom excessive use of theswitches (except for long-termparking for over 1 month).
OYB076037
SC PE USA 7.qxp 9/9/2021 6:28 PM Page 60
Page 448 of 528
761
Maintenance
Engine compartment fuse
replacement
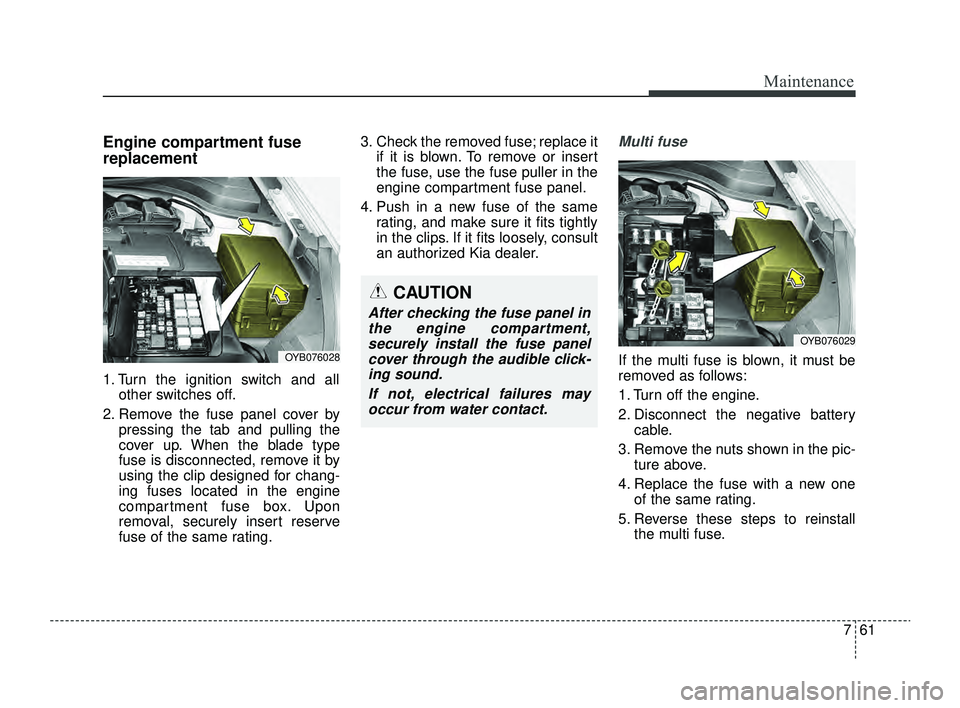
1. Turn the ignition switch and allother switches off.
2. Remove the fuse panel cover by pressing the tab and pulling the
cover up. When the blade type
fuse is disconnected, remove it by
using the clip designed for chang-
ing fuses located in the engine
compartment fuse box. Upon
removal, securely insert reserve
fuse of the same rating. 3. Check the removed fuse; replace it
if it is blown. To remove or insert
the fuse, use the fuse puller in the
engine compartment fuse panel.
4. Push in a new fuse of the same rating, and make sure it fits tightly
in the clips. If it fits loosely, consult
an authorized Kia dealer.
Multi fuse
If the multi fuse is blown, it must be
removed as follows:
1. Turn off the engine.
2. Disconnect the negative batterycable.
3. Remove the nuts shown in the pic- ture above.
4. Replace the fuse with a new one of the same rating.
5. Reverse these steps to reinstall the multi fuse.
CAUTION
After checking the fuse panel inthe engine compartment,securely install the fuse panelcover through the audible click-ing sound.
If not, electrical failures mayoccur from water contact.
OYB076028
OYB076029
SC PE USA 7.qxp 9/9/2021 6:28 PM Page 61