Page 537 of 710

What to do in an emergency
18
6
You may not be able to identify a low
tire by simply looking at it. Always
use a good quality tire pressure
gauge to measure the tire's inflation
pressure. Please note that a tire that
is hot (from being driven) will have a
higher pressure measurement than a
tire that is cold (from sitting station-
ary for at least 3 hours and driven
less than 1 mile (1.6 km) during that
3 hour period).
Allow the tire to cool before measur-
ing the inflation pressure. Always be
sure the tire is cold before inflating to
the recommended pressure.
A cold tire means the vehicle has
been sitting for 3 hours and driven for
less than 1 mile (1.6 km) in that 3
hour period.
Never use tire sealant if your vehicle
is equipped with a Tire Pressure
Monitoring System. The liquid
sealant can damage the tire pres-
sure sensors. The TPMS cannot alert you to
severe and sudden tire damage
caused by external factors such as
nails or road debris.
If you feel any vehicle instability, immediately take your foot off the
accelerator, apply the brakes grad-
ually and with light force, and slow-
ly move to a safe position off the
road.
✽ ✽ NOTICE - Protecting TPMS
Tampering with, modifying, or dis-
abling the Tire Pressure Monitoring
System (TPMS) components may
interfere with the system's ability to
warn the driver of low tire pressure
conditions and/or TPMS malfunc-
tions. Tampering with, modifying,
or disabling the Tire Pressure
Monitoring System (TPMS) compo-
nents may void the warranty for
that portion of the vehicle.
This device complies with Part
15 of the FCC rules.
Operation is subject to the following
two conditions:
1. This device may not cause harm-
ful interference, and
2. This device must accept any inter- ference received, including inter-
ference that may cause undesired
operation.
3. Changes or modifications not expressly approved by the party
responsible for compliance could
void the user’s authority to operate
the device.
Page 549 of 710

What to do in an emergency
30
6
Notes on the safe use of the
Tire Mobility Kit
Park your car at the side of the
road so that you can work with the
Tire Mobility Kit away from moving
traffic.
To be sure your vehicle will not move, even when you're on fairly
level ground, always set your park-
ing brake.
Only use the Tire Mobility Kit for sealing/inflation passenger car
tires. Only punctured areas located
within the tread region of the tire
can be sealed using the Tire
Mobility Kit.
Do not use on motorcycles, bicy- cles or any other type of tires.
When the tire and wheel are dam- aged, do not use Tire Mobility Kit
for your safety. Use of the Tire Mobility Kit may not
be effective for tire damage larger
than approximately 0.16 in. (4
mm).
Please contact the nearest Kia
dealership if the tire cannot be
made roadworthy with the Tire
Mobility Kit.
Do not use the Tire Mobility Kit if a tire is severely damaged by driving
run flat or with insufficient air pres-
sure.
Do not remove any foreign objects such as nails or screws that have
penetrated the tire.
Provided the car is outdoors, leave the engine running. Otherwise
operating the compressor may
eventually drain the car battery.
Never leave the Tire Mobility Kit unattended while it is being used.
Do not leave the compressor run- ning for more than 10 min. at a time
or it may overheat.
Do not use the Tire Mobility Kit if the ambient temperature is below -
22°F (-30°C).
WARNING
Do not use the Tire sealant after
the sealant has expired (i.e.
past the expiration date on the
sealant container). This can
increase the risk of tire failure.
CAUTION
When repairing a flat tire withthe Tire Mobility Kit (TMK),quickly remove the sealant onthe tire pressure sensor andwheel. When installing therepaired tire and wheel, tightenthe wheel nut to a torque valueof 11 ~ 13 kgf·m.
WARNING - Sealant
Keep out of reach of children.
Avoid contact with eyes.
Do not swallow.
Page 555 of 710

What to do in an emergency
36
6
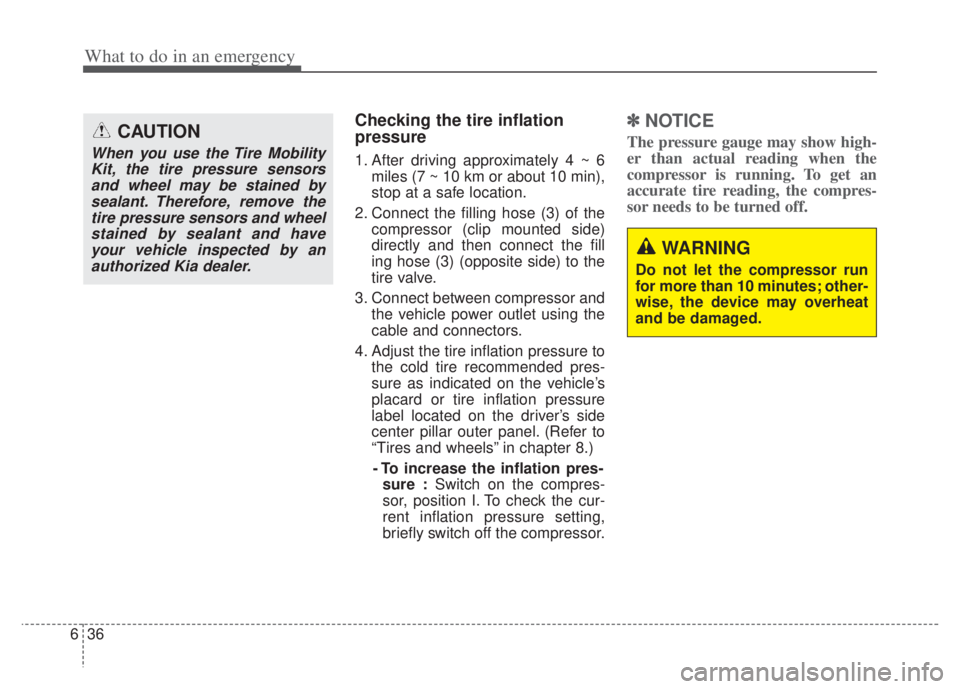
Checking the tire inflation
pressure
1. After driving approximately 4 ~ 6
miles (7 ~ 10 km or about 10 min),
stop at a safe location.
2. Connect the filling hose (3) of the compressor (clip mounted side)
directly and then connect the fill
ing hose (3) (opposite side) to the
tire valve.
3. Connect between compressor and the vehicle power outlet using the
cable and connectors.
4. Adjust the tire inflation pressure to the cold tire recommended pres-
sure as indicated on the vehicle’s
placard or tire inflation pressure
label located on the driver’s side
center pillar outer panel. (Refer to
“Tires and wheels” in chapter 8.)
- To increase the inflation pres- sure : Switch on the compres-
sor, position I. To check the cur-
rent inflation pressure setting,
briefly switch off the compressor.
✽ ✽ NOTICE
The pressure gauge may show high-
er than actual reading when the
compressor is running. To get an
accurate tire reading, the compres-
sor needs to be turned off.CAUTION
When you use the Tire Mobility
Kit, the tire pressure sensorsand wheel may be stained bysealant. Therefore, remove thetire pressure sensors and wheelstained by sealant and haveyour vehicle inspected by anauthorized Kia dealer.
WARNING
Do not let the compressor run
for more than 10 minutes; other-
wise, the device may overheat
and be damaged.
Page 556 of 710
637
What to do in an emergency
- To reduce the inflation pres-sure: Press the button (9) on the
compressor.
CAUTION - Tire pressure
sensor
When you use the Tire MobilityKit with sealant not approved byKia, the tire pressure sensorsmay be damaged by sealant. Thesealant on the tire pressure sen-sor and wheel should beremoved when you replace thetire with a new one and inspectthe tire pressure sensors at anauthorized dealer.
Page 558 of 710

TOWING
Towing service
If emergency towing is necessary,
we recommend having it done by an
authorized Kia dealer or a commer-
cial tow-truck service. Proper lifting
and towing procedures are neces-
sary to prevent damage to the vehi-
cle. The use of wheel dollies (1) or
flatbed is recommended.On FWD vehicles, it is acceptable to
tow the vehicle with the rear wheels
on the ground (without dollies) and
the front wheels off the ground. If any
of the loaded wheels or suspension
components are damaged or the
vehicle is being towed with the front
wheels on the ground, use a towing
dolly under the front wheels. When
being towed by a commercial tow
truck and wheel dollies are not used,
the front of the vehicle should always
be lifted, not the rear.
WARNING - Side and
curtain Air bag
If your vehicle is equipped with
side and curtain air bag, set the
ignition switch to LOCK or ACC
position when the vehicle is
being towed.
The side and curtain air bag
may deploy when the ignition is
ON, and the rollover sensor
detects the situation as a
rollover.
ODEP061237L
What to do in an emergency
39
6
Page 597 of 710
Maintenance
34
7
Replace the filter according to the
Maintenance Schedule.
If the vehicle is operated in extreme-
ly dusty or sandy areas, replace theelement more often than the usualrecommended intervals. (Refer to“Maintenance under severe usageconditions” in this chapter.)
CAUTION - Air filter
maintenance
Do not drive with the air clean- er removed; this will result inexcessive engine wear.
When removing the air cleaner filter, be careful that dust ordirt does not enter the airintake, or damage may result.
Use a Kia genuine part. Use of a non-genuine part coulddamage the air flow sensor.
Page 630 of 710

767
Maintenance
Instrument panel (Driver’s side fuse panel) (Hybrid)
Fuse NameFuse ratingCircuit Protected
MODULE 510A
Electro Chromic Mirror, Audio/Video & Navigation Head Unit, Audio, Shift Lever Indicator, Air Conditioner
Control Module, Rear Seat Warmer Control Module, Front Air Ventilation Seat Control Module, Front Seat
Warmer Control Module, Head Lamp Leveling Device Actuator LH/RH, Crash Pad Switch, AMP (Amplifier),
Keyboard, OBD
MODULE 410AFront View Camera, Crash Pad Switch, Rear Corner Radar LH/RH, EPB, VESS
INTERIORLAMP10AFront Vanity Lamp LH/RH, Room Lamp, Overhead Console Lamp, Luggage Lamp, Mood Lamp, Wireless
Charger, Rain sensor, Driver warning switch
A/BAG15APassenger Occupant Detection Sensor, ACU
IG 125AEngine Room Junction Block (Fuse - DCT4, HPCU2, ACTIVE HYDRAULIC BOOSTER3, ECU3)
CLUSTER10AInstrument Cluster
MODULE 310ABCM (Body Control Module), DCT (Dual Clutch Transmission) Shift Lever, Stop Lamp Switch, Driver Door
Module, Passenger Door Module
MEMORY 27.5AActive Air Flap Unit, VESS
MODULE 810AActive Air Flap Unit, Electric Water Pump (Engine), Engine Room Junction Block (Battery C/Fan Relay),
BMS (Battery Management System) Control Module
A/BAG IND7.5AAir Conditioner Control Module, Instrument Cluster
START7.5A[With Smart Key/With Immobilizer] Inhibitor Switch
Page 631 of 710

Maintenance
68
7
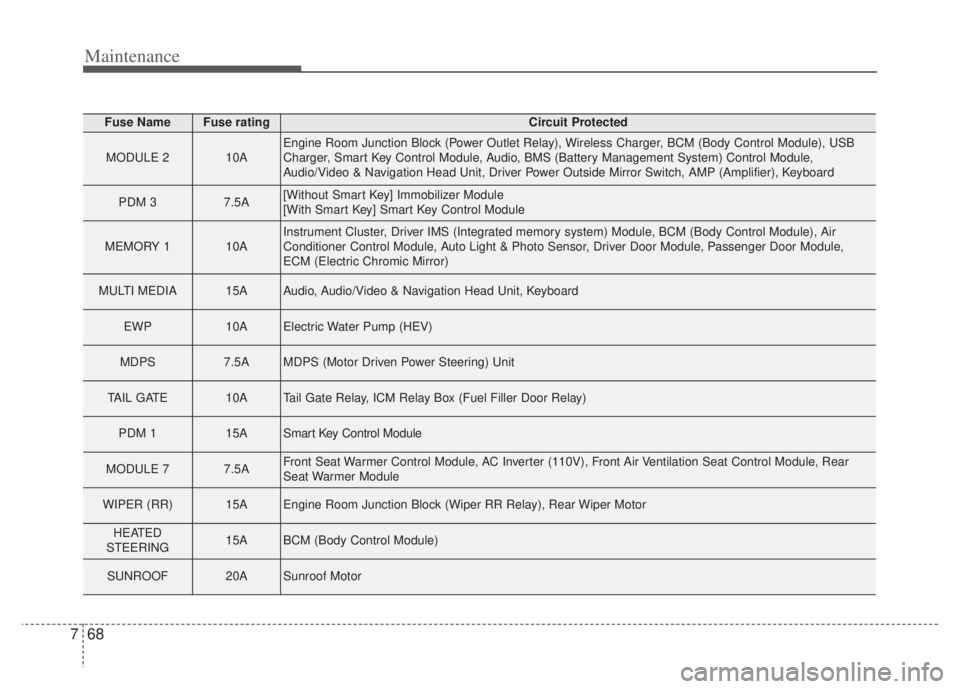
Fuse NameFuse ratingCircuit Protected
MODULE 210AEngine Room Junction Block (Power Outlet Relay), Wireless Charger, BCM (Body Control Module), USB
Charger, Smart Key Control Module, Audio, BMS (Battery Management System) Control Module,
Audio/Video & Navigation Head Unit, Driver Power Outside Mirror Switch, AMP (Amplifier), Keyboard
PDM 37.5A[Without Smart Key] Immobilizer Module
[With Smart Key] Smart Key Control Module
MEMORY 110AInstrument Cluster, Driver IMS (Integrated memory system) Module, BCM (Body Control Module), Air
Conditioner Control Module, Auto Light & Photo Sensor, Driver Door Module, Passenger Door Module,
ECM (Electric Chromic Mirror)
MULTI MEDIA15AAudio, Audio/Video & Navigation Head Unit, Keyboard
EWP10AElectric Water Pump (HEV)
MDPS7.5AMDPS (Motor Driven Power Steering) Unit
TAIL GATE10ATail Gate Relay, ICM Relay Box (Fuel Filler Door Relay)
PDM 115ASmart Key Control Module
MODULE 77.5AFront Seat Warmer Control Module, AC Inverter (110V), Front Air Ventilation Seat Control Module, Rear
Seat Warmer Module
WIPER (RR)15AEngine Room Junction Block (Wiper RR Relay), Rear Wiper Motor
HEATED
STEERING15ABCM (Body Control Module)
SUNROOF20ASunroof Motor