2022 KIA NIRO PHEV clock
[x] Cancel search: clockPage 4 of 66

2*IF EQUIPPEDNIRO HYBRID / PLUG-IN HYBRID FEATURES & FUNCTIONS GUIDE
TABLE OF CONTENTS
VIDEOS & QR CODES Inside Front Cover
INSTRUMENT CLUSTERInstrument Cluster Overview 03Indicators & Warning Lights 04Tire Pressure Monitoring System (TPMS) 05Hybrid / Plug-In Hybrid Indicators at Star tup 06Hybrid / Plug-In Hybrid Modes 06Spor t/ECO Modes 07Fuel Economy 07
VEHICLE SETTINGSTrip Modes / Trip Computer 08LCD Instrument Cluster Modes* 08User Set tings - Instrument Cluster 09Vehicle Set tings* - Audio Head Unit 10Service Interval Mode 11
H Y B R I D / P LU G - I N H Y B R I D S YS T E MPlug-In Hybrid Display* 12Instrument Cluster - Energy Flow 13Emergency Star ting* (Hybrid only) 15Charging the Plug-In Hybrid Vehicle 16Charging Connector Auto/Lock Mode 18Scheduled Charging* (Plug-In Hybrid only) 18
ADVANCED DRIVER ASSISTANCE SYSTEMS (ADAS)Forward Collision-Avoidance Assist (FCA)* 19Lane Keeping Assist (LK A)* 20Blind-Spot Collision Warning (BCW)* 22Driver At tention Warning (DAW)* 22Leading Vehicle Depar ture Aler t (LVDA)* 23Cruise Control 23Smar t Cruise Control (SCC) with Stop & Go* 24Navigation-based Smar t Cruise Control (NSCC)* 25Lane Following Assist (LFA)* 26Highway Driving Assist (HDA)* 27Rear View Monitor (RVM)* 28Rear Cross-Traffic Collision Warning (RCCW)* 28Reverse Parking Distance Warning (PDW)* 29
DRIVER’S PANELInstrument Cluster Control 30Electronic Stability Control (ESC) 30Hill-Star t Assist Control (HAC) 30Reverse Parking Aid Function* 31Engine Star t/Stop But ton 31Power Windows, Window Lock & Central Door Lock 32Manual Folding Mirrors* 32Automatic Door Lock/Unlock 32Power/Heated Outside Mirrors* 32Power Folding Outside Mirrors* 32
STEERING WHEEL CONTROLSHeadlights & High Beams 33Turn Signals & Fog Lights* 33Heated Steering Wheel But ton* 34Windshield / Rear Wipers & Washers 34Tilt/Telescoping Steering Wheel 35
AUDIO SYSTEMSBluetooth® Wireless Technology 36 Audio Controls 37Android Auto™ / Apple CarPlay® S et up* 38UVO link Activation* / UVO Assistance* 39Kia Access with UVO link App Download 40Kia Access with UVO link App Features Guide 40Standard Audio System - Value* 41Standard Audio System* - Value with UVO link 42UVO link* 43UVO link with Navigation* 44
CENTER PANELDigital Clock 45Multimedia USB Por t, Charger Por ts / AC Inver ter* 45Wireless Smar tphone Charging System* 46Automatic Climate Control 47Automatic Gear Shift with Spor tmatic® Shifting 48Dual Clutch Transmission 48Paddle Shifters* 48Electric Parking Brake (EPB)* / Auto Hold* 49Seat Warmers / Ventilated Seats* 50
SEATINGDriver Position Memory System* 51Front Seat Headrest Adjustment 51Rear Occupant Aler t (ROA) with Door Monitoring 51Power Adjustable Driver ’s Seat* 526-Way Manual Adjustable Driver ’s Seat* 52Folding Rear Seats 53
OTHER KEY FEATURESRemote Keyless Entry (Folding Key)* 54Smar t Key / Remote Star t* 55Double-Turn Lock/Unlock All 55Map/Room Lamps 56Sunroof Operation* 56Hood Release Lever and Latch 57Sunvisor 57Fuel Cap / Malfunction Indicator 57Fuel Filler Lid 57Liftgate Release But ton* 58High Voltage Bat tery Air Intake 58Child-Protector Rear Door Locks (Manual) 59Tire Mobility Kit 59
SAFETY FEATURESOccupant Detection System (ODS) /Passenger Airbag Off Indicator 60Seat Belts 60
MAINTENANCE CHART Back Cover
LEGAL DISCLAIMERS Inside Back Cover
Page 47 of 66

45*IF EQUIPPEDALWAYS CHECK THE OWNER ’S MANUAL FOR COMPLETE OPER ATING INFORMATION AND SAFET Y WARNINGS
The power outlets are inactive when ignition is in the OFF position
QUICK TIP •Press the Return but ton on the audio head unit to ensure changes are saved
•
When needed, Daylight Savings must be enabled in the Clock Set tings screen
•To access manual date and time set tings, turn GPS time OFF in the Clock Set tings (UVO link with Navigation*)
QUICK TIP
CENTER PANEL
CENTERPA N EL
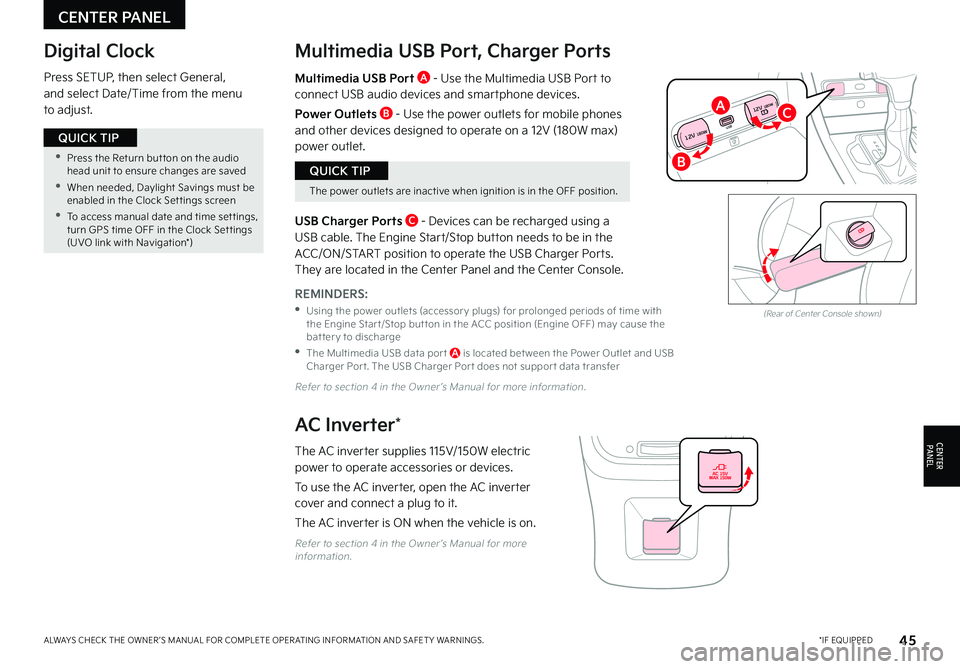
Digital Clock
Press SETUP, then select General, and select Date/Time from the menu to adjust
Multimedia USB Port, Charger Ports
REMINDERS:
•
Using the power outlets (accessor y plugs) for prolonged periods of time with the Engine Star t/Stop but ton in the ACC position (Engine OFF) may cause the bat ter y to discharge
•
The Multimedia USB data por t A is located bet ween the Power Outlet and USB Charger Por t The USB Charger Por t does not suppor t data transfer
Multimedia USB Port A - Use the Multimedia USB Port to connect USB audio devices and smartphone devices
Power Outlets B - Use the power outlets for mobile phones and other devices designed to operate on a 12V (180W max) power outlet
(Rear of Center Console shown)
AC Inverter*
Refer to section 4 in the Owner ’s Manual for more information
USB
12V 180W
12V 180W
USB Charger Ports C - Devices can be recharged using a USB cable The Engine Start/Stop button needs to be in the ACC/ON/START position to operate the USB Charger Ports They are located in the Center Panel and the Center Console
The AC inverter supplies 115V/150W electric
power to operate accessories or devices
To use the AC inverter, open the AC inverter cover and connect a plug to it
The AC inverter is ON when the vehicle is on
Refer to section 4 in the Owner ’s Manual for more information
B
AC
Page 57 of 66

55†LEGAL DISCL AIMERS ON BACK INSIDE COVER | *IF EQUIPPEDALWAYS CHECK THE OWNER ’S MANUAL FOR COMPLETE OPER ATING INFORMATION AND SAFET Y WARNINGS
B
A
C
D
E
F
Smart Key / Remote Start*†7
Smart Key Fob:
A Press to lock All Doors; Press twice within 2 seconds to sound the horn
B Press to unlock Driver ’s Door Press twice in 4 seconds to unlock All Doors
C Press and hold for more than 1 second to unlock Liftgate Then lift by the handle to manually open Liftgate
REMINDER: The Liftgate unlocks when the Smar t Key fob is within close proximit y of the vehicle’s Liftgate
D Press and hold more than 1 second for Panic Alarm To turn off Alarm, press any button
E Press to release Mechanical Key
Driver’s Door Lock/Unlock button F:
•
Press button once to unlock Driver ’s Door
•Press again within 4 seconds to unlock All Doors
•Press again to lock All Doors
Mechanical Key G:
•Use to lock/unlock Driver ’s Door by turning once or all doors by turning twice
•
Use to enable/disable Child Safety Locks
Remote Start* H: Lock the doors by pressing the door lock button A within 32 feet distance from the vehicle Within four (4) seconds of pressing the door lock button A, press and hold the Remote Start button H for more than two (2) seconds to start the vehicle To stop the Remote Start operation, press the button again If driver does not enter vehicle within ten minutes of starting the vehicle, the engine will automatically turn off
REMINDERS:
• Remote but ton configuration may var y depending on vehicle options
•
When reinser ting the mechanical key, make sure it is pushed all the way in until there is a click sound
Double-Turn Lock/Unlock All
•Turn clockwise once to unlock Driver ’s Door
•Turn clockwise again within 4 seconds to unlock All Doors
•Turn counterclockwise once to lock All Doors
LockUnlock
Refer to section 4 in the Owner ’s Manual for more information
HOLD
HOLD
HOLDHOLD
Refer to the inside front cover for more information on QR codes www youtube com/KiaFeatureVideos
Remote Start - Smart Key Video
QR CODE
•If the Smar t Key bat ter y is weak or not working properly, hold the Smar t Key fob up to the Engine Star t/Stop but ton (Lock but ton side closest) and press to star t engine
•The Smar t Key ’s signal can be blocked by the normal operation of a cell phone or smar tphone To help prevent this, store each device separately
QUICK TIPS
H
G
OTHER KEY FEATURES
OTHER KEY F E AT U R E S
Page 59 of 66

57†LEGAL DISCL AIMERS ON BACK INSIDE COVER | *IF EQUIPPEDALWAYS CHECK THE OWNER ’S MANUAL FOR COMPLETE OPER ATING INFORMATION AND SAFET Y WARNINGS
Refer to the inside front cover for more information on QR codes www youtube com/KiaFeatureVideos
One-Click Fuel Cap Video
QR CODE
Opening the Hood:
1 Pull the Hood Release Lever A to unlatch the Hood
2 In the front of the vehicle, lift the Hood slightly, pull the secondary Latch B inside of the Hood’s center and lift the Hood
Closing the Hood: Lower the Hood about halfway and then press down to securely lock in place
AUTOOFF
Fuel Filler Lid
(But tons located on Driver's Panel to the left of the Steering Wheel)
Hood Release Lever and Latch
(Located on Driver side kick panel)(Latch located inside hood)
Fuel Cap / Malfunction
Indicator (Check Engine Light)
Tighten for ONE CLICK to prevent Malfunction
Indicator from illuminating
REMINDERS:
•
The Fuel Filler Door Release but ton is located on the left side of the Steering Wheel on the lower but ton panel
•
It is normal to hear one click when tightening and for the Fuel Cap to click back when released
CLICK!
Refer to section 4 in the Owner ’s Manual for more information
REMINDERS:
•
Sunvisor may not shield all direct light
•
Do not operate the vehicle if Sunvisor is impairing your visibilit y
•
Be aware of your seating position when adjusting or swinging Sunvisor around from the front or side windows
Sunvisor†1 7
Refer to section 4 in the Owner ’s Manual for more information Refer to section 4 in the Owner ’s Manual for more information
Refer to section 4 in the Owner ’s Manual for more information
There may be a delay in Fuel Filler Lid opening for about 20 seconds due to depressurization
QUICK TIP
Use the Sunvisor to shield direct light through the front or side windows Slide the Sunvisor out and adjust as needed
1 Stop the engine
2
Press the Fuel Filler Lid button C to open the Fuel Filler Lid The LCD may
display this message: Wait until fuel door opens (Plug-In Hybrid Only) Once the Fuel Filler Lid is open, the LCD may display this message: Fuel door open
3 Pull open the Fuel Filler Lid
4
Remove cap by turning counterclockwise
B
A
C
OTHER KEY FEATURES
OTHER KEY F E AT U R E S
Page 64 of 66

Multimedia USB Por t, Charger
Por ts & Power Outlets – page 45
Cruise Control – page 23 Demonstrate operation Standard Audio System - Value* / Value with UVO link – pages 41-42 For fur ther operational information, refer to the Car Infotainment System Quick Reference Guide.
Android Auto
™ / Apple CarPlay
®
Setup* – page 38 UVO link Activation / UVO Assistance* – page 39
Walk customer through
the registration/
activation process
for UVO link
UVO link* & UVO link with
Navigation* – pages 43-44 For further operational information, refer to the Car Infotainment System
Quick Reference Guide.
AUX USB
12V 180W
12V 180W
Bluetooth
® Wireless Technology –
page 36 Demonstrate operation, and pair customer’s phone.
ENTER
PWR VOLFILE
TUNE
RADIOMEDIA SEEKTRACK SETUP
ENTER
PWR VOLFILE
TUNE
MAPN AV RADIOMEDIA SETUP
SEEK
TRACK
Blind-Spot Collision Avoidance-Assist (BCA)* - page 22 Clock Setup - page 45 Engine Start/Stop Button - page 31 Lane Keeping Assist (LK A)* - page 20 Passenger Airbag Off Indicator - page 60 Sunroof Operation* - page 56 Rear View Monitor (RVM) - page 28
Seat Warmers* - page 50 Smart Key - page 55 Sunvisor - page 57 Tire Pressure Monitoring System (TPMS)
- page 05
Explain first service process and schedule first service appointment Tour Parts & Service departments, introduce staff and explain value of Kia Parts and Service Review recommended maintenance schedule and maintenance requirements to validate warranty Review business hours Review the Kia 10-year/100,000-mile warranty program Ensure 100% satisfaction with sales and delivery process and no problems with the vehicle Confirm time and best contact number for initial dealer follow-upKEY FEATURE WALKTHROUGHDURING DELIVERY
Demonstrate the following with the customer:
Sales Consultant:
____________________________________________________________________________________
Date:
___________________________
Sales Manager:
_______________________________________________________________________________________
Date:
___________________________
Customer:
____________________________________________________________________________________________
Date:
___________________________
*IF EQUIPPED
NIRO HYBRID / PLUG-IN HYBRID
DELIVERY CHECKLIST
CNCLRES
CRUISE
SET
CNCLRES
CRUISE
SET
MODE