Page 158 of 684

Features of your vehicle
20 4
lock button on the smart key.
After completion of the steps
above, the hazard warning lights
will operate once to indicate that
the system is armed.
If the liftgate or engine hood
remains opened, the hazard
warning lights will not operate
and theft-alarm will not arm. After
this, if the liftgate and engine
hood are closed, the hazard
warning lights will blink once and
the theft-alarm will arm.Do not arm the system until all
passengers have left the vehicle. If
the system is armed while a pas-
senger(s) remains in the vehicle,
the alarm may be activated when
the remaining passenger(s)
leaves the vehicle. If any door (or
liftgate) or engine hood is opened
within 30 seconds after the sys-
tem enters the armed stage, the
system will be disarmed to pre-
vent unnecessary alarm.Theft-alarm stage
The alarm will be activated if any of
the following occurs while the system
is armed.
A front or rear door is opened with-
out using the transmitter (or smart
key).
The liftgate is opened without
using the transmitter (or smart
key).
The engine hood is opened.
The horn will sound and the hazard
warning lights will blink continuously
for approximately 27 seconds. To
turn off the system, unlock the doors
with the transmitter (or smart key).
Page 159 of 684

421
Features of your vehicle
Disarmed stage
The system will be disarmed when:
Folding key
- The door unlock button is pressed.
- The engine is started. (within 3
seconds)
- The ignition switch is in the “ON”
position for 30 seconds or more.
Smart key
- The door unlock button is pressed.
- The button of the front outside door
is pressed while carrying the smart
key.
- The engine is started. (within 3
seconds)
After the doors are unlocked, the
hazard warning lights will blink twice
to indicate that the system is dis-
armed.
After pressing the unlock button, if
any door (or liftgate) is not opened
within 30 seconds, the system will be
rearmed.
✽ ✽
NOTICE
• Without smart key system
If the system is not disarmed with
the transmitter, insert the key into
the ignition switch and start the
engine. Then the system will be
disarmed.
• With smart key system
If the system is not disarmed with
the smart key, open the door with
the mechanical key and start the
engine. Then the system will be
disarmed.
• If you lose your keys, Kia recom-
mends to visit an authorized Kia
dealer/service partner.CAUTION
Do not change, alter or adjust the
theft-alarm system because it
could cause the theft-alarm sys-
tem to malfunction have the sys-
tem serviced by a professional
workshop. Kia recommends to
visit an authorized Kia
dealer/service partner.
Malfunctions caused by improp-
er alterations, adjustments or
modifications to the theft-alarm
system are not covered by your
vehicle manufacturer warranty.
Page 188 of 684

Features of your vehicle
50 4
(Continued)
• When abnormality is detected in
the electric power steering system,
to prevent a deadly accident, the
steering assist function will stop.
At this time, the warning light
turns on or blinks on the cluster.
The steering wheel may become
difficult to control or operate.
Have your vehicle checked imme-
diately, after moving the vehicle to
a safe zone.
• When the charging system warning
light comes on due to low voltage
(when the alternator or battery
does not operate normally or mal-
function), the steering wheel may
require increased steering effort.
• If the vehicle needs to be jump
started due to battery discharge,
the steering wheel may not function
normally. This is a temporary situ-
ation caused by low battery volt-
age. It will be solved once the bat-
tery is charged. Check for normal
steering function by turning the
steering wheel slowly before driv-
ing the vehicle.Tilt and telescopic steering
Tilt and telescopic steering allows
you to adjust the steering wheel
before you drive. You can also raise it
to give your legs more space when
you get on or off the vehicle.
The steering wheel should be posi-
tioned so that it is comfortable for
you to drive, while permitting you to
see the instrument panel warning
lights and gauges.
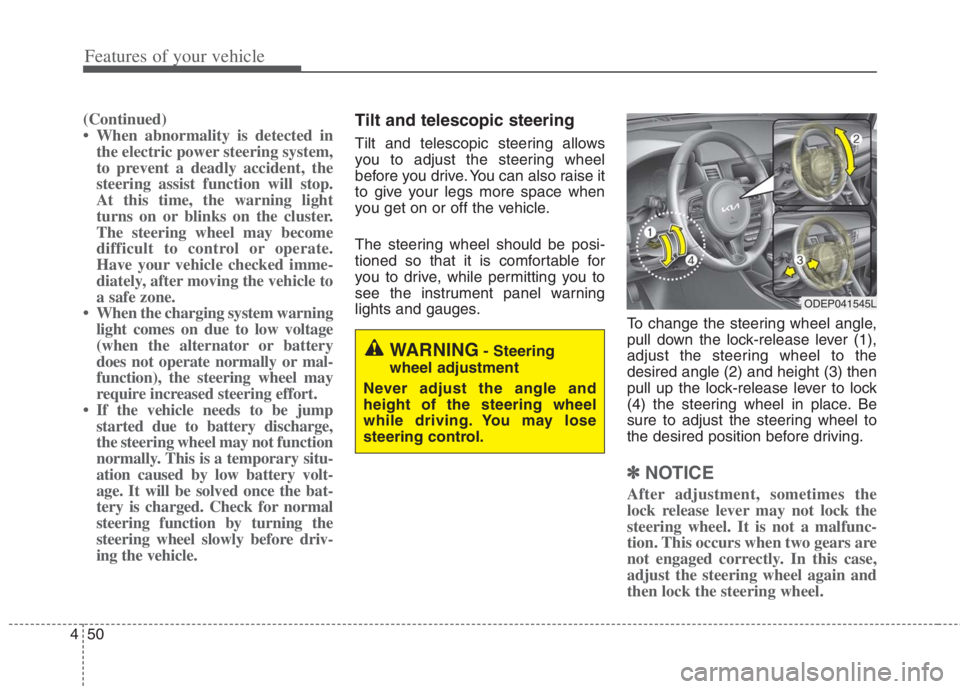
To change the steering wheel angle,
pull down the lock-release lever (1),
adjust the steering wheel to the
desired angle (2) and height (3) then
pull up the lock-release lever to lock
(4) the steering wheel in place. Be
sure to adjust the steering wheel to
the desired position before driving.
✽ ✽
NOTICE
After adjustment, sometimes the
lock release lever may not lock the
steering wheel. It is not a malfunc-
tion. This occurs when two gears are
not engaged correctly. In this case,
adjust the steering wheel again and
then lock the steering wheel.
WARNING- Steering
wheel adjustment
Never adjust the angle and
height of the steering wheel
while driving. You may lose
steering control.
ODEP041545L
Page 191 of 684
453
Features of your vehicle
MIRRORS
Inside rearview mirror
Adjust the rearview mirror so that the
center view through the rear window
is seen. Make this adjustment before
you start driving.
Do not place objects in the rear seat
or cargo area which would interfere
with your vision through the rear win-
dow.
Day/night rearview mirror
(if equipped)
Make this adjustment before you
start driving and while the day/night
lever (3) is in the day position.
Pull the day/night lever (3) toward
you to reduce the glare from the
headlights of the vehicles behind you
during night driving.
Remember that you lose some
rearview clarity in the night position.
❈(1) : Day, (2) : Night
WARNING- Mirror adjust-
ment
Do not adjust the rearview mir-
ror while the vehicle is moving.
This could result in loss of con-
trol.
WARNING
Do not modify the inside mirror
and don’t install a wide mirror. It
could result in injury during an
accident or deployment of the
air bag.
ODE046025L
Page 206 of 684
Features of your vehicle
68 4
INSTRUMENT CLUSTER
1. Hybrid system gauge
2. Fuel gauge
3. Speedometer
4. Warning and indicator lights
5. LCD display
6. Battery SOC (State of Charge) gauge
7. Distance To Empty
ODEP049100C/ODEP049538C
■ ■
Type A for Hybrid
❈For more details, refer to the “Gauges” in
this chapter.
■ ■
Type B for Hybrid
❈The actual cluster and contents of the LCD display in the vehicle may differ from the illustration.
Page 207 of 684
469
Features of your vehicle
1. Hybrid system gauge
2. Fuel gauge
3. Speedometer
4. Warning and indicator lights
5. LCD display
6. Battery SOC (State of Charge) gauge
7. Distance To Empty
ODEP049182C/ODEP049183C
■ ■
Type A for Plug-in Hybrid
❈For more details, refer to the “Gauges” in
this chapter.
■ ■
Type B for Plug-in Hybrid
❈The actual cluster and contents of the LCD display in the vehicle may differ from the illustration.
Page 217 of 684
479
Features of your vehicle
LCD Display Modes
RangeRoute Guidance
Warning
Assist
Driver AssistanceThe Master Warning
mode displays warn-
ing messages related
to the vehicle when
one or more functions
is not operating nor-
mally.
Fuel EconomyDestination InfoDoor
Accumulated InfoLights
Drive InfoSound
Digital SpeedometerConvenience
Driving StyleDriver Attention
WarningService Interval
Energy FlowTPMSOther
Engine TemperatureLanguage
Reset
Mode
Trip Computer TBT Driving Assist User Settings
Master warning
Up/Down
❈ ❈
The information provided may differ depending on which functions are applicable to your vehicle.
Page 220 of 684
Features of your vehicle
82 4
User settings mode (if equipped)
In this mode, you can change the
settings of the instrument cluster,
doors, lamps, etc.
1. Driver Assistance
2. Door
3. Lights
4. Sound
5. Convenience
6. Service Interval
7. Other
8. Language
9. ResetThe information provided may differ
depending on which functions are
applicable to your vehicle.
Shift to P to edit settings
This warning message appears if
you try to adjust the User Settings
while driving.
For your safety, change the User
Settings after parking the vehicle,
applying the parking brake and mov-
ing the shift lever to P (Park).
ODEP049584L
ODEP049586L