2022 KIA NIRO HYBRID EV turn signal
[x] Cancel search: turn signalPage 407 of 684
Driving your vehicle
80 5
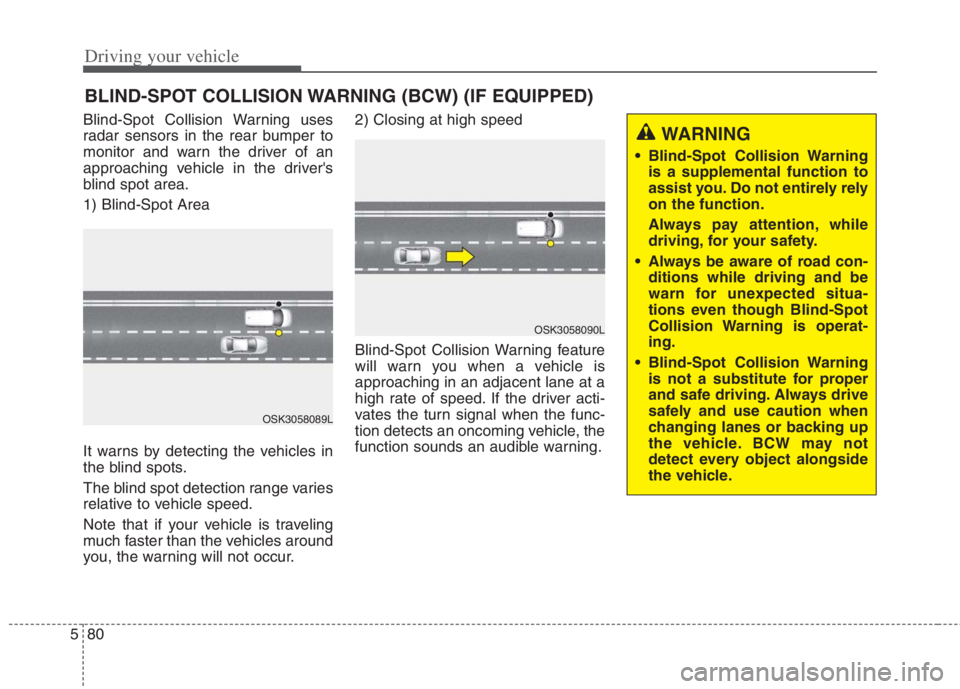
Blind-Spot Collision Warning uses
radar sensors in the rear bumper to
monitor and warn the driver of an
approaching vehicle in the driver's
blind spot area.
1) Blind-Spot Area
It warns by detecting the vehicles in
the blind spots.
The blind spot detection range varies
relative to vehicle speed.
Note that if your vehicle is traveling
much faster than the vehicles around
you, the warning will not occur.2) Closing at high speed
Blind-Spot Collision Warning feature
will warn you when a vehicle is
approaching in an adjacent lane at a
high rate of speed. If the driver acti-
vates the turn signal when the func-
tion detects an oncoming vehicle, the
function sounds an audible warning.
BLIND-SPOT COLLISION WARNING (BCW) (IF EQUIPPED)
OSK3058089L
OSK3058090L
WARNING
Blind-Spot Collision Warning
is a supplemental function to
assist you. Do not entirely rely
on the function.
Always pay attention, while
driving, for your safety.
Always be aware of road con-
ditions while driving and be
warn for unexpected situa-
tions even though Blind-Spot
Collision Warning is operat-
ing.
Blind-Spot Collision Warning
is not a substitute for proper
and safe driving. Always drive
safely and use caution when
changing lanes or backing up
the vehicle. BCW may not
detect every object alongside
the vehicle.
Page 410 of 684
583
Driving your vehicle
Warning message and func-
tion control
Blind-Spot Collision Warning
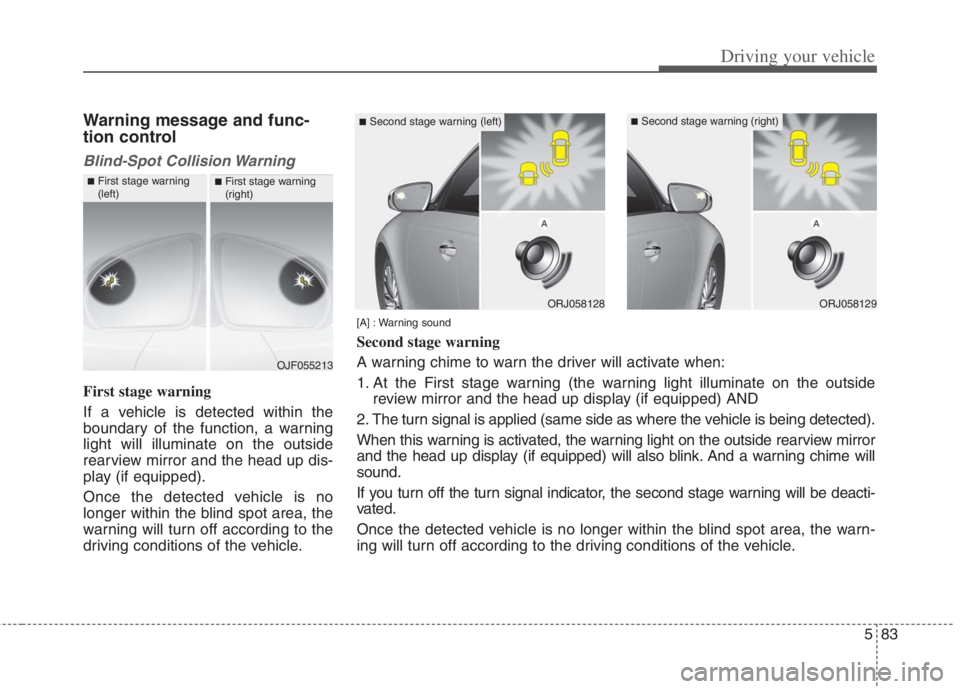
First stage warning
If a vehicle is detected within the
boundary of the function, a warning
light will illuminate on the outside
rearview mirror and the head up dis-
play (if equipped).
Once the detected vehicle is no
longer within the blind spot area, the
warning will turn off according to the
driving conditions of the vehicle.
OJF055213
■First stage warning
(left)■First stage warning
(right)
ORJ058128ORJ058129
[A] : Warning sound
Second stage warning
A warning chime to warn the driver will activate when:
1. At the First stage warning (the warning light illuminate on the outside
review mirror and the head up display (if equipped) AND
2. The turn signal is applied (same side as where the vehicle is being detected).
When this warning is activated, the warning light on the outside rearview mirror
and the head up display (if equipped) will also blink. And a warning chime will
sound.
If you turn off the turn signal indicator, the second stage warning will be deacti-
vated.
Once the detected vehicle is no longer within the blind spot area, the warn-
ing will turn off according to the driving conditions of the vehicle.
■Second stage warning (left)■Second stage warning (right)
Page 440 of 684
5113
Driving your vehicle
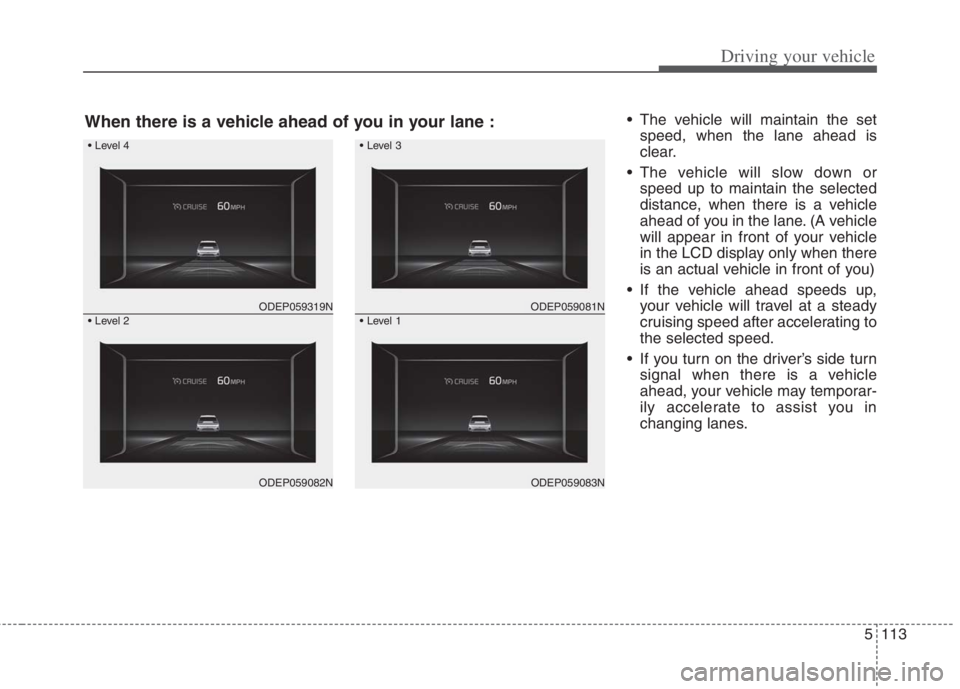
The vehicle will maintain the set
speed, when the lane ahead is
clear.
The vehicle will slow down or
speed up to maintain the selected
distance, when there is a vehicle
ahead of you in the lane. (A vehicle
will appear in front of your vehicle
in the LCD display only when there
is an actual vehicle in front of you)
If the vehicle ahead speeds up,
your vehicle will travel at a steady
cruising speed after accelerating to
the selected speed.
If you turn on the driver’s side turn
signal when there is a vehicle
ahead, your vehicle may temporar-
ily accelerate to assist you in
changing lanes.
ODEP059319N
ODEP059082N
ODEP059081N
ODEP059083N
When there is a vehicle ahead of you in your lane :
Page 463 of 684
Driving your vehicle
136
5
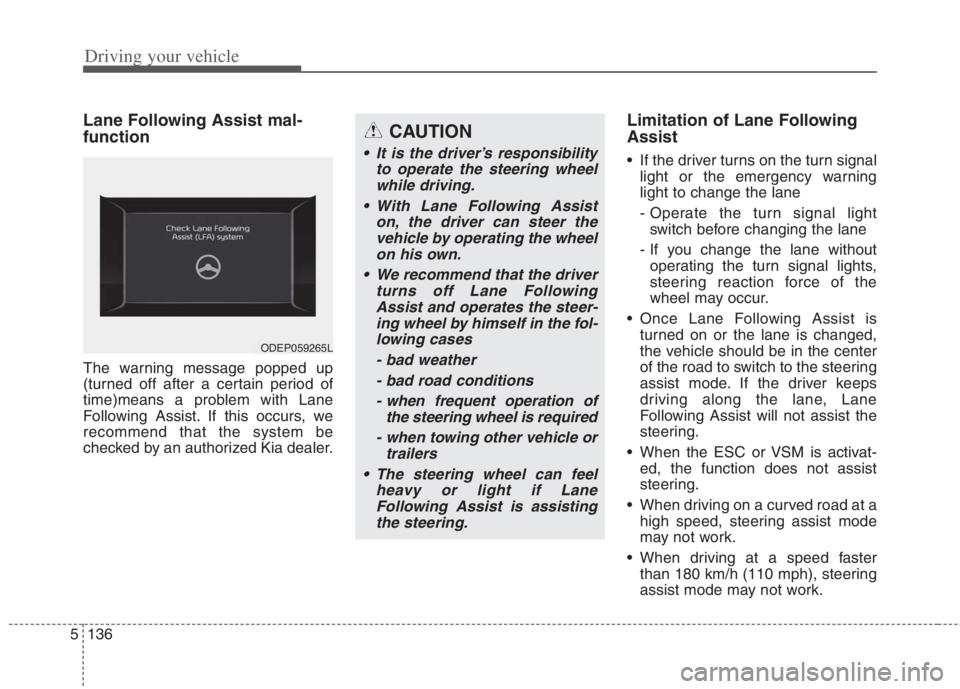
Lane Following Assist mal-
function
The warning message popped up
(turned off after a certain period of
time)means a problem with Lane
Following Assist. If this occurs, we
recommend that the system be
checked by an authorized Kia dealer.
Limitation of Lane Following
Assist
If the driver turns on the turn signal
light or the emergency warning
light to change the lane
- Operate the turn signal lightswitch before changing the lane
- If you change the lane without operating the turn signal lights,
steering reaction force of the
wheel may occur.
Once Lane Following Assist is turned on or the lane is changed,
the vehicle should be in the center
of the road to switch to the steering
assist mode. If the driver keeps
driving along the lane, Lane
Following Assist will not assist the
steering.
When the ESC or VSM is activat- ed, the function does not assist
steering.
When driving on a curved road at a high speed, steering assist mode
may not work.
When driving at a speed faster than 180 km/h (110 mph), steering
assist mode may not work.
CAUTION
It is the driver’s responsibility to operate the steering wheelwhile driving.
With Lane Following Assist on, the driver can steer thevehicle by operating the wheelon his own.
We recommend that the driver turns off Lane FollowingAssist and operates the steer-ing wheel by himself in the fol-lowing cases
- bad weather- bad road conditions- when frequent operation of the steering wheel is required
- when towing other vehicle or trailers
The steering wheel can feel heavy or light if LaneFollowing Assist is assistingthe steering.
ODEP059265L
Page 500 of 684
What to do in an emergency
2 6
ROAD WARNING
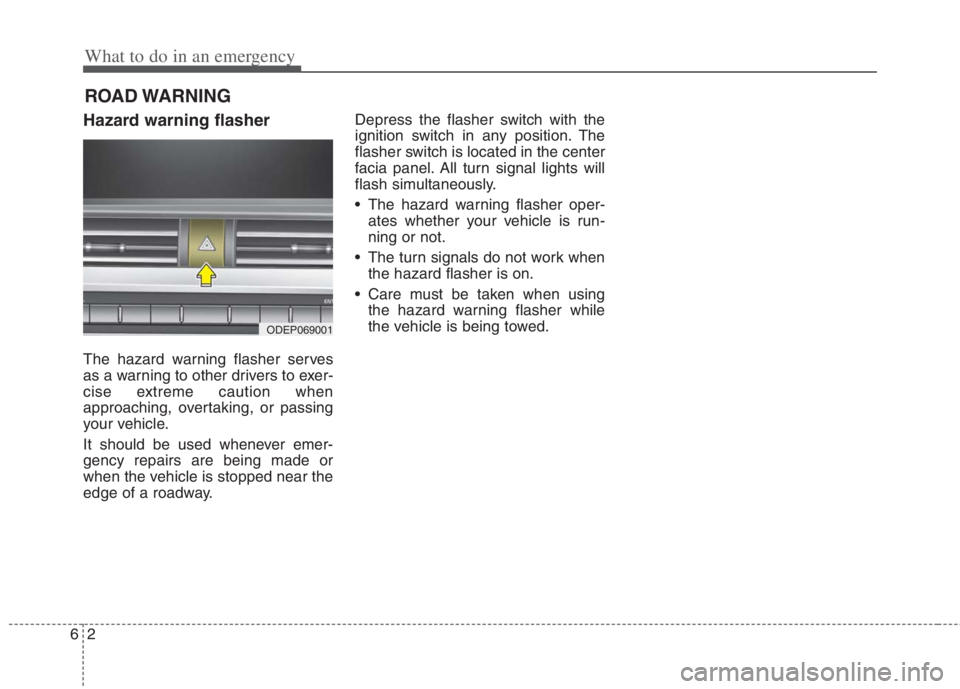
Hazard warning flasher
The hazard warning flasher serves
as a warning to other drivers to exer-
cise extreme caution when
approaching, overtaking, or passing
your vehicle.
It should be used whenever emer-
gency repairs are being made or
when the vehicle is stopped near the
edge of a roadway.Depress the flasher switch with the
ignition switch in any position. The
flasher switch is located in the center
facia panel. All turn signal lights will
flash simultaneously.
• The hazard warning flasher oper-
ates whether your vehicle is run-
ning or not.
The turn signals do not work when
the hazard flasher is on.
Care must be taken when using
the hazard warning flasher while
the vehicle is being towed.
ODEP069001
Page 544 of 684

• Tire traction . . . . . . . . . . . . . . . . . . . . . . . . . . . . . . . . . 7-48
• Tire maintenance . . . . . . . . . . . . . . . . . . . . . . . . . . . . 7-48
• Tire sidewall labeling . . . . . . . . . . . . . . . . . . . . . . . . . 7-48
• Tire terminology and definitions . . . . . . . . . . . . . . . . 7-52
• All season tires . . . . . . . . . . . . . . . . . . . . . . . . . . . . . . 7-55
• Summer tires . . . . . . . . . . . . . . . . . . . . . . . . . . . . . . . . 7-55
• Snow tires . . . . . . . . . . . . . . . . . . . . . . . . . . . . . . . . . . . 7-56
• Radial-ply tires . . . . . . . . . . . . . . . . . . . . . . . . . . . . . . 7-56
• Low aspect ratio tire . . . . . . . . . . . . . . . . . . . . . . . . . . 7-57
Fuses . . . . . . . . . . . . . . . . . . . . . . . . . . . . . . . . . . . . 7-59
• Inner panel fuse replacement . . . . . . . . . . . . . . . . . . . 7-60
• Engine compartment fuse replacement. . . . . . . . . . . 7-62
• Fuse/relay panel description. . . . . . . . . . . . . . . . . . . . 7-65
Light bulbs . . . . . . . . . . . . . . . . . . . . . . . . . . . . . . . 7-87
• Bulb replacement precaution . . . . . . . . . . . . . . . . . . 7-87
• Light bulb position (Front). . . . . . . . . . . . . . . . . . . . . 7-88
• Light bulb position (Rear) . . . . . . . . . . . . . . . . . . . . . 7-89
• Light bulb position (Side) . . . . . . . . . . . . . . . . . . . . . . 7-90
• Headlamp (High/Low beam) (Bulb type) bulb
replacement (Headlamp type A) . . . . . . . . . . . . . . . 7-91
• Front turn signal lamp (Bulb type) bulb replacement
(Headlamp type A) . . . . . . . . . . . . . . . . . . . . . . . . . . 7-92
• Front side marker (Bulb type) bulb replacement
(Headlamp type A) . . . . . . . . . . . . . . . . . . . . . . . . . . 7-93• Headlamp (High/Low beam) (LED type) bulb
replacement (Headlamp type B) . . . . . . . . . . . . . . . 7-93
• Front turn signal (LED type) bulb replacement
(Headlamp type B) . . . . . . . . . . . . . . . . . . . . . . . . . . 7-94
• Front side marker (LED type) bulb replacement
(Headlamp type B) . . . . . . . . . . . . . . . . . . . . . . . . . . 7-94
• Daytime running lamp/Position lamp (LED type)
bulb replacement . . . . . . . . . . . . . . . . . . . . . . . . . . . . 7-94
• Front fog lamp (Bulb/LED type) bulb
replacement . . . . . . . . . . . . . . . . . . . . . . . . . . . . . . . . 7-95
• Stop and tail lamp, Rear turn signal lamp
(Bulb type) bulb replacement . . . . . . . . . . . . . . . . . 7-95
• Tail lamp (inside) (Bulb type) bulb replacement . . . 7-96
• Rear side marker (Bulb type) bulb replacement . . . 7-97
• Stop and tail lamp (LED type) bulb replacement . . 7-99
• Rear side marker (LED type) bulb replacement . . . 7-99
• Back-up lamp (Bulb type) bulb replacement . . . . . . 7-99
• License plate lamp (Bulb type) bulb replacement . 7-100
• High mounted stop lamp (LED type) bulb
replacement . . . . . . . . . . . . . . . . . . . . . . . . . . . . . . . 7-100
• Side repeater lamp (LED type) bulb replacement . 7-101
• Map lamp (Bulb type) bulb replacement . . . . . . . . 7-101
• Map lamp (LED type) bulb replacement . . . . . . . . 7-102
• Vanity mirror lamp (Bulb type) bulb replacement . 7-102
• Room lamp (Bulb type) bulb replacement . . . . . . . 7-103
• Room lamp (LED type) bulb replacement . . . . . . . 7-103
7
Page 550 of 684
Maintenance
8 7
At least monthly:
Check the coolant level in the
engine coolant reservoir.
Check the operation of all exterior
lights, including the stoplights, turn
signals and hazard warning flash-
ers.
Check the inflation pressures of all
tires including the spare for tires
that are worn, show uneven wear,
or are damaged.
Check for loose wheel lug nuts.
At least twice a year
(i.e., every Spring and Fall) :
Check the radiator, heater and air
conditioning hoses for leaks or
damage.
Check the windshield washer
spray and wiper operation. Clean
the wiper blades with clean cloth
dampened with washer fluid.
Check the headlight alignment.
Check the muffler, exhaust pipes,
shields and clamps.
Check the lap/shoulder belts for
wear and function.
At least once a year :
Clean the body and door drain
holes.
Lubricate the door hinges and
check the hood hinges.
Lubricate the door and hood locks
and latches.
Lubricate the door rubber weather-
strips.
Check the air conditioning system.
Inspect and lubricate dual clutch
transmission linkage and controls.
Clean the battery and terminals.
Check the brake fluid level.
Page 603 of 684

761
Maintenance
3. Pull the suspected fuse straight
out. Use the removal tool provided
on the engine compartment fuse
panel cover.
4. Check the removed fuse; replace it
if it is blown.
Spare fuses are provided in the
engine compartment fuse panel.
5. Push in a new fuse of the same
rating, and make sure it fits tightly
in the clips.
If it fits loosely, consult an authorized
Kia dealer.
If you do not have a spare, use a
fuse of the same rating from a circuit
you may not need for operating the
vehicle, such as the power outlet
fuse.
If the head lamp, turn signal lamp,
stop signal lamp, fog lamp, DRL, tail
lamp, HMSL do not work and the
fuses are OK, check the fuse panel
in the engine compartment. If a fuse
is blown, it must be replaced.
✽ ✽
NOTICE
If the headlamp, fog lamp, turn sig-
nal lamp, or tail lamp malfunction
even without any problem to the
lamps, have the vehicle checked by
an authorized Kia dealer for assis-
tance.
ODEP079020
CAUTION
Do not input any other objects
except fuses or relays into
fuse/relay terminals, such as a
driver or wiring. It may cause
contact failure and system
malfunction.
Do not plug in screwdrivers or
aftermarket wiring into the ter-
minal originally designed for
fuse and relays only. The elec-
trical system and wiring of the
vehicle interior may be dam-
aged or burned due to contact
failure.
If you directly connect the
wire on the taillight or replace
the bulb which is over the reg-
ulated capacity to install trail-
ers, etc., the inner junction
block can get burned.