Page 191 of 684
453
Features of your vehicle
MIRRORS
Inside rearview mirror
Adjust the rearview mirror so that the
center view through the rear window
is seen. Make this adjustment before
you start driving.
Do not place objects in the rear seat
or cargo area which would interfere
with your vision through the rear win-
dow.
Day/night rearview mirror
(if equipped)
Make this adjustment before you
start driving and while the day/night
lever (3) is in the day position.
Pull the day/night lever (3) toward
you to reduce the glare from the
headlights of the vehicles behind you
during night driving.
Remember that you lose some
rearview clarity in the night position.
❈(1) : Day, (2) : Night
WARNING- Mirror adjust-
ment
Do not adjust the rearview mir-
ror while the vehicle is moving.
This could result in loss of con-
trol.
WARNING
Do not modify the inside mirror
and don’t install a wide mirror. It
could result in injury during an
accident or deployment of the
air bag.
ODE046025L
Page 192 of 684

Features of your vehicle
54 4
Day/night rearview mirror with
Telematics function (if equipped)
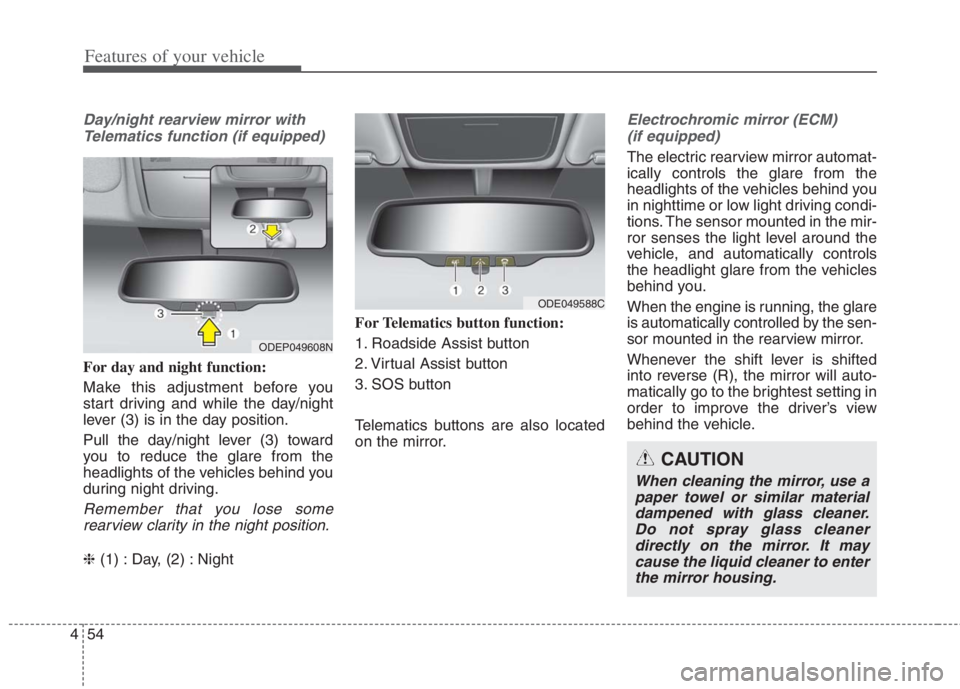
For day and night function:
Make this adjustment before you
start driving and while the day/night
lever (3) is in the day position.
Pull the day/night lever (3) toward
you to reduce the glare from the
headlights of the vehicles behind you
during night driving.
Remember that you lose some
rearview clarity in the night position.
❈(1) : Day, (2) : NightFor Telematics button function:
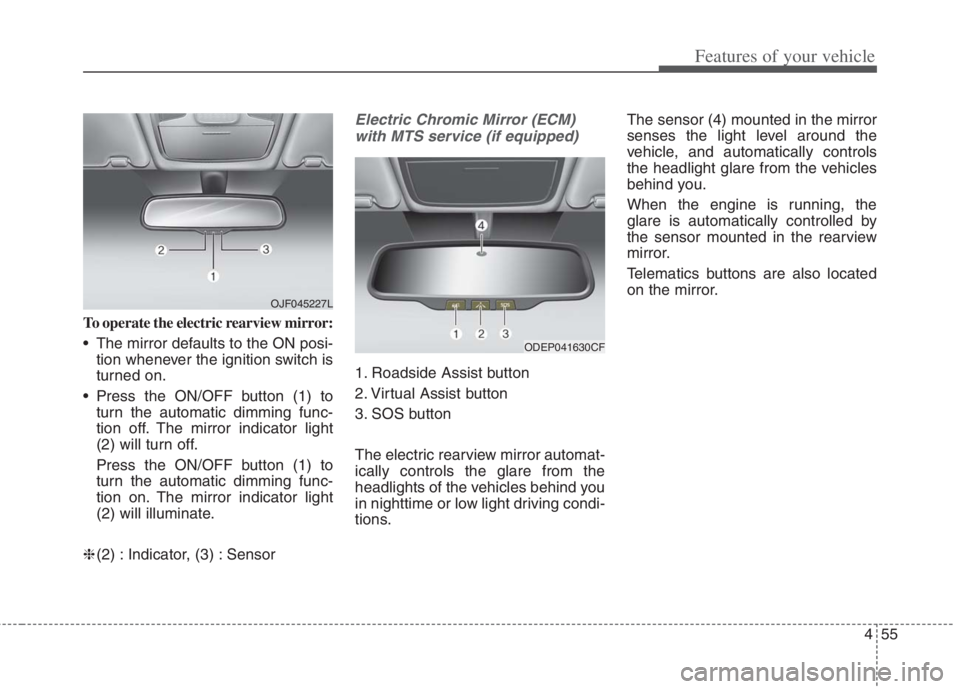
1. Roadside Assist button
2. Virtual Assist button
3. SOS button
Telematics buttons are also located
on the mirror.
Electrochromic mirror (ECM)
(if equipped)
The electric rearview mirror automat-
ically controls the glare from the
headlights of the vehicles behind you
in nighttime or low light driving condi-
tions. The sensor mounted in the mir-
ror senses the light level around the
vehicle, and automatically controls
the headlight glare from the vehicles
behind you.
When the engine is running, the glare
is automatically controlled by the sen-
sor mounted in the rearview mirror.
Whenever the shift lever is shifted
into reverse (R), the mirror will auto-
matically go to the brightest setting in
order to improve the driver’s view
behind the vehicle.
ODEP049608N
ODE049588C
CAUTION
When cleaning the mirror, use a
paper towel or similar material
dampened with glass cleaner.
Do not spray glass cleaner
directly on the mirror. It may
cause the liquid cleaner to enter
the mirror housing.
Page 193 of 684

455
Features of your vehicle
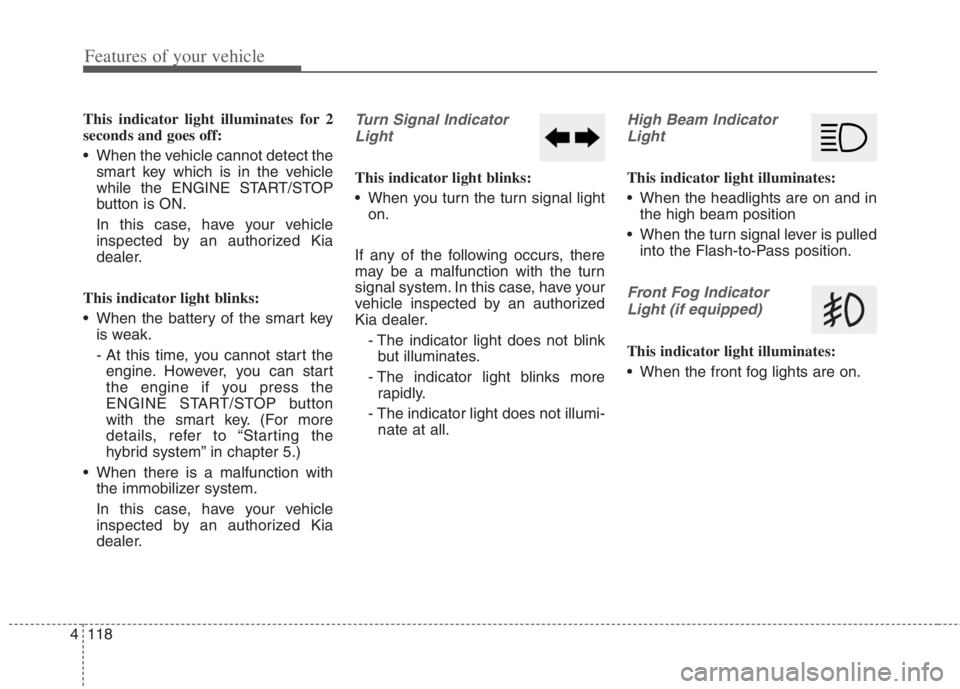
To operate the electric rearview mirror:
The mirror defaults to the ON posi-
tion whenever the ignition switch is
turned on.
Press the ON/OFF button (1) to
turn the automatic dimming func-
tion off. The mirror indicator light
(2) will turn off.
Press the ON/OFF button (1) to
turn the automatic dimming func-
tion on. The mirror indicator light
(2) will illuminate.
❈(2) : Indicator, (3) : Sensor
Electric Chromic Mirror (ECM)
with MTS service (if equipped)
1. Roadside Assist button
2. Virtual Assist button
3. SOS button
The electric rearview mirror automat-
ically controls the glare from the
headlights of the vehicles behind you
in nighttime or low light driving condi-
tions.The sensor (4) mounted in the mirror
senses the light level around the
vehicle, and automatically controls
the headlight glare from the vehicles
behind you.
When the engine is running, the
glare is automatically controlled by
the sensor mounted in the rearview
mirror.
Telematics buttons are also located
on the mirror.
ODEP041630CF
OJF045227L
Page 256 of 684

Features of your vehicle
118 4
This indicator light illuminates for 2
seconds and goes off:
When the vehicle cannot detect the
smart key which is in the vehicle
while the ENGINE START/STOP
button is ON.
In this case, have your vehicle
inspected by an authorized Kia
dealer.
This indicator light blinks:
When the battery of the smart key
is weak.
- At this time, you cannot start the
engine. However, you can start
the engine if you press the
ENGINE START/STOP button
with the smart key. (For more
details, refer to “Starting the
hybrid system” in chapter 5.)
When there is a malfunction with
the immobilizer system.
In this case, have your vehicle
inspected by an authorized Kia
dealer.Turn Signal Indicator
Light
This indicator light blinks:
When you turn the turn signal light
on.
If any of the following occurs, there
may be a malfunction with the turn
signal system. In this case, have your
vehicle inspected by an authorized
Kia dealer.
- The indicator light does not blink
but illuminates.
- The indicator light blinks more
rapidly.
- The indicator light does not illumi-
nate at all.
High Beam Indicator
Light
This indicator light illuminates:
When the headlights are on and in
the high beam position
When the turn signal lever is pulled
into the Flash-to-Pass position.
Front Fog Indicator
Light (if equipped)
This indicator light illuminates:
When the front fog lights are on.
Page 257 of 684
4119
Features of your vehicle
Low Beam Indicator
Light (if equipped)
This indicator light illuminates:
When the headlights are on.
Light ON Indicator Light
This indicator light illuminates:
When the tail lights or headlights
are on.
High Beam Assist
indicator (if equipped)
This warning light illuminates :
When the High-Beam is on with
the light switch in the AUTO light
position.
If your vehicle detects oncoming or
preceding vehicles, High Beam
Assist will switch the high beam to
low beam automatically.
❈For more details, refer to “High
Beam Assist (HBA)” in chapter 4.
EV Mode Indicator
This indicator illuminates when the
vehicle is driven by the electric
motor.
EV
Page 269 of 684

4131
Features of your vehicle
Battery saver function
The purpose of this feature is to pre-
vent the battery from being dis-
charged if the lights are left in the ON
position.
The system automatically shuts off
the parking lights after the engine is
off and the driver's door is opened.
However, the position lamps stay ON
even when the driver-side door is
opened if the light switch is operated
after the engine is turned off.
If necessary, to keep the lamps on
turn the position lamps OFF and ON
again using the headlamp switch on
the steering column after the engine
is turned off.
Headlight escort function
(if equipped)
If you turn the ignition switch to the
ACC or OFF position with the head-
lights ON, the headlights remain on
for about 5 minutes. However, if the
driver's door is opened and closed,
the headlights are turned off after 15
seconds.
The headlights can be turned off by
pressing the lock button on the trans-
mitter (or smart key) one more or
turning the light switch to the OFF
position.
Daytime running light (DRL)
The Daytime Running Lights (DRL)
can make it easier for others to see the
front of your vehicle during the day.
DRL can be helpful in many different
driving conditions, and it is especially
helpful after dawn and before sunset.
The DRL system will turn the dedi-
cated lamp OFF when:
1. The headlight switch is on
2. The engine is off
3. The front fog light is on.
4. Engaging the Parking Brake
LIGHTING
Page 271 of 684

4133
Features of your vehicle
Headlight position ( )
When the light switch is in the head-
light position, the head, tail, license
lights will turn ON.
✽ ✽
NOTICE
The ignition switch must be in the ON
position to turn on the headlights.
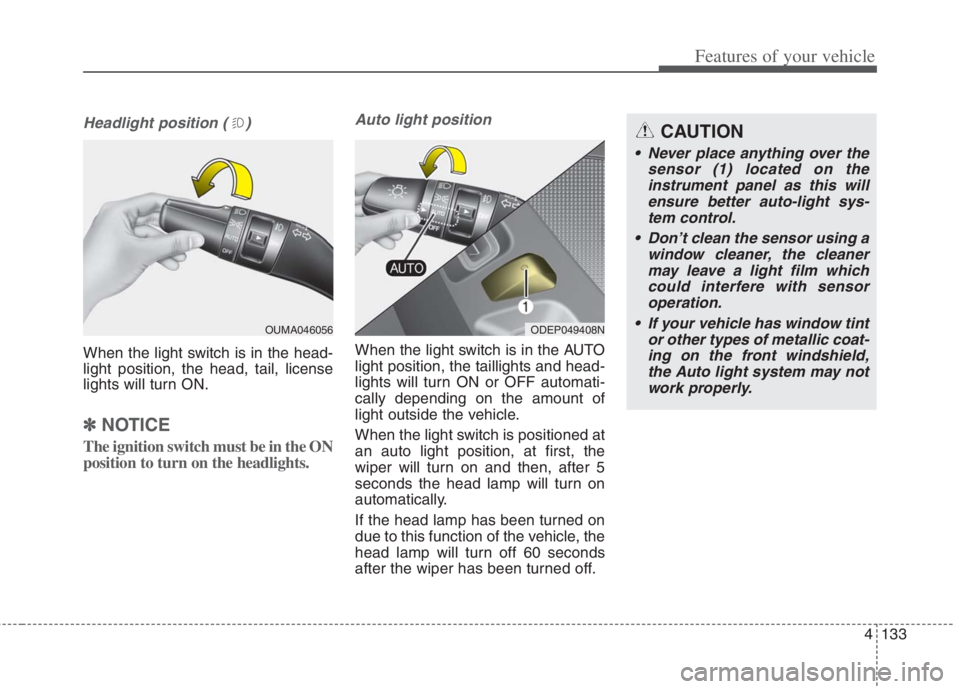
Auto light position
When the light switch is in the AUTO
light position, the taillights and head-
lights will turn ON or OFF automati-
cally depending on the amount of
light outside the vehicle.
When the light switch is positioned at
an auto light position, at first, the
wiper will turn on and then, after 5
seconds the head lamp will turn on
automatically.
If the head lamp has been turned on
due to this function of the vehicle, the
head lamp will turn off 60 seconds
after the wiper has been turned off.
ODEP049408N
CAUTION
Never place anything over the
sensor (1) located on the
instrument panel as this will
ensure better auto-light sys-
tem control.
Don’t clean the sensor using a
window cleaner, the cleaner
may leave a light film which
could interfere with sensor
operation.
If your vehicle has window tint
or other types of metallic coat-
ing on the front windshield,
the Auto light system may not
work properly.
OUMA046056
Page 272 of 684
Features of your vehicle
134 4
High beam operation
To turn on the high beam headlamp,
push the lever away from you. The
lever will return to its original position.
The high beam indicator will light
when the headlight high beams are
switched on.
To prevent the battery from being
discharged, do not leave the lights
on for a prolonged time while the
engine is not running.To flash the headlights, pull the lever
towards you. It will return to the nor-
mal (low beam) position when
released. The headlight switch does
not need to be on to use this flashing
feature.
OUM044058
WARNING - High beams
Do not use high beams when
there are other vehicles in front
of or approaching your vehicle.
Using high beams could
obstruct the other driver’s
vision.
OUM044059