2022 KIA NIRO EV tow
[x] Cancel search: towPage 8 of 62

6*IF EQUIPPEDNIRO EV FEATURES & FUNCTIONS GUIDE
Low Battery Warning – When the high-voltage battery level reaches 8% or less, this warning message appears on the LCD and the warning indicator light on the instrument cluster illuminates . Charge the high-voltage battery immediately .
Power limited due to low EV battery temperature. Charge battery – When the outside temperature is low and you turn the vehicle on or off, this warning message may appear on the LCD . If the battery level is low and the vehicle is parked outside for a long time, vehicle power may be limited . Charging battery before driving helps increase power .
Stop vehicle and check power supply – When there is a failure in the power supply system, this warning message appears on the LCD . Park the vehicle in a safe location and have it towed to the nearest Kia dealer for inspection .
EV Battery Overheated! Stop Vehicle – When the high-voltage battery temperature is too high, this warning message will appear on the LCD . Stop the vehicle and turn off the Power button so that the battery temperature decreases .
Charge immediately. Power limited – When the high-voltage battery level reaches 3% or less, this warning message appears on the LCD,
the warning indicator light on the instrument cluster illuminates and the power down warning light turns ON simultaneously .
The vehicle’s power will be reduced to minimize the energy consumption of the high-voltage battery . Charge the high-voltage battery immediately .
Power limited – This warning message appears when the vehicle’s power is limited due to the following reasons:
1 . When the high-voltage battery is below a
certain level, or voltage is decreasing
2 . When the temperature of the motor or high-voltage battery is too high or too low
3 . When there is a problem with the cooling system or a failure that may interrupt normal driving
Charge Warning Messages on LCD Display
REMINDERS:
•
When these warning messages are displayed, do not accelerate or star t the vehicle suddenly
•
All stored driving information (except Odometer and Range) is reset if the bat ter y is disconnected
Low EV BatteryEV Battery Overheated!Stop Vehicle
Power limiteddue to low EV batterytemperature .Charge battery
Stop vehicle andcheck power supplyCharge immediately .Power limited
Power limited
These illustrations are for demonstration purposes only . Some messages may appear differently . See your Owner ’s Manual for more information .
INSTRUMENT CLUSTER
INSTRUMENTCLUSTER
Page 18 of 62

16 *IF EQUIPPEDNIRO EV FEATURES & FUNCTIONS GUIDE
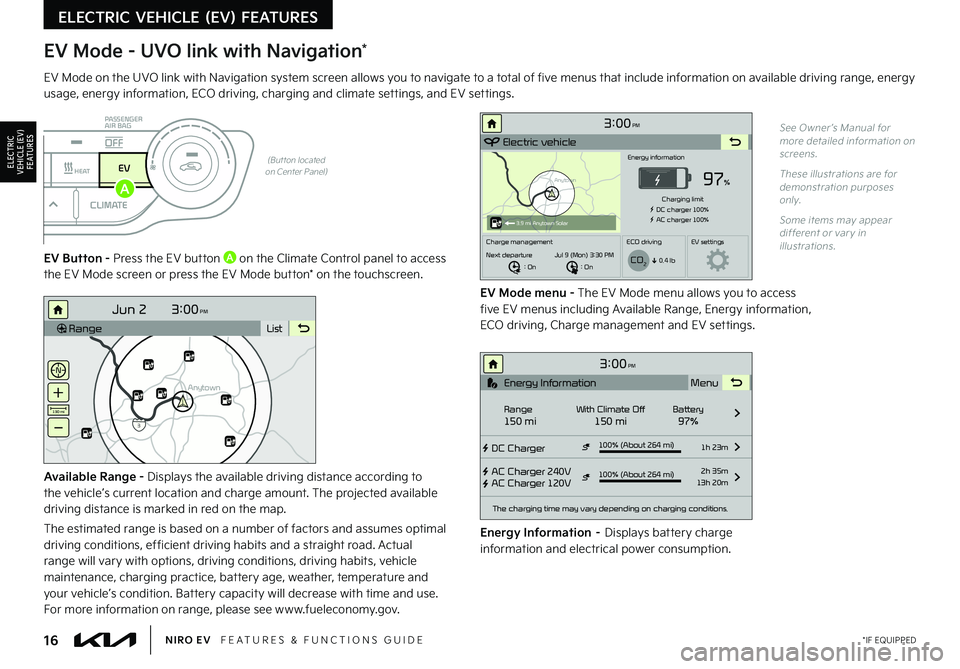
EV Mode - UVO link with Navigation*
EV Mode on the UVO link with Navigation system screen allows you to navigate to a total of five menus that include information on available driving range, energy usage, energy information, ECO driving, charging and climate settings, and EV settings .
(But ton located on Center Panel)
EV Button - Press the EV button A on the Climate Control panel to access the EV Mode screen or press the EV Mode button* on the touchscreen .
EV Mode menu - The EV Mode menu allows you to access five EV menus including Available Range, Energy information, ECO driving, Charge management and EV settings .
Available Range - Displays the available driving distance according to the vehicle’s current location and charge amount . The projected available driving distance is marked in red on the map .
The estimated range is based on a number of factors and assumes optimal driving conditions, efficient driving habits and a straight road . Actual range will vary with options, driving conditions, driving habits, vehicle maintenance, charging practice, battery age, weather, temperature and your vehicle’s condition . Battery capacity will decrease with time and use . For more information on range, please see www .fueleconomy .gov .
Energy Information – Displays battery charge information and electrical power consumption .
See Owner ’s Manual for more detailed information on screens .
These illustrations are for demonstration purposes only .
Some items may appear different or var y in illustrations .
3:00PM
Range List
Anytown
3
Jun 2
+
–
130 mi
Anytown
3:00PM
Electric vehicle
97%
Energy information
Charging limit
DC charger 100% AC charger 100%
Charge management ECO drivingEV settings
Next departure : On : On
Jul 9 (Mon) 3:30 PM
0.4 lb
3.9 mi Anytown Solar
CO2
3:00PM
DC Charger
AC Charger 240V
AC Charger 120V100% (About 264 mi) 1h 23m
2h 35m
13h 20m
The charging time may vary depending on charging conditions.
Range150 miWith Climate Off150 miBattery97% Menu
Energy Information
100% (About 264 mi)
i
DRIVERAUTOACHEAT
CLIMATEOFF
ONLYEV
PASSENGER
AIR BAG
OFF
ELECTRIC VEHICLE (EV) FEATURES
ELECTRIC VEHICLE (EV) F E AT U R E S
A
Page 36 of 62

34†LEGAL DISCL AIMERS ON BACK INSIDE COVER | *IF EQUIPPEDNIRO EV FEATURES & FUNCTIONS GUIDE
Headlight position ON
Parking light position
AUTO*Auto Light Position / Day time Running Lights / High Beam Assist
OFFHeadlight OFF position
Headlights & High Beams
To operate:
•Rotate lever to change the Headlight function
•Push lever to turn High Beams ON
•Pull lever to flash Headlights/ High Beams
AUTO Light position – When the light switch is in the AUTO Light position, the tail lights and headlights will turn ON/OFF automatically depending on the amount of light outside the vehicle .
Daytime Running Lights (DRL) – DRL may help others to see the front of your vehicle during the day . The lights will be on automatically
when the ignition or POWER button* is ON and the headlight switch is in the AUTO position, unless one of the following occurs:
•Parking brake is applied
•Engine is turned off
High Beam Assist (HBA) – The High Beam Assist is designed to automatically adjust the headlight range by switching between high and low beams based on light detected from oncoming vehicles and road conditions .
To enable HBA , toggle the light switch to the AUTO Light position and turn on the high beams by pushing the lever away from you . The High Beam Assist indicator will illuminate .
High Beam Assist does not operate below certain speeds, or in some lighting and driving conditions . Please be aware of your surroundings and exercise proper road etiquette when operating a vehicle using the high beams .
PUSH
PULL
REMINDERS:
•
HBA will operate when vehicle speed exceeds 25 mph
•
If the lever is pushed away from you while HBA is operational, HBA will turn off and the high beams will be on continuously . If the lever is pulled toward you while HBA is operational, HBA will turn off
•
If the light switch is switched to the headlight position, HBA will turn off and low beams will be on continuously
•The DRL system turns off when parking brake is applied
•DRL only operates during the day time
STEERING WHEEL CONTROLS
STEERING
WHEEL CONTROLS
Page 37 of 62

35†LEGAL DISCL AIMERS ON BACK INSIDE COVER | *IF EQUIPPEDALWAYS CHECK THE OWNER ’S MANUAL FOR COMPLETE OPER ATING INFORMATION AND SAFET Y WARNINGS .
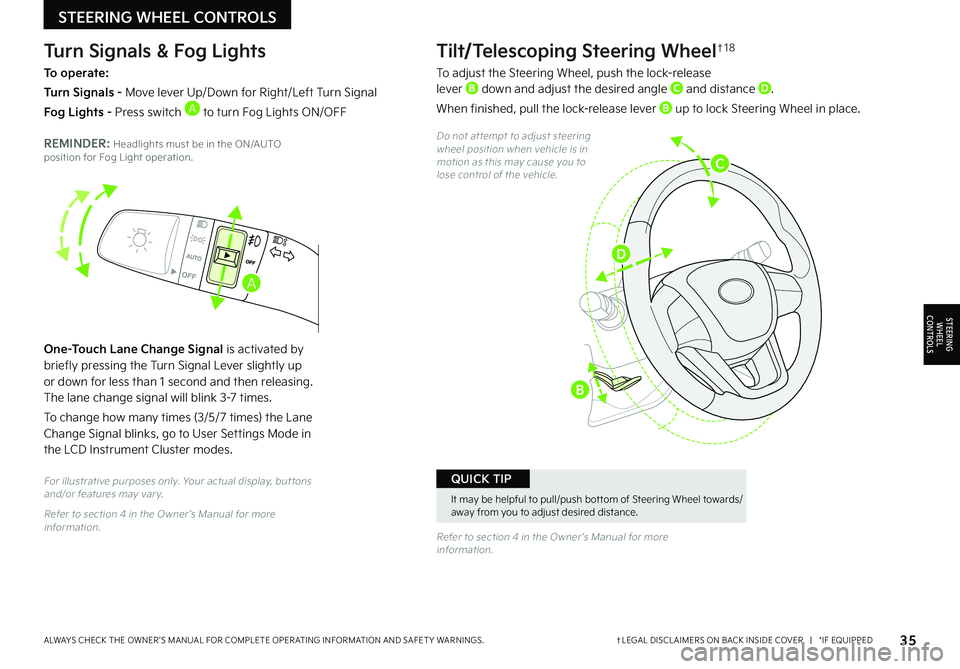
Tilt/Telescoping Steering Wheel†1 8
To adjust the Steering Wheel, push the lock-release lever B down and adjust the desired angle C and distance D .
When finished, pull the lock-release lever B up to lock Steering Wheel in place .
Do not at tempt to adjust steering wheel position when vehicle is in motion as this may cause you to lose control of the vehicle .
Refer to section 4 in the Owner ’s Manual for more information .
One-Touch Lane Change Signal is activated by briefly pressing the Turn Signal Lever slightly up or down for less than 1 second and then releasing . The lane change signal will blink 3-7 times .
To change how many times (3/5/7 times) the Lane Change Signal blinks, go to User Settings Mode in the LCD Instrument Cluster modes .
Turn Signals & Fog Lights
To operate:
Turn Signals - Move lever Up/Down for Right/Left Turn Signal
Fog Lights - Press switch A to turn Fog Lights ON/OFF
REMINDER: Headlights must be in the ON/AUTO position for Fog Light operation .
For illustrative purposes only . Your actual display, but tons and/or features may var y .
Refer to section 4 in the Owner ’s Manual for more information .
A
STEERING WHEEL CONTROLS
STEERING
WHEEL CONTROLS
It may be helpful to pull/push bot tom of Steering Wheel towards/away from you to adjust desired distance .
QUICK TIP
B
C
D
Page 43 of 62

41†LEGAL DISCL AIMERS ON BACK INSIDE COVER | *IF EQUIPPEDALWAYS CHECK THE OWNER ’S MANUAL FOR COMPLETE OPER ATING INFORMATION AND SAFET Y WARNINGS .
Driving while distracted can result in a loss of vehicle control that may lead to an accident, severe bodily injur y, and death . The driver ’s primar y responsibilit y is in the safe and legal operation of a vehicle, and any handheld devices, other equipment, or vehicle systems which take the driver ’s eyes, at tention and focus away from the safe operation of a vehicle or which are not permissible by law should never be used during operation of the vehicle .
For fur ther UVO link operation, refer to the Car Infotainment System Quick Reference Guide . For fur ther audio system operations, refer to pages 37-4 3 .
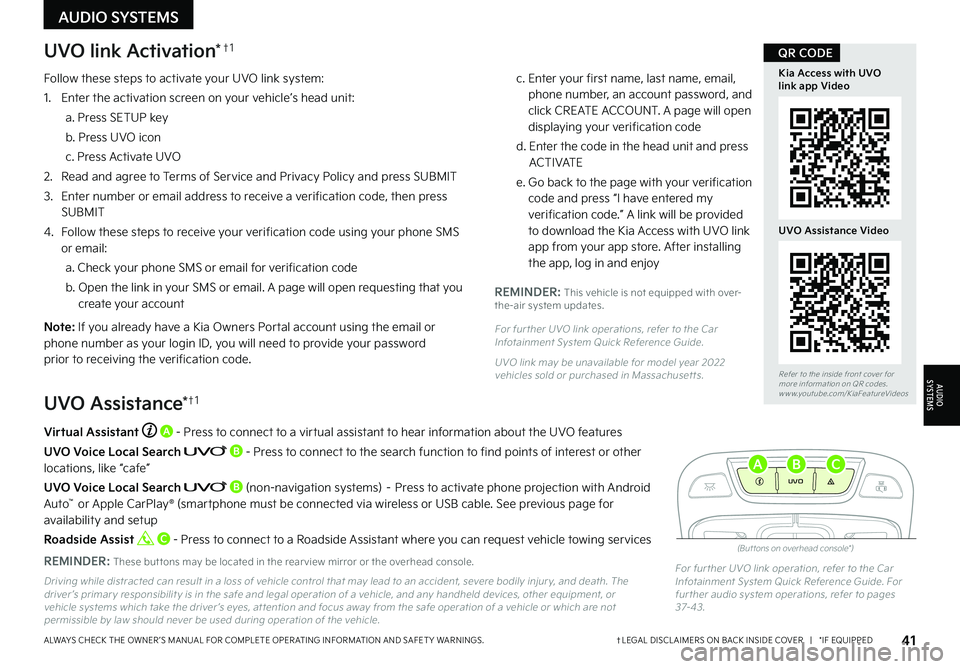
Virtual Assistant A - Press to connect to a virtual assistant to hear information about the UVO features
UVO Voice Local Search B - Press to connect to the search function to find points of interest or other locations, like “cafe”
UVO Voice Local Search B (non-navigation systems) – Press to activate phone projection with Android Auto™ or Apple CarPlay® (smartphone must be connected via wireless or USB cable . See previous page for availability and setup
Roadside Assist C - Press to connect to a Roadside Assistant where you can request vehicle towing services
REMINDER: These but tons may be located in the rear view mirror or the overhead console .
UVO Assistance*†1
(But tons on overhead console*)
UVO
FRONTREAR
ONOFFDOOR
UVO link Activation*†1
Follow these steps to activate your UVO link system:
1
. Enter the activation screen on your vehicle’s head unit:
a . Press SETUP key
b . Press UVO icon
c . Press Activate UVO
2 .
Read and agree to Terms of Service and Privacy Policy and press SUBMIT
3 .
Enter number or email address to receive a verification code, then press SUBMIT
4 .
Follow these steps to receive your verification code using your phone SMS or email:
a . Check your phone SMS or email for verification code
b . Open the link in your SMS or email . A page will open requesting that you create your account
N o t e : If you already have a Kia Owners Portal account using the email or phone number as your login ID, you will need to provide your password prior to receiving the verification code .
c . Enter your first name, last name, email, phone number, an account password, and click CREATE ACCOUNT . A page will open displaying your verification code
d . Enter the code in the head unit and press ACTIVATE
e . Go back to the page with your verification code and press “I have entered my verification code .” A link will be provided to download the Kia Access with UVO link app from your app store . After installing the app, log in and enjoy
REMINDER: This vehicle is not equipped with over-the-air system updates .
For fur ther UVO link operations, refer to the Car Infotainment System Quick Reference Guide .
UVO link may be unavailable for model year 2022 vehicles sold or purchased in Massachuset ts .
AUDIO SYSTEMS
AUDIOSYSTEMS
ABC
Refer to the inside front cover for more information on QR codes .www .youtube .com/KiaFeatureVideos
Kia Access with UVO link app Video
UVO Assistance Video
QR CODE
Page 49 of 62

47*IF EQUIPPEDALWAYS CHECK THE OWNER ’S MANUAL FOR COMPLETE OPER ATING INFORMATION AND SAFET Y WARNINGS .
Rotary Dial Shifter Knob
Rotate dial for the following:
P: Park - Press to place in Park
R: Reverse
N: Neutral
D: Drive
P Release: (Park Release) – Press brake pedal and press the P Release button A to release the Parking Brake and rotate dial to R, D or N . P Release is for emergency/towing use and not used in normal daily driving
(Located to the right of Rotar y Dial Shifter Knob)
Heated Steering Wheel Button*
Press button B to turn ON/OFF the steering wheel heater, while the POWER button is in the ON or READY position .
The steering wheel heater will turn off automatically after 30 minutes, or when button is pressed again to deactivate .
REMINDER: If the steering wheel becomes too warm, turn the system off . The heated steering wheel may cause burns even at low temperatures, especially if used for long periods of time .
N
P
PRELEASE
AUTO
HOLD
DRIVE
MODE
D
R
N
P
PRELEASE
AUTO
HOLD
DRIVE
MODE
D
R
REMINDER: The vehicle is equipped with a shift-by-wire system and a shift-lock system that prevents you from shifting gears without depressing the brake pedalRefer to section 4 in the Owner ’s Manual for more information .
Refer to section 5 in the Owner ’s Manual for more information .
CENTER PANEL
CENTERPA N EL
If ignition is cycled, the Heated Steering Wheel turns OFF . Press but ton again to turn ON .
QUICK TIP
A
B
Page 53 of 62

51†LEGAL DISCL AIMERS ON BACK INSIDE COVER | *IF EQUIPPEDALWAYS CHECK THE OWNER ’S MANUAL FOR COMPLETE OPER ATING INFORMATION AND SAFET Y WARNINGS .
Folding Rear Seats
To Fold:
1 . Ensure the belt strap is out of way of the Seatback folding D . Insert the metal seat belt tab into the holder E
2 . Adjust the Front Seatback to the upright position and lower the rear headrest to the lowest position
3 . Pull on the Rear Seatback lock release lever F, then fold the seat toward the front
To Unfold:
1 . Pull the lock release lever F and lift the Seatback backward until it clicks firmly in place
2 . Return the rear seat belt to the proper position
REMINDERS:
•
Before unfolding Seatback, ensure the seat belt is placed into the holder
•
Always make sure the Seatback is locked in place when unfolded
For illustration purposes only . Actual vehicle might be slightly different . Refer to section 3 in the Owner ’s Manual for more information .
SEATING
S E AT I N G
•It may be necessar y to adjust the Front Seatbacks to fully lower rear seats
•Ensure seat is locked by pressing down on Seatback and ensuring red line is NOT visible on bot tom of Folder Lever
QUICK TIPS
D
E
F
Page 61 of 62

OFF
LO
HI
Climate Control System* – page 46
Demo Defrost and Defog Windshield
EV Mode Displays* on the audio head unit – page 16
Instrument Cluster / EV Displays – pages 03-05
Windshield/Rear Wipers & Washers – page 36 Windshield: Move lever Up/Down to change Wiper modes. Rotate lever to adjust Intermit tent Wipe Speed.
WindshieldMIST: Single wipeOFF: Wipe offINT: Intermit tent wipeLO: Slow wipeHI: Fast wipe
220200
20
20 12 0
1 40
40
10 0
60
80
180
40 160
60 140
80 120
100
E
Fmi
RANGE
68
°c
CRUISE 60
mi/h
EPSECO
MPHelectric
LV .3
R ND
L H
2518 mi
DRIVERPASSENGER PASSENGER
AIR BAG
OFF
AUTO
AC EV
HEATCLIMATE
OFF
ONLY
Type A shown
Anytown
3:00
PM
Electric vehicle
97
%
Energy information
Charging limit
DC charger 100% AC charger 100%
Charge management ECO drivingEV settings
Next departure : On : On
Jul 9 (Mon) 3:30 PM
0.4 lb
3.9 mi Anytown Solar
CO2
Pull to spray and wipe.
Type B shown
Owner ’s Name:
VIN:
Mileage:
Dealership Name:
Sales Consultant:
Date:
BEFORE DELIVERY Test and confirm “Good Battery” using a Kia battery tester and affix Results Label Verify all tire pressures are to spec (see driver ’s door label) LF
LR
RF
RR
Verify proper operation of Remote Keyless Entry and Smart Key lock/unlock Ensure floor mats are snapped into place (if applicable) Verify vehicle is clean (interior and exterior), in good condition and free of chips and scratches Ensure all key documents are in the vehicle (Owner ’s Manual, Warranty and Consumer Information booklet, Tire Warranty booklet and Features & Functions Guide and any Audio System User ’s Manual)KEY FEATURE WALKTHROUGH
NIRO EV
DELIVERY CHECKLIST
*IF EQUIPPED