2022 KIA NIRO EV light
[x] Cancel search: lightPage 35 of 62

33*IF EQUIPPEDALWAYS CHECK THE OWNER ’S MANUAL FOR COMPLETE OPER ATING INFORMATION AND SAFET Y WARNINGS .
Automatic Door Lock
Auto Door Lock will engage when the Rotary Dial Shifter Knob is moved into or out of the P (Park) position . Refer to the User Settings in the LCD Instrument Cluster modes on how to turn Auto Door Lock/Unlock ON/OFF .
But ton configuration may var y depending on vehicle model . Refer to section 4 in the Owner ’s Manual for more information .
Power/Heated Outside Mirrors
Mirror heaters automatically turn ON/OFF at the same time the Rear Window Defroster is turned ON/OFF . Rear Window Defroster button* is located on climate control system panel .
Refer to section 4 in the Owner ’s Manual for more information .
Power Folding Outside Mirrors*
Press L or R buttons D (left or right) to select mirrors . Then press arrows E to adjust mirror position .
To fold and unfold both the outside rearview mirrors, press the folding mirror button F as pictured:
•Left − The mirrors will unfold
•Right − The mirrors will fold
•Center − The mirrors will fold/unfold automatically when doors are locked/unlocked with the Smart Key or a door handle button is pressed . Also, the mirrors will unfold when approaching the vehicle with the Smart Key fob in proximity
REMINDER: To lock position of mirrors, toggle switch to the neutral (center) position .
Power Windows, Window Lock
& Central Door Lock
Refer to section 4 in the Owner ’s Manual for more information .
Refer to section 4 in the Owner ’s Manual for more information .
A Pull/Press to operate Driver ’s and Front Passenger ’s Windows Auto-Up/Down*
B Press to Unlock/Lock All Doors
C Press to disable Rear Passenger Windows
REMINDERS:
•
When pressed C, window controls for the Rear Passenger Windows are disabled
•When closing, be mindful of any objects or persons
Press the but ton again to stop Auto Up/Down function .
QUICK TIP
•While driving with the rear windows down or with the sunroof* in an open or par tially open position, a wind buffeting or pulsation noise may be heard . This noise is a normal occurrence and can be reduced or eliminated by the following:
•If the noise occurs with one or both of the rear windows down, par tially lower both front windows approximately 1 inch
•If the noise occurs with the sunroof open, slightly reduce the size of the sunroof opening
QUICK TIPS
To automatically fold mirrors when exiting vehicle, press the LOCK but ton once on the Smar t Key .
QUICK TIP
DRIVER’S PANEL
DRIVER’SPA N EL
A
B
C
D
E
F
Page 36 of 62

34†LEGAL DISCL AIMERS ON BACK INSIDE COVER | *IF EQUIPPEDNIRO EV FEATURES & FUNCTIONS GUIDE
Headlight position ON
Parking light position
AUTO*Auto Light Position / Day time Running Lights / High Beam Assist
OFFHeadlight OFF position
Headlights & High Beams
To operate:
•Rotate lever to change the Headlight function
•Push lever to turn High Beams ON
•Pull lever to flash Headlights/ High Beams
AUTO Light position – When the light switch is in the AUTO Light position, the tail lights and headlights will turn ON/OFF automatically depending on the amount of light outside the vehicle .
Daytime Running Lights (DRL) – DRL may help others to see the front of your vehicle during the day . The lights will be on automatically
when the ignition or POWER button* is ON and the headlight switch is in the AUTO position, unless one of the following occurs:
•Parking brake is applied
•Engine is turned off
High Beam Assist (HBA) – The High Beam Assist is designed to automatically adjust the headlight range by switching between high and low beams based on light detected from oncoming vehicles and road conditions .
To enable HBA , toggle the light switch to the AUTO Light position and turn on the high beams by pushing the lever away from you . The High Beam Assist indicator will illuminate .
High Beam Assist does not operate below certain speeds, or in some lighting and driving conditions . Please be aware of your surroundings and exercise proper road etiquette when operating a vehicle using the high beams .
PUSH
PULL
REMINDERS:
•
HBA will operate when vehicle speed exceeds 25 mph
•
If the lever is pushed away from you while HBA is operational, HBA will turn off and the high beams will be on continuously . If the lever is pulled toward you while HBA is operational, HBA will turn off
•
If the light switch is switched to the headlight position, HBA will turn off and low beams will be on continuously
•The DRL system turns off when parking brake is applied
•DRL only operates during the day time
STEERING WHEEL CONTROLS
STEERING
WHEEL CONTROLS
Page 37 of 62

35†LEGAL DISCL AIMERS ON BACK INSIDE COVER | *IF EQUIPPEDALWAYS CHECK THE OWNER ’S MANUAL FOR COMPLETE OPER ATING INFORMATION AND SAFET Y WARNINGS .
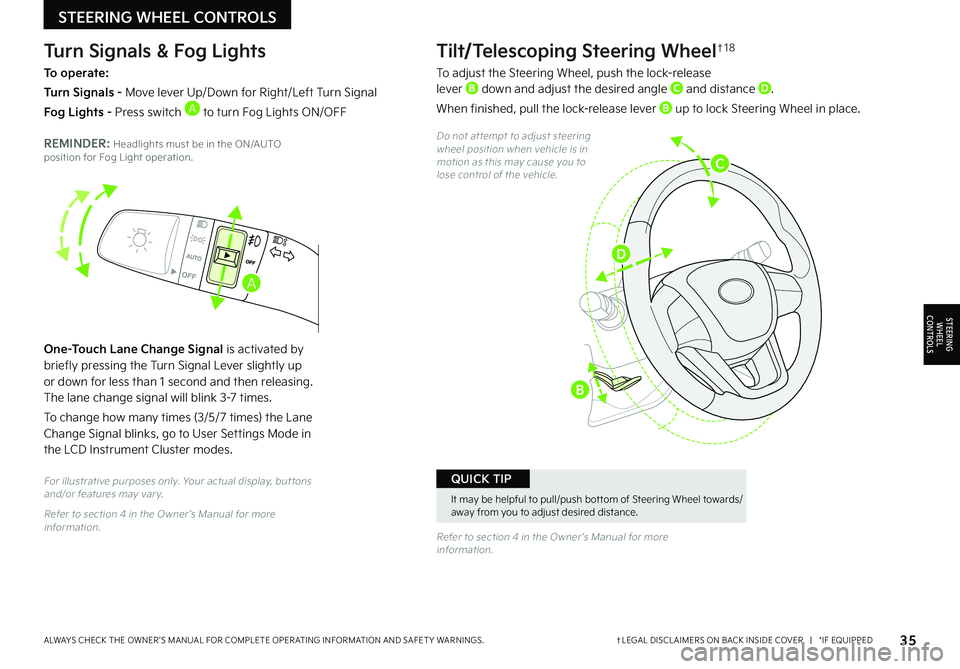
Tilt/Telescoping Steering Wheel†1 8
To adjust the Steering Wheel, push the lock-release lever B down and adjust the desired angle C and distance D .
When finished, pull the lock-release lever B up to lock Steering Wheel in place .
Do not at tempt to adjust steering wheel position when vehicle is in motion as this may cause you to lose control of the vehicle .
Refer to section 4 in the Owner ’s Manual for more information .
One-Touch Lane Change Signal is activated by briefly pressing the Turn Signal Lever slightly up or down for less than 1 second and then releasing . The lane change signal will blink 3-7 times .
To change how many times (3/5/7 times) the Lane Change Signal blinks, go to User Settings Mode in the LCD Instrument Cluster modes .
Turn Signals & Fog Lights
To operate:
Turn Signals - Move lever Up/Down for Right/Left Turn Signal
Fog Lights - Press switch A to turn Fog Lights ON/OFF
REMINDER: Headlights must be in the ON/AUTO position for Fog Light operation .
For illustrative purposes only . Your actual display, but tons and/or features may var y .
Refer to section 4 in the Owner ’s Manual for more information .
A
STEERING WHEEL CONTROLS
STEERING
WHEEL CONTROLS
It may be helpful to pull/push bot tom of Steering Wheel towards/away from you to adjust desired distance .
QUICK TIP
B
C
D
Page 46 of 62

Digital Clock
Press SETUP, then select General, then select Date/Time from the menu to adjust .
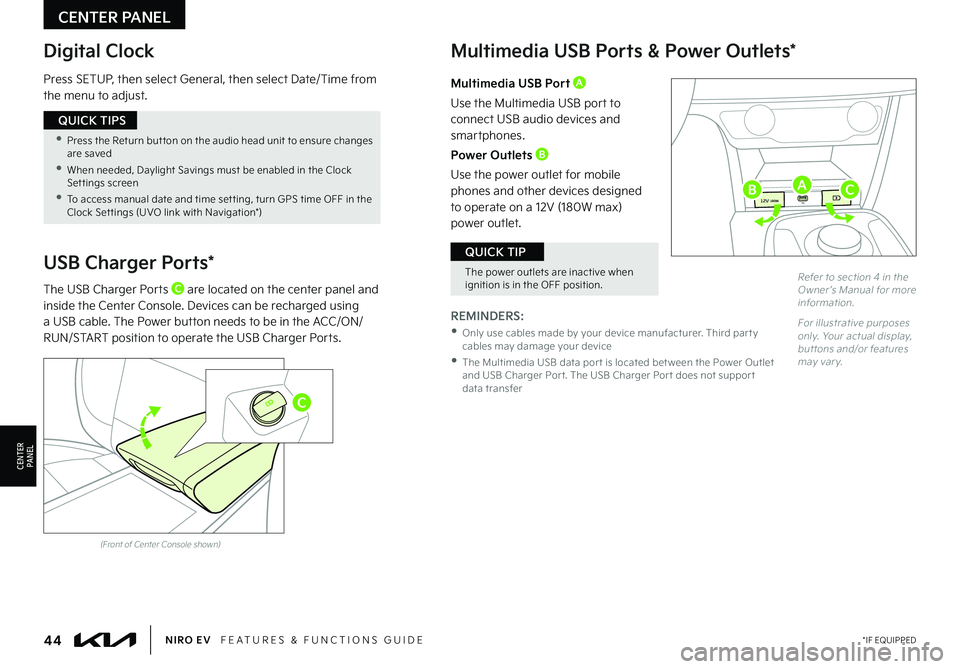
Multimedia USB Ports & Power Outlets*
REMINDERS:
•
Only use cables made by your device manufacturer . Third par t y cables may damage your device
•
The Multimedia USB data por t is located bet ween the Power Outlet and USB Charger Por t . The USB Charger Por t does not suppor t data transfer
Multimedia USB Port A
Use the Multimedia USB port to connect USB audio devices and smartphones .
Power Outlets B
Use the power outlet for mobile phones and other devices designed to operate on a 12V (180W max) power outlet .
USB Charger Ports*
The USB Charger Ports C are located on the center panel and inside the Center Console . Devices can be recharged using a USB cable . The Power button needs to be in the ACC/ON/RUN/START position to operate the USB Charger Ports .
(Front of Center Console shown)
Refer to section 4 in the Owner ’s Manual for more information .
For illustrative purposes only . Your actual display, but tons and/or features may var y .
C
CENTER PANEL
CENTERPA N EL
•
Press the Return but ton on the audio head unit to ensure changes are saved
•
When needed, Daylight Savings must be enabled in the Clock Set tings screen
•
To access manual date and time set ting, turn GPS time OFF in the Clock Set tings (UVO link with Navigation*)
QUICK TIPS
The power outlets are inactive when ignition is in the OFF position .
QUICK TIP
44*IF EQUIPPEDNIRO EV FEATURES & FUNCTIONS GUIDE
USB
12V 180W
12V 180W
12V 180WUSBABC
Page 47 of 62

Refer to the inside front cover for more information on QR codes .www .youtube .com/KiaFeatureVideos
Wireless Charging Video
QR CODE
REMINDERS:
•
Wireless charging technology allows for a device to be charged using inductive charging . See your Owner ’s Manual for more detailed information and the back page for legal disclaimers
•
Inductive charging systems are less ef ficient than conventional charging through cable . As a result, higher device operating temperatures may be experienced during use
•
Charging Per formance - Device position on the wireless charging system can affect charging per formance . Other factors that may affect the charging rate includes foreign objects, such as coins or pens, and phone case thickness
•If driver door is opened, charging will be disabled
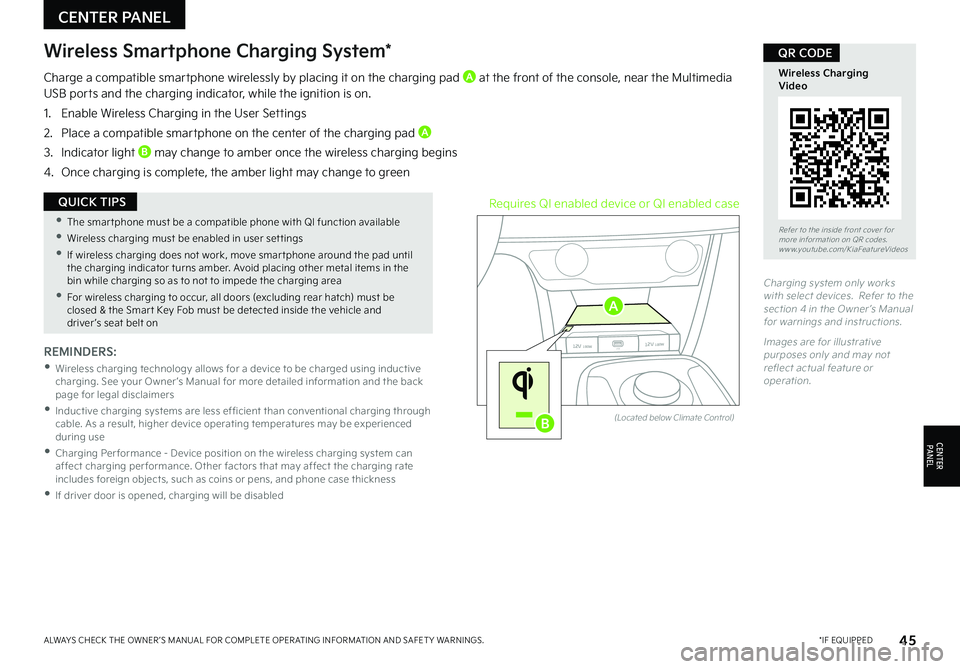
Wireless Smartphone Charging System*
Charge a compatible smartphone wirelessly by placing it on the charging pad A at the front of the console, near the Multimedia USB ports and the charging indicator, while the ignition is on .
1 . Enable Wireless Charging in the User Settings
2 . Place a compatible smartphone on the center of the charging pad A
3 . Indicator light B may change to amber once the wireless charging begins
4 . Once charging is complete, the amber light may change to green
(Located below Climate Control)
Requires QI enabled device or QI enabled case
USB
12V 180W
12V 180W
12V 180W12V 180WUSB
USB
12V 180W
12V 180W
12V 180W12V 180WUSB
Charging system only works with select devices . Refer to the section 4 in the Owner ’s Manual for warnings and instructions .
Images are for illustrative purposes only and may not reflect actual feature or operation .
CENTER PANEL
CENTERPA N EL
•
The smar tphone must be a compatible phone with QI function available
•Wireless charging must be enabled in user set tings
•
If wireless charging does not work, move smar tphone around the pad until the charging indicator turns amber . Avoid placing other metal items in the bin while charging so as to not to impede the charging area
•
For wireless charging to occur, all doors (excluding rear hatch) must be closed & the Smar t Key Fob must be detected inside the vehicle and driver ’s seat belt on
QUICK TIPS
45*IF EQUIPPEDALWAYS CHECK THE OWNER ’S MANUAL FOR COMPLETE OPER ATING INFORMATION AND SAFET Y WARNINGS .
A
B
Page 48 of 62

46*IF EQUIPPEDNIRO EV FEATURES & FUNCTIONS GUIDE
Your Automatic Climate Control system may differ from those in the illustration . Refer to section 4 in the Owner ’s Manual for more information .
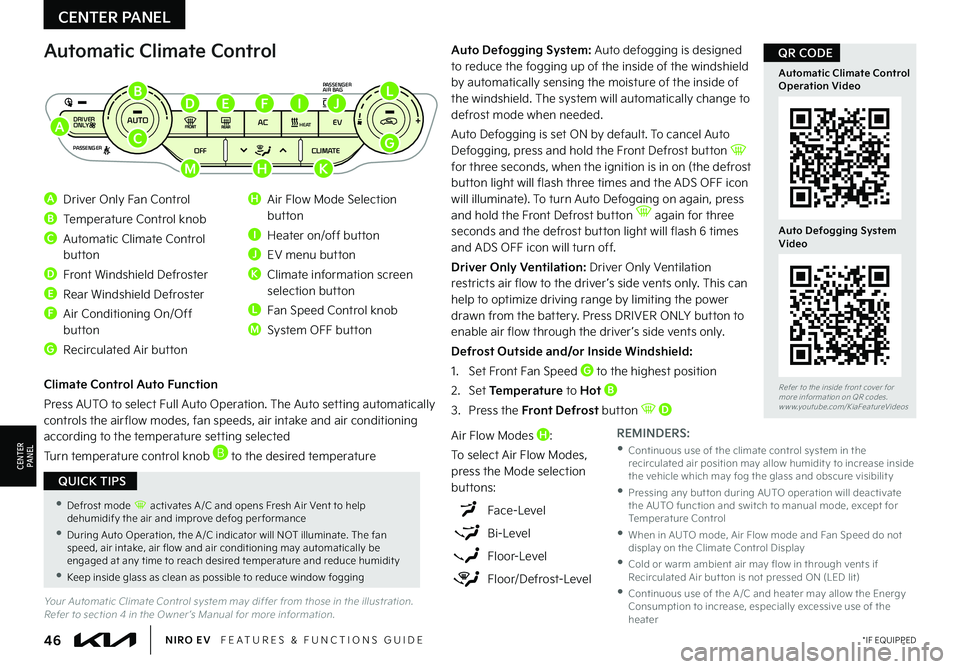
Automatic Climate Control
A Driver Only Fan Control
B Temperature Control knob
C Automatic Climate Control
button
D Front Windshield Defroster
E Rear Windshield Defroster
F Air Conditioning On/Off button
G Recirculated Air button
H Air Flow Mode Selection button
I Heater on/off button
J EV menu button
K Climate information screen selection button
L Fan Speed Control knob
M System OFF button
DRIVER
PASSENGER PASSENGER
AIR BAG
OFF
AUTO
AC EVHEAT
CLIMATE
OFF
ONLY
Climate Control Auto Function
Press AUTO to select Full Auto Operation . The Auto setting automatically controls the air flow modes, fan speeds, air intake and air conditioning according to the temperature setting selected
Turn temperature control knob B to the desired temperature
REMINDERS:
•
Continuous use of the climate control system in the recirculated air position may allow humidit y to increase inside the vehicle which may fog the glass and obscure visibilit y
•
Pressing any but ton during AUTO operation will deactivate the AUTO function and switch to manual mode, except for Temperature Control
•
When in AUTO mode, Air Flow mode and Fan Speed do not display on the Climate Control Display
•
Cold or warm ambient air may flow in through vents if Recirculated Air but ton is not pressed ON (LED lit)
•
Continuous use of the A /C and heater may allow the Energy Consumption to increase, especially excessive use of the heater
Auto Defogging System: Auto defogging is designed to reduce the fogging up of the inside of the windshield by automatically sensing the moisture of the inside of the windshield . The system will automatically change to defrost mode when needed .
Auto Defogging is set ON by default . To cancel Auto Defogging, press and hold the Front Defrost button for three seconds, when the ignition is in on (the defrost button light will flash three times and the ADS OFF icon will illuminate) . To turn Auto Defogging on again, press and hold the Front Defrost button again for three seconds and the defrost button light will flash 6 times and ADS OFF icon will turn off .
Driver Only Ventilation: Driver Only Ventilation restricts air flow to the driver ’s side vents only . This can help to optimize driving range by limiting the power drawn from the battery . Press DRIVER ONLY button to enable air flow through the driver ’s side vents only .
Defrost Outside and/or Inside Windshield:
1 . Set Front Fan Speed G to the highest position
2 . Set Temperature to Hot B
3 .
Press the Front Defrost button D
Air Flow Modes H:
To select Air Flow Modes, press the Mode selection buttons:
Face-Level
Bi-Level
Floor-Level
Floor/Defrost-Level
CENTER PANEL
CENTERPA N EL
•Defrost mode activates A /C and opens Fresh Air Vent to help dehumidify the air and improve defog per formance
•During Auto Operation, the A /C indicator will NOT illuminate . The fan speed, air intake, air flow and air conditioning may automatically be engaged at any time to reach desired temperature and reduce humidit y
•Keep inside glass as clean as possible to reduce window fogging
QUICK TIPS
A
B
C
D
MHK
EFIJL
G
Refer to the inside front cover for more information on QR codes .www .youtube .com/KiaFeatureVideos
Automatic Climate Control Operation Video
Auto Defogging System Video
QR CODE
Page 50 of 62

(Located below left of Rotar y Dial Shifter Knob)
Electronic Parking Brake (EPB)Auto Hold
REMINDERS:
•
As a bulb check, the EPB malfunction indicator will illuminate for approximately 3 seconds when the ignition switch is turned ON
•
If the warning light does not illuminate temporarily, or continues to remain lit, take your vehicle to an authorized Kia dealer and have the system checked
•The EPB should not be operated while the vehicle is moving
•
A click or electric brake motor sound may be heard while operating or releasing the EPB, but these conditions are normal and indicate that the EPB is functioning properly
REMINDERS:
•
To reduce the risk of an accident, do not activate Auto Hold while driving downhill, backing up or parking your vehicle
•
Do not solely rely on the Auto Hold system to keep the vehicle stopped . Always pay at tention to traf fic and road conditions, and be prepared to depress the brakes
•Auto Hold turns off when ignition is cycled
•
Auto Hold only operates when vehicle is in Drive, Neutral or Reverse
N
P
PRELEASE
AUTO
HOLD
DRIVE
MODE
D
R
Auto Hold temporarily maintains the vehicle at a standstill even if the brake pedal is released . Auto Hold can be turned ON/OFF using the AUTO HOLD switch B on the center panel . Before Auto Hold will operate, the driver ’s door, engine hood and trunk must be closed, and the driver ’s seat belt must be fastened .
The Auto Hold indicator has four states:
Standby (white): With vehicle in Park and at a standstill, and AUTO HOLD switch B turned ON, the indicator will illuminate white . While driving the vehicle (vehicle is not at a standstill), the Auto Hold indicator will remain white .
Engaged (green): When coming to a complete stop and depressing the brake pedal, the Auto Hold indicator changes from white to green .
OFF (not illuminated): The indicator will turn OFF when the AUTO HOLD switch B is turned OFF or when the EPB is manually turned ON .
Malfunction (yellow): When the indicator is illuminated yellow, there may be a system malfunction . Take your vehicle to a local Kia dealer .
Refer to section 5 in the Owner ’s Manual for more information .
Refer to section 5 in the Owner ’s Manual for more information .
A
B
CENTER PANEL
CENTERPA N EL
•When leaving your keys with parking lot at tendants or valet, make sure to inform them how to operate the EPB
•If parked on a steep incline/decline, pull up the EPB switch for more than 3 seconds for a firmer EPB application
•Pull up and hold EPB switch again to increase brake pressure if parked on a decline or incline
QUICK TIPS
The Electronic Parking Brake (EPB) system utilizes an electric motor to engage the parking brake .
Applying the Parking Brake
Pull up the EPB switch A . Ensure that the indicator light is illuminated on the instrument cluster .
Releasing the Parking Brake
The EPB will automatically release when the brake pedal is engaged and shifter is shifted out of P (Park) to R (Reverse) or shifted out of N (Neutral) to Reverse or D (Drive) .
Manually, depress the brake pedal, then press the EPB switch A
down, with the ignition switch in the ON position . Ensure that the indicator light is OFF .
48*IF EQUIPPEDNIRO EV FEATURES & FUNCTIONS GUIDE
Refer to the inside front cover for more information on QR codes .www .youtube .com/KiaFeatureVideos
Electronic Parking Brake Video
QR CODE
Page 53 of 62

51†LEGAL DISCL AIMERS ON BACK INSIDE COVER | *IF EQUIPPEDALWAYS CHECK THE OWNER ’S MANUAL FOR COMPLETE OPER ATING INFORMATION AND SAFET Y WARNINGS .
Folding Rear Seats
To Fold:
1 . Ensure the belt strap is out of way of the Seatback folding D . Insert the metal seat belt tab into the holder E
2 . Adjust the Front Seatback to the upright position and lower the rear headrest to the lowest position
3 . Pull on the Rear Seatback lock release lever F, then fold the seat toward the front
To Unfold:
1 . Pull the lock release lever F and lift the Seatback backward until it clicks firmly in place
2 . Return the rear seat belt to the proper position
REMINDERS:
•
Before unfolding Seatback, ensure the seat belt is placed into the holder
•
Always make sure the Seatback is locked in place when unfolded
For illustration purposes only . Actual vehicle might be slightly different . Refer to section 3 in the Owner ’s Manual for more information .
SEATING
S E AT I N G
•It may be necessar y to adjust the Front Seatbacks to fully lower rear seats
•Ensure seat is locked by pressing down on Seatback and ensuring red line is NOT visible on bot tom of Folder Lever
QUICK TIPS
D
E
F