2022 HYUNDAI VELOSTER horn
[x] Cancel search: hornPage 16 of 446
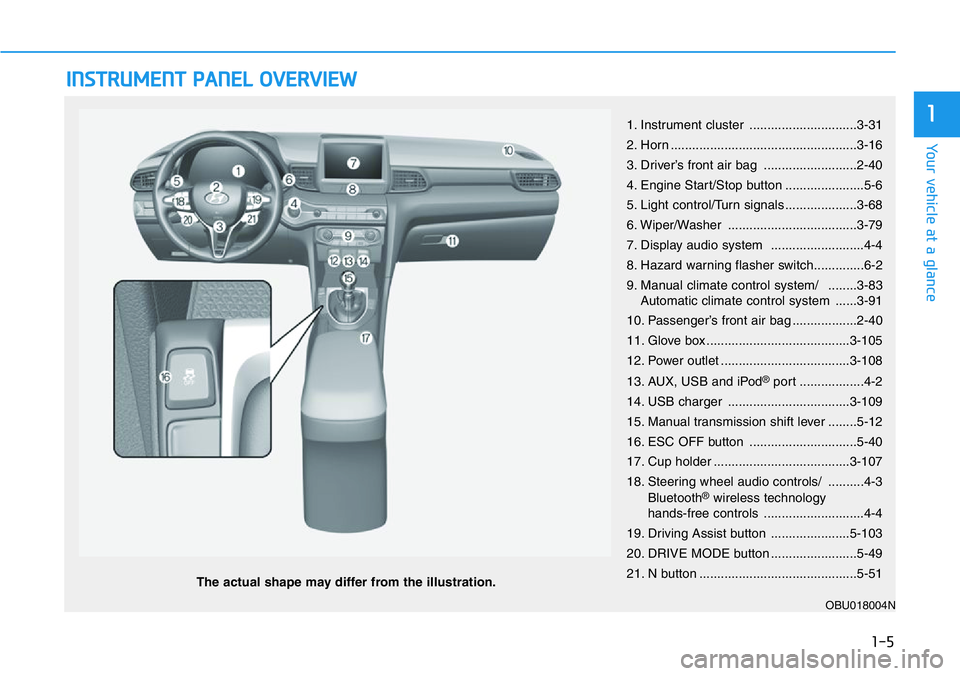
INSTRUMENT PANEL OVERVIEW
The actual shape may differ from the illustration.
1-5
Your vehicle at a glance
11. Instrument cluster ..............................3-31
2. Horn ....................................................3-16
3. Driver’s front air bag ..........................2-40
4. Engine Start/Stop button ......................5-6
5. Light control/Turn signals ....................3-68
6. Wiper/Washer ....................................3-79
7. Display audio system ..........................4-4
8. Hazard warning flasher switch..............6-2
9. Manual climate control system/ ........3-83
Automatic climate control system ......3-91
10. Passenger’s front air bag ..................2-40
11. Glove box ........................................3-105
12. Power outlet ....................................3-108
13. AUX, USB and iPod
®port ..................4-2
14. USB charger ..................................3-109
15. Manual transmission shift lever ........5-12
16. ESC OFF button ..............................5-40
17. Cup holder ......................................3-107
18. Steering wheel audio controls/ ..........4-3
Bluetooth
®wireless technology
hands-free controls ............................4-4
19. Driving Assist button ......................5-103
20. DRIVE MODE button ........................5-49
21. N button ............................................5-51
OBU018004N
Page 79 of 446
Convenient features of your vehicle
Accessing Your Vehicle .........................................3-3
Smart Key ............................................................................3-3
Immobilizer System ...........................................................3-8
Door Locks ............................................................3-10
Operating Door Locks from Outside the Vehicle ....3-10
Operating Door Locks from Inside the Vehicle .......3-11
Automatic Door Lock and Unlock Features .............3-13
Child-Protector Rear Door Locks ...............................3-13
Theft-Alarm System ............................................3-14
Steering Wheel .....................................................3-15
Electric Power Steering (EPS) .....................................3-15
Tilt Steering / Telescope Steering ..............................3-16
Horn ....................................................................................3-16
Mirrors ...................................................................3-17
Inside Rearview Mirror ..................................................3-17
Side View Mirrors ...........................................................3-18
Windows ................................................................3-21
Power Windows ...............................................................3-22
Exterior Features .................................................3-25
Hood ...................................................................................3-25
Liftgate ..............................................................................3-26
Fuel Filler Door ................................................................3-28
Instrument cluster................................................3-31
Instrument Cluster Control............................................3-32
Gauges and Meters ........................................................3-33
Transmission shift indicator .........................................3-36
Warning and Indicator Lights .......................................3-38
LCD Display Messages ...................................................3-48
LCD Display ...........................................................3-54
LCD Display Control ........................................................3-54
LCD Display Modes .........................................................3-55
Trip Computer .......................................................3-64
Lighting..................................................................3-68
Exterior Lights .................................................................3-68
Interior Lights...................................................................3-72
High Beam Assist (HBA) .....................................3-75
System operation ............................................................3-76
System malfunction and limitations ...........................3-77
Wipers And Washers ...........................................3-79
Windshield Wipers...........................................................3-79
Windshield Washers .......................................................3-80
Rear Window Wiper and Washer ................................3-81
Rear View Monitor (RVM) ..................................3-82
3
Page 83 of 446
3-5
Convenient features of your vehicle
Opening the liftgate
To unlock and open the liftgate:
1. Make sure you have the smart key
in your possession.
2. Press either the liftgate handle
release button on the vehicle or
press and hold the Liftgate Unlock
button on the smart key for more
than one second. The hazard
warning lights will blink two times
and the liftgate latch will unlock.
The liftgate must be operated
manually to open the liftgate.
Once the liftgate latch is
unlocked, pull upward on the lift-
gate handle to fully open the lift-
gate.
3. Once the liftgate is opened and
then closed, the liftgate will lock
automatically.Information
• The liftgate handle button will only
operate when the smart key is with-
in 28 inches (0.7 m) from the liftgate
handle.
• The Liftgate Unlock button (3) will
only unlock the liftgate. It will not
release the latch and open the lift-
gate automatically. If the Liftgate
Unlock button is used, someone
must still press the liftgate handle
button to open the liftgate.
Panic button
Press and hold the Panic button (4)
for more than one second. The horn
sounds and hazard warning lights
blink for about 30 seconds. To cancel
the panic mode, press any button on
the Smart Key.
Start-up
You can start the vehicle without
inserting the key.
For information, refer to the
"Engine Start/Stop Button" sec-
tion in chapter 5.
To prevent damaging the smart key:
• Keep the smart key in a cool, dry
place to avoid damage or mal-
function. Exposure to moisture
or high temperature may cause
the internal circuit of the smart
key to malfunction which may
not be covered under warranty.
• Avoid dropping or throwing the
smart key.
• Protect the smart key from
extreme temperatures.
NOTICE
i
NOTICE
3
Page 92 of 446
3-14
Convenient features of your vehicle
To allow a rear door to be opened
from inside the vehicle, unlock the
child safety lock.This system helps to protect your
vehicle and valuables. The horn will
sound and the hazard warning lights
will blink continuously if any of the
following occur:
- A door is opened without using the
smart key.
- The liftgate is opened without
using the smart key.
- The engine hood is opened.
The alarm continues for 30 seconds,
then the system resets. To turn off
the alarm, unlock the doors with the
smart key.
The Theft Alarm System automati-
cally sets 30 seconds after you lock
the doors and the liftgate. For the
system to activate, you must lock the
doors and the liftgate from outside
the vehicle with the smart key or by
pressing the button on the outside of
the door handle with the smart key in
your possession.
The hazard warning lights will blink
and the chime will sound once to
indicate the system is armed.Once the security system is set,
opening any door, the liftgate, or the
hood without using the smart key will
cause the alarm to activate.
The Theft Alarm System will not set if
the hood, the liftgate, or any door is
not fully closed. If the system will not
set, check the hood, the liftgate, or
the doors are fully closed.
Do not attempt to alter this system or
add other devices to it.
Information
• Do not lock the doors until all pas-
sengers have left the vehicle. If the
remaining passenger leaves the
vehicle when the system is armed,
the alarm will be activated.
• If the vehicle is not disarmed with the
smart key, open the doors by using
the mechanical key and start the
engine by directly pressing the igni-
tion switch with the smart key.
• If the system is disarmed by unlock-
ing the vehicle, but neither a door or
the liftgate is opened within 30 sec-
onds, the doors will relock and the
system will rearm automatically.
i
THEFT-ALARM SYSTEM
If children accidently open the
rear doors while the vehicle is
in motion, they could fall out of
the vehicle. The rear door safety
locks should always be used
whenever children are in the
vehicle.
WARNING
Page 94 of 446
3-16
Convenient features of your vehicle
Tilt Steering / Telescope
Steering
When adjusting the steering wheel to
a comfortable position, adjust the
steering wheel so that it points
toward your chest, not toward your
face. Make sure you can see the
instrument cluster warning lights and
gauges. After adjusting, push the
steering wheel both up and down to
be certain it is locked in position.
Always adjust the position of the
steering wheel before driving.
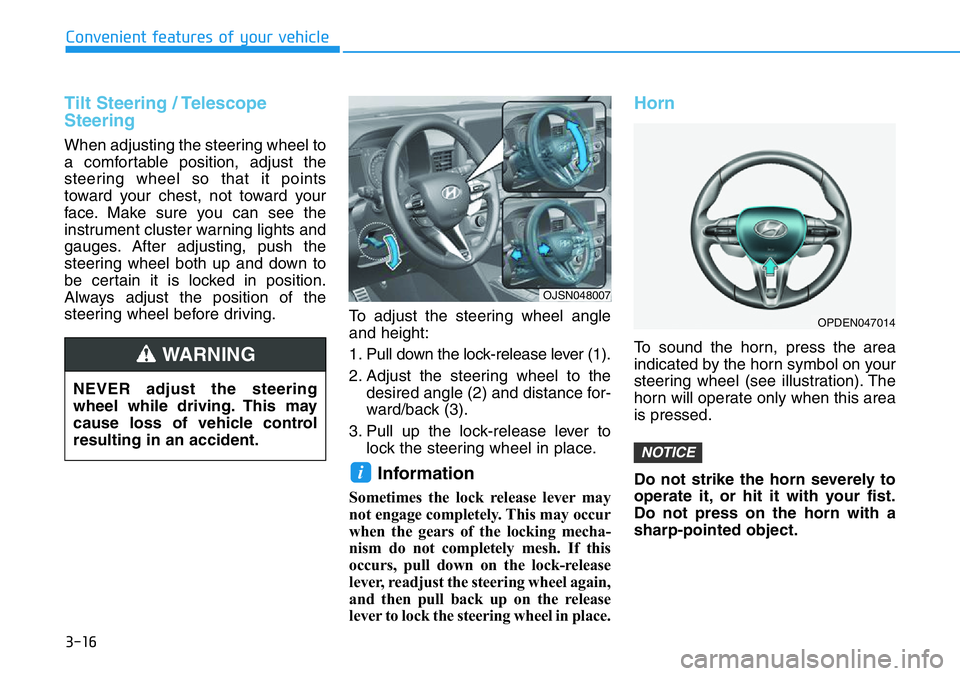
To adjust the steering wheel angle
and height:
1. Pull down the lock-release lever (1).
2. Adjust the steering wheel to the
desired angle (2) and distance for-
ward/back (3).
3. Pull up the lock-release lever to
lock the steering wheel in place.
Information
Sometimes the lock release lever may
not engage completely. This may occur
when the gears of the locking mecha-
nism do not completely mesh. If this
occurs, pull down on the lock-release
lever, readjust the steering wheel again,
and then pull back up on the release
lever to lock the steering wheel in place.
Horn
To sound the horn, press the area
indicated by the horn symbol on your
steering wheel (see illustration). The
horn will operate only when this area
is pressed.
Do not strike the horn severely to
operate it, or hit it with your fist.
Do not press on the horn with a
sharp-pointed object.
NOTICE
i
NEVER adjust the steering
wheel while driving. This may
cause loss of vehicle control
resulting in an accident.
WARNING
OJSN048007
OPDEN047014
Page 409 of 446
7-57
7
Maintenance
Engine compartment fuse panel
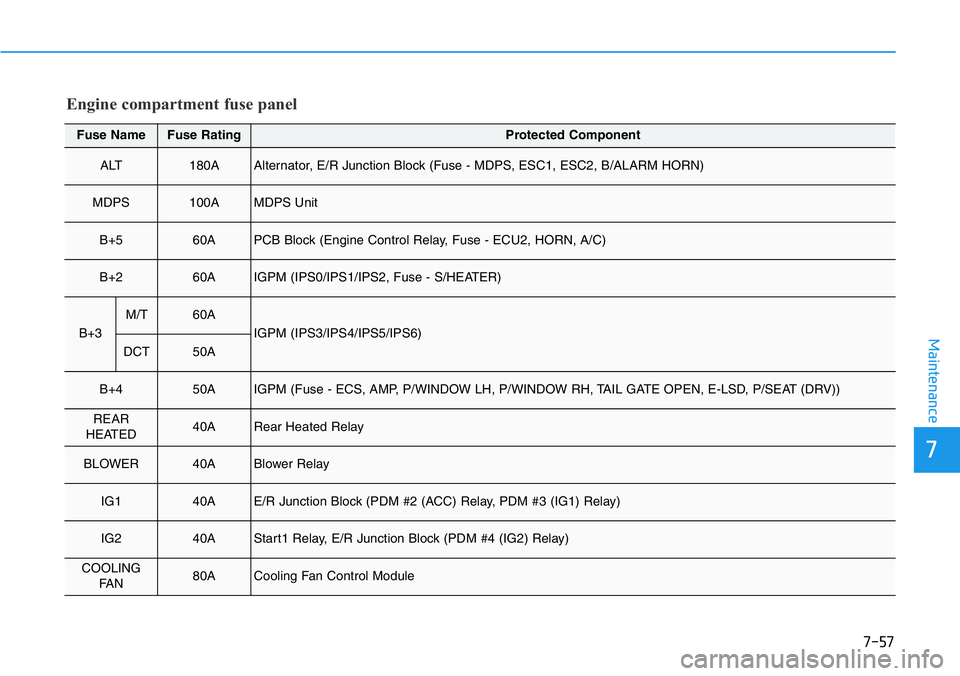
Fuse NameFuse RatingProtected Component
ALT180AAlternator, E/R Junction Block (Fuse - MDPS, ESC1, ESC2, B/ALARM HORN)
MDPS100AMDPS Unit
B+560APCB Block (Engine Control Relay, Fuse - ECU2, HORN, A/C)
B+260AIGPM (IPS0/IPS1/IPS2, Fuse - S/HEATER)
B+3
M/T60A
IGPM (IPS3/IPS4/IPS5/IPS6)
DCT50A
B+450AIGPM (Fuse - ECS, AMP, P/WINDOW LH, P/WINDOW RH, TAIL GATE OPEN, E-LSD, P/SEAT (DRV))
REAR
HEATED40ARear Heated Relay
BLOWER40ABlower Relay
IG140AE/R Junction Block (PDM #2 (ACC) Relay, PDM #3 (IG1) Relay)
IG240AStart1 Relay, E/R Junction Block (PDM #4 (IG2) Relay)
COOLING
FA N80ACooling Fan Control Module
Page 410 of 446
7-58
Maintenance
Engine compartment fuse panel
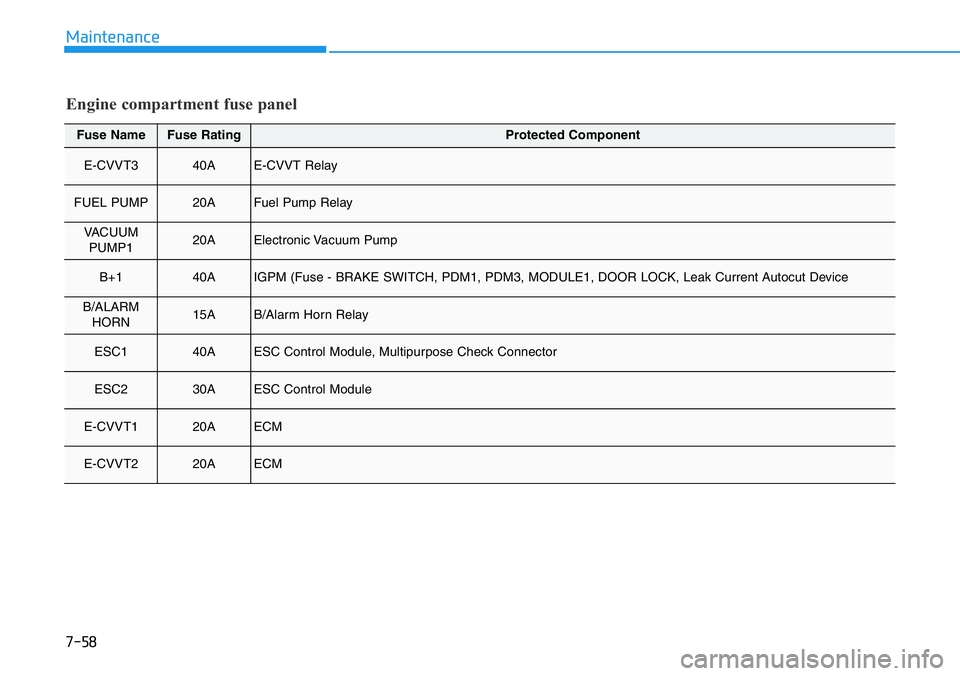
Fuse NameFuse RatingProtected Component
E-CVVT340AE-CVVT Relay
FUEL PUMP20AFuel Pump Relay
VACUUM
PUMP120AElectronic Vacuum Pump
B+140AIGPM (Fuse - BRAKE SWITCH, PDM1, PDM3, MODULE1, DOOR LOCK, Leak Current Autocut Device
B/ALARM
HORN15AB/Alarm Horn Relay
ESC140AESC Control Module, Multipurpose Check Connector
ESC230AESC Control Module
E-CVVT120AECM
E-CVVT220AECM
Page 411 of 446
7-59
7
Maintenance
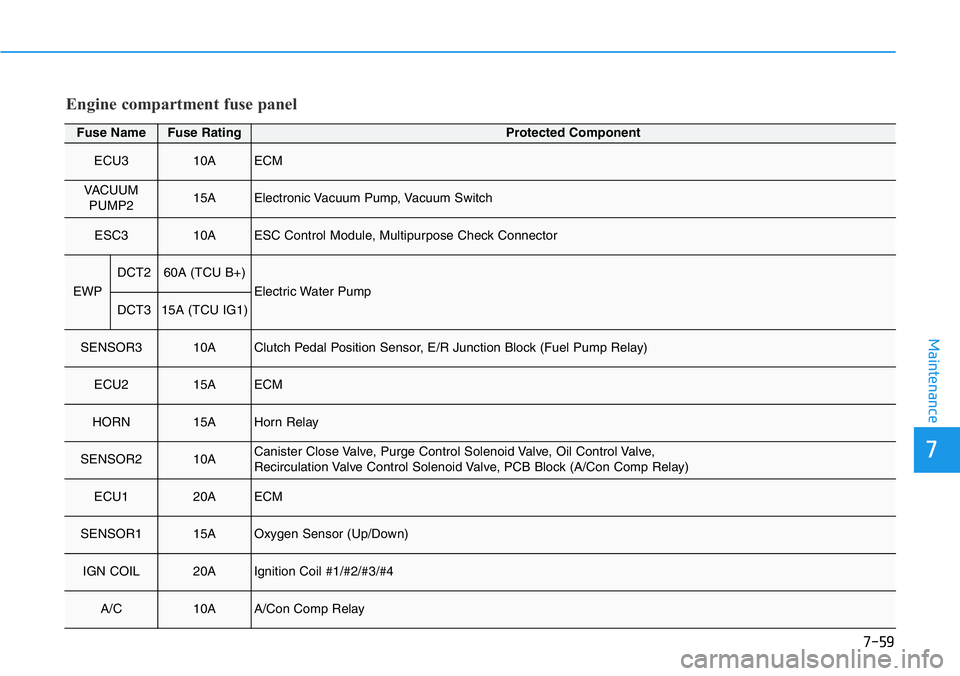
Fuse NameFuse RatingProtected Component
ECU310AECM
VACUUM
PUMP215AElectronic Vacuum Pump, Vacuum Switch
ESC310AESC Control Module, Multipurpose Check Connector
EWP
DCT260A (TCU B+)
Electric Water Pump
DCT315A (TCU IG1)
SENSOR310AClutch Pedal Position Sensor, E/R Junction Block (Fuel Pump Relay)
ECU215AECM
HORN15AHorn Relay
SENSOR210ACanister Close Valve, Purge Control Solenoid Valve, Oil Control Valve,
Recirculation Valve Control Solenoid Valve, PCB Block (A/Con Comp Relay)
ECU120AECM
SENSOR115AOxygen Sensor (Up/Down)
IGN COIL20AIgnition Coil #1/#2/#3/#4
A/C10AA/Con Comp Relay
Engine compartment fuse panel